Fluval Venezia Mode D'emploi
Masquer les pouces Voir aussi pour Venezia:
Table des Matières

Publicité

Les langues disponibles

Les langues disponibles

Liens rapides

INSTRUCTION MANUAL
MODE D'EMPLOI
BENUTZERHANDBUCH
MANUAL DE INSTRUCCIONES

Publicité

Table des Matières
loading

Sommaire des Matières pour Fluval Venezia

  • Page 1 INSTRUCTION MANUAL MODE D’EMPLOI BENUTZERHANDBUCH MANUAL DE INSTRUCCIONES...
  • Page 2 42 Section nº 2 p. 102 Sección no. 2 Installation du filtre extérieur Fluval et préparation du démarrage Instalación del Filtro externo Fluval y preparación para su puesta en marcha p. 47 Section nº 3 p. 107 Sección no. 3 Installation et préparation du démarrage du chauffe-eau pour aquarium...
  • Page 3 All kits include a tank, a cabinet, a Strip-Light canopy, a Fluval external filter and a heater. CABINET The Fluval external filter can be connected to the tank easily and safely, thanks to the new “Easy- Connect” system, which makes connecting to powerful external filtration systems easy and eliminates the REVERSIBLE DOOR use of unsightly hosing and prominent cross rim devices.
  • Page 4: Setting Up Your Fluval Aquarium

    For a neat installation, the cords can be supported inside the tank by special clips hooked to the aquarium’s internal top rim. SETTING UP YOUR FLUVAL AQUARIUM For proper installation and start-up of your aquarium, please follow these guidelines: A.
  • Page 5: Placing The Aquarium With Its Cabinet In The Final Location

    The Fluval Aquarium must be placed on the appropriate Fluval cabinet designed for that aquari- um. Fluval cabinets are guaranteed to provide a suitably solid and level surface that will not bend or warp. Using any other form of support will invalidate your guarantee.
  • Page 6 Locate the 2 openings (l) and (O) in the tank’s bottom glass and the corresponding holes in the cabinet. The 2 openings in the tank’s OUTPUT bottom glass come complete with factory-installed special plastic OUTPUT STEM (B) NOZZLE (N) fittings, which must never be removed, turned or loosened, and with two sealing plugs (P) and (Q).
  • Page 7: Important Safety Instructions

    SECTION #2 FLUVAL EXTERNAL FILTER: TECHNICAL CHARACTERISTICS INSTALLING THE FLUVAL EXTERNAL FILTER AND PREPARING FOR START-UP FLUVAL FLUVAL Pump Mechanical Biological Total Filter Max water Power Power aquarium filter output* filtration filtration filtration circulation column absorption absorption IMPORTANT SAFETY INSTRUCTIONS...
  • Page 8 FLUVAL FILTER INSTALLATION FLUVAL FILTER: PRODUCT PARTS 1. Unpack and identify all parts. This filter is for installation with this Fluval Aquarium Kit only. 2. Prepare intake/output connections Remove the Aquastop valve (3) from canister cover (5) by first lifting the black lever all the way up and then fully lifting the silver lever.
  • Page 9 Fluval offers a wide variety of filter media. Some perform more than one job. The true power of the Fluval Upper Level Basket system is that it is very flexible, offering a wide range of media and multiple media placement options.
  • Page 10: Heater Installation

    SECTION #3 AQUARIUM HEATER: PRODUCT PARTS INSTALLING THE AQUARIUM HEATER AND PREPARING FOR START-UP IMPORTANT SAFETY INSTRUCTIONS REGULATION KNOB WARNING - To guard against injury, basic safety precautions should be observed, including the following: 1. READ AND FOLLOW ALL SAFETY INSTRUCTIONS EASY SET NUMBERED TEMPERATURE DIAL and all the important notices on the appliance before using the heater.
  • Page 11: Strip-Light Canopy: Parts

    • 2 LIDS for opening and closing the aquarium for the best effect. (except Venezia 350 which features 3 lids) • 1 STRIP-LIGHT complete with 2 T5 fluorescent tubes When decorating the aquarium, ensure that the filter intake strainer sticks out by at least 5 cm from the (except Venezia 350 which features 2 Strip-Lights) gravel bottom to prevent the filter pump from sucking gravel or sand.
  • Page 12 6. This is a non submersible AQUARIUM LUMINAIRE (STRIP-LIGHT), suitable for INDOOR use only, SECTION #6 destined to be assembled on the Fluval Vicenza and Venezia TOP COVER FRAMES only, for fresh AQUARIUM START-UP and salt water aquariums with max 35° C water temperature. Do not use this appliance for different aquariums or applications.
  • Page 13 ¡ button is released before the desired On time has been set, restart the procedure from point #1 Depending on the specific version supplied, Fluval Aquarium Strip-Lights can be switched on and off by above. either the line cord Switch or the built-in electronic Light Timer on top of the Strip Light.
  • Page 14: Replacement Parts

    Output nozzle (N): 15470 one for all models WARNING: Always disconnect all appliances in the aquarium from the electrical supply Output stem (B): for Vicenza 180 & Venezia 190: 15471 before placing hands in the water, before putting on or taking off parts, and whenever the Output stem (B): for Vicenza 260 &...
  • Page 15 Lift the foam screen, media cover, and media baskets out 3. If the well needs cleaning, wipe gently with a Fluval Cleaning Brush. of the canister and place them in your sink or bucket.
  • Page 16: Strip-Light Canopy Maintenance

    (Always replace the impeller cover to ensure proper alignment). The Impeller will wear out over time. A replacement may be ordered from your local Fluval dealer or by contacting Customer Service at Rolf C. Hagen (UK) Ltd. or Rolf C. Hagen Inc. in Canada.
  • Page 17 (as shown in diagram 1). Ensure that the gaskets are properly positioned. No special maintenance is required for the Fluval Strip-Light Canopy, other than periodic cleaning with a damp cloth (never use harsh chemical products or detergents). To remove calcareous deposits, use a mild 6.
  • Page 18 Fluval et un chauffe-eau. AQUARIUM EN VERRE Le filtre extérieur Fluval peut être raccordé aisément et en toute sécurité à l'aquarium grâce au nouveau système « Easy Connect » facilitant le raccord à une filtration extérieure puissante et éliminant la vue de MEUBLE tuyaux et de supports sur le cadre de l'aquarium.
  • Page 19: Mesures De Sécurité Additionnelles Pour L'installation Et L'entretien D'aquariums D'eau De Mer

    ENTRETIEN INSTALLATION DE VOTRE AQUARIUM FLUVAL Pour tout entretien, se reporter à la Section nº 7 de ce mode d'emploi. Pour une installation et un démarrage adéquats de votre aquarium, prière de suivre les directives suivantes : A.
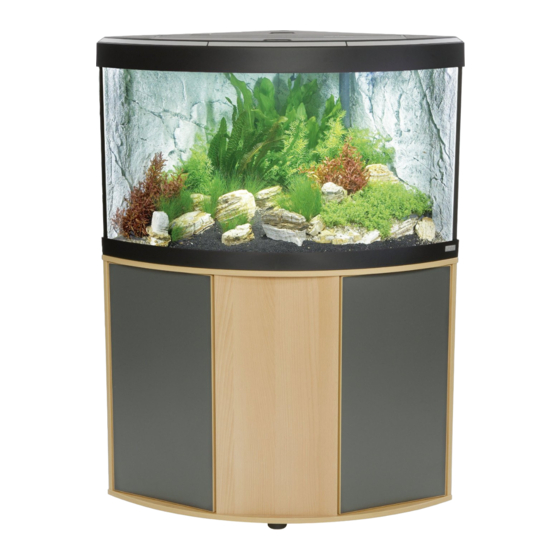
  • Page 20: Installation Du Meuble D'aquarium - Vérification Et Installation De L'aquarium En Verre

    Les dimensions et la structure du meuble sont tout spécialement conçues pour supporter le poids L'aquarium Fluval doit être placé sur le meuble Fluval approprié. Les meubles Fluval garantissent d'un aquarium complètement rempli. L'emploi d'un meuble ou d'un support différents peut être dangereux.
  • Page 21 INSTALLATION DU SYSTÈME «EASY CONNECT» Éviter de diriger les jets d'eau vers la rampe d'éclairage. Installation du tube d'entrée d'eau Tous les aquariums Vicenza et Venezia Fluval sont munis du nouveau BEC DE SORTIE (N) système Easy Connect vous permettant de raccorder directement 1.
  • Page 22: Caractéristiques Techniques Des Filtres Extérieurs Fluval

    SECTION Nº 2 CARACTÉRISTIQUES TECHNIQUES DES FILTRES EXTÉRIEURS FLUVAL INSTALLATION DU FILTRE EXTÉRIEUR FLUVAL ET PRÉPARATION DU DÉMARRAGE Aquarium Filtre Débit de Volume de Surface de Volume Débit de Hauteur max. Consommation FLUVAL FLUVAL sortie filtration filtration total de filtration de la électrique...
  • Page 23: Installation Du Filtre Fluval

    Si vous préférez, vous pouvez aussi ajouter une masse filtrante de votre choix. (Consulter la La véritable force de Fluval est le vaste choix de masses filtrantes offertes ainsi que les nombreuses section « Filtration avancée Fluval » pour plus d’information).
  • Page 24: Installation Et Préparation Du Démarrage Du Chauffe-Eau Pour Aquarium

    La pile de paniers de filtration Fluval Panier supérieur de filtration La pile de paniers de filtration des filtres Fluval de série 05 vous permet d’utiliser les trois types de Ce panier reçoit les courants d’eau les plus purs, en rendant l’endroit approprié aux masses filtrantes filtration, dans l’ordre qui est le meilleur pour répondre aux besoins du milieu aquatique que vous voulez...
  • Page 25: Pièces Du Chauffe-Eau Pour Aquarium

    9. Si une rallonge électrique est nécessaire, vérifier qu'elle est d'un calibre suffisant. Un cordon 3. NE PAS BRANCHER LE CHAUFFE-EAU MAINTENANT. Il est prêt pour le démarrage mais électrique de moins d'ampères ou de watts que l'appareil peut surchauffer. Des précautions doivent on le fera fonctionner seulement après avoir terminé...
  • Page 26: Pièces De La Rampe D'éclairage

    À L'INTÉRIEUR seulement, ne doit être assemblée que sur les CADRES SUPÉRIEURS des fluorescents T5 (sauf Venezia 350 qui est équipé de deux aquariums Vicenza et Venezia Fluval et dans des aquariums d'eau douce ou d'eau de mer avec une rampes d'éclairage) CADRE SUPÉRIEUR...
  • Page 27: Démarrage De La Rampe D'éclairage

    Toujour maintenir le niveau d'eau dans l'aquarium afin de compenser la perte d'eau due à l'évaporation. Selon le modèle utilisé, la rampe d'éclairage Fluval pour aquarium peut être allumée ou éteinte à l'aide de Après avoir rempli l'aquarium, attendre 30 minutes et brancher ensuite le chauffe-eau à la prise de l'interrupteur du cordon d'alimentation ou de la minuterie électronique intégrée sur le dessus de la rampe...
  • Page 28: Exemple De Réglage

    Au besoin, régler une fois de plus la 5. Procéder au réglage du temps d'arrêt. marche et l'arrêt après avoir redémarré le système. Le modèle Venezia 350 est muni de deux rampes d'éclairage ayant deux minuteries ¡ Réglage du temps d'arrêt indépendantes.
  • Page 29: Pièces De Rechange

    ÉCROU À ŒILLET (R) mode automatique des temps de marche et d'arrêt après avoir rétabli le courant. Tube de montée (B): - pour Vicenza 180 et Venezia 190: 15471 Tube de montée (B): - pour Vicenza 260 et Venezia 350: 15472 Tube de raccordement (A): - 15473 pour tous les modèles...
  • Page 30: Entretien Du Filtre Extérieur Fluval

    3. Si le puits a besoin d’être nettoyé, frotter délicatement avec une brosse de nettoyage Fluval. 4. Remettre la couronne dans le puits : 6. En tenant le couvercle des masses filtrantes en place, vider le boîtier au-dessus de l’évier ou du renvoi pour enlever autant d’eau que possible.
  • Page 31: Entretien De La Rampe D'éclairage

    La couronne s'usera avec le temps. Une couronne de rechange peut être commandée chez votre détail- lant Fluval local ou en contactant le Service à la clientèle de Rolf C. Hagen inc. au Canada. PIÈCES DE RECHANGE Commander les pièces de rechange auprès de votre détaillant Fluval local ou du Service à la clientèle.
  • Page 32: Remplacement Du Réflecteur De La Rampe D'éclairage

    Serrer fermement ces raccords à la main; l'utilisation d'un outil n'est pas Toujours utiliser des pièces de rechange Fluval originales pour vous assurer d'un rendement prolongé recommandée. Ces pièces sont en plastique; il faut éviter de les endommager en les vissant et en toute sécurité.
  • Page 33 LICHTTIMER Einleitung WENN VORHANDEN) AUSLASS Dieses Benutzerhandbuch ist für die Aquariensets Fluval Vicenza 180, Vicenza 260, Venezia 190 und HEIZER EINLASS Venezia 350 gedacht. Diese Aquariensets beinhalten jeweils ein Becken, einen Aquarienschrank, eine Strip-Light-Abdeckung, einen Filter und einen Heizer. Alle Aquariensets sind mit einem Fluval Außenfilter AUßENFILTER...
  • Page 34 Süßwasser ist und sowohl Plastik- als auch Metallteile sich in der Regel bei Salzwasser schneller “maximaler Wasserstand“ mit Wasser auf abnutzen. Um Salzablagerungen am dem Fluval Aquarium zu vermindern, halten Sie sich bitte an die folgenden Emfehlungen: 11. Bereiten Sie die Strip-Light-Abdeckung siehe Abschnitt #5 in diesem Benutzerhandbuch 1.
  • Page 35 (Lüftungskanälen, Heizungen etc.), um die Temperatur immer ordnungsgemäß beibehalten zu können. Aufbauanleitung. Zugluft sollte ebenfalls verhindert werden. Positionieren Sie Ihr neues Fluval Aquarium an einer Stelle, an der mögliche Wasserspritzer kein Problem darstellen. Versuchen Sie nicht den Aquarienschrank aufzubauen, ohne die Aufbauanleitung gelesen zu haben und ohne sie zu befolgen.
  • Page 36 Auslassrohr (B) über das Verbindungsrohr (A) schieben. 7. Sie können die Wasseraustrittsstutzen (N) ganz leicht drehen, um den Wasserfluss in die WASSERAUS- Alle Fluval Vicenza und Venezia Aquarien verfügen über das neue und gewünschte Richtung zu lenken TRITTSSTUTZEN (N) innovative “EasyConnect”-System, dass die direkte Verbindung zwischen dem Becken und dem Außenfilter durch den Boden des...
  • Page 37: Wichtige Sicherheitshinweise

    Produktes wird empfohlen, diese Anleitung gründlich zu lesen und zu verstehen, da sonst Schäden INSTALLATION FLUVAL AUßENFILTERS VORBEREITUNG an diesem Produkt entstehen können. INBETRIEBNAHME FLUVAL AUßENFILTER: TECHNISCHE DATEN WICHTIGE SICHERHEITSHINWEISE FLUVAL FLUVAL Pumpen- Mechanischer Biologisches Gesamtes Filterzir- Max Höhe Power Power Energieverbrauch Aquarium Filter auslass* Filterbereich Filtervolumen Filter-...
  • Page 38: Installation Des Fluval Filters

    2. Spülen Sie die Körbe und die Filtermaterialien unter fließendem Leitungswasser, Stärke des Fluval Systems ist die Flexibilität, die durch eine breite Auswahl an Medien und die vielfältigen um möglichen Staub zu entfernen und legen Sie sie in die Medienkörbe. Wenn Sie dies Positionierungsmöglichkeiten geschaffen wird.
  • Page 39 Bakterienkolonien. Mit der mechanischen Reinigung des Wasserstromes im Schaumstoffsieb am Anfang Der Medienkorb-Stapel in der Fluval 05 Filterserie ermöglicht es Ihnen, alle drei Filterarten in der und im unteren Korb ist es normal, zusätzliche biologische Medien in die mittleren Medienkörbe zu füllen.
  • Page 40: Installation Des Heizers

    7. Dieser Heizer ist AUSSCHLIESSLICH für den GEBRAUCH IN GESCHLOSSENEN RÄUMEN Vorbereitung des Heizers geeignet . Installieren oder lagern Sie das Gerät nicht an Stellen, an denen es der Witterung 1. Wählen Sie die geeignete Temperatur, indem Sie die nummerierte Easy Set Temperatureinstellung oder Temperaturen unter dem Frostpunkt ausgesetzt ist.
  • Page 41 1. LESEN UND BEFOLGEN SIE ALLE SICHERHEITSHINWEISE und alle wichtigen Hinweise auf dem Gerät vor der Inbetriebnahme der Strip-Light. Alle Aquarienmodelle beinhalten je eine Strip-Light mit der Ausnahme von Venezia 350, bei dem Bei Nichtbeachtung kann dies zu Schäden an diesem Gerät und/oder zu Fischverlusten führen.
  • Page 42 SCHALTER AM NETZKABEL 2. INBETRIEBNAHME DES AQUACLEAR HEIZERS. Abhängig vom speziellen Modell kann die Strip Light des Fluval Aquariums entweder durch den Schalter am Netzkabel oder durch den eingebauten elektronischen Lichttimer oben auf der Strip Light an- oder VORSICHT - Der Wasserstand darf nicht unter den Mindeststand abfallen, der auf dem ausgestellt werden Glasheizerrohr angegeben ist.
  • Page 43 Bei Venezia 350 sind 2 Strip-Lights mit 2 unabhängigen Lichttimern enthalten. Folglich weichen Der Timer speichert die AUSzeit nur, nachdem der AN/AUS-Knopf wieder losgelassen wurde. ¡ ¡ die AN/AUSzeiten je nach Programmierung und/oder anderen Einstellungen voneinander ab. Wenn Sie aus irgendeinem Grund den AN/AUS-Knopf losgelassen haben, bevor die gewünschte Zeit eingestellt war, beginnen Sie die Prozedur erneut mit Schritt 1.
  • Page 44 Gummiring (O): 15476 für alle Modelle und sowohl Plastik- als auch Metallteile sich in der Regel bei Salzwasser schneller abnutzen. Um Salzablagerungen am dem Fluval Aquarium zu vermindern, halten Sie sich bitte an die folgenden Empfehlungen: 2. WARTUNG DES AQUACLEAR HEIZERS 1.
  • Page 45 2. Wenn der Antriebsmagnet gereinigt werden muss, umfassen Sie vorsichtig das Flügelrad und ziehen es vorsichtig aus dem Schacht. Spülen Sie es vorsichtig unter reinem Wasser ab. 3. Wenn der Schacht gereinigt werden muss, wischen Sie ihn vorsichtig mit einer Fluval Reinigungsbürste aus.
  • Page 46 Nur für die Modelle 305 und 405: ERSATZTEILE WARNUNG: Die Antriebsmagnetwelle ist zerbrechlich. Passen Sie besonders auf, wenn Sie das Bestellen Sie Ersatzteile bei Ihrem Fluval Händler oder bei HAGEN Deutschland GmbH & Co. KG. Flügelrad umfassen. Antriebsmagnetwelle Keramik wird Boden Antriebsmagnetenschachtes durch ein Gummilager festgehalten.
  • Page 47: Wartung Der Strip-Light-Abdeckung

    Gewinde zum Ende der Leuchtstoffröhre weist (wie in Abbildung 1 gezeigt). Achten Sie darauf, dass die Dichtungsringe richtig sitzen. Für die Fluval Strip-Light-Abdeckung ist keine spezielle Wartung nötig. Sie muss nur regelmäßig mit 6. Schieben Sie die Stifte der neuen Leuchtstoffröhre vorsichtig in die Lampenhalterungsschlitze, einem feuchten Tuch gereinigt werden (benutzen Sie niemals aggressive chemische Produkte oder bis sie einrasten.
  • Page 48 CALENTADOR Vicenza 180 Vicenza 260 ENTRADA Venezia 190 Venezia 350 Todos los kits incluyen un tanque, una mesa, una cubierta con luces en hilera, un Filtro externo Fluval y FILTRO EXTERNO un calentador. TANQUE DE VIDRIO El Filtro externo Fluval puede conectarse al tanque con mucha facilidad y sin peligro, gracias al nuevo MESA sistema de fácil conexión “Easy Connect”...
  • Page 49: Montaje Del Acuario Fluval

    MANTENIMIENTO Para cualquier servicio de mantenimiento, remítase a la Sección no. 7 de este Manual. MONTAJE DEL ACUARIO FLUVAL Para lograr una instalación apropiada y la puesta en marcha de su acuario, por favor observe las siguientes pautas: A.
  • Page 50 El Acuario Fluval deberá colocarse en una mesa Fluval adecuado, exclusivamente diseñado para un tomacorriente eléctrico. ese acuario. Los mesaes Fluval garantizan una apropiada superficie sólida y plana, que no se dobla ni se deforma. El uso de otro soporte invalidará la garantía.
  • Page 51 Ubique las 2 aberturas (l) y (O) del vidrio inferior del tanque y los TUBO DE BOQUILLA DE agujeros correspondientes en la mesa. Las 2 aberturas en el vidrio SALIDA (B) SALIDA (N) inferior del tanque vienen completas con accesorios de plástico especiales instalados en fábrica, que nunca deberán sacarse, girarse o aflojarse, y con dos tapones herméticos (P) y (Q).
  • Page 52 SECCIÓN NO. 2 FILTRO EXTERNO FLUVAL: CARACTERÍSTICAS TÉCNICAS INSTALACIÓN DEL FILTRO EXTERNO FLUVAL Y PREPARACIÓN PARA SU PUESTA EN MARCHA Acuario Filtro Caudal de Área de Volumen de Volumen Circulación Altura máx Power Power Absorción de energía FLUVAL FLUVAL la bomba* filtración...
  • Page 53 La pila Fluval de las canastas de los medios filtrantes medios filtrantes. (Para mayor información, remítase a la sección “Filtración Avanzada La pila de las canastas de los medios filtrantes en los Filtros Fluval Series 05 permite que se utilicen los Fluval”).
  • Page 54: Medidas De Seguridad Importantes

    Dado que puede utilizar los medios filtrantes de su preferencia en cada nivel, usted mismo, si lo desea, SECCIÓN NO. 3 puede diseñar un sistema de filtración mecánica adicional. A continuación, encontrará información detal- INSTALACIÓN DEL CALENTADORY PREPARACIÓN PARA SU PUESTA EN MARCHA lada y pautas generales para la selección y el uso de medios filtrantes.
  • Page 55: Instalación Del Calentador

    CALENTADOR : PIEZAS DEL PRODUCTO SECCIÓN NO. 4 DECORACIÓN DE SU ACUARIO CON GRAVA, ADORNOS Y PIEDRAS Retire la(s) luz(ces) en hilera y las tapas superiores de la parte de arriba del acuario para tener completo acceso al tanque. Los adornos y las rocas deberán colocarse cuando el acuario está seco. Enjuague la grava para acuario o el sustrato marino antes de colocarlo en el fondo.
  • Page 56 LA(S) LUZ(CES) EN HILERA. Todos los modelos de acuarios vienen con 1 luz en hilera, con la excepción del modelo Venezia 350, que De lo contrario, los peces podrían morirse y/o el aparato podría dañarse.
  • Page 57: Puesta En Marcha De La(S) Luz(Ces) En Hilera

    Se encenderá otra vez, sólo cuando el calentador deba El modelo Venezia 350 viene con 2 luces en hilera y 2 reguladores de luz independientes. Por lo mantener la temperatura al nivel seleccionado.
  • Page 58: Ejemplo De Programación

    Funcionamiento automático de las luces EJEMPLO DE PROGRAMACIÓN El regulador de luz puede encenderse o apagarse automáticamente luego de programar los tiempos de encendido y apagado (On/Off), según se indica a continuación. Presione 3 veces el botón + Presione 8 veces el botón + 1h durante la programación 1h durante la programación “tiempo de ENCENDIDO”...
  • Page 59 Filtro de alimentación (S): A-20009, uno para todos los modelos Tubo de salida (B): para Vicenza 180 y Venezia 190: 15471 6.Mantenga la tapa de los medios filtrantes en su lugar, incline el cartucho sobre el fregadero o Tapón del tanque (P): 15475, uno para todos los modelos Tubo de salida (B): para Vicenza 260 y Venezia 350: 15472 drenaje y escúrralo todo el agua que sea posible.
  • Page 60 3. VUELVA A ARMAR EL APARATO El impulsor se gasta con el tiempo. Puede solicitar el repuesto a través de su concesionario Fluval o NO LLENE EL CARTUCHO CON AGUA CUANDO VUELVA A ARMAR EL APARATO comunicándose con el Departamento de Servicio a la Clientela de Rolf C.
  • Page 61: Limpieza De La Cubierta De Luces En Hilera

    6.Con cuidado coloque las espigas del nuevo fluorescente en las ranuras de la base de éste hasta que hagan “clic”. 7.Con cuidado sostenga las bases de los fluorescentes con una mano mientras con la otra enrosca suavemente los accesorios roscados. Asegure bien estos accesorios, pero no se recomienda el uso de herramientas.
  • Page 62 Pour ce faire, nous vous recommandons de conserver votre reçu. Nous nous réservons le droit de réparer ou de remplacer l'article, à notre discrétion. Venezia 190 T5 2x24W 15499 15490 15484 Rolf C. Hagen inc. vous souhaite bien des heures d'agrément avec votre aquarium Fluval. Venezia 350 T5 2x39W 15499 15491 15486 GERMAN: Strip 39W Vielen Dank, dass Sie sich für eine FLUVAL-Aquarien-Kombination entschieden haben.
  • Page 63 Distributed by: Canada: Rolf C. Hagen Inc., Montreal, Quebec, H9X OA2 U.K.: Rolf C. Hagen (U.K.) Ltd., Castleford, W. Yorkshire WF10 5QH France: Hagen France SA., F-77388 Combs la Ville Germany: HAGEN Deutschland GmbH & Co. KG, 25488 Holm Spain: Rolf C Hagen España S.A. Avda.

Table des Matières