Table des Matières
Publicité
Les langues disponibles
Les langues disponibles
Liens rapides
Publicité
Table des Matières

Manuels Connexes pour switel HSIP 5700

Sommaire des Matières pour switel HSIP 5700
- Page 1 HSIP 5700 Home Monitoring HD Digital Surveillance Monitor Bedienungsanleitung User‘s Manual Manuel de l‘utilisateur Manual del Usuario DEUTSCH ENGLISH FRANÇAIS ITALIANO Please read carefully before using this equipment.
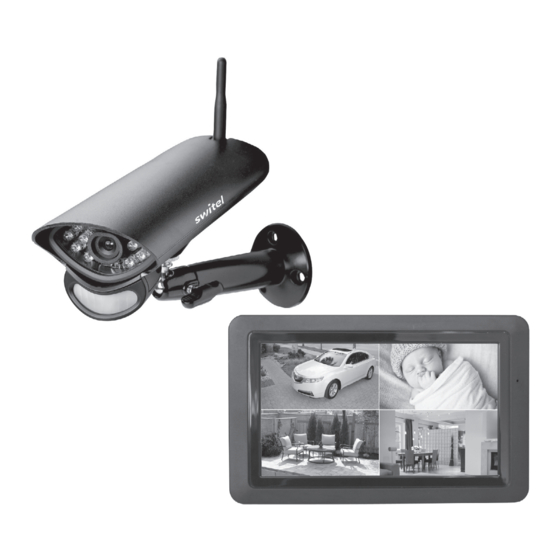
- Page 2 ÜBERSICHT Monitor (Empfänger) LCD Monitor: Zeigt das Video von der Kamera oder die Systembedienoberfläche an Mikrofon EIN/AUS-Taste / Scan-Taste: Drücken und halten, um den Monitor ein- oder auszuschalten. Drücken und loslassen, während das Gerät eingeschaltet ist, um den Scan-Modus ein- oder auszuschalten Antenne Lautsprecher Anschlussbuchse für mitgeliefertes Netzgerät...
-
Page 3: Gerät In Betrieb Nehmen
Standfuss: zur Befestigung der Kamera an der Wand oder auf einer anderen ebenen Fläche Netzanschluss Pairing-Taste: Die Pairing-Taste befindet sich auf der Rückseite der Kamera Hinweis: Diese Kamera enthält einen automatischen mechanischen IR-Cut-Filter. Wenn die Kamera zwi- schen Tag-Modus und Nachtsicht-Modus umschaltet, hört man Geräusch von der Kamera. Dieses Klicken ist normal und zeigt an, dass der Kamerafilter funktioniert. -
Page 4: Kamera Installieren
Kamera installieren Nehmen Sie zur Montage der Kamera den Monitor mit. Dies erleichtert die Positionierung. 1 Positionieren Sie die Kamera am gewünschten Ort, schließen Sie das Netzteil an und überprüfen Sie das Bild auf dem Monitor. Bewegen Sie die Kamera, wenn die Ansicht nicht so ist, wie Sie wollen. 2 Halten Sie die Fussplatte an die gewünschte Stelle und markieren Sie die Position der Schraubenlöcher. -
Page 5: Bedienung
BEDIENUNG LIVE VIEW Bildschirm Der Live View-Bildschirm ist der Hauptbildschirm des Monitors, der das Video von Ihrer Kamera anzeigt. Sie können eine einzelne Kamera oder alle anzeigen lassen. Sie können auch zwischen allen Live-Videos wechseln. Tippen Sie auf das Symbol , um die Live-Bildschirmanzeige zu ändern. - Page 6 Wenn Sie dieses Symbol auf dem Bildschirm tippen, teilt der Monitor das Bild in 5 Bereiche. Tip- pen Sie auf den Bereich, den Sie vergrößert sehen möchten. Dieser Bereich wird in doppelter Größe angezeigt. Tippen Sie erneut auf das Symbol, um den Zoom-Modus zu verlassen. Zeigt die aktuelle Lautstärke an.
-
Page 7: Allgemeine Einstellungen
Allgemeine Einstellungen Mit den allgemeinen Einstellungen können Sie Funktionen Ihres Systems einstellen. Sie können z. B. Ka- meras ein- und ausschalten, einen bestimmten Zeitplan für bestimmte Kameras festlegen, das Datum und die Uhrzeit und die Bewegungserkennungsempfindlichkeit einstellen. 1 Tippen Sie auf Hauptpunkt Unterpunkt Beschreibung... - Page 8 Hauptpunkt Unterpunkt Beschreibung Einstellung Erweiterte Wählen Sie „Dynamische IP-Adresse“ oder geben Sie Netzwerk Einstellungen eine statische IP-Adresse ein. Passwort wiederher- Stellen Sie das MyCam View-APP-Kennwort auf die stellen Standardeinstellung zurück (000000). Information Zeigt Netzwerkinformationen an und ermöglicht Ihnen, Änderungen in Ihrem Netzwerk und die UID des Monitors zu ändern.
- Page 9 BEDIENUNG AM MONITOR (SCHNELLANLEITUNG)
-
Page 10: Bedienung Der App
BEDIENUNG MIT DER MYCAM VIEW APP 1 Laden Sie MyCam View vom AppStore oder Google Play auf Ihr Smartphone oder Tablet herunter. 2 Verbinden Sie den Monitor mit Ihrem Router über ein Ethernet-Kabel, so dass er eine Internet Verbin- dung hat (Symbol leuchtet grün). -
Page 11: Sicherheitshinweise
Einstellungen in der APP Während der Listen-Darstellung der verbundenen Kameras (diese erreichen Sie mit der Zurück-Taste Ihres Handys während der Live-Bild-Darstellung) können Sie folgende Einstellungen vornehmen: - Verbindung zur Kamera neu herstellen, falls die Verbindung abgebrochen sein sollte. - Geräteeinstellungen bearbeiten. Die UID der Kamera wird gezeigt und Sie können den Namen der Kamera ändern. -
Page 12: Entsorgung
2014/53/EU. Die Konformität mit der o. a. Richtlinie wird durch das CE−Zeichen auf dem Gerät bestätigt. Für die komplette Konformitätserklärung nutzen Sie bitte den kostenlosen Download von unserer Website www.switel.com/support. Telgo AG, Route d’Agy 16, 1763 Granges-Paccot, Switzerland Pflegehinweise •... -
Page 13: Garantie
Vorsatz oder grober Fahrlässigkeit des Herstellers beruhen. Sollte Ihr Gerät dennoch einen Defekt innerhalb der Garantiezeit aufweisen, wenden Sie sich bitte unter Vorlage Ihrer Kaufquittung ausschließlich an das Geschäft, in dem Sie Ihr SWITEL-Gerät gekauft haben. Alle Gewährleistungsansprüche nach diesen Bestimmungen sind ausschließlich gegenüber Ihrem Fach- händler geltend zu machen. - Page 14 AT A GLANCE Monitor (Receiver) LCD Screen: Displays video from the camera(s) or system operation interface Microphone Power Button/ Scan Button: Press and hold to turn the receiver on/off. Press and release while the unit is powered on to turn Scan mode on/ off Wireless Antenna Speaker Power Port: Connect to a local power outlet using the included power adapter...
- Page 15 Bracket – Use the bracket to mount the camera on a wall or other flat surfaces Power Jack – Connect the DC 9V Power Adaptor to the Camera Pairing Button – The pairing button is located on the back of the camera behind by the stand mount Note: This camera includes an Auto Mechanical IR Cut Filter.
- Page 16 INSTALL CAMERAS When you are positioning the camera, bring the monitor along; it’s much easier to get the camera into the right position when you have the display handy. 1 Position the camera where you want it, plug it into power, and check video on the monitor. Move the camera if the view is not what you want.
-
Page 17: System Operation
SYSTEM OPERATION Your monitor operates through a series of screens that let you choose groups of operations. LIVE VIEW SCREEN The Live View screen is the monitor’s main screen that displays video from your camera(s). You can have the system display a single camera or you can set the screen to display all of them. You can also set the screen to cycle between all live video feeds. -
Page 18: Functions
ZOOM INDICATOR: When you tap this icon on the screen, the monitor breaks the screen image into 5 areas. Tap the area you want to see in Zoom. That area displays in 2X size. Tap the icon again to exit Zoom mode. VOLUME INDICATOR: Indicates current audio volume. - Page 19 GENERAL SETTINGS The General Settings screen contains 6 subsections, each of which may contain sub-screens. These sub- screens let you set features about your system. You can turn cameras on and off, establish a specific schedule for specific cameras to record, set the date and time, and motion detection sensitivity, among other features.
- Page 20 Main Screen Sub-Screen What it Does Network Setup Advanced Set up Dynamic or Static IP address. Setup Reset Reset app password to the default (000000). Password Information Displays and allows you to change information about your network and the monitor's unique UID number.
- Page 21 MONITOR BASIC OPERATION (QUICK GUIDE)
- Page 22 OPERATING THE MYCAM VIEW APP 1 Download MyCam View from AppStore or Google Play to your smartphone or tablet. 2 Connect the monitor to your router using an Ethernet cable so that it has an Internet connection (the icon lights green). The following example shows how to use the Android app.
- Page 23 Settings in the APP Whilst in the list display of the connected cameras (which can be reached with the back button of your mo- bile phone during the live image display), you can make the following settings: - Reconnect to the camera if the connection is broken. - Edit device settings.
- Page 24 Conformity with the above mentioned directive is confirmed by the CE symbol on the device. To view the complete Declaration of Conformity, please refer to the free download available on our website www.switel.com/support. Telgo AG, Route d’Agy 16, 1763 Granges-Paccot, Switzerland Maintenance •...
- Page 25 If your equipment shows signs of defect during the period of guarantee, please return to the sales outlet in which you purchased the SWITEL equipment together with the purchase receipt. All rights to claims under the terms of guarantee in accordance with this agreement must be asserted exclusively with regard to your sales outlet.
-
Page 26: Moniteur (Récepteur)
APERÇU Moniteur (Récepteur) Moniteur LCD : affiche la vidéo de la caméra ou la surface utilisateur du système Microphone Touche marche/arrêt / Touche Scan : appuyer et maintenir appuyée la touche pour allumer ou éteindre le moniteur. Appuyer et relâcher quand l'appareil est allumé pour activer ou désactiver le mode scan (balayage). Antenne Haut-parleur Prise de raccordement pour le bloc d'alimentation livré... -
Page 27: Mettre L'appareil En Service
Antenne Support : pour fixer la caméra au mur ou sur une autre surface plane Raccord de secteur Touche de jumelage : La touche de jumelage se situe au dos de la caméra Indication : Cette caméra contient un filtre anti-infrarouges (IR-cut) mécanique automatique. Un bruit est émit de la caméra quand elle passe du mode diurne au mode nocturne. -
Page 28: Installation De La Caméra
Installation de la caméra Emportez le moniteur lors du montage de la caméra. Ceci facilite le positionnement. 1 Positionnez la caméra à l’endroit souhaité, branchez le bloc d'alimentation et vérifiez l’image sur le moniteur. Bougez la caméra si l'affichage n’est pas tel que vous le souhaité. 2 Tenez le pied à... -
Page 29: Utilisation
UTILISATION Écran LIVE VIEW L’écran Live View est l’écran principal du moniteur qui affiche la vidéo de votre caméra. Vous pouvez faire afficher une caméra individuelle ou toutes les caméras. Vous pouvez aussi alterner entre toutes les vidéos Live. Appuyez sur le symbole pour modifier l'affichage Live de l’écran. -
Page 30: Luminosité
Si vous tapez ce symbole sur l’écran, le moniteur divise l’écran en 5 zones. Tapez sur la zone que vous souhaitez agrandir. La taille de cette zone est doublée. Tapez à nouveau sur le symbole pour quitter l'agrandissement. Indique le volume actuel. Pour modifier le volume, vous devez vous trouver en mode monocanal. Tapez sur + ou - pour régler le volume. -
Page 31: Réglages Généraux
Réglages généraux Les réglages généraux vous permettent de régler les fonctions de votre système. Vous pouvez, par exemple, activer et désactiver les caméras, fixer un calendrier déterminé pour des caméras déterminées, régler la date, l’heure et la sensibilité de la détection de mouvements. 1 Tapez sur Point principal Sous-point... -
Page 32: Ajouter Une Nouvelle Camera
Point principal Sous-point Description Réglage Réglages Sélectionnez « Adresse IP dynamique » ou saisissez Réseau avancées une adresse IP statique. Restituer le mot de Remettez le code de l’APPLI MyCam View sur le passe réglage par défaut (000000). Information Affiche des informations réseau et vous permet des modifications dans votre réseau et de modifier l’UID du moniteur. - Page 33 UTILISATION SUR LE MONITEUR (GUIDE RAPIDE)
-
Page 34: Utilisation Avec L'appli Mycam View
UTILISATION AVEC L’APPLI MYCAM VIEW 1 Téléchargez MyCam View depuis l’AppStore ou Google Play sur votre Smartphone ou tablette. 2 Raccordez le moniteur avec votre routeur via un câble Ethernet afin qu’il ait une connexion Internet (le symbole brille en vert). L’exemple suivant illustre l’utilisation avec l’appli Android. -
Page 35: Annexe
Réglages dans l’APPLI Durant l’affichage de la liste de caméras raccordées (vous y parvenez via la touche retour de votre mobile pendant l’affichage de l’image Live), vous pouvez procéder aux réglages suivants : - Rétablir la liaison avec la caméra au cas où le raccordement serait suspendu. - Ajuster les réglages des appareils. -
Page 36: Élimination Des Déchets
La conformité avec la directive citée ci-avant est confirmée par le marquage CE apposé sur cet appareil. Pour obtenir la déclaration de conformité complète, veuillez la télécharger gratuitement sur notre site internet : www.switel.com/support. Telgo AG, Route d’Agy 16, 1763 Granges-Paccot, Switzerland Indications d’entretien... -
Page 37: Caractéristiques Techniques (Caméra) Portée
-10°C ... +50°C / Humidité 0% ... 85% Garantie Les appareils SWITEL sont fabriqués et testés selon les procédés de production les plus modernes. Les matériaux choisis et la haute technologie assurent un fonctionnement parfait et une longue durée de vie. La durée de garantie est de 24 mois à... - Page 38 PANORAMICA Monitor (ricevitore) Monitor LCD: Visualizza il video dalla telecamera o l'interfaccia utente del sistema Microfono Pulsante ON/OFF / Tasto scansione: Premere e tenere premuto per accendere o spegnere il monitor. Premere e rilasciare mentre l’apparecchio è acceso, per attivare o disattivare la modalità di scansione Antenna Altoparlante Presa di collegamento per alimentatore di rete in dotazione...
-
Page 39: Messa In Servizio Dell'apparecchio
Allacciamento di rete Tasto accoppiamento: Il tasto di accoppiamento si trova sul retro della telecamera Avvertenza: Questa telecamera include un filtro IR-cut meccanico automatico. Se si commuta la telecamera dalla modalità giorno alla modalità notte o viceversa, è possibile avvertire un rumore proveniente dalla telecamera. -
Page 40: Installazione Della Telecamera
Installazione della telecamera Prendere il monitor per installare la telecamera. Ciò facilita il posizionamento. 1 Posizionare la telecamera nella posizione desiderata, collegare l'alimentatore e controllare l'immagine sul monitor. Muovere la telecamera se la visione non corrisponde a quella desiderata. 2 Tenere la pedana nel punto desiderato e segnare la posizione dei fori di avvitamento. 3 Utilizzare le viti e tasselli forniti per fissare il piede alla parete o al soffitto. - Page 41 Schermo live view Lo schermo live view è la schermata principale del monitor, che visualizza il video della vostra telecamera. Potete decidere di visualizzare una singola telecamera oppure tutte le telecamere. Potete anche navigare tra tutti i video live. Toccare sul simbolo per modificare la visualizzazione della schermata live.
- Page 42 Se si tocca questo simbolo sullo schermo, il monitor divide l'immagine in 5 aree. Toccare l’area che si desidera visualizzare ingrandita. Quest’area viene visualizzata in un formato doppio. Toccare nuovamente il simbolo per uscire dalla modalità zoom. Indica il volume attuale. Occorre essere in modalità di visualizzazione mono-canale per modificare il volume.
-
Page 43: Impostazioni Generali
Impostazioni generali Con le impostazioni generali si possono regolare le funzioni del sistema. Potete ad esempio accendere e spegnere le telecamere, stabilire una pianificazione degli orari specifica per determinate telecamere, impostare la data e l’ora e la sensibilità del rilevamento di movimento. 1 Toccare su Voce principale Sottovoce... - Page 44 Voce principale Sottovoce Descrizione Impostazione di Impostazioni Selezionare “indirizzo IP dinamico” oppure inserire un rete avanzate indirizzo IP statico. Ripristino della pass- Riportare la password dell’APP MyCam View alle word impostazioni di fabbrica (000000). Informazioni Mostra le informazioni di rete e consente di apportare modifiche alla propria rete e di modificare l'UID del monitor.
- Page 45 USO SUL MONITOR (GUIDA RAPIDA)
-
Page 46: Utilizzo Dell'app
UTILIZZO CON L’APP MYCAM VIEW 1 Scaricare MyCam View sul proprio smartphone o tablet dall’AppStore o da Google Play. 2 Collegare il monitor con il proprio router tramite un cavo ethernet in modo che abbia un collegamento a Internet (il simbolo si illumina di verde). -
Page 47: Indicazioni Di Sicurezza
Impostazioni nell’APP Durante la raffigurazione dell'elenco delle telecamere collegate (raggiungibile con il tasto "Indietro" del proprio cellulare durante la rappresentazione dell’immagine in tempo reale) è possibile eseguire le se- guenti impostazioni: - instaurazione di un nuovo collegamento alla telecamera qualora il collegamento dovesse interrom- persi;... -
Page 48: Smaltimento
La conformità con la direttiva sopra citata viene confermata con il simbolo CE sull'apparecchio. La dichiarazione di conformità completa la puo scaricare gratuitamente dal nostro sito web allo www.switel.com/support. Telgo AG, Route d’Agy 16, 1763 Granges-Paccot, Switzerland Indicazioni di manutenzione •... - Page 49 Se il Suo apparecchio dovesse evidenziare un difetto durante il periodo di garanzia, La preghiamo di rivolgersi al negozio in cui ha acquistato il Suo apparecchio SWITEL, presentando il Suo scontrino di acquisto. Tutti i diritti di garanzia secondo queste normative sono da far valere esclusivamente presso il rivenditore specializzato.
- Page 52 SERVICE Bei technischen Fragen nutzen Sie bitte das Service-Formular auf unserer Webseite: http://www.switel.com/de/produktanfragen-und-technische-unterstuetzung/ In the case of technical questions, please use the service form on our website: http://www.switel.com/en/product-information-technical-support/ En cas des questions téchniques, veuillez, s'il vous plaît utiliser le formulaire de service sur notre site: http://www.switel.com/fr/support-technique/...