CISA 17353 Instructions De Montage
Des serrures a mortaiser a double panneton
Liens rapides
I
ISTRUZIONI DI MONTAGGIO SERRATURE PER FASCIE A DOPPIA MAP-
PA ART. 17353 - 17358 - 57353 - 57358
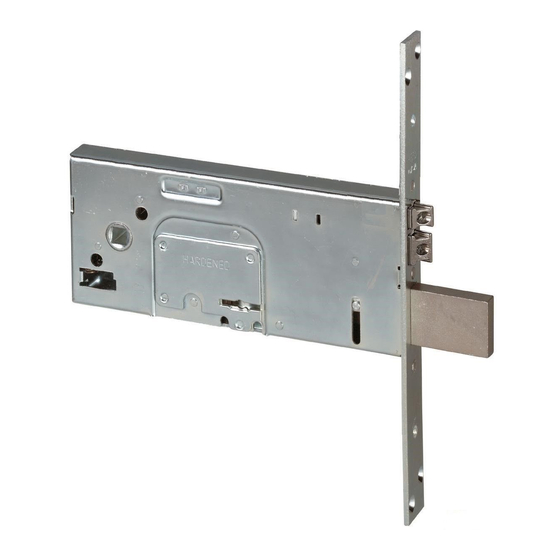
a) Rovesciamento scrocco e pistone di ricarica art. 17353 - 17358 e rovescia-
mento scrocco art. 57353 - 57358.
Per rendere la serratura sinistra, ruotare la vite di regolazione in senso orario
fino a che lo scrocco e il pistone di ricarica (fig. 1) o il solo scrocco (fig. 2)
fuoriescano dal frontale: girare gli stessi di 180° e ruotare la vite di
regolazione in senso antiorario fino a fine corsa.
b) Regolazione sporgenza scrocco per art. 57353 - 57358 e sporgenza
scrocco e pistone di ricarica per art. 17353 - 17358.
Per aumentare la sporgenza dello scrocco, fino ad un massimo di mm. 6, fare
ruotare la vite di regolazione in senso orario. Per la regolazione ottimale, in
base al profilo utilizzato, occorre verificare la distanza fra la testata della
serratura e la contropiastra.
Se la distanza supera 4,5 mm. aumentare la sporgenza fino a compensare
la differenza.
ATTENZIONE:
Sulla versione elettrica art. 17353 - 17358, se il pistone di ricarica non é
regolato correttamente, rispetto allo scrocco, la serratura non funziona.
Quindi, al momento di effettuare la regolazione verificare con l'apposita
dima che la sporgenza del pistone sia sempre superiore di 1 mm. rispetto a
quella dello scrocco.
F
INSTRUCTIONS DE MONTAGE DES SERRURES A MORTAISER A DOU-
BLE PANNETON ART. 17353 - 17358 - 57353 - 57358
a ) Changement de la main du pêne demi-tour et pêne lançant art. 17353 -
17358 et changement de la main du pêne demi-tour art. 57353 - 57358.
Pour que la main de la serrure soit "à gauche", tourner la vis de réglage dans
le sens des aiguilles d'une montre jusqu'à dégager de la têtière le pêne demi-
tour et le pêne lançant (fig. 1) ou bien le pêne demi-tour seulement (fig. 2). Leur
faire faire une rotation de 180° puis tourner la vis dans le sens inverse des
aiguilles d'une montre jusqu'au blocage final de celle-ci.
b) Réglage de la saillie du pêne demi-tour art. 57353 - 57358 et saillie du pêne
demi-tour et du pêne lançant art. 17353 - 17358.
Pour augmenter la saillie du pêne demi-tour jusqu'à un maximum de 6 mm,
il faut tourner la vis de réglage dans le sens des aiguilles d'une montre. Pour
un réglage optimal, selon le profil qu'on a utilisé, il faut vérifier la distance
entre la tête de la serrure et la contre-platine. Si la distance est majeure de 4,5
mm, il faut augmenter la saillie au but de compenser la différence.
ATTENTION:
Dans le modèle électrique art. 17353 - 17358, si le pêne lançant n'est pas
réglé correctement, toujours par rapport au pêne demi-tour, la serrure ne
fonctionne pas. Alors, avant de commencer le réglage, il faut vérifier à l'aide
du gabarit correspondant que la saillie du pêne lançant soit toujours 1 mm
plus grande que celle du pêne demi-tour.
Fig. 1
GB
INSTALLATION INSTRUCTIONS FOR DOUBLE BIT KEY MORTICE LOCKS
ITEM 17353 - 17358 - 57353 - 57358
a) Changing hand and reloading pin for items 17353 - 17358 an changing
hand for 57353 - 57358.
In order to make the lock left hand, turn the adjustment screw clockwise until
the latch and the reloading pin (fig. 1) or latch only (fig. 2) come out of the
faceplate. Turn them by 180° and turn the adjustment screw counter-
clockwise until it stops.
b) Adjusting latch projection item 57353 - 57358 and latch projection and
reloading pin item 17353 - 17358.
In order to increase the projection of the latch up to 6 mm, turn the adjustment
screw clockwise. For an optimal adjustment, according to the profile which has
been used, it is necessary to check the distance between the lock head and the
striking plate. If the distance exceeds 4.5 mm, it is necessary to increase the
projection in order to compensate the difference.
WARNING:
In the electric model item 17353 - 17358, if the reloading pin is not set
correctly - with respect to the latch - the lock does not work. When adjusting,
check that the pin projection always exceeds the latch projection by more than
1 mm., by means of the suitable template.
E
INSTRUCCIONES DE MONTAJE CERRADURAS PARA FAJAS DE DOBLE
PALETÓN ART. 17353 - 17358 - 57353 - 57358
a) Giro para cambio de mano del picaporte y pitón de recarga en art. 17353
- 17358 y del picaporte en art. 57353 - 57358.
Para convertir la cerradura en mano izquierda, girar el tornillo de regulación
en sentido horario hasta que el picaporte y el pitón de recarga (fig.1), o sólo
el picaporte (fig.2) sobresalgan del frente: girarlos 180° y apretar el tornillo
de regulación en sentido antihorario hasta el final del recorrido.
b) Ajuste del saliente del pestillo para art. 57353 - 57358 y saliente pestillo
y pistón de recarga para art. 17353 - 17358.
Para aumentar el saliente del pestillo, hasta un máximo de 6 mm, hacer girar
el tornillo de ajuste en el sentido de las agujas del reloj. Para conseguir el
ajuste óptimo, de acuerdo con el perfil utilizado, hay que comprobar la
distancia entre el cabezal de la cerradura y la contraplaca. Si la distancia
supera 4,5 mm, aumentar el saliente hasta compensar la diferencia.
ATENCIÓN:
En la versión eléctrica art. 17353 - 17358, si el pistón de carga no está
ajustado correctamente respecto al pestillo, la cerradura no funciona. Por lo
tanto, a la hora de efectuar el ajuste, comprobar con la galga a propósito que
el saliente del pistón sea siempre superior de 1 mm respecto al saliente del
pestillo.
Fig. 2
1

Manuels Connexes pour CISA 17353


Sommaire des Matières pour CISA 17353
- Page 1 Se la distanza supera 4,5 mm. aumentare la sporgenza fino a compensare WARNING: la differenza. In the electric model item 17353 - 17358, if the reloading pin is not set ATTENZIONE: correctly - with respect to the latch - the lock does not work. When adjusting, Sulla versione elettrica art.
- Page 2 c) Fermo a giorno. c) Hold-open device. Con la serratura a riposo arretrare il catenaccio con la chiave fino a fine corsa When the lock is at its rest position, withdraw the dead bolt by means of the in modo da portarlo a filo testata. key until it stops and is flush with the head.
- Page 3 CISA S.p.A. e sono consi- For applications other than those shown, advise technique des catalogues CISA S.p.a. et sont indicadas en la descripción técnica de los gliati solamente per gli scopi ivi precisati.