Table des Matières
Publicité
Les langues disponibles
Les langues disponibles
Liens rapides
Publicité
Chapitres
Table des Matières
Dépannage

Manuels Connexes pour Renkforce IR1


Sommaire des Matières pour Renkforce IR1
- Page 1 D Bedienungsanleitung Internet Radio IR1 Best.-Nr. 1285920 Seite 2 - 28 G Operating Instructions Internet Radio IR1 Item No. 1285920 Page 29 - 55 F Notice d’emploi Radio Internet IR1 N° de commande 1285920 Page 56 - 84 O Gebruiksaanwijzing Internetradio IR1 Bestelnr.
-
Page 2: Table Des Matières
Inhaltsverzeichnis Seite Einführung ................................3 Symbol-Erklärung..............................3 Bestimmungsgemäße Verwendung ........................4 Lieferumfang ................................4 Sicherheitshinweise .............................4 Batterie- und Akkuhinweise..........................6 Produktübersicht..............................7 a) Internet Radio ..............................7 b) Fernbedienung ..............................9 c) Menüübersicht ..............................12 Inbetriebnahme ..............................17 a) Anschluss ..............................17 b) Einlegen bzw. wechseln der Batterien der Fernbedienung ..............17 Ersteinrichtung ..............................18 10. -
Page 3: Einführung
1. Einführung Sehr geehrte Kundin, sehr geehrter Kunde, wir bedanken uns für den Kauf dieses Produkts. Dieses Produkt entspricht den gesetzlichen, nationalen und europäischen Anforderungen. Um diesen Zustand zu erhalten und einen gefahrlosen Betrieb sicherzustellen, müssen Sie als Anwender diese Bedienungsanleitung beachten! Diese Bedienungsanleitung gehört zu diesem Produkt. -
Page 4: Bestimmungsgemäße Verwendung
3. Bestimmungsgemäße Verwendung Das Produkt dient zur Wiedergabe von Radiosendern, die über das Internet empfangen werden. Außerdem kann das Produkt Musik über das Netzwerk wiedergeben (UPNP/DLNA). Zusätzlich zeigt es die Uhrzeit an und es ist ein Wecker integriert. Die Verbindung zum Internet und zu Ihrem Netzwerk kommt über WLAN zu Stande. Eine andere Verwendung als zuvor beschrieben führt zur Beschädigung dieses Produktes. - Page 5 • Die Netzsteckdose für das Netzkabel muss sich in der Nähe des Geräts befinden und leicht zugänglich sein. Somit kann das Gerät im Fehlerfall schnell und einfach von der Netzstromver- sorgung getrennt werden. • Fassen Sie den Netzstecker niemals mit feuchten oder nassen Händen an. Es besteht die Ge- fahr eines lebensgefährlichen elektrischen Schlages! •...
-
Page 6: Batterie- Und Akkuhinweise
6. Batterie- und Akkuhinweise • Batterien/Akkus gehören nicht in Kinderhände. • Lassen Sie Batterien/Akkus nicht offen herumliegen, es besteht die Gefahr, dass diese von Kindern oder Haustieren verschluckt werden. Suchen Sie im Falle eines Verschluckens sofort einen Arzt auf. Es be- steht Lebensgefahr! •... -
Page 7: Produktübersicht
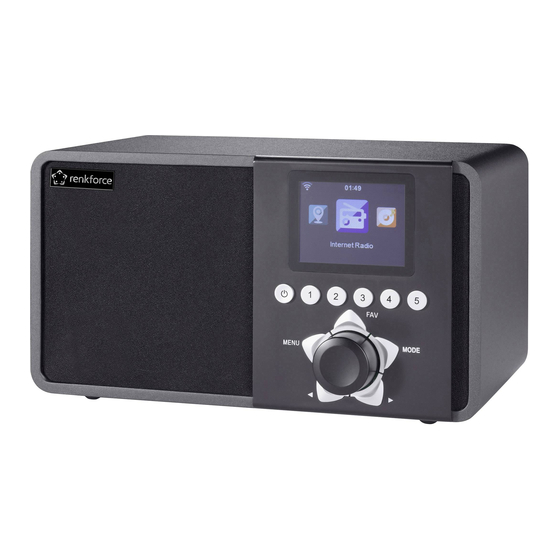
7. Produktübersicht a) Internet Radio Lautsprecher Ein- /Aus-Taster Display Stationstasten 1 bis 5; zur direkten Auswahl der ersten 5 gespeicherten Sender in den Favoriten Taster „FAV“; zum Öffnen der Favoriten Taster „MENU“; zum Öffnen des Hauptmenüs Taster um im Menü nach links zu navigieren oder eine Ebene zurück zu springen Drehknopf/Taster;... - Page 8 Netzschalter Ein/Aus Eingangsbuchse für Spannungsversorgung 100 - 240 V/AC, 50 - 60 Hz AUX-Eingang, 3,5 mm Klinke Line-Ausgang, 3,5 mm Klinke Kopfhöreranschluss, 3,5 mm Klinke Bass Reflex Rohr...
-
Page 9: Fernbedienung
b) Fernbedienung... - Page 10 um das Gerät Ein- bzw. Auszuschalten; entspricht der Taste A2 am Gerät öffnet das Einstellungsmenü für den Wecker Alarm Sleep Sleep-Timer; um den Einschlaf-Timer zu aktivieren und einzustellen Mute; um den Ton aus bzw. einzuschalten Mute startet WPS öffnet das Hauptmenü; entspricht der Taste A6 am Gerät MENU MODE zum Umschalten der Betriebsart (AUX, UPNP, iRadio);...
- Page 11 zur Auswahl der gespeicherten Sender auf den Stationstasten; Eingabe der Zahlen und Buch- D0 – D9 staben für den WLAN-Schlüssel Reihenfolge der Zeichen von den einzelnen Tasten 0-9 (D0-D9) Taste „0“ 0 DEL Taste „1“ 1 @ Leerzeichen ! ” # $ % & ‘ ( ) * + , - . / : ; < = > ? [ \ ] ^ _ ` { | } ~ Taste „2“...
-
Page 12: Menüübersicht
c) Menüübersicht Nachfolgend finden Sie eine Übersicht aller Punkte, die Sie im Menü anwählen können. Au- ßerdem ist beschrieben, was Sie bei welchem Menüpunkt einstellen können bzw. was für eine Funktion hinter dem entsprechenden Punkt steht. Die aktive Einstellung erkennen Sie an dem voran gestellten Punkt. - Page 13 „Informations-Center“ „Wetter-Information“ Hier können Sie sich verschiedene Wetterinformationen von bestimmten Städten anzeigen las- sen. Die Auswahl erfolgt nach Kontinenten, Land und Stadt. Die Daten werden aktuell vom Inter- net abgerufen. „Finanz-Information“ Hier werden verschiedene Börsendaten, wie z.B. der „DOW JONES“ oder der „DAX“, angezeigt. Die Daten werden ebenfalls vom Internet abgerufen.
- Page 14 „Einstellungen“ „Zeiteinstellungen“ „Datum und Zeit einstellen“ Hier können Sie das Datum und die Uhrzeit manuell einstellen. Beachten Sie, dass dies auch normalerweise automatisch passiert, sobald das Internet Radio eine Ver- bindung zum Internet hat. Um die Einstellung zu verändern, benutzen Sie entweder die Tasten 0 bis 9 (D0 –...
- Page 15 „Einstellungen“ „Dimmer“ „Energiesparmodus“ Wenn Sie diesen Punkt öffnen, die gewünschte Helligkeit einstellen und mit „Enter“ auf der Fernbedienung bestätigen, wird das Display, sobald das Radio in den Ener- giesparmodus wechselt, auf die von Ihnen eingestellte Helligkeit gedimmt. „Ein“ Hier stellen Sie die Helligkeit des Displays für den Normalbetrieb ein. Um die Einstel- lung zu übernehmen, müssen Sie nach der Auswahl der Helligkeit mit der Taste C13 bestätigen.
- Page 16 „Einstellungen“ „Lokale-Standort-Einstellung“ Hier können Sie die automatische Auswahl für den Menüpunkt „Lokale Sender“ manuell anpas- sen. Wählen Sie zuerst „Manuell einstellen“ und dann Ihr gewünschtes Land aus. Zum Überneh- men bestätigen Sie „Als Lokale Station speichern“ mit der Taste C13/A8. „Wiedergabe-Einstellungen“...
-
Page 17: Inbetriebnahme
8. Inbetriebnahme a) Anschluss Elektrischer Anschluss: • Um das Gerät in Betrieb zu nehmen, stecken Sie zuerst das beiliegende Netzkabel in die Spannungsver- sorgungsbuchse B2 an der Rückseite des Radios ein. • Anschließend stecken Sie den Netzstecker des Kabels in eine Netzsteckdose ein. •... -
Page 18: Ersteinrichtung
9. Ersteinrichtung Beim ersten Einschalten des Geräts oder wenn Sie es zuvor komplett vom Netz getrennt ha- ben, erscheint nach dem Anschließen an die Versorgungspannung im Display „Renkforce“. Der Startvorgang dauert einige Sekunden. Der Status wird an Hand des Ladebalkens angezeigt. -
Page 19: Bedienung Und Konfiguration
10. Bedienung und Konfiguration a) Grundsätzliche Bedienung Nachfolgend beschreiben wir Ihnen die grundsätzliche Bedienung des Internet Radios. • Mit der Taste C1 auf der Fernbedienung bzw. mit der Taste A2 am Gerät, können Sie das Internet Radio ein- bzw. ausschalten. Wenn Sie es mit dieser Taste ausschalten, wechselt es in den Standby-Modus und zeigt die Uhrzeit und falls Sie die Funktion aktiviert haben, das Wetter an. -
Page 20: Internet Radio
b) Internet Radio Umschalten auf Internet Radio: • Um auf Internet Radio umzuschalten, scrollen Sie im Hauptmenü mit einer der beiden Pfeiltasten C11/C12 bzw. A7/A9 solange nach links oder rechts, bis in der Mitte des Displays „Internet Radio“ angezeigt wird. Drücken Sie dann die Taste C13 oder A8 um die Funktion zu öffnen. - Page 21 • Die andere Möglichkeit einen Sender zu speichern funktioniert nur im Menü, wo die einzelnen Sender angezeigt werden. Wenn Sie gerade einen Sender wiedergeben, gehen Sie einfach mit der Taste C11/A7 einen Schritt zurück. Wählen Sie als nächstes mit den Pfeiltasten C9 und C10 bzw. mit dem Drehknopf A8 den gewünschten Sender aus, drücken aber nicht die Taste C13/A8, sondern die rechte Pfeiltaste C12 bzw.
-
Page 22: Upnp
c) „UPnP“ Das Gerät unterstützt „UPnP“ („Universal Plug and Play“). Damit haben Sie die Möglichkeit Musik von Ihrem Netzwerk zu streamen. Es setzt aber voraus, dass sich in Ihrem Netzwerk ein kompatibles Gerät befindet, welches als Sever fungiert. Dies kann z.B. eine Netzwerkfestplatte mit UPnP-Server sein oder auch ein herkömmlicher PC mit z.B. -
Page 23: Dlna-Wiedergabe
Sie starten die Wiedergabe, in dem Sie mit der rechten Maustaste im Media Player auf das Musikstück klicken und „Wiedergeben auf“ auswählen. Das Internet Radio hat den DLNA-Namen „Renkforce IR1“. Diesen müssen Sie dann noch anklicken. • Eine weitere Möglichkeit, ist hier z.B. die Wiedergabe von einem Smartphone oder Tablet mit Android oder iOS. -
Page 24: My Mediau
• Navigieren Sie zum Punkt „Modus: Melodie“ und öffnen Sie ihn. Hier stellen Sie den Weck Ton ein. Be- stätigen Sie Ihre Auswahl mit der Taste C13 oder A8. Wählen Sie „Summer“ aus, wenn der Wecker nur piepen soll. Wenn Sie „Melodie“ auswählen, wird eine fest hinterlegte Weck Melodie abgespielt. Bei „Internet Radio“... -
Page 25: Beheben Von Störungen
11. Beheben von Störungen Sie haben Probleme das Internet Radio an Ihrem WLAN anzumelden: • Überprüfen Sie, ob ein anderes Gerät, wie z.B. ein Computer oder ein Tablet über das WLAN auf das Internet zugreifen kann. • Überprüfen Sie, ob in Ihrem Router der DHCP-Server läuft, bzw. ob Sie die statische IP-Adresse samt allen Einstellung (Subnetz Maske, Standard Gateway) im Internet Radio richtig konfiguriert haben. -
Page 26: Wartung Und Reinigung
Wenn das Internet Radio den ausgewählten Sender immer wieder zwischenspeichern muss und die Wie- dergabe dadurch stockt: • Der Internet Radio Sender wird über eine Breitbandverbindung übertragen. Wenn die Bandbreite Ihres Internetanschlusses zu gering ist oder durch eine andere Anwendung ausgelastet wird, kann es zu Aus- setzern kommen. -
Page 27: Entsorgung
13. Entsorgung a) Produkt Elektronische Geräte sind Wertstoffe und dürfen nicht in den Hausmüll! Entsorgen Sie das Produkt am Ende seiner Lebensdauer gemäß den geltenden gesetzlichen Be- stimmungen. Entnehmen Sie evtl. eingelegte Batterien und entsorgen Sie diese getrennt vom Produkt. b) Batterien und Akkus Sie als Endverbraucher sind gesetzlich (Batterieverordnung) zur Rückgabe aller gebrauchten Batterien und Akkus verpflichtet;... -
Page 28: Technische Daten
15. Technische Daten Betriebsspannung........100 - 240 V/AC, 50 - 60 Hz Leistungsaufnahme ........max. 20 W Audio Ausgangsleistung ......max. 10 W Lautsprecher..........10 cm Anschlüsse............3,5 mm Kopfhörer; 3,5 mm Line in; 3,5 mm Line out Display ............2,8 Zoll, 240 x 320 Pixel WLAN .............IEEE802.11b/g;... - Page 29 Table of Contents Page Introduction................................30 Explanation of symbols ............................30 Intended use ................................31 Scope of delivery ..............................31 Safety information...............................31 Information on batteries and rechargeable batteries ..................33 Product overview ..............................34 a) Internet Radio ..............................34 b) Remote control ..............................36 c) Menu overview .............................39 Commissioning ..............................44 a) Connection ..............................44 b) Inserting or changing the remote control batteries.
-
Page 30: Introduction
1. Introduction Dear Customer, thank you for purchasing this product. This product complies with the statutory national and European requirements. To maintain this status and to ensure safe operation, you as the user must observe these operating instruc- tions! These operating instructions are part of this product. They contain important notes on commis- sioning and handling. -
Page 31: Intended Use
3. Intended use The product serves playback of radio stations that are received through the internet. Additionally, the product can play back music on the network (UPNP/DLNA). It also shows the time and an alarm is integrated. The connection to the internet and your network is made by WiFi. Any other use than that described above and will damage the product. - Page 32 • The mains socket for the mains cable must be close to the device and easily accessible. This way, the device can be disconnected from the power supply quickly and easily in case of error. • Never touch the mains plug with wet or damp hands! There is a risk of potentially fatal electric shock! •...
-
Page 33: Information On Batteries And Rechargeable Batteries
6. Information on batteries and rechargeable batteries • Keep batteries/rechargeable batteries out of the reach of children. • Do not leave any batteries/rechargeable batteries lying around openly. There is a risk of batteries being swallowed by children or pets. If swallowed, consult a doctor immediately. Danger to life! •... -
Page 34: Product Overview
7. Product overview a) Internet Radio Speakers Turn On/Turn Off button Display Station buttons 1 to 5; for direct selection of the first 5 stations stored in your favourites “FAV” button to open your favourites “MENU” button to open the main menu Button to navigate to the left in the menu or to jump back by one level Dial switch/button for selection in the menu;... - Page 35 Mains switch Turn On/Turn Off Input socket for voltage supply 100 - 240 V/AC, 50 - 60 Hz AUX-input, 3.5 mm jack plug Line output, 3.5 mm jack plug Headphones connection, 3.5 mm jack plug Bass Reflex tube...
-
Page 36: Remote Control
b) Remote control... - Page 37 To switch the device on or off; corresponds to button A2 on the device Opens the configuration menu for the alarm Alarm Sleep Sleep timer; to enable and adjust the sleep timer Mute; to turn the sound off and on Mute Starts WPS Opens the main menu;...
- Page 38 D0 – D9 To select the saved channels on the station buttons; input of the numbers and letters for the WiFi key Order of characters of the individual buttons 0-9 (D0-D9) Button “0” 0 DEL Button “1” 1 @ space ! ” # $ % & ‘ ( ) * + , - . / : ; < = > ? [ \ ] ^ _ ` { | } ~ Button “2”...
-
Page 39: Menu Overview
c) Menu overview Below, you will find an overview of all items that you can select in the menu. There also is a de- scription of what you can set in which menu item or which function is behind the corresponding item. - Page 40 “Informations Center” “Weather Information” Here, you can have various weather information for specific towns displayed. Selection takes place by continent, country and town. The data are currently called from the internet. “Financial Information” Here, different stock data, such as the “DOW JONES” or the “DAX”, are displayed. The data are also called from the internet.
- Page 41 “Configuration” “Date&Time” “Set Date and Time” Here, you can set the date and time. Observe that this is usually done automatically once the internet radio is connected to the internet. To change the setting, use ei- ther the buttons 0 to 9 (D0 – D9) or the four arrow buttons (C9 – C12). “Set Time Format”...
- Page 42 “Configuration” “Dimmer” “Power Saving”“ When opening this parameter, set the desired brightness and confirm with “Enter” on the remote control, the display will be dimmed to your pre-set brightness once the radio switches to energy savings mode. “Turn On” Here, you can set the brightness of the display for normal operation. To accept the setting, you need to confirm with the button C13 after choosing the brightness.
- Page 43 “Configuration” “Local Radio Setup” Here, you can adjust the automatic selection for the menu item “Local Radio” manually. First select “Manual Setup” and then choose your desired country. To accept, confirm “Save as Local Radio” with the C13/A8 button. “Playback Setup” Here, you can choose if the track is to be repeated individually at playback or if all tracks are to be repeated, or if you want to play the tracks in random order.
-
Page 44: Commissioning
8. Commissioning a) Connection Electrical connection: • To take the device into operation, first connect the enclosed mains cable to the voltage supply socket B2 at the rear of the radio. • Then plug the mains plug of the cable into a mains socket. •... -
Page 45: Initial Setup
9. Initial setup At first activation of the device, or if you had disconnected it from the mains completely, “Renk- force” will appear in the display after connection to the supply voltage. The starting process takes a few seconds. The status is displayed by a charging bar. If you want to change the following configurations later, you can find them in the menu item “Configuration”. -
Page 46: Operation And Configuration
10. Operation and configuration a) General Operation Below, we will describe the general operation of the internet radio for you. • The C1 button on the remote control or the A2 button on the device switches the internet radio on or off. If you switch it off with the button, it will switch to standby mode and display the time and, if you have activated the function, the weather. -
Page 47: Internet Radio
b) Internet Radio Switching to Internet Radio • To switch to Internet Radio, scroll through the main menu to the left or right with one of the two arrow buttons C11/C12 or A7/A9, until “Internet Radio” is shown in the middle of the display. Then push the but- ton C13 or A8 to open the function. - Page 48 • The other option for saving a station works only in the menu where the individual stations are displayed. While you are playing back a station, simply return one step with the C11/A7 button. Next use the arrow buttons C9 and C10 or the A8 dial to select the desired station, but instead of the but- ton C13/A8, push the right arrow C12 or A9 on the device.
-
Page 49: Upnp
c) “UPnP” The device supports “UPnP” (“Universal Plug and Play”). This enables you to stream music from your network. However, it requires that your network contains a compatible device that works as a server. This may be, e.g., a network hard disc with UPnP server or a conventional PC with, e.g., Windows 8, on which ®... -
Page 50: Media Center
Start the playback by right-clicking the track in Media Player and selecting “Play To”. The internet radio has the DLNA name “Renkforce IR1”. You then need to click it. • Another option here is, e.g., playback from a Smartphone or tablet with Android or iOS. Here, you can switch playback to the internet radio while a piece of music is played on the respective device. -
Page 51: My Mediau
• Navigate to the item “Sound: Melody” and open it. Set the alarm sound here. Confirm your selection with the C13 or A8 button. Select “Summer” if you want your alarm to merely bleep. If you select “Melody”, a firmly stored wake-up melody is played back. For “Internet Radio”, you need to select a station from your saved favourites. -
Page 52: Troubleshooting
11. Troubleshooting You have problems logging on the internet radio to your WiFi: • Check if another device, such as a computer or tablet, can access the internet through the WiFi. • Check if your router’s DHCP server is running, whether the static IP address is properly configured with all configurations (subnet mask, standard gateway) in the internet radio. -
Page 53: Maintenance And Cleaning
If the internet radio keeps having to buffer the selected station and playback stutters because of this: • The internet radio station is transmitted through a broadband connection. If the bandwidth of your inter- net connection is too low or if it is utilised to capacity by another application, there may be breaks. Check your internet connection and test it with another station. -
Page 54: Disposal
13. Disposal a) Product Electronic devices are recyclable waste and must not be disposed of in the household waste! Dispose of the product according to the applicable statutory provisions at the end of its service life. Remove any inserted batteries and dispose of them separately from the product. b) Batteries and rechargeable batteries You as the end user are required by law (Battery Ordinance) to return all used batteries/rechargeable bat- teries. -
Page 55: Technical Data
15. Technical data Operating voltage.........100 - 240 V/AC 50 - 60 Hz Power intake ..........max. 20 W Audio output power ........max. 10 W Speaker............10 cm Connections ..........3.5 mm headphones; 3.5 mm line in; 3.5 mm line out Display ............2.8 inch, 240 x 320 pixels WiFi..............IEEE802.11b/g;... - Page 56 Table des matières Page Introduction................................57 Explication des symboles ..........................57 Utilisation conforme ............................58 Étendue de la livraison ............................58 Consignes de sécurité............................58 Remarques spécifiques aux piles et batteries ....................60 Vue d’ensemble du produit ..........................61 a) Internet Radio ..............................61 b) Télécommande .............................63 c) Vue d’ensemble du menu ..........................66 Mise en service ..............................71 a) Raccordement ...............................71 b) Insertion / remplacement des piles de la télécommande ..............71...
-
Page 57: Introduction
1. Introduction Chère cliente, cher client, Nous vous remercions pour l’achat du présent produit. Ce produit satisfait aux exigences légales nationales et européennes. Afin de maintenir cet état et de garantir un fonctionnement sans danger, l’utilisateur doit impérativement observer le présent mode d’emploi ! Ce mode d’emploi fait partie intégrante du produit. -
Page 58: Utilisation Conforme
3. Utilisation conforme Le produit a été conçu en vue du centre multimédia de stations radio disponibles via Internet. De plus, le produit permet d’écouter la musique sur le réseau (UPNP/DLNA). Il affiche également l’heure et une alarme est intégrée. La connexion Internet et la connexion à... - Page 59 • La prise de courant pour le cordon d’alimentation doit se trouver à proximité de l’appareil et être facilement accessible. En présence d’un défaut, le périphérique peut ainsi rapidement être débranché de l’alimentation secteur. • Ne touchez jamais la fiche de secteur avec les mains mouillées ou humides. Il y a danger de mort par électrocution ! •...
-
Page 60: Remarques Spécifiques Aux Piles Et Batteries
6. Remarques spécifiques aux piles et batteries • Tenir les piles et batteries hors de portée des enfants. • Ne laissez pas traîner les piles et batteries, les enfants ou les animaux domestiques risqueraient de les avaler. En tel cas, consultez immédiatement un médecin. Il y a danger de mort ! •... -
Page 61: Vue D'ensemble Du Produit
7. Vue d’ensemble du produit a) Internet Radio Haut-parleur Bouton Activer/Désactiver Écran Touches des stations 1 à 5 ; pour sélectionner directement les 5 premières stations enregistrées dans les favoris Bouton-poussoir « FAV » ; pour afficher les favoris Bouton-poussoir « MENU » ; pour ouvrir le menu principal Bouton-poussoir de navigation vers la gauche dans le menu ou retourner au niveau précédent Bouton rotatif / bouton-poussoir ;... - Page 62 Commutateur principal Activer/Désactiver Prise d’entrée pour l’alimentation électrique 100 - 240 V/CA, 50 - 60 Hz Entrée AUX, jack 3,5 mm Sortie Line, jack 3,5 mm Prise pour le casque d’écoute, jack 3,5 mm Tube bass-reflex...
-
Page 63: Télécommande
b) Télécommande... - Page 64 Pour allumer ou éteindre l’appareil ; équivaut à la touche A2 sur l’appareil Ouvre le menu de configuration pour l’alarme Alarm Sleep Minuterie Sommeil ; pour activer et configurer la minuterie Sommeil Mute ; pour désactiver ou activer le son Mute Démarre la fonction WPS Ouvre le menu principal ;...
- Page 65 D0 – D9 Pour la sélection des stations mémorisées à partir des touches des stations ; saisie des chiffres et des lettres de la clé Wi-Fi Ordre des caractères des touches 0 à 9 (D0-D9) Taste « 0 » 0 DEL Taste «...
-
Page 66: Vue D'ensemble Du Menu
c) Vue d’ensemble du menu Vous trouverez ci-dessous une vue d’ensemble de toutes les rubriques disponibles dans le menu. Les réglages possibles sont décrits pour chaque rubrique du menu et les fonctions cor- respondantes sont expliquées. Un point précède la configuration active. Veuillez noter que les différentes rubriques de la configuration et leurs traductions peuvent être modifiées après l’installation de mises à... - Page 67 « Centre d’informations » « Infos météo » Vous pouvez ici afficher les prévisions météorologiques pour différentes villes. La sélection s’ef- fectue en choisissant le continent, le pays puis la ville. Les informations sont actualisées via Internet. « Infos financières » Différentes informations boursières, comme par ex.
- Page 68 « Configuration » « Date et heure » « Régler la date et l’heure » Vous pouvez ici réaliser une installation manuelle de la date et de l’heure. Veuillez noter que cette procédure est automatiquement effectuée dès que la radio Internet est connectée à...
- Page 69 « Configuration » « Rétor-éclairage » « Economie d’énergie » Lorsque vous ouvrez cette rubrique, définissez la luminosité souhaitée et validez en appuyant sur la touche « Enter » de la télécommande, l’écran applique la luminosité programmée dès que le poste de radio bascule en Economie d’énergie. «...
- Page 70 « Configuration » « Installation de la radio locale » Vous pouvez ici modifier manuellement la sélection automatique pour la rubrique « Radio lo- cale » du menu. Sélectionnez d’abord « Installation manuelle » puis le pays souhaité. Pour enre- gistrer, validez l’option «...
-
Page 71: Mise En Service
8. Mise en service a) Raccordement Raccordement électrique : • Pour mettre en marche l’appareil, branchez d’abord le cordon d’alimentation dans la prise d’alimentation B2 au dos du poste de radio. • Enfichez ensuite la fiche de secteur du câble dans une prise de courant. •... -
Page 72: Configuration Initiale
Lors de la première mise en marche de l’appareil ou lorsqu’il était complètement débranché du secteur, le message « Renkforce » s’affiche sur l’écran lors du raccordement à la tension d’ali- mentation. La procédure de démarrage dure quelques secondes. Le statut est indiqué sur l’écran par la barre de progression. -
Page 73: Utilisation Et Configuration
10. Utilisation et configuration a) Fonctions de base Les fonctions de base de la radio Internet sont décrites ci-dessous. • Une pression sur la touche C1 de la télécommande ou sur la touche A2 de l’appareil vous permet d’al- lumer ou d’éteindre la radio Internet. Lorsque vous l’éteignez en appuyant sur cette touche, le poste de radio bascule en mode veille et affiche l’heure et, si vous avez activé... -
Page 74: Radio Internet
• Les 4 touches C16, C17, C18 et C19 de la télécommande permettent de piloter le centre multimédia en mode UPnP et le centre multimédia des stations de la radio Internet. Une pression sur la touche C16 permet d’écouter le titre ou la station précédents, une pression sur la touche C19 le titre ou la station suivants. - Page 75 • La première méthode fonctionne uniquement à condition que vous écoutiez actuellement une station. Appuyez et maintenez la touche Favoris « FAV+ » (C23) enfoncée sur la télécommande ou « FAV » (A5) jusqu’à ce que liste des favoris s’affiche sur l’écran. Sélectionnez ensuite une plage de mémoire à...
-
Page 76: Upnp
c) « UPnP » L’appareil prend en charge le protocole « UPnP » (« Universal Plug and Play »). Ce protocole vous permet de lire en continu la musique disponible sur votre réseau. Cela implique néanmoins qu’un périphérique com- patible faisant office de serveur soit disponible au sein de votre réseau. Il peut par ex. s’agir d’un disque dur réseau avec serveur UPnP ou d’un ordinateur classique sur lequel le système d’exploitation Windows ®... -
Page 77: Centre Multimédia Dlna
Lancez le centre multimédia en cliquant avec le bouton droit de la souris sur le titre dans le lecteur mul- timédia puis en sélectionnant l’option « pour jouer ». La radio Internet porte le nom DLNA « Renkforce IR1 ». Vous devez alors encore cliquer sur ce nom. -
Page 78: My Mediau
• Naviguez jusqu’à l’option « Modus: Melodie » puis ouvrez-la. Vous pouvez ici sélectionner la tonalité du réveil. Validez votre sélection en appuyant sur la touche C13 ou A8. Sélectionnez « Bip » lorsque l’alarme doit uniquement biper. Si vous sélectionnez « Sonnerie: Mélodie », une mélodie de réveil prédéfinie retentit. Avec «... -
Page 79: Dépannage
11. Dépannage Vous n’arrivez pas à connecter votre radio Internet au réseau Wi-Fi : • Testez si vous arrivez à vous connecter à Internet via le réseau Wi-Fi à partir d’un autre périphérique, par ex. un ordinateur ou une tablette. •... -
Page 80: Maintenance Et Nettoyage
Lorsque la radio Internet enregistre constamment la station sélectionnée dans la mémoire tampon et que le centre multimédia s’en trouve constamment interrompu : • La station de radio Internet emploie une connexion à haut débit. Lorsque votre connexion Internet est trop lente ou surchargée par une autre application, il est possible que le centre multimédia soit tempo- rairement interrompu. -
Page 81: Élimination
13. Élimination a) Produit Les appareils électroniques sont des matériaux recyclables et il est interdit de les jeter avec les ordures ménagères ! À la fin de sa durée de vie, éliminez le produit conformément aux dispositions légales en vigueur. Le cas échéant, retirez d’abord les piles insérées et éliminez-les séparément. -
Page 82: Caractéristiques Techniques
15. Caractéristiques techniques Tension de service ........100 - 240 V/CA, 50 - 60 Hz Puissance absorbée ........Max. 20 W Puissance de sortie audio ......Max. 10 W Haut-parleur..........10 cm Raccords ............Casque d’écoute 3,5 mm, Line in 3,5 mm, Line out 3,5 mm Écran ..............2,8 pouces, 240 x 320 pixels Wi-Fi ...............IEEE802.11b/g, max. - Page 83 Inhoudsopgave Pagina Inleiding ................................84 Verklaring van symbolen ...........................84 Voorgeschreven gebruik ...........................85 Leveringsomvang ..............................85 Veiligheidsvoorschriften ............................85 Batterij- en accuvoorschriften .........................87 Productoverzicht ..............................88 a) Internetradio ..............................88 b) Afstandsbediening ............................90 c) Menu-overzicht .............................93 Ingebruikname..............................98 a) Aansluiting ..............................98 b) Plaatsen of vervangen van de batterijen van de afstandsbediening ..........98 Eerste instelling ..............................99 10.
-
Page 84: Inleiding
1. Inleiding Geachte klant, Hartelijk dank voor de aanschaf van dit product. Dit product voldoet aan de wettelijke nationale en Europese voorschriften. Volg de instructies van de gebruiksaanwijzing op om deze status van het apparaat te handhaven en een ongevaarlijke werking te garanderen! Deze gebruiksaanwijzing hoort bij dit product. -
Page 85: Voorgeschreven Gebruik
3. Voorgeschreven gebruik Het product wordt gebruikt voor het afspelen van radiozenders, die via het internet ontvangen worden. Bovendien kan het product muziek via het netwerk afspelen (UPNP/DLNA). Het geeft ook de tijd weer en er is een wekker geïntegreerd. De verbinding met het internet en uw netwerk gebeurt via WLAN. - Page 86 • Er dient een stopcontact voor het netsnoer in de buurt van het apparaat en gemakkelijk be- reikbaar te zijn. Zo kan het apparaat in geval van defect snel en makkelijk van de netvoeding worden ontkoppeld. • Raak de stekker nooit met vochtige of natte handen aan. Er bestaat het gevaar voor een le- vensgevaarlijke elektrische schok! •...
-
Page 87: Batterij- En Accuvoorschriften
6. Batterij- en accuvoorschriften • Houd batterijen/accu´s buiten het bereik van kinderen. • U mag batterijen/accu´s niet zomaar laten rondslingeren wegens het gevaar dat kinderen of huisdieren ze inslikken. Raadpleeg bij inslikken onmiddellijk een arts. Dit is levensgevaarlijk! • Lekkende of beschadigde batterijen/accu´s kunnen bij contact met de huid verwondingen veroorzaken. Draag in zo´n geval steeds beschermende handschoenen. -
Page 88: Productoverzicht
7. Productoverzicht a) Internetradio Luidspreker Aan-/uittoets Scherm Zendertoetsen 1 tot 5: om rechtstreeks de eerste 5 opgeslagen zenders in de favorieten te kiezen Toetsen „FAV” om de favorieten te openen Tast „MENU” om het hoofdmenu te openen Toets om in het menu naar links te navigeren of een niveau terug te keren Draaiknop/Toets om in het menu te selecteren;... - Page 89 Netschakelaar aan/uit Ingangsbus voor spanningsverzorging 100 - 240 V/AC, 50 - 60 Hz AUX-ingang, 3,5 mm cinch Line-uitgang, 3,5 mm cinch Koptelefoonaansluiting, 3,5 mm cinch Bass Reflex leiding...
-
Page 90: Afstandsbediening
b) Afstandsbediening... - Page 91 om het apparaat in of uit te schakelen; komt overeen met toets A2 op het apparaat opent het instelmenu voor de wekker Alarm Sleep sleep-timer; om de inslaaptimer te activeren en in te stellen mute; om het geluid uit of in te schakelen Mute start WPS opent het hoofdmenu;...
- Page 92 D0 – D9 om de opgeslagen zender op de stationstoetsen te selecteren; invoeren van cijfers en letters voor de WLAN-sleutel Volgorde van de tekens van de afzonderlijke toetsen 0-9 (D0-D9) Toets „0” 0 DEL Toets „1” 1 @ spatie ! ” # $ % & ‘ ( ) * + , - . / : ; < = > ? [ \ ] ^ _ ` { | } ~ Toets „2”...
-
Page 93: Menu-Overzicht
c) Menu-overzicht Hieronder vindt u een overzicht van alle punten, die u in het menu kunt selecteren. Bovendien is beschreven wat u bij welk menupunt kunt instellen, resp. wat voor een functie na het overeen- komstig punt staat. De actieve instelling herkent u aan het vooraf gestelde punt. Let op dat afzonderlijke configuratiepunten of hun vertaling door software-updates kunnen ver- anderen. - Page 94 „Informatiecentrum” „Weerinformatie” Hier kunt u allerhande weersinformatie van bepaalde steden weergeven. De keuze gebeurt vol- gens continenten, land en stad. De gegevens worden nu van het internet opgeroepen. „Financiële informatie” Hier worden allerhande beursgegevens, zoals vb. de „DOW JONES” of de „DAX” weergegeven. De gegevens worden nu van het internet opgeroepen.
- Page 95 „Configuratie” „Datum en tijd” „Datum en Tijd Instellen” Hier kunt u de datum en tijd handmatig instellen. Let op dat dit normaal gezien ook automatisch gebeurt van zodra de internetradio een verbinding met het internet heeft gemaakt. Om de instelling te wijzigen, gebruikt u ofwel toetsen 0 tot 9 (D0 – D9) of de vier pijltoetsen (C9 –...
- Page 96 „Configuratie” „Dimmer” „Energiebesparing” Wanneer u dit punt opent, de gewenste helderheid instelt en met „Enter” op de af- standsbediening bevestigt, gaat het scherm over in de door u ingestelde helderheid van zodra de radio naar de energiespaarmodus overgaat. „Inschakelen” Hier stelt u de helderheid van het scherm voor normaal gebruik in. Opdat de in- stelling wordt overgenomen, moet u na de keuze van de helderheid met toets C13 bevestigen.
- Page 97 „Configuratie” „Instelling Lokale radio” Hier kunt u de automatische keuze voor het menupunt „Lokale radio” handmatig aanpassen.. Kies eerst „Handmatinge instelling” en dan uw gewenste land. Om de instellingen over te nemen bevestigt u „Opslaan als lokale radio” met toets C13/A8. „Afspelen instellen”...
-
Page 98: Ingebruikname
8. Ingebruikname a) Aansluiting Elektrische aansluiting: • Om het apparaat in bedrijf te nemen, steekt u eerst de meegeleverde netkabel in de spanningsverzor- gingsbus B2 aan de achterzijde van de radio. • Vervolgens steekt u de netstekker van de kabel in een contactdoos. •... -
Page 99: Eerste Instelling
Wanneer u het apparaat voor het eerst inschakelt of het volledig van het stroomnet hebt ontkop- peld, verschijnt nadat u het met de verzorgingsspanning hebt verbonden „Renkforce” op het scherm. Het opstarten duurt enkele seconden. De status wordt aan de hand van de laadbalk weergegeven. -
Page 100: Bediening En Configuratie
10. Bediening en configuratie a) Principiële bediening Hieronder beschrijven wij de principiële bediening van de internetradio. • Met toets C1 op de afstandsbediening of met toets A2 op het apparaat kunt u de internetradio in- of uitschakelen. Wanneer u hem met deze toets uitschakelt, gaat hij in de stand-bymodus over en geeft de tijd en het weer weer als u de functie geactiveerd hebt. -
Page 101: Internetradio
b) Internetradio Naar internetradio omschakelen: • Om naar de internetradio om te schakelen scrollt u in het hoofdmenu met een van beide pijltoetsen C11/12 of A7/9 naar links of rechts tot in het midden van het scherm „Internet Radio” wordt weergege- ven. - Page 102 • De andere mogelijkheid om een zender op te slaan werkt alleen in het menu, waar de afzonderlijke zen- ders worden weergegeven. Wanneer u een zender aan het afspelen bent, keert u gewoon met toets C11/ A7 een stap terug. Kies vervolgens met pijltoetsen C9 en C10 of met draaiknop A8 de gewenste zender en druk niet op toets, C13/A8, maar op de rechter pijltoets C12 of toets A9 op het apparaat.
-
Page 103: Upnp
c) „UPnP” Het apparaat ondersteunt „UPnP” („Universal Plug and Play”). Zo hebt u de mogelijkheid om muziek van uw netwerk te streamen. Voorwaarde is echter dat er een compatibel apparaat in het netwerk aanwezig is dat als server fungeert. Dit kan vb. een harde netwerkschijf met UPnP-server zijn of een traditionele pc met vb. -
Page 104: Dlna-Weergave
Bovendien moet u dit evt. in uw firewall vrijgeven. U start het afspelen door met de rechter muisknop in de mediaspeler op het muziekstuk te klikken en „Play To” te selecteren. De internetradio heeft de DLNA-naam „Renkforce IR1”. Dit moet u dan nog aanklikken. -
Page 105: My Mediau
• Navigeer naar het punt „Geluid: Melodie” en open het. Hier stelt u de wektoon in. Bevestig uw keuze met toets C13 of A8. Kies „Pieptoon” wanneer de wekker alleen moet piepen. Wanneer u „Melodie” kiest, wordt een vast opgeslagen wekmelodie afgespeeld. Bij „Internet-radio”... -
Page 106: Verhelpen Van Storingen
11. Verhelpen van storingen U hebt problemen om de internetradio aan uw WLAN aan te melden: • Controleer of een ander apparaat, zoals vb. een computer of tablet via WLAN op het internet toegang kan krijgen. • Controleer of de DHCP-server in uw router loopt, resp. of u het statisch IP-adres met alle instellingen (subnetmasker, standaard gateway) in de internetradio correct hebt geconfigureerd. -
Page 107: Onderhoud En Reiniging
Wanneer de internetradio de geselecteerde zender altijd opnieuw in het tussengeheugen moet opslaan en het afspelen daardoor hapert: • De internetradio wordt via een breedbandverbinding overgedragen. Wanneer de bandbreedte van uw internetaansluiting te laag is of door een andere toepassing wordt belast, kan het tot haperingen komen. Controleer uw internetverbinding en test alles met een andere zender. -
Page 108: Afvoer
13. Afvoer a) Product Elektronische apparaten zijn waardevolle stoffen en behoren niet bij het huisvuil! Als het product niet meer werkt, moet u het volgens de geldende wettelijke bepalingen voor afvalverwerking inleveren. Verwijder evt. geplaatste batterijen en gooi deze afzonderlijk van het product weg. b) Batterijen en accu´s U bent als eindverbruiker volgens de KCA-voorschriften wettelijk verplicht alle lege batterijen en accu’s in te leveren;... -
Page 109: Technische Gegevens
15. Technische gegevens Bedrijfsspanning ..........100 - 240 V/AC 50 - 60 Hz Opgenomen vermogen max......20 W Audio uitgangsvermogen......max. 10 W Luidspreker ...........10 cm Aansluitingen ..........3,5 mm koptelefoon, 3,5 mm line in, 3,5 mm line out Scherm............2,8” inch, 240 x 320 pixels WLAN .............IEEE802.11b/g;... -
Page 112: F Information Légales
D Impressum Dies ist eine Publikation der Conrad Electronic SE, Klaus-Conrad-Str. 1, D-92240 Hirschau (www.conrad.com). Alle Rechte einschließlich Übersetzung vorbehalten. Reproduktionen jeder Art, z. B. Fotokopie, Mikroverfilmung, oder die Erfassung in elektronischen Datenverarbeitungsanlagen, bedürfen der schriftlichen Genehmigung des Herausgebers. Nachdruck, auch auszugsweise, verboten. Die Publikation entspricht dem technischen Stand bei Drucklegung.