Johnson 40-6715 Manuel D'instructions
Liens rapides
8695H_Manuals 12/5/14 1:50 PM Page 1
Two-Sided Laser Detector with Clamp
Model No. 40-6715 & 40-6763
Instruction Manual
This laser detector is an indispensable accessory when using a rotary laser. The main
function of the detector is to detect the position of the laser signals that are transmit-
ted by rotary lasers. This detection quickly and precisely provides
the user with the horizontal and vertical references.
This product features high sensitivity, a double-faced display, low power consumption, good
reliability and easy operation. It can be used with most types of rotating lasers.
1. Technical Specifications
Detecting accuracy:
Fine: ±0.039" (±1mm)
Coarse 1: ±0.098" (±2.5mm)
Coarse 2: ±0.394" (±10mm)
Automatic Shut-off:
6 minutes ±1 minute
Power Supply:
9V battery, 30 hrs continuous use (with LCD illumination off)
Sound indicator:
slow short beep, rapid short beep and continuous sound
LED display:
down arrow, up arrow, horizontal on grade bar
Dimensions:
6.30" x 3.35" x 1.10" (160 x 85 x 28mm)
Weight:
1 lb. (0.45kg)
Others:
Rain and dust resistant
©2015 Johnson Level & Tool - Rev. 2
Detector láser bilateral con abrazadera
Modelo No. 40-6715 & 40-6763
Manual de instrucciones
El detector láser es un accesorio indispensable cuando se utiliza un nivel láser rotati-
vo. La principal función del detector es detectar la posición de las señales de láser
transmitidas por los láseres giratorios. Dicha detección le brinda al usuario una refer-
encia horizontal y vertical rápida y precisa.
Este producto es un equipo de alta sensibilidad, posee pantalla doble, ofrece un bajo
consumo de energía, y es altamente confiable y fácil de usar. Puede ser utilizado con
la mayoría de niveles láser rotativos.
1. Especificaciones técnicas
Exactitud de detección:
Fina: ±0.039" (±1mm)
Basto 1: ±0.098" (±2,5mm)
Basto 2: ±0.394" (±10mm)
Apagado automático:
6 minutos ± 1 minuto
Fuente de alimentación:
batería de 9 V, 30 horas de uso continuo
(con la iluminación de la pantalla apagada)
Indicador sonoro:
pitido corto y lento, pitido corto y rápido y sonido continuo
Pantalla de cristal líquido:
flecha hacia abajo, flecha hacia arriba, barra a nivel horizontal
Dimensiones:
6.30" x 3.35" x 1.10" (160 x 85 x 28mm)
Peso:
1 libra (0,45 kg)
Otros:
Impermeable y resistente al polvo
©2015 Johnson Level & Tool - Rev. 2
Détecteur laser à deux faces et pince
Modèle no 40-6715 & 40-6763
Manuel d'instructions
Le détecteur laser est un accessoire indispensable lors de l'utilisation d'un niveau
laser rotatif. La principale fonction du détecteur est de localiser la position des sig-
naux laser transmis par les lasers rotatifs, de façon à fournir rapidement et avec pré-
cision des repères horizontaux et verticaux à l'utilisateur.
Ce produit comporte une sensibilité élevée, un écran à deux faces, une faible consom-
mation d'énergie, une excellente fiabilité et une utilisation facile. Il peut être utilisé
avec la plupart des types de niveaux laser rotatifs.
1. Fiche technique
Précision de détection:
micrométrique : ±1mm (±0,039po)
macrométrique 1: ± 2,5mm (±0,098po)
macrométrique 2: ±10mm (±0,394po)
Arrêt automatique:
6 minutes ± 1 minute
Alimentation électrique:
pile de 9 V, 30 heures en utilisation continue (éclairage à CL éteint)
Signal sonore:
bip lent et court, bip rapide et court et son continu
Affichage à DEL:
flèche pointée vers le bas, flèche pointée vers le haut, barre
horizontale de niveau
Dimensions:
160mm x 85mm x 28mm (6,3po x 3,35po x 1,1po)
Poids:
0,45 kg (1 lb)
Autres:
à l'épreuve de la pluie et de la poussière
©2015 Johnson Level & Tool - Rev. 2
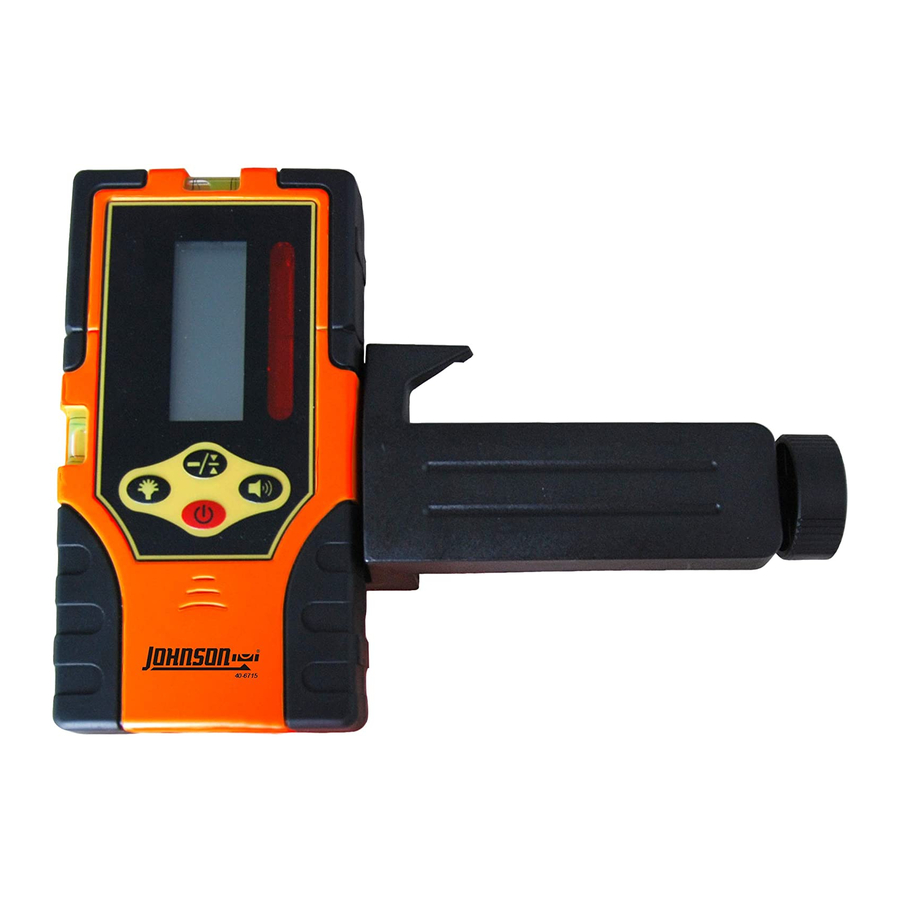
2. Components
(a) Exterior Instruction
1) Horizontal vial
2) Front display window
3) Front on grade mark
4) Vertical vial
5) LED key
6) Power key
7) Beeper
8) Reception window
9) Fine/Coarse accuracy key
10) Beeper key
11) Back display window
12) Back on grade mark
13) Bracket screw thread
(b) Display
14) Battery cover screw
15) Battery cover
1. Power on symbol
2. Low battery indicator
3. Fine/Coarse symbol
4. Beeper symbol
5. Position indication arrows
Power Key: Turn on/off the power
Fine/Coarse Accuracy Key: Switch detecting accuracy
LED Key: Turn on/off the LCD's light
Volume Key: Cycles between high, low and off
2. Componentes
(a) Vista exterior
1) Ampolla horizontal
2) Ventana de la pantalla delantera
3) Marca de nivel frontal
4) Ampolla vertical
5) Botón para LED
6) Botón de encendido
7) Alerta sonora
8) Ventana de recepción
9) Botón para exactitud fina y basta
10) Botón para alarma sonora
11) Ventana de la pantalla posterior
12) Marca de nivel posterior
13) Rosca para el tornillo del soporte
(b) Pantalla
14) Tornillo de la cubierta de la batería
15) Cubierta de la batería
1. Símbolo de encendido
2. Indicador de batería baja
3. Símbolo de exactitud fina y basta
4. Símbolo de la alarma sonora
5. Flechas indicadoras de posición
Botón de encendido: Para encender o apagar el láser
Botón para exactitud fina y basta: Para cambiar la exactitud de detección
Botón para LED: Para encender y apagar la luz de la pantalla
Botón del volumen: Para cambiar entre alto, bajo y apagado
2. Composants
(a) Réglage de l'instrument en mode de fonctionnement extérieur
1) Fiole horizontale
2) Fenêtre d'affichage frontale
3) Marque de niveau frontale
4) Fiole verticale
5) Touche DEL
6) Touche d'arrêt/de mise en marche
7) Signal sonore
8) Fenêtre de réception
9) Touche de précision
micrométrique/macrométrique
10) Touche de signal sonore
11) Fenêtre d'affichage arrière
12) Marque de niveau arrière
13) Filetage de vis de support
14) Vis du couvercle du compartiment de
la pile
(b) Affichage
15) Couvercle du compartiment de la pile
1. Voyant de mise en marche
2. Voyant de pile faible
3. Voyant micrométrique/macrométrique
4. Voyant du signal sonore
5. Flèches d'indication de position
Touche d'arrêt/de mise en marche: Utilisez cette touche pour mettre
l'appareil en marche et l'éteindre.
Touche de précision micrométrique/macrométrique: Utilisez cette
touche pour changer la précision de détection.
Touche DEL: Utilisez cette touche pour allumer la lumière et l'éteindre.
Touche de volume: Utilisez cette touche pour régler la puissance du volume.
3. Operation Guide
!
(a) Battery Installation
• Open the battery cover door by
turning the battery cover screw
counter-clockwise. Put the battery
into the battery case noting the
polarity shown in the battery compartment.
• Put the battery cover door back, and tighten the screw.
Note: 1) Remove the battery when the unit is being stored for
a long time.
2) When the low battery indicator is displayed, change
the battery soon.
4. Operating Instructions
Power On
Press the power key to turn the unit on. The LCD display will
illuminate all the indicator segments for 0.5 second (Fig.2).
When the indicator segments are no longer illuminated, the
detector is ready for use. Note: The LCD display will still have
the power, detection and sound indicators illuminated (Fig. 3).
Fine/Coarse accuracy key
Power on and press the fine/coarse
accuracy key, the unit will cycle between
three accuracy options: fine, coarse 1,
coarse 2. The accuracy symbol displayed
on the LCD will change.
Volume Key
3. Guía de Operación
(a) Instalación de la batería
• Gire el tornillo de la cubierta del compartimiento de la
batería en dirección contraria a las manecillas del reloj
para abrir el compartimiento. Coloque la batería en el
compartimiento de la batería de acuerdo con la polari-
dad que se muestra en el compartimiento de la batería.
• Vuelva a colocar la cubierta del compartimiento de la batería y ajuste el tornillo.
Aviso: 1) Retire la batería cuando guarda el instrumento por un período largo.
2) Cuando aparezca el símbolo de batería baja, cambie pronto la batería.
4. Instrucciones de operación
Encendido
Presione el botón de encendido para encender el instrumento. La
pantalla de cristal líquido iluminará todos los segmentos del indi-
cador por 0,5 segundos (fig. 2). Cuando los segmentos del indi-
cador ya no estén iluminados, el detector estára listo para usarse.
Aviso: La pantalla de cristal líquido conservará iluminados
los indicadores de encendido, detección y sonido (fig. 3).
Botón para exactitud fina y basta
Encienda y presione el botón de exactitud
fina y basta para que el instrumento cam-
bie a una de las tres opciones de exactitud:
fina, basta 1 y basta 2. El símbolo de exac-
Fina
titud mostrado en la pantalla cambiará.
3. Guide d'utilisation
(a) Installation de la pile
• Ouvrez le compartiment de la pile en tournant la vis du
couvercle dans le sens antihoraire. Insérez la pile dans
le compartiment en respectant la polarité indiquée.
• Refermez le compartiment de la pile et serrez la vis.
Remarque: 1) Retirez la pile si vous rangez l'appareil pour une période prolongée.
2) Lorsque le voyant de pile faible s'affiche, remplacez rapidement la pile.
4. Mode d'emploi
Mise sous tension
Allumez l'outil en appuyant sur la touche d'arrêt/de mise en
marche. Tous les voyants s'allumeront à l'écran pendant une
demi-seconde (fig. 2). Lorsque les voyants s'éteignent, le
détecteur est prêt à être utilisé.
Remarque: Les voyants pour l'alimentation, la détection et
le son demeureront allumés (fig.3).
Touche de précision micrométrique/macrométrique
Mettez l'appareil en marche et appuyez sur la touche de précision
micrométrique/macrométrique pour
sélectionner l'une des trois options:
micrométrique, macrométrique 1 et
macrométrique 2. Le voyant de la préci-
sion affiché sur l'écran à CL changera
Micrométrique
selon l'option choisie.
Figure 2
Figure 3
Figura 1
Figura 2
Figura 3
Basta 1
Basta 2
Figure 1
Figure 2
Figure 3
Macrométrique 1
Macrométrique 2

Manuels Connexes pour Johnson 40-6715


Sommaire des Matières pour Johnson 40-6715
- Page 1 Rain and dust resistant coarse 2. The accuracy symbol displayed Volume Key: Cycles between high, low and off on the LCD will change. ©2015 Johnson Level & Tool - Rev. 2 Volume Key 2. Componentes 3. Guía de Operación (a) Vista exterior (a) Instalación de la batería...
- Page 2 8695H_Manuals 12/5/14 1:50 PM Page 2 Laser signal Laser signal Laser signal Laser signal Power on and press the volume key, the Rod Clamp unit will cycle between a high sound, Connecting to the rod clamp. low sound and mute. The sound symbol displayed on the LCD will change accordingly.