Vogel's THIN RC 355 Consignes D'installation
For instruction video,
scan QR-code.
THIN RC 355
EN
Mounting in ru ions
DE
Montageanleitung
FR
Consignes d'in allation
NL
Montagevoorschri
ES
In rucciones de montage
IT
I ruzioni di montaggio
PT
Manual de montagem
EL
SV
Montageföreskri er
PL
In rukcEa monta u
RU
CS
Návod k montá i
SK
Návod na montá
HU Szerelési el írás
TR
Montaj kılavuzu
RO In ruc iuni de montaj
UK
BG
JA
設置の説明書
ZH
www.vogels.com
for more information

Manuels Connexes pour Vogel's THIN RC 355


Sommaire des Matières pour Vogel's THIN RC 355
- Page 1 For instruction video, scan QR-code. THIN RC 355 Mounting in ru ions Montaj kılavuzu Montageanleitung Montageföreskri er RO In ruc iuni de montaj Consignes d’in allation In rukcEa monta u Montagevoorschri In rucciones de montage Návod k montá i 設置の説明書...
-
Page 2: Important
Prima di montare il si ema di fi aggio a parete, leggere le avvertenze sul retro dell’e- Mark: Vogel’s Produ s BV lenco dei pezzi forniti (scheda separata). Type: THIN RC 355 - Importante Antes de montar o suporte de parede, primeiro leia as advertências na parte de trás da Serial no: all produ ion numbers of these types to which this declaration refers. - Page 3 Screw the strips (A) onto the TV. Position the strips as close as possible to the middle of the screen. DE - Schrauben Sie die Lei en (A) auf das Fernsehgerät. HU - Csavarozza a tartólemezeket (A) a TV-készülékre. Positionieren Sie die Lei en so nah an der Mi e des Bildschirms wie möglich. Helyezze a tartólemezeket a lehet legközelebb a képerny közepéhez.
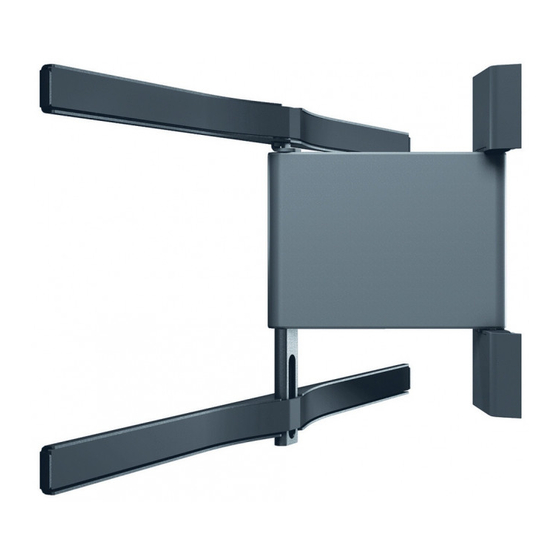
- Page 4 Depending on the screen size: mount the support bar (C or D) onto the wall mount (B). If necessary use connector U to connect the support bars (C and D). DE - Je nach Bildschirmgröße: Befe igen Sie die Halte ange (C oder D) am Wandhalter (B). - Pod a ve ko i obrazovky: podpornú...
- Page 5 ø 5mm 20mm/0.8 " ø 13/64 " 80mm/3.2 " ø 10mm 20mm/0.8 " ø 25/64 " Drill the holes. Use the template to define the position of the holes. DE - Bohren Sie die Löcher. HU - Fúrja ki a lyukakat. Verwenden Sie die Schablone, um die Position der Löcher fe zulegen.
- Page 6 80mm/3.2 " ø 5mm ø 13/64 " Drill the holes. Use the template to define the position of the holes. DE - Bohren Sie die Löcher. HU - Fúrja ki a lyukakat. Verwenden Sie die Schablone, um die Position der Löcher fe zulegen. A sablon segítségével határozza meg a furatok helyét.
- Page 7 Screw the wall mount (B) onto the wall. DE - Schrauben Sie den Wandhalter (B) an die Wand. - Vi ez le support mural (B) sur le mur. NL - Schroef de wand eun (B) op de muur. - Atornille el soporte de pared (B) a la pared. - Avvitare la pia ra (B) alla parete.
- Page 8 5.1 Swivel the wall mount (B) away from the wall at an angle of 90°. 5.2 / 5.3 Hook the TV onto the wall mount (B) and tighten the bolts (S). Swivel the bracket a quarter turn counterclockwise. DE - Schwenken Sie den Wandhalter (B) in einem Winkel von 90° von der Wand weg. Schwenken Sie die Halterung eine Vierteldrehung entgegen DE - Haken Sie das Fernsehgerät am Wandhalter (B) ein und ziehen Sie die Schrauben (S) fe .
- Page 9 Connect the IR receiver (J) and the power adapter (K). Position the IR receiver in view of the remote control. DE - Schließen Sie den IR-Empfänger (J) und den Netzadapter (K) an. HU - Csatlakozta a az infravörös vev t (J) és a tápegységet (K). Positionieren Sie den IR-Empfänger so, da er Sichtkontakt zur Fernbedienung hat.
- Page 10 Place the covers (E) and hide the cables. DE - Bringen Sie die Abdeckungen (E) an und verbergen Sie die Kabel. - Me ez les carénages (E) en place et masquez les câbles NL - Plaats de afdekkappen (E) en verberg de kabels. - Coloque las cubiertas (E) y oculte los cables.
- Page 11 Place the covers (F) onto the strips (A). DE - Bringen Sie die Abdeckungen (F) an den Lei en (A) an. - Me ez les carénages (F) en place sur les barre es (A). NL - Plaats de afdekkappen (F) op de rips (A). - Coloque las cubiertas (F) en las tiras (A).
- Page 12 • In case of any obstacles, pull out the springs. Insert the power adapter (K) into a wall outlet/100-240V power supply. DE - Falls Hinderni e vorhanden sind, ziehen Sie die Federn heraus. DE - Schließen Sie den Netzadapter (K) an eine Netz eckdose/Stromversorgung mit 100 - 240 V an. - S’il a des ob acles, déployez les re orts.
- Page 13 2/6 3/4 BG - (¡) / (™). - Desloca o suporte de parede de volta à posição inicial. JA - (¡) (™) 左 / 右 の回転限度を設定する。 EN - Move wall mount away from wall (3) / towards wall (4). (¡) (™) ZH - SV - Fly ar tillbaka väggfä...
- Page 14 - U aw pozycj pod awow (Home). • Przytrzymaj jednocze nie przyciski 4 i 0, aby przesun uchwyt w kierunku ciany. • Przytrzymaj przycisk SetUp naci ni ty przez 5 sekund, a przycisk 0 zacznie miga . > Gdy przycisk 0 będzie podświetlony, oznacza to, że pozycja podsta- wowa została ustawiona.
- Page 15 Max. Max. limit limit Set the swivel limit (left/right). • Press 1 (left) or 2 (right). Swivel the wall support to the left/right, just before the wall. • Press ¡ or ™ for 5 seconds. > Left/right swivel position is now set. DE - Stellen Sie die Schwenkgrenze (links/rechts) ein.
- Page 16 Move the wall mount away from the wall. Move the wall mount towards the wall. Move the wall mount to the Home position. • Press 3 and 0 simultaneously. • Press Home. • Keep 4 and 0 pressed simultaneously. DE - Bewegen Sie den Wandhalter von der Wand weg. DE - Bewegen Sie den Wandhalter in die Grundposition.
- Page 17 Swivel the wall mount to the left/right. Store a preferred position. Move the wall mount to a preferred position. • Press 1 (left) or 2 (right). • At the preferred position, press Mem1 or Mem2 for 5 sconds. • Press Mem1 or Mem2. DE - Schwenken Sie den Wandhalter nach links/rechts.
- Page 18 EN Guarantee terms and conditions FR Modalités et conditions de la garantie ES Términos y condiciones de garantía Congratulations on the purchase of this Vogel’s produ ! The produ you now Félicitations pour l’achat de ce produit Vogel’s ! Vous venez d’acquérir un Términos y condiciones de garantía have in your po e ion is made of durable materials and is based on a design, produit réalisé...
- Page 19 PT Termos e condições de garantia SV Garantivillkor RU Сроки и условия гарантии Felicitamo-lo pela aquisição de e produto da Vogel’s! Tem agora na sua po e Gra is till din Vogel’s produkt! Ni har ska at en produkt som är tillverkad av Vogel’s! um produto concebido a partir de materiais de elevada durabilidade e cuja hållfa a material och med en i detalj genomtänkt design.
- Page 20 SK Záručné podmienky TR Garanti şart ve koşullari UK Терміни та умови гарантії Gratulujeme vám ku kúpe v robku spolo no i Vogel’s! Stali e sa teraz Bu Vogel’s ürününü aldı ınız için sizi tebrik ediyoruz! ve detayına kadar iyi Vogel’s! vla níkmi v robku, ktor je vyroben z trvanliv ch materiálov a na základe dü...
- Page 21 JA 保証の諸条件 この度は、 Vogelʼs 製品をお買い上げいただき誠にありがと うございました。 今貴方 の 物となったこの製品は、 耐久性に優れた素材で出来ており、 デザインをはじめ、 細部 に至 るまできめ細かに考えぬかれたものです。 そのため Vogelʼs では素材と製造時に おける 生涯保証をお約束しています。 モータ付きモジュール、 電子盤、 リモートコント ロールに 関しては、 保証は 2 年間に限定さ れておりますのでご了承ください。 (バッテリーは保証の 対 象に含まれていません) 1 Vogel’s 社の保証では、 製品の保証期間内に製造上の 欠陥、 または材質による瑕 疵 が認められた場合、 当社の 判断に基づいて、 交換または必要に応じて無料で製品 の 交換をさせていただきます。...
- Page 22 EN WEEE disposal instructions SV WEEE-instruktioner för avyttring RO Instrucţiuni WEEE privind trecerea la deşeuri Do not dispose of this device, the remote control or its ba ery with unsorted Ka a inte den här enheten, ärrkontrollen eller tillhörande ba erier i soporna. Nu arunca i ace dispozitiv, telecomanda sau bateria sa împreun cu household wa e.
- Page 23 www.vogels.com Vogel’s Holding BV 201 1 © All rights reserved...