Vogel's PPC 1500 Consignes D'installation
Masquer les pouces
Voir aussi pour PPC 1500:
- Instructions de montage (18 pages) ,
- Consignes d'installation (2 pages)
Liens rapides
For instruction video,
scan QR-code.
PPC 1500
EN
Mounting instructions
DE
Montageanleitung
FR
Consignes d'installation
NL
Montagevoorschrift
ES
Instrucciones de montage
IT
Istruzioni di montaggio
PT
Manual de montagem
Οδηγίες συναρμογής
EL
SV
Montageföreskrifter
PL
InstrukcEa montażu
Инструкция по сборке и установке
RU
Návod k montáži
CS
Návod na montáž
SK
Szerelési előírás
HU
TR
Montaj k ılavuzu
RO Instrucțiuni de montaj
Вказівки по монтажі
UK
Инструкции за монтаж
BG
設置の説明書
JA
ZH
www.vogels.com
for more information

Manuels Connexes pour Vogel's PPC 1500


Sommaire des Matières pour Vogel's PPC 1500
- Page 1 For instruction video, scan QR-code. PPC 1500 Οδηγίες συναρμογής Mounting instructions Montaj k ılavuzu RO Instrucțiuni de montaj Montageanleitung Montageföreskrifter Вказівки по монтажі Consignes d’installation InstrukcEa montażu Инструкции за монтаж Инструкция по сборке и установке Montagevoorschrift 設置の説明書 Návod k montáži Instrucciones de montage Návod na montáž...
-
Page 2: Important
Important Before mounting the projector mount, first read the guarantee and warning sheet. (seperate sheet) - Lesen Sie vor Montage des Projektorhalters zuerst die Garantie und die Warnhinweise durch. (getrenntes Blatt) - Veuillez lire le document de garantie et d’avertissement avant de monter le support de projecteur. - Page 3 ø 10mm 80mm/3.15” ø 0.39 ” Drill the holes and mount the ceiling tube to the ceiling. DE - Bohren Sie die Löcher und befestigen Sie das Deckenrohr an der Decke. - Percez les trous et montez le tube de plafond au plafond. NL - Boor de gaten en monteer de plafondbuis aan het plafond.
- Page 4 80mm/3.15” ø 5mm ø 0.197 ” 1a Drill the holes and mount the ceiling tube to the ceiling. DE - Bohren Sie die Löcher und befestigen Sie das Deckenrohr an der Decke. - Percez les trous et montez le tube de plafond au plafond. NL - Boor de gaten en monteer de plafondbuis aan het plafond.
- Page 5 1-2-3 PROJECTOR PROJECTOR PROJECTOR PROJECTOR PROJECTOR PROJECTOR PROJECTOR PROJECTOR 1-2-3 PROJECTOR PROJECTOR PROJECTOR PROJECTOR PROJECTOR PROJECTOR PROJECTOR PROJECTOR Optional Mount the arms to the projector. DE - Befestigen Sie die Arme am Projektor. - Montez les bras du projecteur. NL - Monteer de armen aan de projector. - Enganche los brazos al proyector.
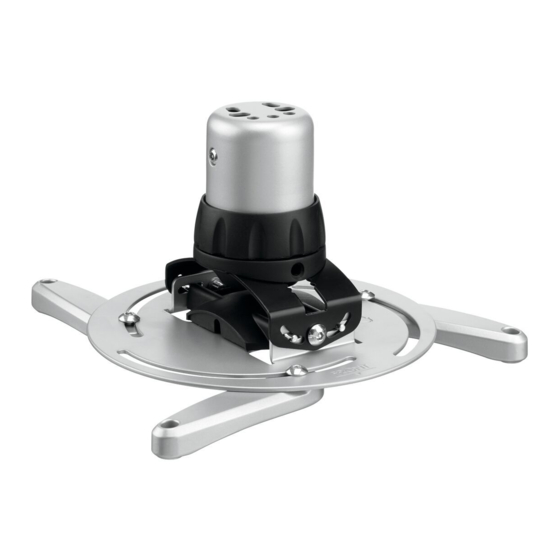
- Page 6 CENTRE OF GRAVITY Mount the projector to the interface. DE - Befestigen Sie den Projektor am Adapter. - Montez le projecteur sur l’interface. NL - Monteer de projector aan de interface. - Enganche el proyector a la interfaz. - Montare il proiettore sull’interfaccia. - Monte o projector na interface.
- Page 7 LOCK Mount the projector to the ceiling tube and lock it (!) in place. DE - Befestigen Sie den Projektor am Deckenrohr und lassen Sie ihn einrasten. FR - Montez le projecteur sur le tube de plafond et verrouillez-le (!) en position. NL - Monteer de projector aan de plafondbuis en vergrendel deze (!) op zijn plek.
- Page 8 Turn the friction ring to eliminate all play and then rotate the projector in the correct position. DE - Drehen Sie den Reibring, um ein eventuell vorhandenes Spiel zu beseitigen, - Otočte trecí kotúč, aby nevznikali medzery a potom natočte projektor do správnej polohy. HU - Fordítsa el a szorítógyűrűt, hogy megszüntessen minden játékot, majd fordítsa a projektort a und drehen Sie dann den Projektor in die richtige Position.
- Page 9 15˚ 15˚ Use the supplied tool to adjust the tilt angle for the perfect image. DE - Verwenden Sie das mitgelieferte Werkzeug, um den Neigungswinkel für das RO - Cu unealta furnizată ajustați unghiul de înclinare pentru o imagine perfectă. perfekte Bild anzupassen.
- Page 10 15˚ 15˚ Use the supplied tool to adjust the roll angle for the perfect image. DE - Verwenden Sie das mitgelieferte Werkzeug, um den Rollwinkel für das perfekte HU - A mellékelt kulccsal fordítsa a projektort a megfelelő szögbe, hogy tökéletes képminőséget kapjon.
- Page 11 PUC 21xx PFA 90xx 8 Optional: For installation with PUC 21xx extension pole mount PL - Opcjonalnie: W celu instalacji z wysięgnikiem PUC 21xx zamontuj adapter sufitowy do wysięgnika. the ceiling tube to the pole. 8b. Optional: For installation with 8b.
- Page 12 ø 10mm ø 0,4 ” ø 5mm ø 0,2 ” 4x E1 4x E2 4x E3 (M6) www.vogels.com © Vogel’s Holding BV 2011 All rights reserved...