Télécharger Imprimer la page

Publicité

Les langues disponibles
  • FR

Les langues disponibles

Liens rapides

Belgium [Head office]
France
Netherlands
USA
Spain
0 ... 10VDC CONTROLLED DIMMER
+32(0)9 384 36 11
+33(0)3 20 15 86 15
+31(0)76 514 7563
+1(817)284-7785
+32(0)9 384 36 11
0 ... 10VDC CONTROLLED DIMMER
0 ... 10VDC GESTUURDE DIMMER
VARIATEUR À PILOTAGE 0 ... 10VCC
0 ... 10VDC GESTEUERTER DIMMER
DIMMER CON CONTROL 0 ... 10VDC
VM165
4
7
10
13
16

Publicité

loading

Sommaire des Matières pour Velleman VM165

  • Page 1 0 ... 10VDC CONTROLLED DIMMER VM165 0 ... 10VDC CONTROLLED DIMMER Belgium [Head office] +32(0)9 384 36 11 0 … 10VDC GESTUURDE DIMMER France +33(0)3 20 15 86 15 VARIATEUR À PILOTAGE 0 … 10VCC Netherlands +31(0)76 514 7563 0 … 10VDC GESTEUERTER DIMMER +1(817)284-7785 DIMMER CON CONTROL 0 …...
  • Page 2 VELLEMAN N.V. Legen Heirweg 33 9890 Gavere Belgium Europe www.velleman.be www.velleman-kit.com...
  • Page 3 Zorgt ervoor dat u met alle bedieningselementen vertrouwd raakt, wanneer U met het toestel zal werken. Velleman modules zijn niet geschikt voor gebruik in of als gedeelte van systemen welke levensfuncties in stand houden of systemen welke gevaarlijke situaties van gelijk welke aard kunnen veroorzaken.
  • Page 4 CONNECTION - AANSLUITING - RACCORDEMENT - ANSCHLUSS - CONEXIÓN max. 500W max. 250W Mind the correct connection of the power voltage. Let op een juiste doorverbinding van de voedingsspanning. Veillez à connecter correctement la tension d’alimentation. Beachten Sie, dass Sie die Netzspannung korrekt anschließen. Asegúrese de que conecte la tensión de alimentación de manera correcta.
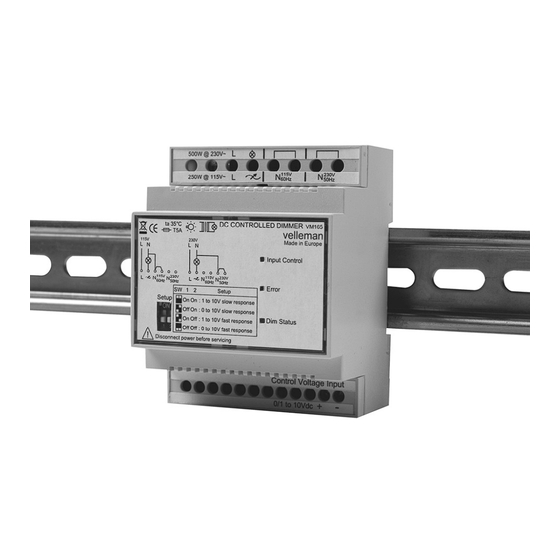
  • Page 5 1) Power supply - Live 2) Output - Live Make sure that the ventilation openings of the module 3) Power supply 115V- N are not obstructed so as to cool the internal parts. 4) Power supply 230V - N The temperature inside the module reach up to 80°C 5) LED indications at maximum capacity;...
  • Page 6 This product is guaranteed against defects in components and construction from the moment it is purchased and for a period of TWO YEAR starting from the date of sale. This guarantee is only valid if the unit is submitted together with the original purchase invoice. VELLEMAN components Ltd limits its responsibility to the reparation of defects or, as VELLEMAN components Ltd deems necessary, to the replacement or reparation of defective components.
  • Page 7 Mode MODE SETTING Disconnect power before setting the DIP switches; all parts carry dangerous voltages (mains) ! Remove the front panel and set the DIP switches to select the desired setting. Switch 1: When choosing 1...10V, input voltages lower than +/- 1V have no influence and the light bulb does not light. This setting allows you to choose the control voltage range, i.e.
  • Page 8 The dimmer module is defective if the connected lighting burns directly at maximum brightness when powering the dimmer module without control voltage. Contact your Velleman repair service. Shortly interrupt the power voltage supply to the module to switch to normal operation after an error indication.
  • Page 9 Dit produkt is gewaarborgd wat betreft gebreken in materialen en vakmanschap op het ogenblik van de aankoop en dit gedurende een periode van TWEE JAAR vanaf de aankoop. De waarborg geldt enkel indien het produkt voorgelegd wordt samen met het origineel aankoop bewijs. De verplichtingen van VELLEMAN COMPONENTS N.V. beperken zich tot het herstellen van defecten of, naar vrije keuze van VELLEMAN COMPONENTS N.V., tot het vervangen of herstellen van defecte onderdelen.
  • Page 10 Instellingen WERKING MODE SELECTIE Ontkoppel de voeding alvorens de DIP-schakelaars in te stellen: alle onderdelen staan onder gevaarlijke netspanning. Om de gewenste instelling te kiezen moet u het frontpaneel verwijderen en de DIP-schakelaar instellen. Schakelaar 1: Kiest U voor 1...10V, dan hebben ingangsspanningen kleiner dan +/- 1V geen invloed en de lamp blijft gedoofd.
  • Page 11 Gelieve dan de module aan te bieden bij de Velleman herstellingsdienst. Om na een foutmelding over te schakelen (of poging tot) naar de normale werkmode, dient u de voedingsspanning van de module kort te onderbreken.
  • Page 12 Ce produit est garanti contre les défauts des composantes et de fabrication au moment de l’achat, et ce pour une période de DEUX ANS à partir de la date d’achat. Cette garantie est uniquement valable si le produit est accompagné de la preuve d’achat originale. Les obligations de VELLEMAN COMPONENTS S.A. . se limitent à la réparation des défauts ou, sur seule décision de VELLEMAN COMPONENTS S.A.
  • Page 13 Selection d'operation SELECTION D'OPERATION Mettre le module hors tension avant de configurer les interrupteurs DIP : tous les composants internes sont mis sous tension dangereuse. Retirez le panneau frontal et réglez les interrupteurs DIP pour sélectionner le réglage souhaité. Interrupteur 1 : Si vous choisissez le réglage 1...10V, les tensions d’entrée inférieures à...
  • Page 14 Le module variateur est défectueux lorsque l’éclairage s’allume à pleine puissance lors de la mise sous tension du module sans tension de commande. Le cas échéant, contactez votre service de réparation Velleman. Interrompez brièvement la tension d’alimentation vers le module pour commuter vers le mode d’opération normal après une indication d’erreur.
  • Page 15 Produtk mit der Originalrechnung abgegeben wird. Die Verpflichtungen der VELLEMAN COMPONENTS AG beschränken sich auf die Aufhebung der Fehler, oder, nach freier Wahl der VELLEMAN COMPONENTS AG , auf den Austausch oder die Reparation der fehlerhaften Teile. Kosten und Risiken des Transports; das Entfernen und...
  • Page 16 Modus MODUS Trennen Sie das Gerät vom Netz, ehe Sie die DIP-Schalter einstellen: alle Teile stehen unter gefährlicher Netzspannung. Um die gewünschte Einstellung auszuwählen, entfernen Sie die Frontplatte und stellen Sie die DIP-Schalter ein. Schalter 1: Wählen Sie 1...10V, dann haben Eingangsspannungen kleiner als +/- 1V keinen Einfluss und bleibt die Lampe ausgeschaltet.
  • Page 17 Brennt die Beleuchtung sofort auf voller Stärke beim Einschalten des Dimmermoduls, ohne dass es Regelspannung gibt, so weist dies auf einen Defekt im Dimmermodul hin. Ist dies der Fall, dann senden Sie die Velleman-Reparaturabteilung bitte das Modul. Um nach einer Fehlermeldung auf den normalen Betriebsmodus umzuschalten, unterbrechen Sie die Stromversorgungsspannung des Moduls kurz blinkt langsam: Standby, Helligkeit ist 0%.
  • Page 18 Este producto está garantizado contra defectos de componentes y construcción a partir de su adquisición y durante un período de 2 AÑO a partir de la fecha de venta. Esta garantía sólo es válida si la unidad se entrega junto con la factura de compra original. VELLEMAN COMPONENTS Ltd. limita su responsabilidad a la reparación de los defectos o, si VELLEMAN COMPONENTS Ltd.
  • Page 19 Modo MODO Desconecte el aparato de la red eléctrica antes de ajustar los interruptores DIP: todos los componentes internos están bajo una tensión peligrosa. Saque el panel frontal y ajuste los interruptores DIP para seleccionar el ajuste deseado. Interruptor 1: Las tensiones de entrada inferiores a +/- 1V no tienen ninguna influencia y la bombilla no se ilumina si selecciona el ajuste 1...10V.
  • Page 20 El módulo está defectuoso si la iluminación se ilumina a intensidad completa al activarlo. Si es el caso, contacte con el departamento de reparaciones de Velleman. Interrumpa brevemente la tensión de alimentación hacia el módulo para conmutar al modo de funcionamiento normal después de una indica- ción de error.
  • Page 21 Important environmental information...
  • Page 24 Modifications and typographical errors reserved - © Velleman Components nv - HVM165G - 2010 - ED1 5 4 1 0 3 2 9 4 2 7 6 4 1...