Télécharger Imprimer la page

Publicité

Les langues disponibles
  • FR

Les langues disponibles

  • FRANÇAIS, page 9

Liens rapides

ELECTROLUX
FOUR A POSER
ESO930
MANUEL D'UTILISATION
PROLINE
REFRIGERATEUR
BRF40
Besoin d'aide ?
Rendez-vous sur votre communauté https://sav.darty.com

Publicité

loading

Sommaire des Matières pour Electrolux ESO930

  • Page 1 ELECTROLUX FOUR A POSER ESO930 MANUEL D'UTILISATION PROLINE REFRIGERATEUR BRF40 Besoin d'aide ? Rendez-vous sur votre communauté https://sav.darty.com...
  • Page 2 Instruction Book ESO930 Oven INSTRUCTION BOOK ...... MODE D'EMPLOI....... 7-14 GEBRUIKSAANWIJZING....15-22 LIBRO DE INSTRUCCIONES.... 23-30 MANUAL DE INSTRUÇÖES....31-37...
  • Page 3 PLEASE READ THE FOLLOWING INSTRUCTIONS CAREFULLY BEFORE USING THE APPLIANCE AND KEEP FOR FUTURE REFERENCE. WARNINGS This appliance is intended to be used in household and similar applications such as: staff kitchen areas in shops, offices and other working environments; farm houses;...
  • Page 4 IMPORTANT SAFETY INSTRUCTIONS To protect against electric shock, do not immerse the cord, plug or any part of the oven in water or other liquids. Do not let the cord hang over the edge of a table or counter, or touch hot surfaces.
  • Page 5 PRODUCT DESCRIPTION 1. Door handle 2. Door 3. Temperature control knob Adjust the thermostat to the desired temperature. 4. Function selection knob Select cooking function by turning this knob to the desired setting. 5. Timer control knob with bell signal Set cooking time up to 120 minutes.
  • Page 6 BEFORE FIRST USE Remove all packaging materials and wipe the outside of the appliance with a damp cloth. Wash the accessories in warm soapy water. Dry thoroughly before using Place the oven on a stable flat surface, making sure that there is at least 12 cm of space on the top and at the sides for proper ventilation.
  • Page 7 3. Place two skewer clamps into the food and secure the skewer clamps with two thumbscrews. Skewer clamps Thumbscrews 4. Insert the pointed end of the rotisserie skewer into the drive socket located on the right hand side of the oven wall. Drive socket 5.
  • Page 8 The appliance and if applicable, batteries should be taken to your local collection point for recycling. Some collection points accept appliance free of charge. We apologize for any inconvenience caused by minor inconsistencies in these instructions, which may occur as a result of product improvement and development. ELECTROLUX 23 / 11 / 2018...
  • Page 9 MERCI DE BIEN VOULOIR LIRE LES CONSIGNES DE SÉCURITÉ ATTENTIVEMENT AVANT L'UTILISATION DE L'APPAREIL ET DE LES CONSERVER POUR CONSULTATION ULTERIEURE. AVERTISSEMENTS Cet appareil est destine à être utilise dans des applications domestiques et analogues telles que: les coins cuisines réservés au personnel des magasins, bureaux et autres environnements professionnels;...
  • Page 10 Les surfaces sont susceptibles de devenir chaudes au cours de l'utilisation. Ne pas placer l'appareil près de ou sur une gazinière ou une plaque chauffante, ne le posez pas sur un four ou un mini-four. L'arrière de l'appareil doit être placé contre un mur. INSTRUCTIONS IMPORTANTES DE SÉCURITÉ...
  • Page 11 Portez toujours des maniques (non fournies) ou utilisez la poignée de plaque/grille fournie pour insérer ou sortir les articles du four chaud. N'utilisez pas le four en extérieur. N'utilisez pas cet appareil pour un usage autre que celui pour lequel il a été...
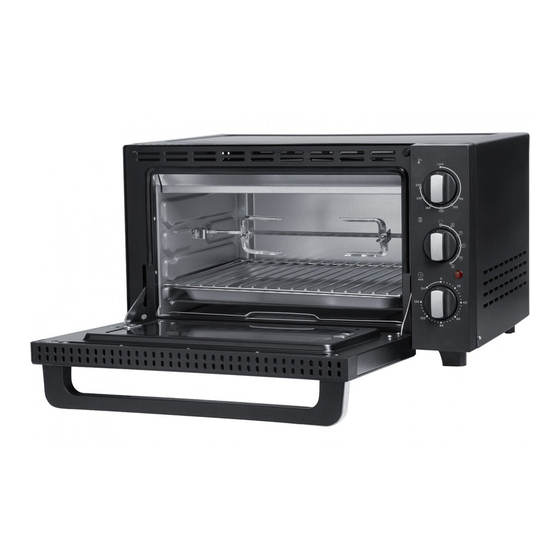
  • Page 12 DESCRIPTION DU PRODUIT 1. Poignée de porte 2. Porte 3. Bouton de contrôle de température Réglez le thermostat à la température désirée. 4. Bouton de sélection de mode Sélectionnez le mode de cuisson en tournant ce bouton sur le réglage désiré. 5.
  • Page 13 AVANT LA PREMIÈRE UTILISATION Retirez tous les éléments d'emballage et essuyez l'extérieur de l'appareil avec un chiffon humide. Lavez les accessoires dans l'eau chaude savonneuse. Faites-les bien sécher avant de les réutiliser. Posez le four sur une surface plane et stable en veillant à ce qu'il y ait un espace de 12 cm minimum au-dessus et sur les côtés pour permettre une bonne ventilation.
  • Page 14 3. Enfoncez les deux griffes dans les aliments et fixez les griffes avec les deux vis papillon. Griffes de broche Vis papillon 4. Insérez l'extrémité pointue de la broche dans la douille d'entraînement se trouvant sur la paroi intérieure droite du four. Douille d'entraînement 5.
  • Page 15 ENTRETIEN ET NETTOYAGE Débranchez l'appareil de la prise secteur et attendez qu'il ait complètement refroidi avant de le nettoyer. Nettoyez l'extérieur de l'appareil avec un chiffon légèrement humide. Séchez-le intégralement. N'immergez pas l'appareil dans de l'eau. Lavez les accessoires dans l'eau chaude savonneuse. Rincez-les et séchez-les entièrement avant de les réutiliser.
  • Page 16 Le service après-vente est joignable au +32 2 334 00 00, du lundi au vendredi de 8h à 18h et le samedi de 9h à 18h. En raison des mises au point et améliorations constamment apportées à nos produits, de petites incohérences peuvent apparaître dans ces instructions. Veuillez nous excuser pour la gêne occasionnée. ELECTROLUX 23/11/2018...
  • Page 17 LEES DE VOLGENDE INSTRUCTIES AANDACHTIG DOOR ALVORENS HET APPARAAT TE GEBRUIKEN EN BEWAAR DEZE GEBRUIKSAANWIJZING VOOR LATERE RAADPLEGING. WAARSCHUWINGEN Dit apparaat is geschikt voor huishoudelijk gebruik en gelijksoortige toepassingen zoals: kantines voor personeel in winkels, kantoren en andere werkruimtes;  boerderijen; door gasten in hotels, motels en andere woonomgevingen;...
  • Page 18 BELANGRIJKE VEILIGHEIDSINSTRUCTIES Dompel geen enkel onderdeel van de oven, de stekker of het snoer in water of een andere vloeistof om elektrocutiegevaar te vermijden. Laat het snoer niet over de rand van een tafel of aanrecht hangen en laat het niet met hete oppervlakken in aanraking komen.
  • Page 19 Gebruik de oven niet buitenshuis. Gebruik het apparaat niet voor andere doeleinden dan waarvoor het is bestemd. Plaats geen bovenmaats voedsel of metalen keukengerei in de oven, ze kunnen brand of een elektrische schok veroorzaken. Gebruik het apparaat in een goed geventileerde ruimte. Houd het deurhandvat van de oven altijd in het midden vast.
  • Page 20 PRODUCTBESCHRIJVING 1. Deurhandvat 2. Deur 3. Temperatuurregelaar Stel de thermostaatregelaar in op de gewenste temperatuur. 4. Functiekeuzeknop Draai deze knop naar de gewenste bakmodus. 5. Timerregelaar met belsignaal Stel een baktijd tot 120 minuten in. De oven wordt aan het einde van de baktijd automatisch uitgeschakeld.
  • Page 21 VOOR HET EERSTE GEBRUIK Verwijder al het verpakkingsmateriaal en maak de buitenkant van het apparaat schoon met een vochtige doek. Was het toebehoren in een warm sopje. Veeg grondig droog voor gebruik. Plaats de oven op een stabiel en vlak oppervlak. Zorg voor een vrije ruimte van minstens 12 cm boven en aan de zijkant voor een goede ventilatie.
  • Page 22 3. Breng de twee vorkjes in het voedsel aan en zet ze vast met de twee duimschroeven. Vorkjes Duimschroeven 4. Breng het puntige uiteinde van het draaispit in de aandrijving aan de rechterkant van de ovenwand. Aandrijving 5. Zorg dat het vierkante uiteinde van het draaispit rust op de draaispitsteun aan de linkerkant van de ovenwand.
  • Page 23 REINIGING EN ONDERHOUD Trek de stekker uit het stopcontact en laat het apparaat volledig afkoelen voordat u het reinigt. Maak de buitenkant van het apparaat schoon met een licht bevochtigde doek. Veeg het vervolgens grondig droog. Dompel het apparaat niet in water. Was het toebehoren in een warm sopje.
  • Page 24 Hiervoor kunt u contact opnemen met het BCC Service Center: 0900 0555 (lokaal tarief ), geopend van maandag t/m vrijdag van 9.00 tot 17.00 uur. We verontschuldigen ons voor enig ongemak veroorzaakt door kleine inconsistenties in deze gebruikershandleiding, die kunnen ontstaan door productverbetering of –ontwikkeling. ELECTROLUX 23/11/2018...
  • Page 25 POR FAVOR, LEA ESTE MANUAL DE INSTRUCCIONES DETENIDAMENTE ANTES DE USAR EL APARATO Y GUÁRDELO PARA FUTURAS CONSULTAS. ADVERTENCIAS Este aparato está concebido para usarse en aplicaciones domésticas y similares, como puedan ser: Áreas de cocina para el personal en tiendas, oficinas y otros entornos de trabajo.
  • Page 26 En lo que concierne a las instrucciones para la limpieza de las superficies en contacto con la comida, consulte el apartado Limpieza y mantenimiento. La puerta y la superficie externa pueden alcanzar temperaturas elevadas cuando el aparato está en funcionamiento. Las superficies pueden calentarse durante su uso.
  • Page 27 No coloque objetos encima del horno cuando esté funcionando. No coloque ninguno de los materiales siguientes dentro del horno: papel, cartón, plástico u otros materiales similares. No guarde ningún material en este horno cuando no se esté utilizando, salvo los accesorios recomendados. Siempre debe utilizar guantes de horno (no incluidos) o el mango de la bandeja/parrilla cuando introduzca o saque alguna cosa del horno caliente.
  • Page 28 DESCRIPCIN DEL PRODUCTO 1. Asa de la puerta 2. Puerta 3. Mando de control de la temperatura Permite ajustar el termostato a la temperatura deseada. 4. Selector de modo Permite seleccionar el modo de cocción deseado girando el mando. 5. Mando del temporizador con aviso de campana Permite ajustar el tiempo de cocción hasta 120 minutos.
  • Page 29 ANTES DE USAR POR PRIMERA VEZ Quite todos los materiales de embalaje y limpie el exterior del aparato con un paño húmedo. Lave los accesorios en agua jabonosa caliente. Séquelos bien antes de usar. Coloque el horno sobre una superficie plana, procurando que haya un espacio mínimo de 12 cm por encima y alrededor del horno para que tenga suficiente ventilación.
  • Page 30 3. Fije la comida con las púas y asegúrelas con los tornillos de mariposa.. Púas del espetón Tornillos de mariposa 4. Inserte el extremo puntiagudo del espetón en la entrada del eje de transmisión situada en la pared derecha del horno. Entrada del eje de transmisión...
  • Page 31 LIMPIEZA Y MANTENIMIENTO Desenchufe el aparato de la toma de corriente y espere a que se enfríe antes de proceder a su limpieza. Limpie el exterior del aparato utilizando un paño ligeramente húmedo y séquelo bien. No sumerja el aparato en el agua. Lave los accesorios en agua jabonosa caliente.
  • Page 32 El aparato se debe depositar en un punto local de recogida de residuos para proceder a su reciclaje. En algunos puntos de recogida se aceptan residuos gratuitamente. Le pedimos disculpas por cualquier problema provocado por pequeñas inconsistencias en estas instrucciones, que podrían ser debidas al proceso de desarrollo y mejora del producto. ELECTROLUX 23/11/2018...
  • Page 33 LEIA ESTAS INSTRUÇÕES COM ATENÇÃO ANTES DE UTILIZAR O APARELHO E GUARDE-AS PARA FUTURAS REFERÊNCIAS. AVISOS Este aparelho destina-se a ser usado em agregados familiares e aplicações similares como: áreas de cozinha para funcionários em lojas, escritórios e outros ambientes de trabalho; casas de quinta;...
  • Page 34 INSTRUÇÕES DE SEGURANÇA IMPORTANTES Para se proteger contra choques elétricos, não mergulhe o fio, a ficha ou qualquer outra peça do forno dentro de água ou outros líquidos. Não deixe o fio pender de uma mesa ou bancada, nem entrar em contacto com superfícies quentes.
  • Page 35 Não use o forno no exterior. Não utilize o forno com outros intuitos para além dos previstos. Alimentos demasiado grandes e utensílios metálicos não podem ser inseridos dentro do forno, uma vez que estes podem causar um risco de incêndio ou choque elétrico. O aparelho tem de ser usado numa divisão bem ventilada.
  • Page 36 DESCRIÇÃO DO PRODUTO 1. Pega da porta 2. Porta 3. Manípulo de controlo da temperatura Ajuste o termóstato para a temperatura desejada.. 4. Manípulo de seleção da função Escolha a função de confeção rodando o manípulo para a definição desejada.. 5.
  • Page 37 ANTES DA PRIMEIRA UTILIZAÇÃO Remova todo o material de empacotamento e limpe a parte exterior do aparelho com um pano húmido. Lave os acessórios com água quente e detergente. Seque completamente antes de utilizar. Coloque o forno numa superfície plana estável, certificando-se de que existe, pelo menos, 12 cm de espaço no topo e nas laterais para uma ventilação adequada.
  • Page 38 3. Coloque dois grampos do espeto nos alimentos e segure-os com os parafusos manuais. Grampos do espeto Parafusos manuais 4. Insira a extremidade pontiaguda do espeto de churrasqueira no encaixe do aparelho localizada na parte lateral direita do forno. Encaixe do aparelho 5.
  • Page 39 O aparelho deve ser transportado para o ponto de recolha local, para reciclagem. Alguns pontos de recolha aceitam os aparelhos sem encargos. Pedimos desculpa por qualquer inconveniente provocado por pequenas inconsistências nestas instruções, as quais poderão ser resultado do melhoramento e desenvolvimento do produto. ELECTROLUX 23/11/2018...
  • Page 40 3484 E ESO930 02 01 1218 Share more of our thinking at www.electrolux.com electrolux.com/shop Electrolux Floor Care AB S:t Goransgatan 143 S-105 45 Stockholm Sweden...