Table des Matières
Publicité
Les langues disponibles
Les langues disponibles
Liens rapides
Publicité
Table des Matières

Manuels Connexes pour M-Audio air 192


Sommaire des Matières pour M-Audio air 192
- Page 1 User Guide English ( 3 – 8 ) Guía del usuario Español ( 9 – 14 ) Guide d'utilisation Français ( 15 – 20 ) Guida per l'uso Italiano ( 21 – 26 ) Benutzerhandbuch Deutsch ( 27 – 32 ) Appendix English ( 34 –...
- Page 3 3. Read the End-User License Agreement, then check the box to Agree and click Next to continue. 4. Click Install to begin the installation. You may be asked to connect AIR 192|8 to your computer during the installation process. Click Install on any further system messages during the installation.
- Page 4 5. Select your Sample Rate and then click OK to close the Setup window. 6. Go to the Setup > I/O and select M-Audio AIR 192|8 for the Input and Output devices. You can now add tracks to send and receive audio and MIDI from sources connected to AIR 192|8 inputs and stream recorded audio back through the AIR 192|8 outputs.
-
Page 5: Connection Diagrams
Connection Diagrams Items not listed under Introduction > Box Contents are sold separately. Example 1 Powered Monitors Top/Front Panel Computer Acoustic Guitar Rear Panel Headphones Example 2 Powered DJ Mixer Monitors Computer Top/Front Panel Rear Panel MIDI Device Headphones Keyboard Example 3 Powered Top/Front Panel... -
Page 6: Top Panel
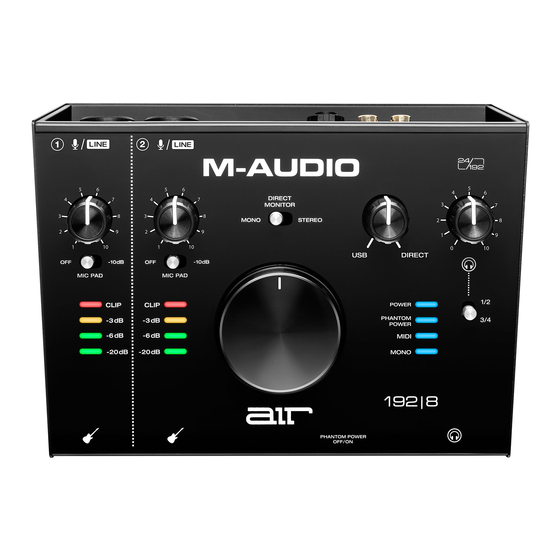
Top Panel Power LED: This LED illuminates when a valid USB connection has been established between your computer and AIR 192|8. Use this light to verify that AIR 192|8 is receiving power and is ready to use. Input Gain: Adjusts the input's gain level. Set this knob so the corresponding LED Meter (located below the knob) displays a "healthy"... - Page 7 Monitor Level: Adjusts the output volume of Main TRS and RCA Outputs (1/L 2/R), which should be connected to your powered monitors or amplifier system. 10. Monitor Mix: Adjusts the mix of the audio signal from your inputs (Direct) and the audio output of your computer (USB) that will be sent to the Main Outputs and Headphone Output.
-
Page 8: Rear Panel
Use the included USB-C-to-USB-C or USB-C-to-USB-A cables to connect the AIR 192|8 to a computer. Connect the USB-C end of the cable by firmly pressing it into place to ensure a strong connection is felt. The AIR 192|8 requires a USB 2.0 connection (or higher). -
Page 9: Contenido De La Caja
4. Haga clic en Install (Instalar) para comenzar la instalación. Es posible el sistema le solicite conectar el AIR 192|8 a su ordenador durante el proceso de instalación. Haga clic en Install en respuesta a todos los posibles mensajes adicionales del sistema durante la instalación. - Page 10 En la ventana Audio Devices (Dispositivos de audio), seleccione AIR 192|8 en la columna izquierda. Haga clic derecho en AIR 192|8 y seleccione Use this device for sound input (Utilizar este dispositivo para la entrada de sonido). Haga clic derecho en AIR 192|8 y seleccione Use this device for sound output (Utilizar este dispositivo para la salida de sonido).
-
Page 11: Diagramas De Conexión
Diagramas de conexión Los elementos que no se enumeran en Introducción > Contenido de la caja se venden por separado. Ejemplo 1 Monitores Panel superior/frontal Computadora alimentados Guitarra acustica Panel trasero Auriculares Ejemplo 2 Mezclador de DJ Monitores alimentados Computadora Panel superior/frontal Panel Dispositivos... -
Page 12: Características
LED de encendido: Este LED se enciende cuando se establece una conexión USB válida entre su ordenador y el AIR 192|8. Utilice esta luz para verificar que el AIR 192|8 está conectado al suministro eléctrico y está listo para usar. - Page 13 Nivel de monitoreo: Ajusta el volumen de salida de las salidas Salidas principales TRS y RCA (1/L 2/R), las cuales deberían estar conectadas a monitores alimentados o a un sistema de amplificación. 10. Monitor Mix: Ajusta la mezcla de la señal de audio proveniente de sus entradas (Direct) y la salida de audio de su ordenador (USB) que se enviará...
-
Page 14: Panel Trasero
Puerto USB (tipo C): Esta conexión le permitirá enviar audio y datos MIDI hacia o desde un ordenador. Utilice los cables USB-C–a–USB-C o USB-C–a–USB-A para conectar el AIR 192|8 a un ordenador. Conecte el extremo USB-C del cable insertándolo firmemente en su lugar hasta sentir que está bien conectado. -
Page 15: Présentation
Pour de l'assistance supplémentaire, veuillez visiter m-audio.com/support. Démarrage Paramètres audio Utilisateurs Windows : Avant de brancher l'AIR 192|8 à votre ordinateur pour la première fois, vous devez installer le pilote : 1. Veuillez visiter m-audio.com/support/drivers et télécharger la dernière version du pilote AIR... - Page 16 Vous pouvez maintenant ajouter des pistes et recevoir un signal audio et des messages MIDI des sources branchées aux entrées de l'AIR 192|8 et transmettre en continu des fichiers par le biais des sorties de l'AIR 192|8. Pour configurer l'AIR 192|8 pour Ableton Live Lite Utilisez le câble USB fourni pour brancher l'AIR 192|8 à...
-
Page 17: Schéma De Connexion
Schéma de connexion Les éléments qui ne figurent pas dans Présentation > Contenu de la boîte sont vendus séparément. Exemple 1 Moniteurs amplifiés Panneau supérieur/avant Ordinateur Guitare acoustique Panneau arrière Casque d'écoute Exemple 2 Mixeur DJ Moniteurs amplifiés Panneau Ordinateur supérieur/avant Panneau Appareils... -
Page 18: Caractéristiques
DEL d’alimentation : Cette DEL s’allume lorsqu’une connexion USB est établie entre votre ordinateur et l'AIR 192|8. Cette DEL permet de vérifier que l'AIR 192|8 est alimenté et prêt à être utilisé. Gain d'entrée : Ces boutons permettent d'ajuster le niveau de gain du signal d'entrée. Réglez ce bouton afin que le vumètre à... - Page 19 Bouton moniteur : Ce bouton permet de régler le volume des Principales sorties TRS et RCA (1/L 2/R) reliées à des moniteurs amplifiés ou à un système d'amplification. 10. Monitor Mix : Ce bouton permet d'ajuster le mélange du signal des entrées (Direct) et de la sortie audio de l'ordinateur (USB) qui sera transmis aux sorties principales et à...
-
Page 20: Panneau Arrière
MIDI vers et depuis un ordinateur. Utilisez le câble USB-C–vers–USB-C ou USB-C–vers–USB- A fourni pour brancher l'AIR 192|8 à un ordinateur. Branchez l'extrémité USB-C du câble en appuyant fermement dessus afin de vous assurer qu’il est bien inséré. L'AIR 192|8 requiert une connexion USB 2.0 (ou version ultérieure). -
Page 21: Contenuti Della Confezione
5. Una volta completata l’installazione, cliccare su Finish (fine). Per utilizzare il driver Windows, aprire il pannello di controllo M-Audio AIR 192|8 Control Panel. Qui è possibile configurare la Preferred Buffer Size (dimensione del buffer) e la Sample Rate (frequenza... - Page 22 Recarsi su Applicazioni > Utilità > Audio MIDI Setup. Nella finestra Audio Devices (dispositivi audio), selezionare AIR 192|8 nella colonna sinistra. Fare clic col tasto destro su AIR 192|8 e selezionare Use this device for sound input (utilizza questo dispositivo per ingresso audio).
-
Page 23: Schemi Di Collegamento
Schemi di collegamento Elementi non elencati sotto Introduzione > Contenuti della confezione sono venduti separatamente. Esempio 1 Monitor alimentati Pannello superiore/anteriore Computer Cuffie Chitarra acustica Pannello posteriore Esempio 2 Monitor Mixer DJ alimentati Pannello Computer superiore/anteriore Cuffie Pannello posteriore Dispositivi MIDI Tastiera Esempio 3... -
Page 24: Pannello Superiore
Pannello superiore LED di alimentazione: questo LED si illumina quando viene stabilita una connessione USB valida tra il computer e l’AIR 192|8. Servirsi di questa spia per assicurarsi che l’AIR 192|8 sia alimentato e pronto all’uso. Gain d'ingresso: regola il livello di guadagno degli ingressi. Impostare questa manopola in modo che il corrispondente misuratore LED (situato sotto la manopola) mostri a display un livello "sano"... - Page 25 Monitor Level: regola il volume di uscita delle Principali uscite TRS e RCA (1/L 2/R), che dovrebbero essere collegate ai monitor o al sistema di amplificazione. 10. Monitor Mix: regola il mix del segnale audio proveniente dagli ingressi (Direct) e dell'uscita audio del computer (USB) che sarà...
-
Page 26: Pannello Posteriore
Porta USB (tipo C): questo collegamento consente di inviare audio e dati MIDI da/a un computer. Servirsi dei cavi da USB-C–a–USB-C o da USB-C–a–USB-A in dotazione per collegare l'AIR 192|8 al computer. Collegare l’estremità USB-C del cavo inserendolo saldamente in posizione per garantire un collegamento saldo. -
Page 27: Lieferumfang
Systemmeldungen während der Installation klicken Sie auf Installieren. 5. Sobald die Installation abgeschlossen ist, klicken Sie auf Fertigstellen. Um den Windows-Treiber zu verwenden, öffnen Sie das M-Audio AIR 192|8 Control Panel. Hier können Sie Ihre Bevorzugte Puffergröße und Sample-Rate einstellen. - Page 28 Wählen Sie Anwendungen > Dienstprogramme > Audio-MIDI-Setup. Wählen Sie im Fenster Audiogeräte die Option AIR 192|8 in der linken Spalte aus. Klicken Sie mit der rechten Maustaste auf AIR 192|8, und wählen Sie Dieses Gerät für Soundeingabe verwenden. Klicken Sie mit der rechten Maustaste auf AIR 192|8 und wählen Sie Dieses Gerät für Soundausgabe verwenden.
- Page 29 Anschlussdiagramm Teile, die nicht unter Einführung > Lieferumfang angegeben sind, sind separat erhältlich. Beispiel 1 Aktivemonitore Ober-/Vorderseite Computer Akustische Gitarre Rückseite Kopfhörer Beispiel 2 DJ-Mixer Aktivemonitore Computer Ober-/Vorderseite Rückseite MIDI- Geräte Kopfhörer Keyboard Beispiel 3 Aktivemonitore Ober-/Vorderseite Computer Elektrische Gitarren Kopfhörer Rückseite...
- Page 30 Oberseite Power-LED: Diese LED leuchtet, wenn eine gültige USB-Verbindung zwischen Ihrem Computer und AIR 192|8 hergestellt wurde. Überprüfen Sie mithilfe dieses Lichts, ob das AIR 192|8 mit Strom versorgt wird und einsatzbereit ist. Input Gain: Passt den Verstärkungsfaktor des Eingangs an. Stellen Sie diesen Regler so ein, dass die entsprechende LED-Anzeige (unterhalb des Reglers) während der Performance einen „gesunden“...
- Page 31 Monitorpegel: Passt die Ausgangslautstärke der Haupt-TRS- und RCA-Ausgänge (1/L 2/R) an, welche mit den Aktivboxen oder dem Verstärker verbunden sein sollten. 10. Monitor Mix: Passt den Mix aus dem Audiosignal von Ihren Eingängen (Direct) und dem Audio- Ausgang des Computers (USB) an, der an die Hauptausgänge und die Kopfhörerausgäng gesendet wird.
- Page 32 Verwenden Sie die im Lieferumfang enthaltenen USB-Cauf-USB-C oder USB-C-auf-USB-A- Kabel, um Ihr AIR 192|8 an einen Computer anzuschließen. Schließen Sie das USB-C-Ende des Kabels an, indem Sie es fest einstecken, um sicherzustellen, dass eine sichere Verbindung spürbar ist. AIR 192|8 benötigt einen USB 2.0-Anschluss (oder höher).
-
Page 34: Appendix (English)
Appendix (English) Technical Specifications All specifications are measured at 20 kHz bandwidth. Mic Inputs 1–2 (balanced XLR) Frequency Response 20 Hz – 20 kHz (±0.1 dB) 108 dB (A-weighted) Dynamic Range Signal-to-Noise Ratio 104 dB (+1.0 dBu, A-weighted) 0.001% (1 kHz, +0.8 dBu, -1 dBFS) THD+N Preamp EIN -126 dBu (150-ohm, unweighted) - Page 35 0.90 kg Specifications are subject to change without notice. Trademarks & Licenses M-Audio and AIR Music Tech are registered trademarks of inMusic Brands Inc., registered in the U.S. and other countries. Ableton is a trademark of Ableton AG. Pro Tools is a registered trademark of Avid Technology, Inc. in the U.S. and other countries.
- Page 36 Manual Version 1.1...