Landi MFL02 Mode D'emploi
Table des Matières
Les langues disponibles
Les langues disponibles
Liens rapides
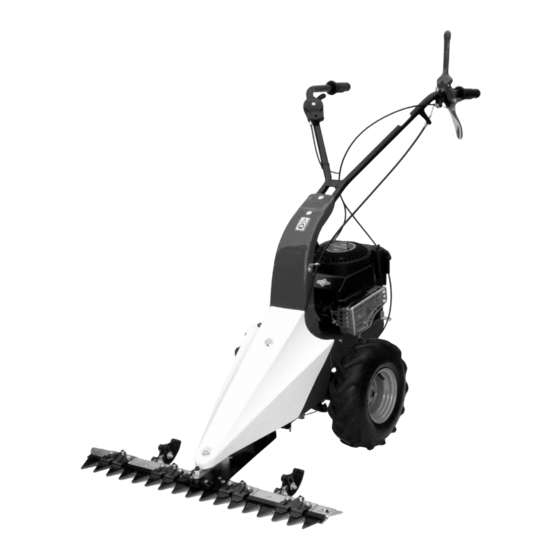
Motofalciatrice
Scythe mower
Motofaucheuse
Balkenmäher
Balkmaaier
Motorklipper
Lištové sekačka
Lištová kosačka
Motocositoarea
Kosiarka silnikowa
Motosegadora
Μηχανική θεριστική μηχανή
Strižna kosilnica
Strižna kosilica
MFL02
Type:
IT
Istruzioni d'uso
EN
Operating Instructions
FR
Mode d'emploi
DE
Bedienungsanweisung
NL
Gebruiksaanwijzing
SV
Bruksanvisning
Instrukce pro použití
CZ
Návod na použitie
SK
Instrucţiuni de utilizare
RO
Instrukcja obsługi
PL
ES
Manual de instrucciones
Οδηγίες χρήσης
EL
SL
Navodila za uporabo
HR
Upute za uporabu
Table des Matières

Manuels Connexes pour Landi MFL02

Sommaire des Matières pour Landi MFL02
- Page 2 B&S 123 - 139 OHV 123 - 139 OHV B&S...
- Page 7 Aufkleber / Gashebel Label accelerator Plaquette acceleration Etichetta acceleratore Sticker voor gashendel Etikett gasspak Štítek akcelerátoru Štítok akcelerátora Plăcuţă acceleraţie Tabliczka przyspieszenia Etiqueta acelerador Ετικέτα επιταχυντή Nalepka ročice plina Naljepnica ručice gasa...
- Page 8 Lesen Sie die Gebrauchsanweisung vor der Inbetriebnahme. Read the instructions manual before operating on the machine. Mähbalkenantrieb Lire le mode d’emploi avant l’usage. Cutter bar clutching Leggere il manuale prima di usare la macchina. Embrayage barre Innesto barra falciante Lees deze handleiding door voor de machine te gebruiken. Maaibalkaandrijving Läs noggrant igenom handboken innan du använder maskinen.
- Page 22 Traduction du mode d’emploi original Introduction Tables des matiéres Cher client, nous vous remercions de la confiance que vous nous témoignez et vous souhaitons beaucoup de satisfaction dans son utilisation. Introduction Afin de garantir d’emblée un fonctionnement sans accrocs nous avons créé cette notice d’utilisation. Si vous observez exactement les indications suivantes votre appareil fonctionnera toujours à...
-
Page 23: Montage De La Motofaucheuse
se trouve à proximité (10 mt). 4) Vérifiez entièrement et avec soin le terrain à tondre. Éloignez tous objets à risque (pierres, bâtons, fils de fer, os, etc.). Ne tondez qu’à la lumière du jour ou en présence d’un bon éclairage. 5) Ne pas mettre en marche la machine lorsqu’on se trouve devant la barre et ne pas s’y approcher lorsqu’elle est en marche. -
Page 24: Montage Cable Accelerateur Avec Moteur (Fig. 2-3)
Positionner le levier commande de l’accélérateur (1) placé sur la MONTAGE CABLE ACCELERATEUR AVEC MOTEUR (Fig. 2-3) moteur à la fin de la course (position d’arrêt), dans le sens indiqué par la flèche. Enlever la vis (2) avec la clé et la borne d’arrêt de gaine (4). Ensuite positionner le levier des gaz (partie 1 fig. - Page 25 « stop », le moteur doit s’arrêter correctement. IMPORTANT : avant l’utilisation de la machine vérifiée qu’il y a l’huile de lubrification à l’intérieur du châssis. Si vous n’avez pas fait ce contrôle, ne faites pas démarrer la machine. Pour des autres renseignements vous pouvez lire le chapitre «boîte ». La motofaucheuse est livrée avec un moteur à...
-
Page 26: Entretien Et Garage : Boite (Fig. 11)
remonter la lame, effectuer les opérations dans l’ordre contraire. Note : Afin de bien couper, la lame doit avoir toujours le fil. ENTRETIEN ET GARAGE : : Vérifier le niveau d’huile de la transmission après presque 60 heures de travail. Démonter la roue droite et avec la machine en BOITE (Fig. -
Page 27: Donnees Techniques
Voie: 430 mm - Largeur de coupe: 660/870 mm - Longueur totale: 1350 mm - Hauteur totale: 1050 mm - Roues: (2) DONNEES TECHNIQUES 13x5.00-6 - Masse: 49/52 kg. Pour tous renseignements et détails techniques, consulter le manuel d’utilisation ci-joint. Lame à... - Page 36 SLÅMASKIN KOSIARKA sekačka kosačka BALKENMÄHER MOTOFACHEUSE MOTOSEGADORA GADANHEIRA LISTWOWA model : STIGA Silex 87 G type: MFL02 výrobní číslo: viz výrobné číslo: Αριθμός σειράς: numero di serie: vedi serial number: seriennummer: numéro de série: número de serie: serienummer: zie numer seryjny:...