
Sommaire des Matières pour WLD-TEC Sterimax smart
- Page 1 Bedienungsanleitung DE Instruction manual EN Mode d’emploi FR Impfösen - Sterilisator Inoculation Loop - Sterilizer Stérilisateur de fils à ensemencer...
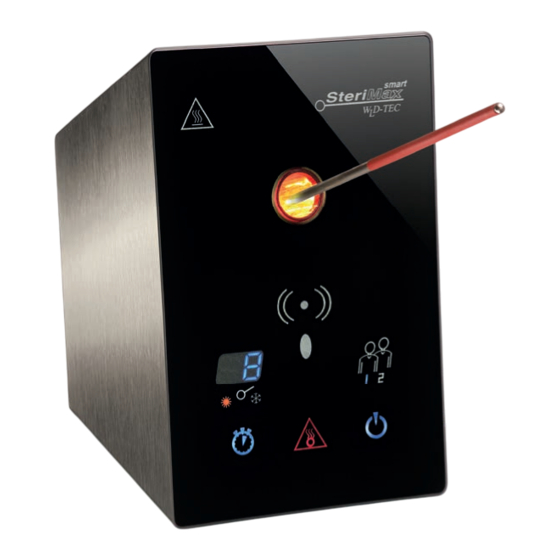
- Page 2 Die Bedienungsanleitung aufmerksam durchlesen, um sich mit dem Produkt vor dem Einsatz vertraut zu machen. Zur späteren Einsichtnahme die Gebrauchsanleitung bitte gut aufbewahren. Fig. A - Ein / Aus Symbol - Timer Symbol - Restwärmeanzeige - Benutzeranzeige - Timer-Anzeige 9, 9a - Symbol Sterilisationszeit (Sonne) - Symbol Abkühlzeit (Schneeflocke) - IR-Sensor...
-
Page 3: Table Des Matières
Inhaltsverzeichnis Lieferumfang Verwendung Warnhinweise 1. Inbetriebnahme 1.1 Quarzglasausglührohr 1.2 Netzanschluss 2. Bedienung 2.1 Gerät einschalten 2.2 Gerät ausschalten 2.3 Benutzerauswahl 2.4 Sterilisationszeit und Abkühlzeiterinnerung anwählen 2.5 Einstellen der Sterilisationszeit (Sonne) 2.6 Einstellen der Abkühlzeiterinnerung (Schneeflocke) 3. Sterilisation des Instruments 3.1 Starten der Sterilisation 3.2 Thermocontrol 4. -
Page 4: Lieferumfang
Impfösenhalter (R3) • Netzanschlusskabel (R4) • 2 Jahre Garantie Fig. D Verwendung Der Infrarot Impfösen-Sterilisator SteriMax smart eignet sich im Laborbetrieb bestens zum Sterilisieren von Impfösen, Pinzetten und Kleinstinstrumenten aus temperaturbeständigem Material, z.B. Edelstahl oder Platin-Iridium- Legierungen. Warnhinweise • Jeder Anwender der mit der Benutzung dieses Gerätes beauftragt... - Page 5 • Stellen Sie sicher, dass das Gerät niemals mit Wasser oder anderen Flüssigkeiten in Berührung kommen kann, solange der Netzstecker in der Steckdose ist, insbesondere wenn Sie es im Labor in Nähe von Wasser oder Flüssigkeiten verwenden. • Benutzung eines zweipoligen Netzadapter / Anschlusskabel ist NICHT empfohlen.
-
Page 6: Inbetriebnahme
1. Inbetriebnahme Die Inbetriebnahme ist, wie in den folgenden Punkten beschrieben, sorgfältig durchzuführen. 1.1 Quarzglasausglührohr Bei Auslieferung ist das Ausglührohr (9) schon in der Sterilisationsöffnung (9a) installiert. Vor erstmaliger Benutzung Schutzfolie und Hinweis-Aufkleber entfernen. Gerät niemals ohne eingesetztes Ausglührohr (9) betreiben! 1.2 Netzanschluss Das Netzanschlusskabel (20) mit dem Anschlussstück (18) in den Netzanschluss (16) auf der Rückseite des Gerätes stecken. -
Page 7: Benutzerauswahl
2.3 Benutzerauswahl Bei der Benutzerauswahl kann zwischen „Benutzer 1“ oder „Benutzer 2“ durch eine kurze Berührung des Ein / Aus Symbols (1) gewählt werden. Der aktuelle Benutzer wird durch die jeweilig aufleuchtende Ziffer 1 oder 2 angezeigt. Beide Benutzerkonten speichern die jeweiligen Parameter nutzerabhängig. -
Page 8: Sterilisation Des Instruments
3. Sterilisation des Instruments Dieses Kapitel beschreibt die Bedienung und Funktionsweise des Gerätes zum Ausglühen von Impfösen oder kleinen Instrumenten. 3.1 Starten der Sterilisation Die Sterilisation wird durch Einführen eines Instruments (z.B. Impföse mit Halter) in die Öffnung des Ausglüh- rohrs (9, 9a) automatisch gestartet. -
Page 9: Einstellungsmenü
4. Einstellungsmenü Dieses Kapitel beschreibt die verschiedenen Einstellmöglichkeiten des Gerätes. 4.1 Einstellungen Durch kurzen Druck auf den Taster (14) auf der Geräterückseite wird das Einstellungsmenü aufgerufen. Durch eine kurze Berührung des Timer-Symbols (2) kann in die einzelnen Menüpunkte geschaltet werden: Einstellungsmenü: ES - Einschaltsterilisation AN / AUS SE - Sensorreichweite 1 - 8... -
Page 10: Sensorreichweite
4.3 Sensorreichweite In diesem Menüpunkt kann die Sensorreichweite in 8 verschiedenen Stufen eingestellt werden. Diese Funktion ist hilfreich um die Aktivierung des Sensors auf die Länge der Instrumente abzustimmen. Durch kurzen Druck auf den Taster (14) auf der Geräterückseite wird das Einstellungsmenü... -
Page 11: Werkseinstellung
4.7 Werkseinstellung Durch die Werkseinstellung lässt sich das Gerät in den Auslieferungs- zustand zurücksetzen. Das Zurücksetzen betrifft sämtliche Parameter. Durch kurzen Druck auf den Taster (14) auf der Geräterückseite wird das Einstellungsmenü aufgerufen. Anschließend durch kurze Berührung des Timer-Symbols (2) Einstellung „W“ anwählen. Timer-Symbol (2) lange berühren und von AUS („-“... -
Page 12: Reinigung Der Glasfront
herausschaut. Beim Einführen der letzten 10 mm durch leichte Dreh- und Schiebebe- wegung das Ausglührohr in die richtige Position bringen. Das Ausglührohr muss von innen und außen sauber und trocken sein bevor es wieder in die Sterilisationsöffnung (9a) eingesetzt wird. Das Ausglührohr ist ein Verschleißteil. -
Page 13: Fehleranzeige
Art.-Nr.: 4.003.100 9. Garantie Die Garantie gilt für 2 Jahre (inkl. IR-Heizelement). Ausgenommen sind Verschleißteile (Quarzglasausglührohr), Defekte durch unsachgemäße Bedienung, Veränderungen oder Eingriffe am Gerät. Serviceadresse: WLD-TEC GmbH Telefon: 036081 68940 Produktion & Service Telefax: 036081 68942 Halle-Kasseler-Str.49 Email: sales@wld-tec.com D-37318 Arenshausen Internet: www.wld-tec.com... -
Page 14: Einfache Fehlerbehebung
Einfache Fehlerbehebung • Die Anzeigen leuchten nach Berührung des Ein / Aus Symbols (1) nicht Hauptschalter (17) einschalten. Korrekten Anschluss des Netzsteckers überprüfen und sicherstellen, dass dieser an einer (passend zum Gerät) spannungsführenden Netzsteckdose angeschlossen ist. Kontrolle der Sicherung, sollte die Sicherung defekt sein kann sie ersetzt werden. -
Page 15: Technische Daten
Technische Daten Touch-Bedienung: ON / OFF, Auswahl für 2 Benutzer Sterilisationstimer 5 - 10 Sekunden Impfösenabkühltimer 0 - 25 Sekunden mit akustischer Unterstützung (abschaltbar) Statusanzeige: optische Darstellung des Sterilisationsvorgangs IR-Sensor: Sensorreichweite 8-stufig einstellbar Thermocontrol: dynamischer Sterilisationstimer, verkürzt die Sterilisation in Abhängigkeit der Restwärme Ausglührohr Quarzglas: 750°C - 1000°C Sterilisationstemperatur... -
Page 16: Konformitätserklärung
Schutz vor optischer Strahlung / Security of optical radiation (Risikofreie Gruppe) (Risk free group) 3.1 EN 62471:2008 Photobiologische Sicherheit von Lampen und Lampensystemen Photobiological safety of lamps and lamp systems WLD-TEC GmbH Halle-Kasseler-Str.49 D-37318 Arenshausen B. Wartewig (Geschäftsführer, CEO) Germany Arenshausen, 20.04.2016... -
Page 17: Optionales Zubehör
Optionales Zubehör Art.Nr.: 6.000.320 Tray, mobil: Art.Nr.: 6.000.341 Tray, rechts- oder linksseitig montierbar: Art.Nr.: 4.000.350 Instrumentenablage (magnetisch): Art.Nr.: 6.000.360 Impfösenhalter aus Edelstahl, Länge 245 mm: Art.Nr.: 6.000.365 Impfösenhalter aus Edelstahl, Länge 215 mm: Impfösen aus Spezial-Edelstahl, Draht Ø 0,6 mm Art.Nr.: 6.000.371 Ø... - Page 18 Read these operating instructions carefully to familiarize yourself with the product before using. Keep the manual in a safe place for future reference. Fig. A - On / Off symbol - Timer symbol - Residual heat display - User display 9, 9a - Timer display - Sterilization time symbol (sun)
- Page 19 Table of contents The range Safety Precautions 1. Initial operation 1.1 Quartz glass annealing tube 1.2 Power connection 2. Operation 2.1 Switching on the device 2.2 Switching off the device 2.3 User selection function 2.4 Selecting the sterilization time and cooling time reminder 2.5 Setting the sterilization time (sun) 2.6 Setting the cooling time reminder (snowflake) 3.
-
Page 20: The Range
• Power cable (R4) • 2 year warranty Fig. D The SteriMax smart infrared inoculating loop sterilizer is ideal for laboratory use for sterilizing inoculating loops, tweezers and micro-instruments made of heat resistant materials such as stainless steel or platinum-iridium alloys. - Page 21 • Make sure that the unit does not come in contact with water or other liquids as long as the plug is in the power socket, especially if you use it in the laboratory near water or liquids. • Using a two-pin AC adapter / connecting cable is NOT recommended. •...
-
Page 22: Initial Operation
1. Initial operation Please handle this sterilizer always with care as described in the following points of this manual. 1.1 Quartz glass annealing tube Upon delivery, the annealing tube (9) is already installed in the sterilization orifice (9a). Remove the protective foil and the adhesive warning label before frist use. Never operate the device without the annealing tube (9) in place! 1.2 Power connection Plug the power cable (20) using the connector (18) into the power socket (16) on the... -
Page 23: Selecting The Sterilization Time And Cooling Time Reminder
2.4 Selecting the sterilization time and cooling time reminder By briefly touching the timer symbol (2), the user can choose between sterilization time (orange sun) (6) and cooling time reminder (blue snowflake) (7). After selecting the cooling time reminder (snowflake), if the time is not changed within 2 seconds, the device returns automatically to the sterilization time (sun). -
Page 24: Starting The Sterilization
3.1 Starting the sterilization Sterilization is started automatically by inserting an instrument (such as an inoculating loop with holder) into the orifice of the annealing tube (9, 9, 9a 9a). Here, the user's hand must be within the detection range of the IR-Sensor (8). -
Page 25: Sterilization At Start-Up
By briefly touching the timer symbol (2), the user can scroll through the individual menu items: Settings menu: ES - Sterilization at start-up ON / OFF SE - Sensor range 1 - 8 SU - Buzzer ON / OFF SA - Stand-by time 15, 30, or 60 minutes AL - Insertion mode ON / OFF W - Factory default settings Exit the settings menu by briefly pressing the button (14) on the back of the device. -
Page 26: Stand-By Time
touching the timer symbol (2). Keep the timer symbol (2) pressed and select ON ("1") or OFF ("-") by releasing. (Factory setting: ON = "1") If no cooling time is selected, the buzzer is not activated automatically. 4.5 Stand-by time If no sterilization is started, or any other settings made during the selected stand-by time, the device switches itself off automatically, thus preventing unwanted sterilization being activated during work breaks, for example. -
Page 27: Cleaning
6. Cleaning Before cleaning the quartz glass annealing tube, the device or the glass front: 1. Switch the device off by touching the On / Off symbol (1) on the glass front for more than 2 seconds and allow to cool. 2. -
Page 28: Fan
clean the appliance with a spray-and-wipe disinfectant. The instrument itself must not be sterilized. Flaming the device is not possible. After switching off, the fans (11) run until the excess heat has been dissipated. 7. Fan Smart fan control ensures that even in continuous operation the temperature of the housing does not rise above 65 degrees. -
Page 29: Warranty
Except parts of wear and tear (quartz glass annealing tube). The WLD-TEC warranty guarantees all SteriMax smart under normal usage conditions and does not cover any damages as a direct result of user misuse or / and abuse. The warranty is void upon any unauthorized servicing, disassembly or modifications. -
Page 30: Troubleshooting Guide
Troubleshooting guide • The displays do not light up after touching the On / Off symbol (1) Switch on the device at the power switch (17). Check if the power plug is correctly wired and make sure that it is connected to a live wall socket (fit to the device). -
Page 31: Technical Data
Technical Data Touch-Operation: ON / OFF, selection for 2 users sterilization timer 5 - 10 seconds inoculation loop cooling timer 0 - 25 seconds with audible signal (disengageable) Status display: optical display of the sterilization progress IR-Sensor: sensor range 8-stage adjustable Thermocontrol: dynamic sterilization timer, reduces the sterilization time according to the residual heat... -
Page 32: Eu-Konformitätserklärung
Schutz vor optischer Strahlung / Security of optical radiation (Risikofreie Gruppe) (Risk free group) 3.1 EN 62471:2008 Photobiologische Sicherheit von Lampen und Lampensystemen Photobiological safety of lamps and lamp systems WLD-TEC GmbH Halle-Kasseler-Str.49 D-37318 Arenshausen B. Wartewig (Geschäftsführer, CEO) Germany Arenshausen, 20.04.2016... - Page 33 Optional accessories Art.No.: 6.000.320 Tray, mobil: Art.No.: 6.000.341 Tray, for right or left side: Art.No.: 4.000.350 Instrument support (magnetic): Art.No.: 6.000.360 Inoculation loop holder, length 245 mm: Art.No.: 6.000.365 Inoculation loop holder, length 215 mm: Inoculation loops (special stainless steel), wire Ø 0.6 mm Art.No.: 6.000.371 Ø...
- Page 34 Lire attentivement le mode d’emploi afin de se familiariser avec le produit avant de l’utiliser. Bien conserver le mode d’emploi pour pouvoir le consulter à tout moment. - Icône MARCHE / ARRÊT Fig. A - Icône de minuterie - Indicateur de chaleur résiduelle - Affichage de l’utilisateur - Affichage de la minuterie - Icône de la durée de stérilisation...
- Page 35 Table de matières Contenu de la livraison Utilisation Avertissements 1. Mise en service 1.1 Tube de stérilisation en verre de quartz 1.2 Prise secteur 2. Utilisation 2.1 Mise en marche de l’appareil 2.2 Mise hors tension de l’appareil 2.3 Sélection de l’utilisateur 2.4 Choisir la durée de stérilisation et le rappel de la durée de refroidissement 2.5 Réglage de la durée de stérilisation (soleil).
-
Page 36: Contenu De La Livraison
• 2 ans de garantie Utilisation Le stérilisateur pour fils à ensemencer à infrarouge SteriMax smart convient parfaitement pour la stérilisation des fils à ensemencer, des pincettes et des petits instruments dans des matériaux résistants à la chaleur, comme p. ex. - Page 37 • Assurez-vous que l’appareil ne soit jamais en contact avec de l’eau ou d’autres liquides, tant que la fiche de raccordement au secteur se trouve dans la prise, en particulier si vous l’utilisez dans le laboratoire à proximité d’eau ou de liquides. •...
-
Page 38: Mise En Service
1. Mise en service La mise en service doit être effectuée soigneusement comme décrit dans les points. 1.1 Tube de stérilisation en verre de quartz Au moment de la livraison, le tube de stérilisation (9) est déjà installé dans l’ouverture de stérilisation (9a). -
Page 39: Sélection De L'utilisateur
2.3 Sélection de l’utilisateur Lorsque vous sélectionnez un utilisateur, vous pouvez choisir soit "Utilisateur 1" soit "Utilisateur 2" en appuyant brièvement sur l’icône Marche / Arrêt (1). L’utilisateur actuel est affiché à l’aide des points lumineux 1 ou 2. Les deux comptes stockent les paramètres en fonction des utilisateurs. -
Page 40: Stérilisation De L'instrument
3. Stérilisation de l’instrument Cette section décrit l'utilisation et de fonctionnement du dispositif pour la stérilisation des de fils à ensemencer ou de petits instruments. 3.1 Lancement de la stérilisation La stérilisation démarre automatique- ment en insérant un instrument (p. ex. fil à... -
Page 41: Menu De Configuration
4. Menu de configuration Ce chapitre décrit les différents paramètres de l'unité. 4.1 Réglages Le menu de configuration est appelé en appuyant brièvement sur la touche (14) Les points de menu peuvent être activés individuellement en touchant brièvement l’icône de minuterie (2): Menu de configuration: ES - Stérilisation à... -
Page 42: Portée Du Capteur
4.3 Portée du capteur La portée du capteur peut être réglée dans ce point de menu selon 8 niveaux différents. Cette fonction est utile pour ajuster l’activation du capteur à la longueur des instruments. Si la touche bouton (14) au dos d’appareil, le menu de configuration est ouvert. -
Page 43: Réglage En Usine
4.7 Réglage en usine Le réglage en usine permet de réinitialiser l’appareil sur les paramètres par défaut (au moment de la livraison). La réinitialisation concerne tous les paramètres. Si la touche bouton (14) au dos d’appareil, le menu de configuration est ouvert. Par la suite en touchant brièvement l’icône de minuterie (2), sélectionner Réglage "W". -
Page 44: Nettoyage De La Façade En Verre
Pour insérer, pousser le tube de stérilisation du côté fermé dans l’ouverture de stérilisation (9a) jusqu’à ce qu’il soit complétement introduit et qu’il ne dépasse plus à l’avant. Lors de l’insertion des 10 derniers mm, mettez le tube de stérilisation dans la bonne position en le faisant légèrement glisser et pivoter. -
Page 45: Messages D'erreur
La garantie est valable 2 ans (y compris la lampe halogène). Sont exclues : les pièces d’usure (tube de stérilisation en verre de quartz), les pannes en cas d’utilisation non conforme, les modifications ou les interventions sur l’appareil. Adresse du service après-vente: WLD-TEC GmbH Téléphon: 036081 68940 Production & Service Téléfax: 036081 68942 Halle-Kasseler-Str.49... -
Page 46: Dépannage Facile
Dépannage facile • Les affichages ne s’allument pas après avoir touché l’icône Marche / Arrêt (1) Allumer l’interrupteur principal (17). Vérifier que la fiche de raccordement au secteur est correctement raccordée, afin de s’assurer qu’elle est bien raccordée à une prise sous tension (adapté... -
Page 47: Données Techniques
Données techniques Marche / Arrêt Commandes tactiles: , sélection pour 2 utilisateurs Minuterie de stérilisation 5 - 10 secondes Minuterie de refroidissement des fils à ensemencer 0 - 25 secondes avec assistance sonore (peut être désactivée) Indicateur de statut: représentation visuelle du processus de stérilisation Capteur infrarouge: portée du capteur réglable sur 8 niveaux Thermocontrol:... -
Page 48: Déclaration De Conformité
Schutz vor optischer Strahlung / Security of optical radiation (Risikofreie Gruppe) (Risk free group) 3.1 EN 62471:2008 Photobiologische Sicherheit von Lampen und Lampensystemen Photobiological safety of lamps and lamp systems WLD-TEC GmbH Halle-Kasseler-Str.49 D-37318 Arenshausen B. Wartewig (Geschäftsführer, CEO) Germany Arenshausen, 20.04.2016... -
Page 49: Accessoires En Option
Accessoires en option Réf.: 6.000.320 Plateau, mobile: Réf.: 6.000.341 Plateau se montant à droite ou à gauche: Réf.: 4.000.350 Stockage de l’instrument (magnétique): Fils à ensemencer en acier inoxydable: Réf.: 6.000.360 longueur 245 mm: Réf.: 6.000.365 longueur 215 mm: Fils à ensemencer en acier spécial Ø 0,6 mm Réf.: 6.000.371 Ø... - Page 50 Notizen / Notes / Notation:...
- Page 52 D-37085 Göttingen D-37318 Arenshausen Telefon: +49 (0)551 / 793789 Telefon: +49 (0)36081 / 68940 Telefax: +49 (0)551 / 793707 Telefax: +49 (0)36081 / 68942 • Email: sales@wld-tec.com Internet: http://www.wld-tec.com Sales Department: Production & Service: Spandauer Weg 1 Halle-Kasseler-Straße 49 D-37085 Göttingen...