Sony SU-PW2 Mode D'emploi

Manuels Connexes pour Sony SU-PW2


Sommaire des Matières pour Sony SU-PW2
- Page 1 4-099-792-13 (1) For Customers and Sony Dealers in North and Central America Wall-Mount Bracket Instructions Mode d’emploi Instrucciones SU-PW2 © 2003 Sony Corporation...
- Page 2 Sufficient expertise is required for installing this product. Be sure to subcontract the installation to Sony dealers or contractors and pay special attention to safety during the installation. Sony is not liable for any damages or injury caused by mishandling or improper installation.
- Page 3 For Customers WARNING If the following precautions are not observed, serious injury or death through fire, electric shock, the product toppling over, or the product dropping can result. Be sure to subcontract the installation to qualified contractors and keep small children away during the installation.
- Page 4 Do not cover the ventilation hole of the Display Unit. If you cover the ventilation hole (with a cloth, etc.), heat may build up inside and cause fire. Do not apply any load other than the Display Unit on the Wall-Mount Bracket.
- Page 5 CAUTION If the following precautions are not observed, injury or property damage may occur. Do not install the Wall-Mount Bracket on wall surfaces where the corners or the sides of the Display Unit protrude away from the wall surface. Do not install the Wall-Mount Bracket on wall surfaces such as a pillar, where the corners or the sides of the Display Unit protrude away from the wall surface.
- Page 6 WARNING To Sony Dealers The following instructions are for Sony Dealers only. Be sure to read safety precautions described above and pay special attention to safety during the installation, maintenance and checking of this product. Be sure to install the Wall-Mount Bracket securely to the wall following the instructions in this instruction manual.
- Page 7 Be sure to tighten the screws securely in the designated position. If you fail to do so, the Display Unit may fall, and cause bodily injury to someone or damage to the Display Unit. Be careful not to subject the Display Unit to shock during installation. If the Display Unit is exposed to shock, it may fall or break apart.
- Page 8 Sécurité Les produits Sony sont conçus pour vous offrir le maximum de sécurité. Toutefois si les produits sont utilisés de façon incorrecte, ils peuvent provoquer des blessures graves en cas d’incendie, d’électrocution, de chute ou s’ils basculent de leur support.
-
Page 9: Confiez Le Déplacement Ou Le Démontage De L'écran À Des Professionnels
À l’attention des clients AVERTISSEMENT Le non-respect des consignes suivantes peut être fatal ou entraîner des blessures graves en cas d’incendie, d’électrocution, de chute de l’appareil ou s’il bascule de son support. Confiez l’installation à des professionnels qualifiés et tenez les enfants à l’écart pendant l’installation. - Page 10 Ne bouchez pas les orifices de ventilation de l’écran. Si vous couvrez les orifices de ventilation (avec un drap ou autre), l’écran risque de surchauffer et de provoquer un incendie. N’installez aucune charge autre que l’écran sur le support de fixation mural. Dans le cas contraire, l’écran risque de tomber et de provoquer des blessures ou des dommages matériels.
- Page 11 ATTENTION Le non-respect des consignes suivantes peut entraîner des blessures ou des dommages matériels. N’installez pas le support de fixation mural sur des surfaces murales où les coins ou les côtés de l’écran dépasseraient. N’installez pas le support de fixation mural sur des surfaces murales comme des colonnes où...
-
Page 12: Installation Du Support De Fixation Mural
AVERTISSEMENT À l’attention des revendeurs Sony Les instructions suivantes concernent les détaillants Sony uniquement. Lisez attentivement les consignes de sécurité décrites ci-dessus et accordez une attention particulière à la sécurité lors de l’installation, de l’entretien et de la vérification de ce produit. - Page 13 Veillez à serrer les vis correctement dans la position indiquée. Sinon, l’écran risque de tomber et de causer des blessures corporelles ou d’être endommagé. Veillez à ne pas faire subir de chocs à l’écran pendant l’installation. Si l’écran subit des chocs, il risque de tomber ou de se casser. Vous pourriez vous blesser. Veillez à...
- Page 14 Para instalar este producto, se requieren unos conocimientos técnicos suficientes. Asegúrese de contratar la instalación a un distribuidor o contratista de Sony y preste especial atención a la seguridad durante la instalación. Sony no se responsabiliza de ningún daño o lesión provocada por una manipulación o instalación incorrectas.
- Page 15 Información para los clientes ADVERTENCIA Si no se tienen en cuenta las siguientes precauciones, pueden provocarse lesiones graves o incluso la muerte a raíz de un incendio, una descarga eléctrica, que el producto vuelque o que se caiga. Asegúrese de contratar la instalación a contratistas cualificados y mantenga a los niños alejados durante la instalación.
- Page 16 No obstruya el orificio de ventilación del monitor. Si se cubre el orificio de ventilación (con un paño, etc.), el monitor podría sobrecalentarse y provocar un incendio. No aplique ningún peso que no sea propio del monitor en el soporte de montaje mural.
- Page 17 PRECAUCIÓN Si no se tienen en cuenta las precauciones siguientes, pueden provocarse daños personales o materiales. No instale el soporte de montaje mural en superficies de paredes en las que puedan sobresalir las esquinas o los lados del monitor. No instale el soporte de montaje mural en superficies de paredes como una columna, en las que puedan sobresalir las esquinas o los lados del monitor.
- Page 18 ADVERTENCIA Información para los distribuidores de Sony Las siguientes instrucciones están destinadas únicamente a los distribuidores de Sony. Asegúrese de leer las precauciones de seguridad descritas más arriba y preste especial atención a la seguridad durante la instalación, el mantenimiento y la comprobación de este producto.
- Page 19 Asegúrese de apretar firmemente los tornillos en la posición correspondiente. Si no lo hace, el monitor puede caerse y dañarse o provocar daños personales. Procure no golpear el monitor durante la instalación. Si el monitor se golpea, puede caerse o romperse, lo que puede provocar daños personales. Procure instalar el monitor en una pared perpendicular y plana.
- Page 21 Step 1: Check the parts required for the installation English Étape 1 : Vérification des pièces requises pour Français l’installation Paso 1: Comprobar las piezas necesarias para la Español instalación English Prepare a Phillips screwdriver and the appropriate screws (four or more M8 (or equivalent) screws, not supplied), depending on the material of the wall, beforehand.
- Page 22 Step 2: Decide on the installation location English Étape 2 : Choix de l’emplacement d’installation Français Paso 2: Decidir la ubicación de instalación Español English Unit: mm (inches)/ Unité : mm (pouces)/ Place the paper template on a perpendicular, flat Unidad: mm (pulgadas) wall and decide on the installation location.
- Page 23 Display installing dimensions table English Français Tableau des dimensions d’installation de l’écran Tabla de dimensiones de instalación del monitor Español Display Dimensions/ Length for each mounting angle/ Weight/ unit: mm (inches)/ Unit: mm (inches)/ Display Model/ Dimensions de l’écran/ Unité : mm (pouces)/ Longueur de chaque angle de fixation/ Unité...
- Page 24 Wall processing dimensions diagram English Schéma des dimensions d’installation au mur Français Diagrama de las dimensiones de la pared Español 670 (26 3/8) Unit: mm (inches)/ 610 (24) Unité : mm (pouces)/ 455 (17 29/32) Unidad: mm (pulgadas) 406 (16) 20 –...
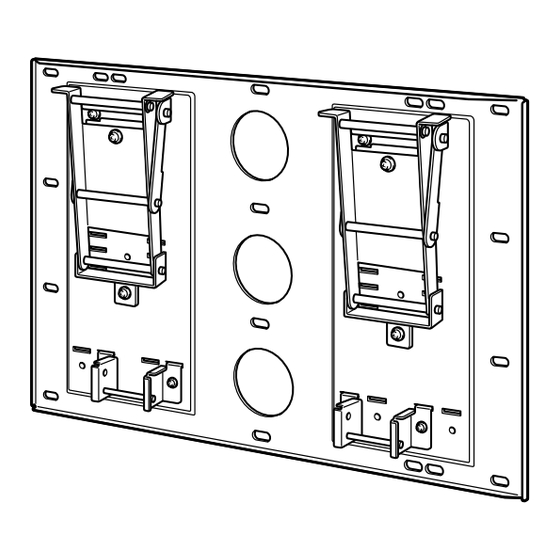
- Page 25 Step 3: Install the Plate Unit on the wall English Étape 3 : Installation de la plaque sur le mur Français Paso 3: Instalar la placa en la pared Español English Align the unit so that it is exactly level./ Alignez l’appareil de sorte qu’il soit parfaitement de Fix the Plate Unit to the wall using four or more niveau./...
- Page 26 English English Adjust the angle of the arms. • 0 degrees: Leave the white screws tightened as When installing the Display Unit perpendicularly (0 degrees), they are. adjustment of the arms angle (Procedure 1 and 2 below) is • Other than 0 degrees: Remove the white screws. not necessary.
- Page 27 When installing the Display Unit of the TV KE-37XS910, English KE-42XS910, KE-50XS910 or KE-42M1, do step 3 below. Si vous installez l’écran TV KE-37XS910, KE-42XS910, Français KE-50XS910 ou KE-42M1, effectuez l’étape 3 ci-dessous. Si instala el monitor del televisor KE-37XS910, Español KE-42XS910, KE-50XS910 o KE-42M1, realice el paso 3 que se describe a continuación.
- Page 28 Prepare for the installation of the Display Unit English Préparation pour l’installation de l’écran Français Preparación para la instalación del monitor Español English Preparation varies depending on the Display Unit to be installed. See the procedure for each model and prepare for the installation. Note When using an electric screwdriver, set the torque setting to approximately 2 N·m.
- Page 29 KE-37XS910 English KE-42XS910 1 Place the Display Unit, with its screen facing down, on a stable, cloth-covered work surface, KE-50XS910 at least 20 cm (8 in) off the floor. 2 Remove the screws that hold the Display Unit KE-42M1 to the Table Top Stand and detach the Table Top Stand from the Display Unit.
- Page 30 PDM-5510 English Español PDM-6110 1 Place the Display Unit, with its screen facing 1 Coloque el monitor con la pantalla mirando down, on a stable, cloth-covered work surface. hacia abajo encima de una superficie de trabajo estable y cubierta con un paño situada. Notes Notas •...
- Page 31 LDM-4210 English Speaker (left)/ Speaker (right)/ Haut-parleur (gauche)/ Place the Display Unit, with its screen facing Haut-parleur (droit)/ down, on a stable, cloth-covered work surface. Altoparlante (izquierdo) Altoparlante (derecho) Notes • If the weight of the Display Unit is placed on the speakers, deformation or a loose connection of the speakers may result.
- Page 32 Step 4: Install the Display Unit English Étape 4 : Installation de l’écran Français Paso 4: Instalar el monitor Español English WARNING Be sure to complete the installation before connecting the AC power cord to the wall outlet. If you allow the AC power cord to be pinched under or between pieces of equipment, this may result in a short circuit or an electric shock.
- Page 33 English Connect the AC power cord and the connecting cable(s) supplied with the Display Unit to the Display Unit. Connect the AC power cord and the connecting cable(s) to the connectors on the rear side of the Display Unit. For details on connecting the AC power cord and the connecting cable(s), refer to the instruction manual of the Display Unit.
- Page 34 English Install the Display Unit on the Plate Unit. 1 Insert the screws (+B6 × L20, supplied) for securing the Mounting Hook Unit into the screw holes on the outer left and right sides of the Mounting Hook Unit support shafts, and then tighten them temporarily.
- Page 35 Español Instale el monitor en la placa. 1 Inserte los tornillos (+B6 × L20, suministrados) para fijar los ganchos de montaje en los orificios para tornillos de los laterales exteriores derecho e izquierdo de los ejes de soporte de los ganchos de montaje y, a continuación, apriételos temporalmente.
- Page 36 Confirm the completion of the installation English Vérifiez que l’installation est terminée Français Confirme que ha finalizado la instalación Español English Check the following points. • Eight hooks of the Mounting Hook Units are firmly hooked on the four shafts on the Plate Unit. •...
- Page 37 Retrait de l’écran Français À l’attention des revendeurs Sony Cómo retirar el monitor Español Información para los distribuidores de Sony English Unplug the AC power cord from the wall outlet. Français Débranchez le cordon d’alimentation de la prise murale. Español Desconecte el cable de alimentación de la toma de corriente.
- Page 38 English Be sure that two or more persons hold the Display Unit and slide it upward to remove the Display Unit. WARNING • Be sure that two or more persons hold the Display Unit when carrying it. • Be careful not to allow the cords and cables to get hung up when removing the Display Unit. •...
- Page 39 Specifications English Spécifications Français Especificaciones Español English Unit: mm (inches) Weight: 9.0 kg (19 lb 14 oz) Design and specifications are subject to change without notice. Français Unité : mm (pouces) Poids : 9,0 kg (19 lb 14 oz) La conception et les spécifications du produit sont sujettes à modification sans préavis. Español Unidad: mm (pulgadas) Peso: 9,0 kg...
- Page 44 Printed on 100% recycled paper using VOC (Volatile Organic Compound)-free vegetable oil based ink. Printed in Japan...