Publicité
Les langues disponibles
Les langues disponibles
Liens rapides
Pipe Vise User Guide
Pipe Vise User Guide
Read the warnings and instructions
for all equipment and material being
used before operating this tool to
reduce the risk of serious personal
injury.
• Properly support the vise and pipe. Failure to properly sup-
port the equipment can cause vise tipping, falling pipe, chain
breakage and serious injury.
• Use appropriate safety equipment. Always wear proper eye
and foot protection to reduce the risk of injury.
• Do not use handle extensions ("cheaters") or excessive
force. These may damage the tool or cause serious injury.
NOTICE
Selection of appropriate materials and installation, join-
ing and forming methods is the responsibility of the system designer
and/or installer. Selection of improper materials and methods could
cause system failure.
Stainless steel and other corrosion resistant materials can be
con taminated during installation, joining and forming. This contam-
ination could cause corrosion and premature failure. Care ful evalu-
ation of materials and methods for the specific service conditions,
including chemical and temperature, should be completed before
any installation is attempted.
If you have any question concerning this RIDGID
– Contact your local RIDGID distributor.
– Visit RIDGID.com to find your local RIDGID contact point.
– Contact Ridge Tool Technical Service Department at rtctech-
services@emerson.com, or in the U.S. and Canada call (800)
519-3456.
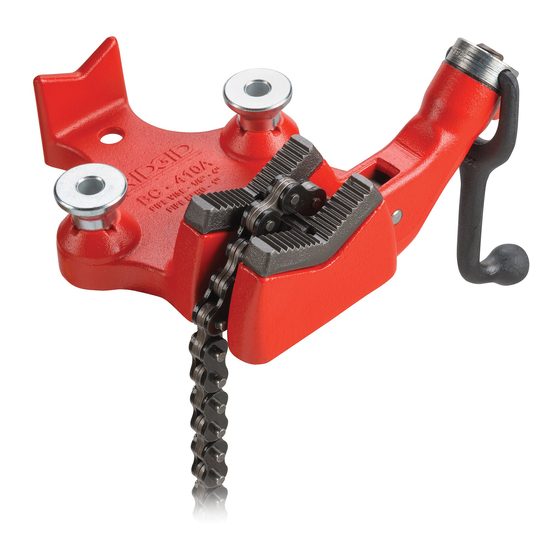
Description
RIDGID
Pipe Vises use a chain or yoke vise to hold and work pipe.
®
Many Pipe Vises include features to allow pipe bending.
The bench vises are mounted to a bench or other stable horizontal
platform. For lighter duty applications, portable vises are equipped
with a clamp or chain for temporary mounting. Vises/jaws are avail-
able for use with plastic pipe.
See the product label for specifications or consult the RIDGID
catalog.
Link
Handle
Chain
A. Bench Chain Vise
Clamp
Screw
Assembly
C. Portable Yoke Vise
Figure 1 – RIDGID Pipe Vises
Printed 7/18
EC42887
The Emerson logo and RIDGID logo are registered trademarks of Emerson Electric Co. or RIDGID, Inc. in the U.S. and other countries.
WARNING
product:
®
Yoke
Base
B. Bench Yoke Vise
Link Chain
Coin Chain
D. Portable Chain Vise
All other trademarks belong to their respective holders.
Inspection/Maintenance
Clean the vise to aid inspection and improve control. Inspect the vise
before each use for proper assembly, wear, damage, modification
or other issues that could affect safe use. Clean the jaws with a wire
brush. Replace jaws if teeth are worn to prevent pipe slippage. If any
problems are found, do not use until corrected.
For chain vises, inspect the chain for separation of the links or any
other damage. Link separation indicates the chain has been over-
stressed and should be replaced. Use only identical replacement
parts from RIDGID when servicing.
Confirm that the mounting fasteners are secure.
Lubricate all moving parts/joints as needed with light lubricating oil.
Wipe up excess oil.
Set Up/Operation
1. Make sure all equipment is inspected and set up per its instruc-
tions.
2. Assemble the Yoke Vise:
a. Place the yoke on base with hook orientation as required,
left or right side (Figure 2).
b. Insert Hinge Bolt through yoke and base assembly. Assem-
ble washer and nut to Hinge Bolt, and then tighten. If yoke
does not swing freely on base, tap threaded end of Hinge
Bolt with hammer.
Figure 2 – Yoke Vise Assembly
3. Choose a level, stable location to mount the vise. Loca tion
must be able to support the working loads applied to the pipe/
vise without bending, breaking, moving, tipping or other issues.
Material may need to be added to allow proper mounting
(wood or metal backing). Make sure there is nothing that will
be damaged by mounting the vise (electrical wires, etc.).
4. Pipe vises are usually located along the edge of benches.
Chain vises overhang the edge and have stops that locate the
vise relative to the bench edge.
a. Bench Vises: Use the holes in the vise base as a template
for locating the holes in the bench. Use the largest diameter
fastener that will fit in the vise and spool holes. Use appro-
priate grade fasteners for the installation. Use through bolts
with washers and locking nuts/wash ers. Bolts go through the
bending spools. See the vise parts list for more information.
Hook
Do not weld the vise in place. The vise bases are not
designed to be welded to.
b. Portable Yoke Vise: Securely clamp the vise to the platform
by tightening the clamp screw assembly (Figure 1C).
c. Portable Chain Vise: Hold the vise near a stable vertical
post/pipe. Wrap the coin chain around post and hook the
chain pin in the base groove. Securely tighten the chain
around post by rotating the eye bolt with handle (Figure 1D).
Confirm that the vise is secure and stable.
Handle
5. Carefully place the pipe on vise. Do not drop the pipe on the
vise. For best stability during use, keep the pipe end to be
worked on as close to the vise as possible.
6. Use appropriate pipe supports if the pipe extends past the base
of the vise.
Place stands to properly support long pipes. Generally pipe
should be supported in at least two places. The number and
©2018 RIDGID, Inc.
OR
999-888-102.10
REV. A
Publicité

Manuels Connexes pour RIDGID 40220


Sommaire des Matières pour RIDGID 40220
- Page 1 The number and 999-888-102.10 ©2018 RIDGID, Inc. Printed 7/18 EC42887 The Emerson logo and RIDGID logo are registered trademarks of Emerson Electric Co. or RIDGID, Inc. in the U.S. and other countries. REV. A All other trademarks belong to their respective holders.
-
Page 2: Inspection Et Entretien
This allows better control in – Consulter le revendeur RIDGID le plus proche. unexpected situations. – Visiter le site RIDGID.com pour localiser le représentant RIDGID Do not apply extreme or prolonged heat to the workpiece – this le plus proche. -
Page 3: Montage Et Utilisation
être Afin de limiter les risques de renversement, assurez-vous que le remplacée. Utilisez exclusivement des pièces de rechange RIDGID tuyau est bien centré à la fois dans l’étau et sur les porte-tube. -
Page 4: Inspección Y Mantenimiento
– Comuníquese con el distribuidor RIDGID en su localidad. a. Coloque la horquilla sobre la base con la orientación desea- – Visite RIDGID.com para averiguar dónde se encuentra su con- da del gancho, izquierda o derecha (Figura 2). tacto RIDGID más cercano. - Page 5 Pipe Vise User Guide y tuercas de bloqueo con arandelas. Los pernos atraviesan los agujeros de las bobinas para curvar. Para más infor- mación, vea la lista de piezas de la prensa de tornillo. No fije la prensa de tornillo mediante soldadura. Las bases de las prensas no están diseñadas para aceptar soldadura.