Table des Matières
Publicité
Les langues disponibles
Les langues disponibles
Liens rapides
Publicité
Chapitres
Table des Matières

Manuels Connexes pour Handi-Move 1020

Sommaire des Matières pour Handi-Move 1020
- Page 1 1020-1028 Body-support tilBeugel Chassis-mains heBeBügel user guide - handleiding - mode d'emploi - Bedienungsanleitung V 2.1 - 28-04-2011 © Handi-Move All rights reserved - Alle rechten voorbehouden - Tous droits réservés - Alle Rechte vorbehalten...
- Page 2 ..............In conformity with Gemäss Richtlinie Voor NV Handi-Move P. Pintelon Quality Manager 12/05/1998 Handi-Move NV - Ten Beukenboom 13, B-9400 Ninove - Tel. +32 54 31 97 10 - Fax +32 54 32 58 27...
-
Page 3: Table Des Matières
user guide Body support Table of contents Safety instructions ............................2 Scope of application ............................2 Product information ............................3 3.1. Body support ............................3 Installation instructions ..........................5 Explanation of the symbols ........................... 6 5.1. Symbols on the nameplate and packaging ..................6 5.2. -
Page 4: Safety Instructions
In this document the person who is lifted is referred to as the user and the person assisting him/her as the care giver. Before using the body support, ensure that the following conditions are fulfilled: the body support is only used with a Handi-Move hoist; ■ the caregivers concerned have received suitable instructions and training;... -
Page 5: Product Information
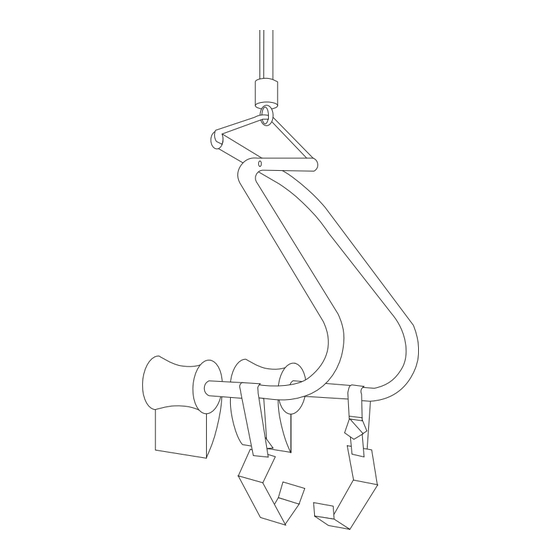
user guide Body support 3. product information 3.1. Body support This user guide refers to the following parts of your body support: A. Attachment hooks B. Cups C. Thigh support D. Thigh support band E. Blue rubber ring Arms g. accessories standard thigh supports Small - art. - Page 6 user guide Body support muscular dystrophy thigh supports Small - art. 2342 Medium- art. 2335 Muscular dystrophy thigh supports are used to prevent persons with weak muscle tone from slipping out of the body support. They are often used with muscular dystrophy patients. These thigh supports can also be used with amputees.
-
Page 7: Installation Instructions
user guide Body support muscular dystrophy thigh supports, slipproof Small - art. 2342 Medium- art. 2335 This version provides extra protection against slipping. This version is not available with a Velcro strap. Cup cushions art. 1068 The cup cushions are pulled over the cups. They should be used if the user finds the pressure of the body support uncomfortable. -
Page 8: Explanation Of The Symbols
user guide Body support step 2. To suspend the body support from the hooks, lower the swivel hook to eye level and press the body support against your body with one hand so the cups touch each other and you can fit the hooks into the ends of the hollow body support tubes. -
Page 9: Nameplate
Body support 5.2. nameplate MODEL - MODÈLE - TYP DISTRIBUTED IN EUROPE BY Handi-Move International nv ❏ 1020 ❏ 1025 ❏ 1026 (XS) 9400 Ninove, Belgium GEPOLIJST - POLI - POLISHED - POLIERT ✆ 32 54 31 97 10... -
Page 10: From Wheelchair To Toilet
user guide Body support step 7. Press the "UP" button to lift the body support slightly, and then check the positions of the cups and thigh supports once again. The user's legs and torso must be lifted at the same time. Ensure that the user is comfortable. -
Page 11: Lifting From The Floor
user guide Body support step 3. Place your hand on the user's back and press him or her gently forward into the cups. step 4. Use the "UP" button to apply enough pressure on the cups to hold the user securely. step 5. -
Page 12: Upright Care Of Incontinent Users
user guide Body support 6.7. upright care of incontinent users. step 1. Arrange the user in a sitting position before you lift the user. step 2. Always fit the safety band around the cups or arms. step 3. Use only the cups and allow the user to rest his or her feet on the floor for support. -
Page 13: Maintenance And Storage
The body support must be inspected at least once a year. ■ The inspection may only be carried out by Handi-Move or a technician approved by Handi-Move. ■ After the inspection, a report will be prepared documenting the tests that were carried out and the parts that ■... -
Page 14: Technical Specifications
user guide Body support The thigh supports show signs of wear: ■ • you can order thigh supports under part number 1066 (see 11. Spare parts). 10. technical specifications Material .....arms ...........st. steel 316 ........hooks ..........st. steel 316 ........cups ..........polyurethane ........bands ............. -
Page 15: Spare Parts And Yearly Inspection
Body support 12. spare parts and yearly inspection For spare parts, maintenance, yearly inspection and free information, contact your Handi-Move distributor. Address of a Handi-Move distributor in your locality: Handi-Move nv, Ten Beukenboom 13, 9400 Ninove, Belgium Tel + 32 54 31 97 10 Fax + 32 54 32 58 27 E-mail: info@handimove.com... - Page 17 handleiding tilBeugel Inhoud Veiligheidsvoorschriften ..........................2 Toepassingsgebied ............................2 Productinformatie ............................3 3.1. De tilbeugel ............................3 3.2. Accessoires ............................3 Installatievoorschriften ..........................5 Verklaring van de symbolen .......................... 6 5.1. Symbolen op het typeplaatje en verpakking ..................6 5.2. Typeplaatje ............................
-
Page 18: Veiligheidsvoorschriften
In dit document wordt de persoon die wordt opgetild de gebruiker genoemd en de persoon die hierbij helpt de begeleider. Alvorens de tilbeugel te gebruiken, verzeker u ervan dat: de tilbeugel enkel wordt gebruikt in combinatie met Handi-Move liften ■ de begeleiders in kwestie de gepaste instructie en training hebben gekregen ■... -
Page 19: Productinformatie
handleiding tilBeugel 3. productinformatie 3.1. de tilbeugel In deze gebruiksaanwijzing zal er worden verwezen naar de volgende onderdelen van uw tilbeugel: a bevestigingshaken B handen C beensteun d beensteunband e blauwe rubberring armen 3.2. accessoires standaard beensteunen Small - art. 1090 Medium- art. - Page 20 handleiding tilBeugel spierdystrofie-beensteunen Small - art. 2360 Medium- art. 2350 Spierdystrofie-beensteunen worden gebruikt om te voorkomen dat mensen met lage spiertonus uit de tilbeugel zouden glijden. Vaak gebruikt voor spierdystrofie-patiënten. Deze beensteunen kunnen ook gebruikt worden voor gebruikers met amputaties. Om de velcroband over de beensteunen te schuiven, plaatst u de beens- ■...
-
Page 21: Installatievoorschriften
handleiding tilBeugel spierdystrofie-beensteunen anti-slip Small - art. 2342 Medium- art. 2335 Deze versie biedt een bijkomende bescherming tegen glijden. Deze versie is niet verkrijgbaar met een velcro- band. Kussens voor cups art. 1068 De kussens voor cups worden over de “handen” (cups) getrokken. Ze wor- den gebruikt als de gebruiker de grip van de tilbeugel oncomfortabel vindt. -
Page 22: Verklaring Van De Symbolen
handleiding tilBeugel stap 2. Om de tilbeugel in de haken te hangen, laat u de draainagel tot ooghoogte zakken en duwt u met één arm de tilbeugel tegen het lichaam aan zodat de “handen” elkaar raken en u de haken in de beide uiteinden van de holle buizen van de tilbeugel kan steken. -
Page 23: Typeplaatje
5.2. typeplaatje MODEL - MODÈLE - TYP DISTRIBUTED IN EUROPE BY Handi-Move International nv ❏ 1020 ❏ 1025 ❏ 1026 (XS) 9400 Ninove, Belgium GEPOLIJST - POLI - POLISHED - POLIERT ✆ 32 54 31 97 10 1021... -
Page 24: Van Rolstoel Naar Toilet
handleiding tilBeugel stap 7. Til met de “OP”-knop de tilbeugel een beetje op en controleer nog eens de positie van de “handen” en de beensteunen. Zowel benen als romp moeten tegelijkertijd getild worden. Verzeker u van het com- fort van de gebruiker. Ga door met tillen tot de gebruiker vrij in de lucht hangt. stap 8. -
Page 25: Tillen Van De Grond
handleiding tilBeugel stap 3. Met uw hand op de rug van de gebruiker duwt u hem zachtjes voorwaarts in de “handen”. stap 4. Zet met de “OP”-knop genoeg druk op de “handen”, zodat de gebruiker in een veilige greep zit. stap 5. -
Page 26: Rechtopstaande Verzorging
handleiding tilBeugel 6.7. rechtopstaande verzorging stap 1. Zorg ervoor dat de gebruiker neerzit vooraleer u hem/haar tilt. stap 2. Gebruik altijd de veiligheidsband rond de "handen" of "armen". stap 3. Gebruik alleen de “handen” en laat de gebruiker met zijn/ haar voeten op de grond steunen. -
Page 27: Onderhoud & Opslagplaats
De tilbeugel moet minstens 1 keer per jaar aan een inspectie worden onderworpen. ■ De inspectie mag enkel uitgevoerd worden door Handi-Move of een door Handi-Move erkend monteur. ■ Na de inspectie wordt er een rapport opgemaakt over welke testen er zijn uitgevoerd en welke onderdelen er ■... -
Page 28: Technische Specificaties
handleiding tilBeugel • De “handen” moeten aan de tilbeugelarm worden vastgehaakt in een correcte hoek. Om deze hoek te con- troleren, duwt u de armen van de tilbeugel samen zodat de onderkant van de “handen” elkaar raken, terwijl de buitenhoek van de “handen” t.o.v. een horizontaal oppervlak 75 graden bedraagt. De beensteunbanden vertonen slijtage: ■... -
Page 29: Reserveonderdelen, Onderhoud En Jaarlijkse Inspectie
12. reserveonderdelen, onderhoud en jaarlijkse inspectie Contacteer uw Handi-Move verdeler voor reserveonderdelen en jaarlijks onderhoud. Adres van een Handi-Move verdeler in uw buurt: Handi-Move nv, Ten Beukenboom 13, 9400 Ninove, België Tel. + 32 54 31 97 10 Fax + 32 54 32 58 27 E-mail: info@handimove.com... - Page 31 mode d'emploi Châssis-mains Sommaire Instructions de sécurité ..........................2 Domaine d'utilisation ............................. 2 Informations sur le produit ..........................3 3.1. Le châssis-mains ..........................3 3.2. Accessoires ............................3 Instructions d'installation ..........................5 Explication des symboles ..........................6 5.1. Symboles sur la plaque d’identification et sur l'emballage ............... 6 5.2.
-
Page 32: Instructions De Sécurité
"l’accompagnateur". Avant d'utiliser le châssis-mains, vous devez vous assurer que : ■ le châssis-mains soit uniquement utilisé en combinaison avec des appareils de levage Handi-Move ■ les accompagnateurs en question aient reçu les instructions et la formation appropriées ■... -
Page 33: Informations Sur Le Produit
mode d'emploi Châssis-mains 3. informations sur le produit 3.1. le châssis-mains Dans le présent mode d'emploi, il est fait réfé- rence aux éléments suivants de votre châssis- mains: a crochets de fixation B mains C support de cuisses d sangle de support de cuisses e anneau de caoutchouc bleu bras 3.2. - Page 34 mode d'emploi Châssis-mains supports de cuisses pour dystrophie musculaire Small - art. 2360 Medium- art. 2350 Les supports de cuisses pour dystrophie musculaire sont utilisés pour éviter que les personnes à faible tonus mus- culaire ne glissent hors du châssis-mains. Souvent utilisés pour les patients souffrant de dystrophie musculaire. Ces supports de cuisses peuvent également être utilisés pour les utilisateurs ayant subi une amputation.
-
Page 35: Instructions D'installation
mode d'emploi Châssis-mains supports de cuisses antidérapants pour dystrophie musculaire Small - art. 2342 Medium- art. 2335 Cette version offre une protection supplémentaire contre le risque de glissade. Cette version n'est pas disponible avec une bande velcro. housses pour les "mains" art. -
Page 36: Explication Des Symboles
mode d'emploi Châssis-mains étappe 2. Pour accrocher le châssis-mains dans les crochets, faites des- cendre le tourillon jusqu'à hauteur du regard et poussez avec un bras le châssis-mains contre le corps de sorte que les "mains" se touchent et que vous puissiez glisser les crochets dans les deux extrémités des tuyaux du châssis-mains. -
Page 37: Plaque D'identification
Châssis-mains 5.2. plaque d’identification MODEL - MODÈLE - TYP DISTRIBUTED IN EUROPE BY Handi-Move International nv ❏ 1020 ❏ 1025 ❏ 1026 (XS) 9400 Ninove, Belgium GEPOLIJST - POLI - POLISHED - POLIERT ✆ 32 54 31 97 10... -
Page 38: De La Chaise Roulante À La Toilette
mode d'emploi Châssis-mains étappe 7. Soulevez légèrement le châssis-mains en appuyant sur le bouton “MONTÉE” et contrôlez une nouvel- le fois la position des “mains” et des supports de cuisses. Les jambes et le tronc doivent être soulevés simultanément. Assurez-vous du confort de l'utilisateur. Continuez à soulever l'utilisateur jusqu'à ce qu'il soit librement suspendu dans l'air. -
Page 39: Soulever Une Personne Allongée Sur Le Sol
mode d'emploi Châssis-mains étappe 2. Faites descendre le châssis-mains jusqu'au-dessus du bassin de l'utilisateur. étappe 3. Placez votre main sur le dos de l'utilisateur et poussez-le légère- ment vers l'avant de manière à le positionner dans les "mains". étappe 4. Utilisez le bouton "MONTÉE" pour générer une traction suf- fisante sur les "mains"... -
Page 40: Verticalisation De Personnes Incontinentes
mode d'emploi Châssis-mains 6.7. verticalisation de personnes incontinentes étappe 1. Veillez à ce que l'utilisateur soit en position assise avant de le soulever. étappe 2. Utilisez toujours la sangle de sécurité que vous appliquez autour des "mains" ou des "bras" du châssis-mains. étappe 3. -
Page 41: Entretien Et Lieu D'entreposage
Le châssis-mains doit être soumis à une inspection au moins une fois par an. ■ L'inspection peut uniquement être réalisée par Handi-Move ou par un monteur agréé par Handi-Move. ■ Après l'inspection, un rapport est rédigé indiquant les tests qui ont été réalisés et les pièces qui doivent être ■... -
Page 42: Spécifications Techniques
mode d'emploi Châssis-mains • Les “mains” doivent être fixées au "bras" du châssis-mains avec un angle correct. Pour contrôler cet angle, poussez les "bras" du châssis-mains l'un vers l'autre de manière à ce que le dessous des "mains" se touche, tandis que l'angle extérieur des "mains"... -
Page 43: Pièces De Rechange Et Inspection Annuel
Châssis-mains 12. pièces de rechange et inspection annuel Veuillez contacter votre distributeur Handi-Move pour obtenir des pièces de rechange et pour l'inspection annuel. Adresse d'un distributeur Handi-Move dans votre région: Handi-Move nv, Ten Beukenboom 13, 9400 Ninove, Belgique... - Page 45 Bedienungsanleitung heBeBügel Inhaltsverzeichnis Sicherheitsvorschriften ..........................2 Anwendungsbereich ............................2 Produktinformation ............................3 3.1. Der Hebebügel ........................... 3 3.2. Zubehör .............................. 3 Installationsvorschriften ..........................6 Liste der Symbole ............................6 5.1. Symbole auf dem Typenschild und der Verpackung ................. 6 5.2. Typenschild ............................
-
Page 46: Sicherheitsvorschriften
In diesem Dokument wird die angehobene Person als Benutzer und die helfende Person als Begleiter bezeichnet. Vergewissern Sie sich vor dem Einsatz des Hebebügels stets, dass: der Hebebügel in Kombination mit Handi-Move Hebemitteln/Liftern verwendet wird ■ die Begleiter die passende Einweisung und Ausbildung erhalten haben ■... -
Page 47: Produktinformation
Bedienungsanleitung heBeBügel 3. produktinformation 3.1. der hebebügel In dieser Bedienungsanleitung wird auf die folgenden Teile des Hebebügels Bezug genom- men: A. Einhängehaken B. Bruststütze C. Beinstütze D. Beinstützengurte E. Blauer Positionsring Arme 3.2. Zubehör Beinstützen, standardausführung Klein - Art. 1090 Mittel - Art. - Page 48 Bedienungsanleitung heBeBügel muskeldystrophie-Beinstützen Klein - Art. 2360 Mittel - Art. 2350 Mit den Muskeldystrophie-Beinstützen soll verhindert werden, dass Menschen mit schwachem Muskeltonus aus den Hebebügeln rutschen. Sie werden häufig bei Muskeldystrophie-Patienten verwendet. Diese Beinstützen sind auch für Benutzer mit Amputationen geeignet. Um die Tasche des Velkrobands über die Beinstützen zu schieben, die ■...
- Page 49 Bedienungsanleitung heBeBügel gleitschutzmuskeldystrophie-Beinstützen ■ Klein - Art. 2342 Mittel - Art. 2335 Diese Version bietet einen zusätzlichen Schutz gegen ein Abrutschen. Diese Version ist nicht mit einem Velkro- band erhältlich. polster für Bruststütze Art. 1068 Die Polster für die Bruststützen werden auf die Bruststützen (Cups) aufge- zogen.
-
Page 50: Installationsvorschriften
Bedienungsanleitung heBeBügel 4. installationsvorschriften Schritt 1. Die Befestigungshaken für den Hebebügel in die Huböse hän- gen. Schritt 2. Um die Haken in den Hebebügel einzuhängen, die Huböse auf Augenhöhe senken und mit einem Arm den Hebebügel gegen den Körper drücken, damit die beiden Bruststützen anliegen und die Haken in die beiden Rohre des Hebebügels gesteckt werden können. -
Page 51: Typenschild
Bedienungsanleitung heBeBügel 5.2. typenschild MODEL - MODÈLE - TYP DISTRIBUTED IN EUROPE BY Handi-Move International nv 1020 1025 1026 ❏ ❏ ❏ (XS) 9400 Ninove, Belgium GEPOLIJST - POLI - POLISHED - POLIERT ✆ 32 54 31 97 10 1021... -
Page 52: Vom Rollstuhl Auf Die Toilette
Bedienungsanleitung heBeBügel Schritt 7. Den Hebebügel durch Drücken des Knopfs "Heben" etwas anheben und die Positionen von Brust- und Beinstützen noch einmal überprüfen. Beine und Rumpf müssen durch den Hebebügel gleichzeitig angehoben werden. Achten Sie auf den Komfort des Benutzers. Den Hebebügel anheben, bis der Benutzer frei in der Luft hängt. -
Page 53: Heben Vom Boden
Bedienungsanleitung heBeBügel Schritt 3. Drücken Sie mit einer Hand gegen den Rücken des Benutzers, um ihn sacht nach vorn auf die Bruststützen zu schieben. Schritt 4. Drücken Sie den Knopf "Heben" kurz, damit die Bruststützen etwas Zug auf den Benutzer ausüben und ihn sicher in Sitzposi- tion halten. -
Page 54: Versorgung Bei Inkontinenz Von Benutzern
Bedienungsanleitung heBeBügel 6.7. versorgung bei inkontinenz von Benutzern Schritt 1. Sorgen Sie dafür, dass sich der Benutzer setzt, bevor Sie ihn anheben. Schritt 2. Verwenden Sie stets den Sicherheitsgurt, der an Bruststützen oder Armen des Hebebügels befestigt wird. Schritt 3. Halten Sie den Benutzer nur mit den Bruststützen und lassen Sie den Benutzer sich mit seinen Füßen auf dem Boden abstützen. -
Page 55: Wartung Und Lagern
8.2. Jährliche inspektion Der Hebebügel muss mindestens einmal pro Jahr inspiziert werden. ■ Diese Inspektion darf nur von Handi-Move oder einem durch Handi-Move anerkannten Monteur durchgeführt ■ werden. Nach der Inspektion wird ein Bericht erstellt, in dem die Art der Prüfungen und die ausgetauschten Teile ■... -
Page 56: Technische Daten
Bedienungsanleitung heBeBügel • Dann das Rohr des Arms reinigen und für die Ersatzstütze vorbereiten. Da sich die Bruststützen links und rechts unterscheiden, darauf achten, dass die richtige Seite bestellt wird. Den Loctite-Kleber auftragen, die neue Bruststütze aufschieben und dann mit einer Niete sichern. •... -
Page 57: Erhalt Von Ersatzteilen Und (Jährliche) Wartung
Bedienungsanleitung heBeBügel 12. erhalt von ersatzteilen und (jährliche) Wartung Für Ersatzteile, jährliche Wartung und unverbindliche Informationen nehmen Sie bitte mit Ihrem Handi-Move- Händler Kontakt auf. Anschrift eines in Ihrer Nähe befindlichen Handi-Move-Händlers: Handi-Move nv - Ten Beukenboom 13 - 9400 Ninove - Belgien Tel.