Table des Matières

Publicité

Les langues disponibles

Les langues disponibles

Liens rapides

CL320
MULTIFUNCTION TELEPHONE
User guide P2
2LMC29YY
Notice D'utilisation P42
1

Publicité

Chapitres

Table des Matières
loading

Sommaire des Matières pour Geemarc CL320

  • Page 1 CL320 MULTIFUNCTION TELEPHONE User guide P2 2LMC29YY Notice D'utilisation P42...
  • Page 2: Table Des Matières

    CONTENTS CONTENTS INTRODUCTION Unpacking the Telephone DESCRIPTION General Description LCD Screen Description Menu Navigation INSTALLATION Setting Up Wall Mounting SETTINGS Language Setting Screen Contrast Setting Time Setting Voice Function Setting Flash (Recall) Setting Dialling Mode (Tone/Pulse) Setting Ringer Volume Setting USING THE TELEPHONE Making a Call Receiving a Call...
  • Page 3 CONTENTS CALLER DISPLAY View Caller Display List Dial a Number from the Caller Display List Delete an Entry from the Caller Display List Delete all Entries from the Caller Display List Copying a Number to the Phone Book PHONE BOOK Create a Phone Book Entry Store/Change a Name Recording Delete a Name Recording...
  • Page 4: Introduction

    Its is important that you read the instructions below in order to use your Geemarc telephone to its full potential. Keep this user guide in a safe place for future reference.
  • Page 5: Unpacking The Telephone

    1 CL320 unit • 1 CL320 handset with curly cord • 1 Mains power adaptor • 1 Telephone line cord • 1 User Guide For product support and help visit our website at www.geemarc.com Telephone 01707 384438 Or fax 01707 372529...
  • Page 6: Description

    DESCRIPTION General Description 3 4 5 CLIP MENU DESCRIPTION...
  • Page 7 Call back, confirm Quick Dial M1 (emergency call number 1) Delete Quick Dial M2 (emergency call number 2) Scroll upwards Quick Dial M3 (emergency call number 3) Scroll downwards LED (flashes when an emergency call is made or a new call has been received) Menu button Phonebook, Exit, Caller ID Recall...
  • Page 8: Lcd Screen Description

    DESCRIPTION LCD Screen Description Time and Date Battery Icon 9:52 9/12 TOTAL:04 NEW:02 New Calls Calls Received Received This LCD display shows the total number of calls and the number of new calls ready to be reviewed. In this example you have a total of 4 calls which includes two new calls.
  • Page 9: Installation

    Connect the handset to one end of the curly cord. The connector at the end of the curly cord plugs into the socket on the left hand side of the CL320 unit. Open the battery compartment (push the small clip backwards and then upwards).
  • Page 10 INSTALLATION Note: Mains power is required to power the multifunction features of the telephone. Fit 4 x AA sized batteries in order to save and use stored numbers in case of mains power failure. Without mains or battery power, the telephone can still be used to answer calls or to manually dial out calls but all the multifunction features will not be available.
  • Page 11: Wall Mounting

    INSTALLATION Wall Mounting Feed the guide tabs (1) on the wall-mounting bracket (2) in the slots (3) on the underside of the telephone. Slide the wall-mounting bracket 10 mm upwards until it audibly locks into place. Drill a hole and insert a screw leaving about 5 mm of the screw projecting from the wall.
  • Page 12: Settings

    SETTINGS Language Setting You can choose between 8 different languages including English and French. Each language has voice announcements available in that language. MENU Press LANGUAGE to select Press to select to select the desired language Press to select Press to exit...
  • Page 13: Screen Contrast Setting

    SETTINGS Screen Contrast Setting Your screen has a backlight which automatically switches off after 15 seconds of inactivity. The contrast of the backlight against the text can be increased or decreased. MENU Press CONTRAST to select Press to select to select the desired contrast setting (3=normal) Press to select Press...
  • Page 14: Time Setting

    SETTINGS Time Setting If you subscribe to a Caller Display service, the date and time will be set whenever you receive a call. However, if you do not subscribe to this service, you will need to set the date and time manually. MENU Press TIME/DATE...
  • Page 15: Voice Function Setting

    SETTINGS Voice Function Setting VOICE When the function is in pre-dial mode numbers 0-9, numbers held in the call log, numbers held in the phone book and a caller’s name (if recorded, see Phonebook Chapter – Storing Name Recording) will be announced in the loudspeaker. MENU Press VOICE...
  • Page 16: Flash (Recall) Setting

    SETTINGS Flash (Recall) Setting Your phone works with a time break recall for United Kingdom (R=100ms). In France, flash time setting should be R=300ms. This value can be set to 100, 270, 300 or 600. MENU Press FLASH to select Press to select 100/270/300/600...
  • Page 17: Dialling Mode (Tone/Pulse) Setting

    TONE or to select the desired method, PULSE Press to select Press to exit Ringer Volume Setting A switch located on the right side of the CL320 unit allows the ringer to be switched to LOW, MEDIUM or HIGH.
  • Page 18: Using The Telephone

    USING THE TELEPHONE Making a Call Pick up the handset. When you hear the dialling tone, dial the number on the keypad. The number will be displayed on the LCD display To end the call simply replace the handset in the cradle Pre-dialling If VOICE is activated, once you press the number keys 0-9 you will hear the number being dialled.
  • Page 19 USING THE TELEPHONE Making a Call – Hands Free Dial the number on the keypad in the on-hook position if necessary to cancel and correct a wrong digit Press and the number will be dialled automatically. The handsfree function (speaker) is now activated and the LED indicator next to the button will ibe illuminated.
  • Page 20: Receiving A Call

    USING THE TELEPHONE Receiving a Call When an incoming call is received, the telephone rings and the LCD display backlight lights up. If the caller can be identified (due to subscription to a Caller Display service), the caller’s telephone number will be displayed. The caller’s name will also be displayed provided that the number and name stored are in the phone book.
  • Page 21: Mute Function

    Handset Volume Setting During a call, the handset volume can be adjusted to one of 10 levels using the control knob located on the handset cradle of the CL320 unit. When the handset volume is set to anything greater than “0”, the handset volume LED will light up.
  • Page 22: Call Timer

    USING THE TELEPHONE Call Timer Your handset automatically times the duration of every external call. The time is shown during the call and for a few seconds after the call has ended. Hearing Aid Use This telephone is hearing aid compatible. Select the T mode on your hearing aid to enable this feature.
  • Page 23: Caller Display

    CALLER DISPLAY The features described in this section are only available if you subscribe to a Caller Display service from your network provider. Caller Display means you can see who is calling before you answer a call or see who has called in your absence (provided the number is not withheld, unavailable or is an international call).
  • Page 24: View Caller Display List

    CALLER DISPLAY View Caller Display List to scroll through the caller display list Notes: At the end of the caller display list the LCD display will END OF LIST display . If there are no caller display telephone NO CALL numbers in the caller display list, is displayed Dial a Number from the Caller Display List...
  • Page 25: Delete An Entry From The Caller Display List

    CALLER DISPLAY Delete an Entry from the Caller Display List to scroll through the caller display list until you find the telephone number you wish to delete DELETE? Press will be shown on the LCD display Press and hold until the telephone number disappears Press to exit Delete All Entries from the Caller Display List...
  • Page 26: Copying A Number To The Phone Book

    CALLER DISPLAY Copying a Number to the Phone Book to scroll through the caller display list until you find the telephone number you wish to copy MENU COPY TO MEMORY Press until the display shows Press...
  • Page 27: Phone Book

    PHONE BOOK Telephone numbers and associated names can be stored in the phone book. The phone book can contain 30 telephone numbers (maximum of 22 digits) with names (maximum of 16 letters). If you subscribe to a caller ID service the name in the phone book will be shown for incoming calls.
  • Page 28 PHONE BOOK Say the desired name. Speak clearly and at a distance of 15- 20cm from the machine. The recording can be up to 3 seconds long Release Press when you are ready to exit 1..[Space character] + & - / X 1 2..A B C Å...
  • Page 29: Store/Change A Name Recording

    PHONE BOOK Store/Change a Name Recording MENU Press NAME RECORDING to select Press to select to select the desired telephone number Press and hold until a tone is heard Say the desired name. Speak clearly and at a distance of 15- 20cm from the machine.
  • Page 30: Delete A Name Recording

    PHONE BOOK Delete a Name Recording MENU Press NAME RECORDING to select Press to select to select the desired telephone number to be deleted Press while the recording is played back Press when you are ready to exit View Phone Book Entries Press to scroll through the phone book entries.
  • Page 31: Dialling Using A Phone Book Entry

    PHONE BOOK Dialling using a Phone Book Entry Locate the required telephone number as shown in one of the above methods (see View Phone Book Entries) Press . The number will be dialled automatically. If names have been recorded, they will be read aloud for the chosen entry.
  • Page 32: Delete A Phone Book Entry

    PHONE BOOK Delete a Phone Book Entry Locate the required telephone number as shown in one of the above methods (see View Phone Book Entries) DELETE? Press will be shown on the LCD display Press and hold until the telephone number disappears Delete all Phone Book Entries Locate any telephone number as shown in one of the above methods (see View Phone Book Entries)
  • Page 33: Emergency Calls

    EMERGENCY CALLS This function enables you to get immediate help from with those contacts whose telephone numbers are stored on the buttons . These buttons can store the numbers of appropriate emergency services and/or private emergency numbers such as friends and family. The emergency message is a voice message that is heard by the emergency contact when the Emergency function is used .
  • Page 34: Check An Emergency Message

    EMERGENCY CALLS The message should also include your name and address. The message can be up to 20 seconds long. Here is an example of an outgoing message:-This is an emergency call from John Smith from 10, Long Street, Middleton. I require your immediate assistance. Press zero to connect this call.
  • Page 35: Storing An Emergency Number

    EMERGENCY CALLS This telephone has 3 emergency number memories. Once a number has been stored in a memory location, you only need press one button to make the call. The emergency buttons are numbered When an emergency call is activated the phone will start to beep and flash for 15 seconds.
  • Page 36: Making An Emergency Call With Emergency Numbers

    EMERGENCY CALLS Note: Even if 3 different emergency numbers are not needed, you should store the same number on different buttons. If you need to change a number, store the new number in the same location as the old one. Making an Emergency Call with Emergency Numbers Hold down the desired emergency button (...
  • Page 37: Quick Dial

    QUICK DIAL M1, M2 and M3 can also be used as quick dial locations Storing a Quick Dial Number MENU Press STORE NUMBER to select Press Enter the telephone number to be stored (maximum of 22 digits) Press Select the speed dial location ( ) by pressing the corresponding button Dialling a Quick Dial Number...
  • Page 38: Troubleshooting

    TROUBLESHOOTING No display • Make sure that the power adaptor is plugged in correctly and is not damaged CL320 does not ring • Make sure that the telephone line cord is plugged in correctly and is not damaged • Connect another telephone to the telephone PTT socket or...
  • Page 39: Safety Information

    SAFETY INFORMATION General Only use the power supply included with the product. Do not open the unit (except to replace the batteries). Contact the helpline for all repairs. Never dispose of batteries in a fire. There is a serious risk of explosion and/ or the release of toxic chemicals.
  • Page 40: Guarantee

    GUARANTEE From the moment your Geemarc product is purchased, Geemarc guarantee it for the period of one year. During this time, all repairs or replacements (at our discretion) are free of charge. Should you experience a problem then contact our help line or visit our website at www.geemarc.com.
  • Page 41 GUARANTEE Electrical connection: The apparatus is designed to operate from a 230V 50Hz supply only. (Classified as ‘hazardous voltage’ according to EN60950 standard). The apparatus does not incorporate an integral power on/off switch. To disconnect the power, either switch off supply at the mains power socket or unplug the AC adaptor. When installing the apparatus, ensure that the mains power socket is readily accessible.
  • Page 42: Recycling Directives

    - Or, hand the old product to the retailer. If you purchase a new one, they should accept it. Thus if you respect these instructions you ensure human health and environmental protection. For product support and help visit our website at www.geemarc.com Telephone 01707 384438 Or fax 01707 372529...
  • Page 43 SOMMAIRE SOMMAIRE INTRODUCTION Composition DESCRIPTION Général Afficheur Navigation menu INSTALLATION Connection Installation murale REGLAGES Sélection langage Contraste écran Réglage date/heure Guide vocal Temps du flash Mode de numérotation Volume sonnerie UTILISATION DU TELEPHONE Appeler Pré-numérotation Mode mains libres Répondre à un appel Répondre en mode mains libres Rappel du dernier numéro composé...
  • Page 44 SOMMAIRE FONCTIONS AVANCEES ( présentation du numéro) Visualiser le journal d'appels Appeler depuis le journal Supprimer une entrée du journal Effacer tous les numéros du journal Copier un numéro du journal dans le répertoire REPERTOIRE Enregistrer un numéro Enregistrer/Modifier une entrée vocale Effacer une entrée Lister les entrées Appeler à...
  • Page 45: Introduction

    INTRODUCTION Merci d'avoir acheté notre modèle "CL320". Ce téléphone vous offre les avantages d'un téléphone multifonctions : main-libre, répertoire, affichage du nom et N° de l'appelant * , annonce vocale Il est important de bien lire les instructions décrites dans cette notice afin de profiter d'une utilisation maximale de votre téléphone.
  • Page 46: Composition

    INTRODUCTION Composition Lors du déballage vous devez trouver : • 1 Combiné • 1 Base CL320 • 1 Adaptateur secteur • 1 Cordon de ligne Visitez notre site sur www.geemarc.com Telephone 0328587575 Ou fax 0328587576...
  • Page 47: Description Général

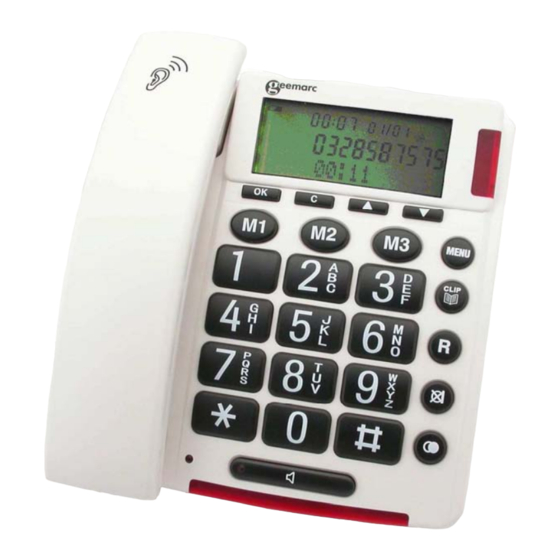
    DESCRIPTION Description Générale 3 4 5 CLIP MENU...
  • Page 48 DESCRIPTION 1 = Rappel ou confirmation 2,4,6 =Mémoires directes (M1 à M3) 3 = Correction, retour 5,7 =Touches de navigation dans le menu 8 =LED (clignote en cas d'appel d'urgence , ou appel en absence) 9 = Accès au Menu 10= Répertoire, liste d'appels, sortie menu 11= Flash 12= Silence...
  • Page 49: Afficheur

    DESCRIPTION Description de l'afficheur Date et heure Niveau usure pile 9:52 9/12 TOTAL:04 NEW:02 Nouveaux Appels reçus appels L'affichage : TOTAL 4 inclus les 2 nouveaux appels 9:52 9/12 N° de l'appelant 01517222277 Nom de l'appelant ROBERT JONES Dumont Marc Navigation dans le Menu Appuyer sur la touche MENU pour accéder et sur pour en sortir...
  • Page 50: Installation

    INSTALLATION Effectuer le branchement comme indiqué ci-dessous Connexion combiné Adaptateur 220V Prise téléphonique - Ouvrez le compartiment à piles (sous la base). - Insérez 4 piles alcalines sans mercure (type AAA 1.5V) en respectant les polarités dans le compartiment situé en dessous de l’appareil. - Refermez le compartiment.
  • Page 51: Montage Mural

    INSTALLATION Montage mural Insérer le support mural (2) sous la base comme indiqué ci- dessous. Percer un trou dans le mur pour insérer une vis d'environ 5mm Accrocher le téléphone en ajustant l'orifice (4) sur la vis Pour maintenir votre combiné en position verticale, retirez l’ergot situé...
  • Page 52: Reglages

    REGLAGES Langage 8 langues sont disponibles , avec aide vocale MENU Appuyer sur LANGUE Utiliser pour sélectionner Appuyer sur Utiliser pour sélectionner le langage Appuyer sur Appuyer sur pour sortir...
  • Page 53 REGLAGES Contraste Vous pouvez faire varier la luminosité de l'écran MENU Appuyer sur CONTRASTE Utiliser pour sélectionner Appuyer sur Utiliser pour sélectionner le contraste voulu (3=normal) Appuyer sur Appuyer sur pour sortir...
  • Page 54: Date Et Heure

    REGLAGES Date et Heure Si vous êtes abonné au service "Présentation du nom et du N°" , la mise à jour et l'heure se fera automatiquement. Sinon suivre les instructions ci-dessous MENU Appuyer sur DATE/HEURE Utiliser pour sélectionner Appuyer sur L'heure clignote, utilisez pour ajuster Appuyer sur...
  • Page 55: Guide Vocal

    REGLAGES Guide Vocal Lorsque la fonction "GUIDE VOCAL" est activée (ON) les chiffres de 0 à 9 , ainsi que tous les N° en mémoire (répert oire, journal d'appels, mémoires M1-M3 ) seront annoncés oralement MENU Appuyer sur Utiliser pour sélectionner GUIDE VOCAL Appuyer sur Utiliser pour sélectionner...
  • Page 56 REGLAGES Flash Pour la France le temps de "Flash" est R=300ms, mais peut être réglée à 100, 270, 300 ou 600ms pour d'autres pays MENU Appuyer sur TOUCHE R Utiliser pour sélectionner Appuyer sur 100/270/300/600 Utiliser pour sélectionner Appuyer sur Appuyer sur pour sortir...
  • Page 57: Mode De Numérotation

    REGLAGES Mode de Numérotation Tous les centraux téléphoniques acceptent la numérotation en fréquences vocales. Par contre connecté derrière un central privé interne , il se peut qu'il faille être en mode décimal ( DC) MENU Appuyer sur FV/DC Utiliser pour sélectionner Appuyer sur Utiliser pour sélectionner...
  • Page 58: Utilisation

    UTILISATION Appeler Décrocher le combiné Lorsque vous entendez la tonalité, vous pouvez numéroter En fin de conversation , reposer le combiné Pre-numérotation Si le mode "Guide Vocal" est activé les chiffres numérotés seront énoncés Composer le numéro sans décrocher le combiné La touche C permet de corriger une erreur Décrocher le combiné...
  • Page 59: Mode Mains Libres

    UTILISATION Appeler en mode mains libres Composer le numéro sans décrocher le combiné La touche permet de corriger une erreur appuyer sur , votre numéro se compose. La lampe rouge en dessous de la touche est allumée. Vous êtes en conversation mode mains libres sans avoir à décrocher le combiné...
  • Page 60: Répondre À Un Appel

    Si le mode vocal est validé et que l'appelant correspond à une personne enregistrée vocalement dans le répertoire, votre CL320 sonnera et annoncera le nom, ( Pour plus de détails, voir chapître "Répertoire" , Créer une entrée ).
  • Page 61: Fonction Secret

    . Volume du haut-parleur En mode mains libres, vous pouvez ajuster le volume du haut- parleur, utilisez le bouton situé sur le côté droit du CL320. Tonalité De même que ci-dessus, vous pouvez aussi régler la tonalité ( graves-aigus) utilisez le bouton situé...
  • Page 62: Chronomètre

    Dès que vous décrochez le combiné , le chronomètre s'active à l'écran et s'efface quelques secondes après le raccrochage Appareil auditif Le CL320 est compatible avec la plupart des appareils auditifs Pour cela , passez en mode "T" sur votre appareil...
  • Page 63: Présentation Du Nom Et Du Numéro

    Présentation du nom et du numéro* Ces services sont accessibles seulement par abonnement. Contactez votre opérateur pour plus de renseignements. Grâce à ce service, le nom et le numéro de la ligne à partir de laquelle votre correspondant vous appelle peuvent s’afficher sur votre écran.
  • Page 64: Visualiser Le Journal D'appels

    Présentation du nom et du numéro Visualiser le journal d'appels Utiliser pour sélectionner l'appel dans la liste Notes: Après avoir parcouru toute la liste , l'afficheur indiquera "FIN DE LISTE" Si aucun appel n'a été reçu ou que avez précedemment effacé...
  • Page 65: Supprimer Une Entrée Du Journal

    Présentation du nom et du numéro Supprimer une entrée du journal d'appels Utiliser pour sélectionner le numéro à effacer EFFACER? Appuyer sur s'affichera Maintenez appuyé jusquà ce que le numéro s'efface Appuyer sur pour sortir Effacer le journal d'appels Utiliser pour entrer dans la liste C, "TOUT EFFACER ?"...
  • Page 66: Copier Un Numéro Du Journal Dans Le Répertoire

    Présentation du nom et du numéro Copier un numéro du journal dans le répertoire Utiliser pour sélectionner le numéro à copier MENU COPIER EN MEM Appuyer sur jusqu'à ce que s'affiche OK , ENREGISTRE Appuyer sur s'affiche...
  • Page 67: Repertoire

    REPERTOIRE Vous pouvez mémoriser 30 numéros ( 22 chiffres maximum) et noms ( 16 lettres maxi) dans le répertoire. Si vous avez souscrit au service "Présentation du numéro et du nom" ( identification de l'appelant ), les noms et numéros enregistrés s'afficheront lors d'un appel en provenance de ces personnes.
  • Page 68: Enregistrer/Modifier Une Entrée Vocale

    REPERTOIRE Enregistrer/Modifier une entrée vocale Chaque entrée du répertoire peut être associée à une séquence vocale ( nom), qui sera annoncée lors de la sélection de cette entrée si le mode "vocal" a été validé ( ON) . MENU Appuyez sur Utilisez les touches pour selectionner ENREGISTRER NOM...
  • Page 69: Effacer Une Séquence Vocale

    REPERTOIRE Effacer une séquence vocale MENU Appuyez sur Utilisez les touches pour selectionner ENREGISTRER NOM Appuyez sur Utilisez les touches pour selectionner le numéro et effacer la séquence vocale associée Appuyer sur pendant l'annonce Appuyer sur pour sortir Lister les entrées Appuyer sur Utilisez les touches pour lister les numéros.
  • Page 70: Appeler À Partir Du Répertoire

    REPERTOIRE Appeler à partir du répertoire Selectionner une entrée comme précedemment (§ lister les entrées) Appuyer sur , votre numéro se compose. Si une séquence vocale a été enregistrée et que le mode "Vocal" est validé, l'annonce sera émise Modifier une fiche du répertoire Selectionner une entrée comme précedemment ( §...
  • Page 71: Effacer Une Fiche

    REPERTOIRE Effacer une fiche du répertoire Selectionner une entrée comme précedemment ( § lister les entrées) EFFACER? Appuyer sur s'affiche Maintenez appuyé jusqu'à l'effacement Appuyer sur pour sortir Effacer tout le répertoire Selectionner une entrée comme précedemment (§ lister les entrées) EFFACER TOUT? Maintenez appuyé...
  • Page 72: Appel D'urgence

    APPEL D'URGENCE Cette fonction vous permettra de déclencher un appel d’urgence vers les personnes de votre choix. 3 numéros sont disponibles en les affectant aux touches M1, M2 ou M3. Afin que cette fonction soit opérationnelle, vous devez au minimum enregistrer un numéro d'urgence (famille, ami, médecin ...etc ) .
  • Page 73: Consulter Le Message

    APPEL D'URGENCE Consulter le message MENU Appuyez sur CONSULTE Utilisez pour selectionner MESSAGE Appuyez sur Le message enregistré est répété Appuyez sur pour sortir Effacer le message Le message d'origine (usine) ne peut être effacé MENU Appuyez sur CONSULTE Utilisez pour selectionner MESSAGE Appuyez sur...
  • Page 74: Enregistrer Un Numéro D'urgence

    APPEL D'URGENCE Enregistrer un numéro d'urgence MENU Appuyez sur ENREGISTRER NUM Utilisez pour selectionner Press Entrez le numéro (maximum de 22 chiffres) Appuyez sur Selectionnez l'emplacement en appuyant sur M1, M2 ou M3 Effectuer un appel d'urgence Procédure d'appel : Le 1er appel se fera vers le numéro correspondant à...
  • Page 75: Memoires Directes

    MEMOIRES DIRECTES M1 à M3 peuvent être aussi utilisées comme mémoires simples à accès direct Enregistrer un numéro MENU Appuyez sur ENREGISTRER NUM Utilisez pour selectionner Appuyer sur Entrer votre numéro , utiliser la touche C pour corriger si necessaire Appuyer sur Appuyer sur la touche mémoire désirée ( M1 à...
  • Page 76: En Cas De Probleme

    EN CAS DE PROBLEME Pas d'affichage Assurez-vous que le cordon et l'adaptateur sont bien connectés. Pas de sonnerie, pas de tonalité Vérifier votre connexion téléphonique ( cordon + prise) Brancher un autre téléphone dans la même prise murale, afin de vous assurez que cela ne provient pas de votre ligne Pas d'affichage du nom et du numéro Vérifier auprès de votre opérateur que vous avez bien souscrit à...
  • Page 77: Securite/Environnement

    SECURITE / ENVIRONNEMENT General Utiliser seulement l'adaptateur secteur fourni Ne jamais ouvrir le combiné ou la base. Ne pas jeter les piles dans un feu ou dans une poubelle, ramenez les à un centre se collecte. Nettoyage Nettoyez le téléphone à l’aide d’un linge doux. N’utilisez jamais de crèmes à...
  • Page 78: Garantie

    GARANTIE Cet appareil est garanti 1 an pièces et main-d'oeuvre. La date d'achat figurant sur le ticket de caisse fera foi. Cette garantie s'exerce sous réserve d'une utilisation normale de l'appareil. Les dommages occasionnés par les surtensions électriques, la foudre ou par un choc sur l'appareil ne peuvent en aucun cas être couverts par la garantie.

Table des Matières