Table des Matières
Publicité
Les langues disponibles
Les langues disponibles
Liens rapides
Publicité
Table des Matières

Manuels Connexes pour Hkoenig UPX18


Sommaire des Matières pour Hkoenig UPX18
- Page 1 MANUEL D'UTILISATION INSTRUCTIONS MANUAL BEDIENUNGSANLEITUNG HANDBOEK MANUAL DE UTILIZACION MANUALE D'USO UPX18 CORDLESS VACUUM CLEANER APIRATEUR BALAI SANS FIL AUFLADBARER STAUBSAUGER OPLAADBARE STOFZUIGER ASPIRADORA RECARCABLE ASPIRAPOLVERE RICARICARICABILE...
- Page 2 ENGLISH IMPORTANT SAFETY INSTRUCTIONS IMPORTANT: READ ALL INSTRUCTIONS BEFORE USE. RETAIN INSTRUCTIONS FOR FUTURE REFERRENCE. Do not use in rain or leave outdoors whilst raining WARNING: Basic safety precautions should always be observed when using an electrical appliance, including the following to reduce the risk of tire, electrical shock, or injury.
- Page 3 9. This appliance may be used by children of at least 8 years of age, as long as they are supervised and have been given instructions about using the appliance safely and are fully aware of the dangers involved. 1O. Cleaning and maintenance should not be carried out by children unless they are at least 8 years of age and are supervised by an adult.
- Page 4 Do not abuse the charger cord; Never carry the charger by the cord; Do not pull the cord to disconnect from a socket, grasp the plug and pull to disconnect; Don't wrap the cod around the charger when storing; 1O. Keep the charger cord away from hot surfaces and sharp edges;...
- Page 5 5. Shorting the battery terminais may cause burns or fire; 6. When the battery pack is not in use, keep it away from paper clips, coins, keys, nails, screws or other small metal abjects that could make a connection from one terminal to another.
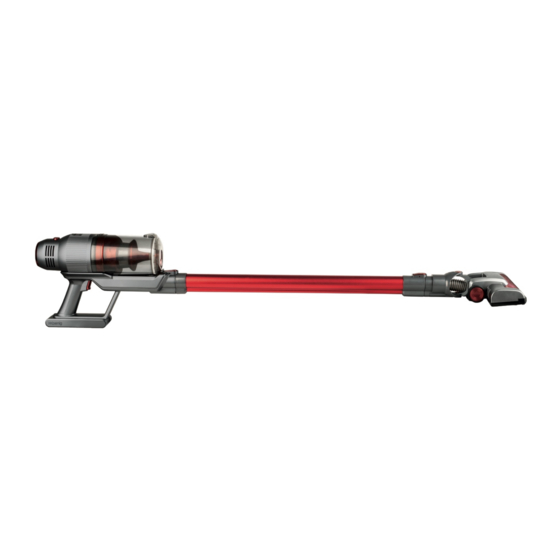
- Page 6 INTRODUCTION OF COMPONENTS:...
-
Page 7: Product Installation
PRODUCT INSTALLATION: I.Use as stick vacuum cleaner Assemble the battery pack with handle assembly , make sure the battery boit head insert the dust cup slot rightly as below Put the slot in the right position b) Attached the metal tube to the body as below until hear click sound c) attached the brush to another head of metal tube as below shown... - Page 8 Turn on the switch , vacuum cleaner start to work . Three levels speed contrai a) Lower speed :lt's lower speed when you press switch button first time ,vacuum cleaner stop work right after turn off the button . b) Touch the speed contrai button ,it will turn to middle, and again to high speed c) No matter which speed vacuum cleaner on , it will stop to work when you push on-off button...
- Page 9 Il. Battery charging: When the battery power indicator is blinking, lease power off the machine, then put it back to charge base for charging. Plug in indication will blink, it shows charging. Battery will be self-cutting when battery is & full If battery indication is not blinking it shows battery is full.
- Page 10 wash HEPA & filter cone take HEPA filter as shown below 6) Assemble the filter to case make sure HEPA filter filter case dry completely. 8) Assemble the dust to handle correctly 7) Put the filter case back after a "c lick "...
-
Page 11: Technical Specification
The symbol here indicates that electrical and electronic equipment should be chosen carefully, a wheeled waste container is marked with a cross. Adeva SAS/ H.Koenig Europe - 8 rue Marc Seguin - 77290 Mitry Mory - France www.hkoenig.com - sav@hkoenig.com - contact@hkoenig.com - Tél: +33 1 64 67 00 05... - Page 12 FRANÇAIS CONSIGNES DE SÉCURITÉ IMPORTANTES IMPORTANT : LIRE TOUTES LES INSTRUCTIONS AVANT UTILISATION. CONSERVER CE MANUEL D'INSTRUCTIONS EN LIEU SÛR. Ne pas utiliser sous la pluie et ne pas laisser dehors lorsqu'il pleut AVERTISSEMENT : lors de l'utilisation d'un appareil électrique, vous devez toujours respecter les consignes de sécurité...
- Page 13 5. Prenez des précautions supplémentaires lors du nettoyage des escaliers. 6. Gardez l'appareil et ses accessoires loin de toute surface chaude. 7. Ne bloquez pas les grilles d'aération de l'appareil et n'entravez pas le flux d'air ; ne bouchez pas les ouvertures avec un objet, que ce soit la poussière, les peluches, les vêtements, les doigts (et toutes les parties du corps).
-
Page 14: Avant Utilisation, Vérifiez Si Le Cordon Du Chargeur
15. Veuillez conserver ce document à disposition et le remettre au futur propriétaire en cas de cession de votre appareil Sécurité électrique : 1. Utilisez uniquement la batterie et le chargeur fournis par le fabricant. 2. Ne modifiez jamais le chargeur de quelque manière que ce soit. - Page 15 mains mouillées. 13. Ne rangez pas et ne chargez pas l appareil à l extérieur. 14. Le chargeur doit être débranché de la prise avant de retirer la batterie, de nettoyer ou d'entretenir l'appareil. Sécurité de la batterie : 1. Cet appareil comprend une batterie li-ion, ne pas à...
-
Page 16: Entretien
Entretien: 1. Avant d'utiliser l'appareil et après un choc, recherchez les traces d'usure ou de dommages et faite-le réparer si nécessaire. 2. N'utilisez pas l'appareil si une partie est endommagée ou défectueuse. 3. Les réparations doivent être effectuées par un agent à... -
Page 17: Description De L'appareil
DESCRIPTION DE L'APPAREIL·... -
Page 18: Montage De L'appareil
MONTAGE DE l' APPAREIL 1. Utilisation d'un aspirateur balai a) Assemblez le bloc-batterie la poignée, assurez-vous que la tête du boulon de la batterie à s'insère exactement dans l'encoche du réservoir comme ci-dessous Mettez l'encoche dans la bonne position... - Page 19 b) Fixez le tube métallique au boitier comme indiqué ci-dessous jusqu'à ce que vous entendiez un déclic c) Fixez la brosse à l'autre extrémité du tube métallique comme indiqué ci-dessous : d) Actionnez l'interrupteur, l'aspirateur commence à fonctionner. Contrôle de vitesse à trois niveaux ..._ a) Basse vitesse lorsque vous appuyez sur le bouton pour la première fois, l'aspirateur démarre à...
- Page 20 Ill. Chargementde la batterie. Lorsque le témoin de charge de la batterie clignote, veuillez éteindre l'aspirateur, puis le remettre en place pour charger le bloc-batterie. Branchez à nouveau et le témoin clignotera, la charge est affichée. La batterie se coupe d'elle-même lorsqu'elle est pleine.
- Page 21 Laver les éléments du filtre 3) Retirer le filtre HEPA comme indiqué ci- dessous 5) Assurez-vous que les Assembler les éléments du filtre. éléments du filtre soient bien secs. Replacer le filtre dans le Assembler le réservoir à poussière réservoir à poussière jusqu'à...
-
Page 22: Guide De Dépannage
électroniques font l'objet d'une collecte sélective, il représente une poubelle sur roues barrée d'une croix. Adeva SAS H.Koenig Europe - 8 rue Marc Seguin - 77290 Mitry Mory - France www.hkoenig.com - sav@hkoenig.c om - contact@hkoenig.com - Tél: +33 1 64 67 00 05... - Page 23 DEUTSCH WICHTIGE SICHERHEITSANWEISUNGEN WICHTIG: LESEN SIE ALLE ANWEISUNGEN VOR DEM GEBRAUCH. BEWAHREN SIE DIE ANWEISUNGEN ALS KÜNFTIGE REFERENZ AUF. Benutzen Sie das Gerat nicht im Regen oder lassen Sie es nicht wahrend des Regens drauBen. WARNUNG: Grundlegende Sicherheitsvorkehrungen müssen wahrend der Nutzung des elektrischen Gerates immer beachtet werden, einschlieBlich die folgenden, um das Risiko eines Brandes, eines Stromschlages oder einer Verletzung zu verringern.
- Page 24 kann das Risiko einer Kërperverletzung darstellen; 5.Seien Sie besonders vorsichtig, wenn Sie Treppen reinigen. Halten Sie das Gerat und das Zubehër von heiBen Flachen fern. Blockieren Sie nicht die Ôffnungen des Gera.tes oder behindern Sie nicht die Belüftung, halten Sie die Ôffnungen frei von jeglichen Gegenstanden einschlieBlich Staub, Fusseln, Kleidung,...
- Page 25 14. Lassen Sie das Gerat wahrend des Betriebs niemals unbeaufsichtigt. 15. Bitte halten Sie dieses Dokument bereit und geben Sie es im Falle einer Übertragung lhres Gerates an den zukünftigen Besitzer weiter. Elektrische Sicherheit: Benutzen Sie ausschlieBlich die von dem Hersteller zu Verfügung gestellten Batterien und Ladegerate;...
- Page 26 Wenn das Kabel beschadigt ist, muss das Ladegerat entsorgt und ersetzt werden. 12. Halten Sie das Ladegerat oder das Gerat nicht mit nassen Handen 13. Lagern Sie das Gerat oder laden Sie dieses nicht drauBen; 14. Das Ladekabel muss aus der Steckdose entfernt werden, bevor die Batterie entnommen oder das Gerat gereinigt und gewartet wird.
- Page 27 diesen von Büroklammern, Münzen, Schlüsseln, Nageln, Schrauben oder anderen kleinen Metallgegenstanden fern, die eine Verbindung von einem Pol zum anderen herstellen kënnen. 7. Wenn Sie das Gerat entsorgen, entnehmen Sie die Batterie und entsorgen Sie diese sicher gemaB lokalen Vorschriften. SERVICE: 1, Vor der Nutzung des Gerates und nach jedem Einfluss, prüfen Sie das Gerat auf VerschleiB und Beschadigung und...
-
Page 28: Beschreibung Der Komponenten
BESCHREIBUNG DER KOMPONENTEN:... - Page 29 PRODUKTINSTALLATION: 1. Nutzung ais Stielstaubsauger a) Montieren Sie den Batteriepack an die Griff-Baugruppe, vergewissern Sie sich, dass der Batterie-Verschlussknopf in den Staubbehalter-Schlitz korrekt, wie unten angezeigt, eingesetzt wurde. Richten Sie den Schlitz korrekt aus...
- Page 30 b) Befestigen Sie das Metallrohr an dem Geratekë>rper, wie unten angezeigt, bis dieses einrastet. c) Befestigen Sie die Bürste an einem anderen Ende des Metallrohrs, wie unten angezeigt. Betatigen Sie den Schalter, der Staubsauger beginnt zu arbeiten. Drei-Stufen-Geschwindigkeitsregelung a) Niedrige Geschwindigkeit: niedrige Geschwindigkeit wird gewahlt, wenn Sie auf den Knopfschalter einmal drücken, der Staubsauger beendet den Betrieb, sobald der Ausschaltknopf gedrückt wird.
- Page 31 Batterieaufladung: Wenn der Ladezustand-lndikator blinkt, schalten Sie das Gerat bitte aus, dann platzieren Sie dieses zurück auf der Lade-Grundlage zum Laden. Nach dem AnschlieBen wird der Ladevorgang durch das Blinken des lndikators anzeigen. Die Batterie wird das Aufladen abbrechen, sobald diese voll ist. Wenn die Batterieanzeige nicht blinkt, ist die Batterie...
- Page 32 4) Reinigen Sie den HEPA & Entnehmen Sie den HEPA- Filter, den Filter-Konus wie unten angezeigt Montieren Sie den Filter in Vergewissern Sie sich, dass Hülle. der HEPA-Filter und die Filter-Hülle vol getrocknet sind. Montieren Sie den Staubfilter an Platzieren Sie die Filter-Hülle Griff korrekt, dieser...
-
Page 33: Technische Spezifikationen
Das Symbol hier darauf hinweisen, dass elektrische oder elektronische Gera.te sollten sorgfaltig ausgewahlt werden, ist ein fahrbarer Abfallbehalter mit einem Kreuz markiert. Adeva SAS/ H.Koenig Europe - 8 rue Marc Seguin - 77290 Mitry Mory - France www.hkoenig.com - sav@hkoenig.com - contact@hkoenig.com - Tél: +33 1 64 67 00 05... - Page 34 NEDERLAND BELANGRIJKE VEILIGHEIDSINSTRUCTIES BELANGRIJK: LEES ALLE INSTRUCTIES VOOR GEBRUIK. BEWAAR HANDLEIDING VOOR TOEKOMSTIGE REFERENTIE. Niet gebruiken in de regen of buiten laten liggen in de regen standaard veiligheidsregels WAARSCHUWING: moeten altijd worden opgevolgd bij het gebruik van een elektrisch apparaat, inclusief de volgenden om de risico te verkleinen op brand, elektrische schok, of verwondingen.
- Page 35 7. Niet openingen apparaat afdekken luchtstromen beperken, houd openingen vrij van objecten, inclusief stof, pluisjes, kleren en vingers (en andere lichaamsdelen); 8. Houd vooral haar weg bij openingen en bewegende onderdelen; 9. Dit apparaat mag worden gebruikt door kinderen vanaf 8 jaar en ouder indien dit gebeurt onder toezicht, ais zij van tevoren instructies hebben ontvangen betreffende het veilige gebruik van het apparaat en ais zij de mogelijke...
-
Page 36: Elektrische Veiligheid
ELEKTRISCHE VEILIGHEID: 1. Gebruik alleen accu's en opladers die worden geleverd door de fabrikant; 2. Nooit aanpassingen maken aan de lader op wat voor manier ook; 3. De oplader is ontworpen voor een specifiek voltage. Altijd controleren dat het voltage overeen komt met hetgeen op het typeplaatje;... -
Page 37: Accu Veiligheid
ACCU VEILIGHEID: 1. Dit apparaat bevat een Li-ion-accu, niet de accu verbranden of blootstellen aan hoge temperaturen, dit kan een explosie veroorzaken; 2. Vloeistoffen die uit de accu komen kunnen leiden tot irritaties en verbrandingen; 3. ln een noodgeval altijd meteen contact opnemen met een professional;... - Page 38 Reparaties moeten worden uitgevoerd door een onderhoudsmonteur gekwalificeerd persoon volgens relevante veiligheidsregels. Reparaties uitgevoerd door ongekwalificeerde personen kunnen gevaarlijk zijn; 4. Nooit het apparaat aanpassen op welke manier dan ook, dit kan het risico verhogen op persoonlijke verwondingen; 5. AIieen vervangende onderdelen gebruiken van de fabrikant of door de fabrikant worden aanbevolen.
- Page 39 INTRODUCTIE VAN ONDERDELEN:...
- Page 40 INSTALLATIE PRODUCT: Gebruik ais een steelstofzuiger A) Plaats de accu aan het handvat, zorg dat de kop van de accu op de juiste manier de stofbak ingaat zoals hieronder aangegeven Plaat alles op de juiste plek...
- Page 41 b) Sluit de metalen buis in de behuizing zoals hieronder aangegeven en luister naar de klik c) plaats de borstel of een ander mondstuk of metalen buis zoals hieronder getoond d) Zet de schakelaar de stofzuiger begint te werken. a) Lage snelheid: hij begint op lage snelheid ais je hem inschakelt, hij stop meteen ais je hem uitschakelt.
- Page 42 Il. Accu opladen: Ais de indicator van de accu brandt, schakel dan het apparaat uit en plaats deze op de basis om hem op te laden. Steek de stekker in het stopcontact en de indicator zal gaan branden, dan wordt opgeladen Het opladen stopt ais de accu vol is.
- Page 43 ) was het HEPA-filter en 3 ) haal HEPA-filter eruit filterbehuizing zoals hieronder getoond wordt 5) zorg dat HEPA-filter en 6 ) plaats het filter in de behuizing filterbehuizing helemaal droog zijn plaats filterbehuizing weer terug plaats de stofbak weer correct aan in de stofbak handgreep...
-
Page 44: Probleemoplossing
Het beeld geeft een afvalbak met een X teken aan. Adeva SAS/ H.Koenig Europe - 8 rue Marc Seguin - 77290 Mitry Mory - France www.hkoenig.com - sav@h koenig.com contact@hkoenig.com - Tél: +33 1 64 67 00 05... -
Page 45: Seguridad Personal
ESPAGNOL MEDIDAS DE SEGURIDAD IMPORTANTES IMPORTANTE: LEA TODAS LAS INSTRUCCIONES ANTES DE USAR LA ASPIRADORA. GUARDE ESTE MANUAL DE INSTRUCCIONES PARA CONSULTAS FUTURAS. No use la aspiradora bajo la lluvia ni la deje a la intemperie mientras llueve. ADVERTENCIA: Durante la manipulaci6n y el uso de cualquier electrodoméstico siempre se deben acatar las precauciones basicas de seguridad, incluyendo las que se relacionan a continuaci6n, para reducir el riesgo de... - Page 46 • Mantenga el aparato y sus accesorios lejos de superficies calientes. • No obstruya las ranuras, ni dificulte el flujo de aire, mantenga las ranuras libres de cualquier objeto, incluyendo polvo, hilas, pelusas, dedos (o cualquier parte del cuerpo). • Especialmente, aleje su cabello de las ranuras de ventilacion y de las partes moviles.
-
Page 47: Seguridad Eléctrica
SEGURIDAD ELÉCTRICA: • Use solamente baterfas y cargadores distribuidos par el fabricante. • No modifique el cargador en ninguna circunstancia. • El cargador se alimenta con una tension especffica. Siempre verifique que la tension de su red eléctrica coincida con la indicada en la placa de caracterfsticas. •... - Page 48 SEGURIDAD DE LA BATERIA: • Esta aspiradora se distribuye con baterfas de Li-ion. Nunca incinere las baterias ni las exponga a altas temperaturas, esta puede hacer que exploten. • El lfquido expelido del interior de la bacteria puede causar irritaci6n o quemaduras. •...
- Page 49 MANTENIMIENTO: • Antes de usar la aspiradora y después de cualquier impacta, compruebe si hay cualquier tipo de dano y reparelo si es necesario. • No use la aspiradora si cualquiera de sus componentes esta con problemas o defectuoso. • Las reparaciones deben ser realizadas por un agente de servicio o una persona debidamente calificada de acuerdo con las normas de seguridad pertinentes.
- Page 50 DESCRIPCIÔN DE LA ASPIRADORA...
- Page 51 INSTALACIÔN DE LA ASPIRADORA 1. Uso de la aspiradora con el mango Monte la baterîa con el conjunto de la manija, asegurese de que la cabeza del perno de la baterîa encaje correctamente en la ranura del dep6sito de polvo como se muestra a continuaci6n.
- Page 52 lnserte el cepillo en el otro extremo del mange metalico, tal corne se muestra a continuaci6n. Presione el interruptor de la unidad para encender la aspiradora. Control de velocidad de tres niveles. a) Potencia baja: Cuando presiona el interruptor por primera vez, selecciona la mener potencia de trabajo, la aspiradora deja de funcionar inmediatamente después de apagar el bot6n.
- Page 53 Ill. Recarga de la baterfa 1. Cuando el indicador luminoso de la baterîa empiece a parpadear, apague la Aspiradora y llévela a la base del cargador para recargar la baterîa. 2. Enchufelo al tomacorriente. El indicador luminoso parpadearâ mostrando que se estâ cargando. Cuando la baterîa esté...
- Page 54 3) Retire el filtro HEPA como se 4) Lavar el filtro HEPA muestra a continuaciôn. embudo del filtro. 6)Cuando estén completamente 5) Asegurese de secar bien el filtro HEPA y su secos, introduzca el filtro en el embudo. embudo antes de volver a montarlos. 8) Monte el depôsito de polvo gire en el 7)Coloque el embudo del filtro...
-
Page 55: Soluciôn De Problemas
El sîmbolo aquî presente indica que los equipos eléctricos o electr6nicos deben de ser cuidadosamente seleccionados, representa un recipiente de basura con ruedas marcado con Adeva SAS/ H.Koenig Europe - 8 rue Marc Seguin, 77290 Mitry-Mory, France www.hkoenig.com - sav@hkoenig.com - contact@hkoenig.com - Tél: +33 1 64 67 00 05... -
Page 56: Sicurezza Personale
ITALIANO IMPORTANTI ISTRUZIONI Dl SICUREZZA IMPORTANTE: LEGGERE TUTTE LE ISTRUZIONI PRIMA DELL'USO. CONSERVARE LE ISTRUZIONI PER RIFERIMENTO FUTURO. Non usare sotte la pioggia o lasciare all'aperto mentre piove AVVERTENZA: Osservare sempre le precauzioni di sicurezza di base quando si utilizza un apparecchio elettrico, incluse le seguenti, per ridurre il rischio di incendi, scosse elettriche o lesioni. - Page 57 scale; Tenere l'apparecchio e gli accessori lontano da superfici calde; Non bloccare le aperture degli apparecchi o ostacolare il flusso d'aria, tenere le aperture libere da oggetti quali polvere, lanugine, vestiti, dita (e tutte le parti del corpo); Tenere in particolare i capelli lontano da aperture e parti mobili;...
-
Page 58: Sicurezza Elettrica
SICUREZZA ELETTRICA: utilizzare solo batterie e caricabatterie forniti dal produttore non modificare mai il caricabatterie in alcun modo; il caricatore è stato progettato per una tensione specifica. Verificare sempre che la tensione di rete corrisponda a quella indicata sulla targhetta dei dati tecnici; un caricabatterie adatto per un tipo di batteria puà... -
Page 59: Sicurezza Della Batteria
SICUREZZA DELLA BATTERIA: Questo apparecchio include batterie agli ioni di litio, non incenerire le batterie e non esporle a temperature elevate, in quanta potrebbero esplodere; il liquida espulso dalla batteria puè causare irritazioni o ustioni; situazione emergenza richiedere immediatamente un aiuto professionale; delle perdite dalle celle della batteria possono verificarsi in condizioni estreme. - Page 60 FUNZIONAMENTO: 1. Prima di utilizzare l'apparecchio e dopa agni impatto, controllare se vi sono segni di usura e d effettuare una riparazione se necessario; 2. non utilizzare l'apparecchio se una qualsiasi parte è danneggiata o difettosa; 3. Le riparazioni devono essere eseguite da un agente di assistenza o da una persona adeguatamente qualificata in conformità...
- Page 61 ILLUSTRAZIONE DEI COMPONENTI:...
- Page 62 ISTALLAZIONE PRODOTTO: 1. Utilizzo corne aspirapolvere a) Montare il gruppo batteria con il gruppo rnaniglia, assicurarsi che la testa del bullone della batteria si inserisca correttarnente la fessura del contenitore polvere corne indicato di seguito Posizionare lo slot in posizione corretta...
- Page 63 b) Collegare il tubo metallico al corpo corne indicato nell'immagine fino a sentire un clic c) fissare la spazzola al tubo metallico corne mostrato di seguito d) Accendere l'interruttore l'aspirapolvere inizia a funzionare. Tre livelli di controllo della velocità a) Bassa velocità: è la velocità più bassa quando si preme il pulsante interruttore la prima volta, l'aspirapolvere smette di funzionare subito dopo aver spento il pulsante.
- Page 64 Il. Utilizzo corne aspirapolvere manuale lnserisci l'accessorio al corpo corne mostrato sotto Il. Carica della batteria : 1) Quando l'indicatore di carica della batteria lampeggia, si prega di spegnere l'apparecchio e rimetterlo alla base di ricarica per la ricarica. 2) La spina e l'indicatore lampeggeranno, per indicare la carica. La batteria si spegnerà automaticamente quando la batteria sarà...
- Page 65 estrarre il filtra 4) lavare il filtra HEPAe il filtra conico HEPA corne mostrato nell'immagine assicurarsi che il filtro HEPA e il contenitore del filtra siano Assemblare il filtro completamente asciutti Assemblare Posizionare il Contenitore correttamente il contenitore filtra nel Contenitore polvere filtra fino a sentire un click...
-
Page 66: Risoluzione Dei Problemi
(rappresentata da un bidone su due ruote sbarrato da una croce. Adeva SAS H.Koenig Europe - 8 rue Marc Seguin - 77290 Mitry Mory - France www.hkoenig.com - sav@h koenig.com - contact@hkoenig.com - Tél: +33 1 64 67 00 05...