Publicité

Les langues disponibles
  • FR

Les langues disponibles

Liens rapides

Quickstart Guide
English ( 3 – 8 )
Guía de inicio rápido
Español ( 9 – 14 )
Guide d'utilisation rapide
Français ( 15 – 20 )
Guida rapida
Italiano ( 21 – 26 )
Schnellstart-Anleitung
Deutsch ( 27 – 32 )
Appendix
English ( 34 )

Publicité

Table des Matières
loading

Sommaire des Matières pour Akai Professional MPC Studio mk2

  • Page 1 Quickstart Guide English ( 3 – 8 ) Guía de inicio rápido Español ( 9 – 14 ) Guide d’utilisation rapide Français ( 15 – 20 ) Guida rapida Italiano ( 21 – 26 ) Schnellstart-Anleitung Deutsch ( 27 – 32 ) Appendix English ( 34 )
  • Page 3 Quickstart Guide Safety & Warranty Manual Important: Visit akaipro.com and find the webpage for MPC Studio mk2 to download the complete User Guide. Support For the latest information about this product (documentation, technical specifications, system requirements, compatibility information, etc.) and product registration, visit akaipro.com.
  • Page 4: Getting Started

    MPC Software Installation akaipro.com 1. Go to and register your product. If you don’t have an Akai Professional account yet, you will be prompted to create one. 2. In your Akai Professional account, download the MPC software package. 3. Open the file and double-click the installer application.
  • Page 5: Top Panel

    Features Top Panel Navigation & Data Entry Controls 1. Display: This RGB LCD display shows information relevant to MPC Studio’s current operation. Much of this information is also shown in the software. Use the Mode and Select buttons to change what is shown on the display, and use the data dial or -/+ buttons to adjust the currently selected setting/parameter.
  • Page 6 9. Copy / Delete: Press this button to copy one pad to another. Use the Copy from pad field to select the “source” pad (the pad you want to copy) and use the Copy to pad field to select the “destination”...
  • Page 7 20. Sample Start / Loop Start: Press this button and use the data dial or -/+ buttons to change the sample start point for the sample on the selected pad. Press the button again to cycle through Layers 1–4 of the pad. Press and hold Shift, press this button, and use the data dial or -/+ buttons to change the Loop Start point for the sample on the selected pad.
  • Page 8: Rear Panel

    35. Automation Read/Write: Press this button to toggle the Global Automation state between Read and Write. Press and hold Shift and press this button to disable or enable Global Automation. 36. Tap Tempo / Master: Press this button in time with the desired tempo to enter a new tempo (in BPM).
  • Page 9: Contenido De La Caja

    Guía de inicio rápido Manual sobre la seguridad y garantía Importante: Visite en akaipro.com la página correspondiente al MPC Studio mk2 para descargar la guía de usuario complete. Soporte Para obtener la información más reciente acerca de este producto (documentación, especificaciones técnicas, requisitos de sistema, información de compatibilidad, etc.) y registrarlo, visite akaipro.com.
  • Page 10: Para Comenzar

    Instalación de software MPC 1. Vaya a akaipro.com y registre su producto. Si aún no tiene una cuenta de Akai Professional, se le pedirá que cree una. 2. En su cuenta de Akai Professional, descargue el paquete de software MPC.
  • Page 11: Características

    Características Panel superior Controles de navegación e ingreso de datos 1. Pantalla: Esta pantalla LCD RGB muestra información relacionada con el funcionamiento actual del MPC Studio. Gran parte de esta información también se muestra en el software. Utilice los botones Mode y Select para modificar lo que se muestra en la pantalla, y utilice el cuadrante de datos o los botones -/+para modificar el ajuste/parámetro actualmente seleccionado.
  • Page 12 9. Copiar / Borrar: Pulse este botón para copiar un pad a otro. Utilice el campo Copy from pad para seleccionar el pad de "fuente" (el pad que desea copiar) y utilice el campo Copy to pad para seleccionar el pad de “destino”. Puede seleccionar múltiples pads destino y puede seleccionar pads en diferentes bancos de pads.
  • Page 13 18. Browse / Up (Explorar / Guardar): Pulse este botón para ver el explorador. El explorador le permite navegar los discos rígidos internos y externos de su ordenador para cargar muestras, secuencias, canciones, etc. Mantenga pulsado Shift y pulse este botón para volver a la carpeta anterior mientras utiliza el explorador.
  • Page 14: Panel Trasero

    30. Play (Reproducir): Pulse este botón para reproducir la secuencia desde la posición actual del cabezal de reproducción. 31. Play Start (Comenzar reproducción): Pulse este botón para reproducir la secuencia desde su punto inicial. 32. </> (Evento |</>|): Use estos botones para desplazar el puntero de audio a la derecha/izquierda, de a un paso por vez.
  • Page 15: Présentation

    Consignes de sécurité et informations concernant la garantie Important : Visitez akaipro.com pour trouver la page Web du MPC Studio mk2 afin de télécharger son guide d’utilisation complet. Assistance Pour les toutes dernières informations concernant la documentation, les spécifications techniques, la configuration requise, la compatibilité...
  • Page 16: Démarrage

    Si vous n’avez pas encore de compte Akai Professional, vous serez invité à en créer un. 2. À partir de votre compte Akai Professional, téléchargez le logiciel MPC 3. Ouvrez le fichier téléchargé, puis double-cliquez sur le fichier d'installation.
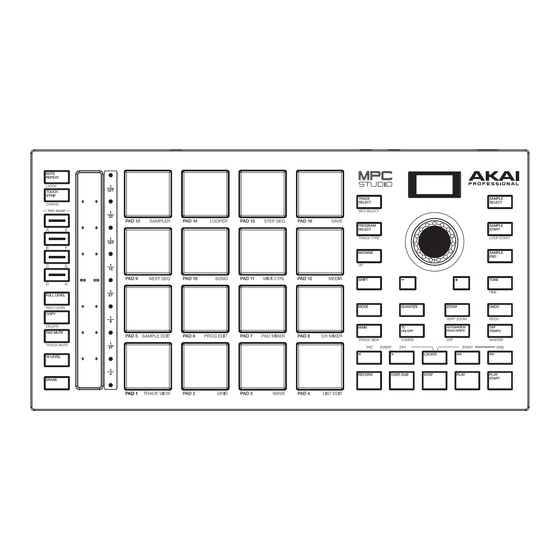
  • Page 17: Caractéristiques

    Caractéristiques Panneau supérieur Commandes de navigation et de saisie de données 1. Écran : Cet écran à cristaux liquides RVB affiche les informations pertinentes aux opérations en cours du MPC Studio. La plupart de ces informations se retrouvent également dans le logiciel. Les touches Mode et Select permettent de changer l’information affichée, et la molette des valeurs et les touches -/+ permettent d’ajuster le paramètre/le réglage sélectionné.
  • Page 18 9. Copy/Delete : Cette touche permet de copier les paramètres d’un pad à un autre. Le champ Copy from pad permet de sélectionner le pad « source » (le pad à copier) et le champ Copy to pad permet de sélectionner le pad de « destination ». Il est possible de sélectionner plusieurs pads de destination et de sélectionner des pads de banques différentes.
  • Page 19 18. Browse / Up : Cette touche permet d’afficher le navigateur. Le navigateur vous permet de parcourir les disques durs internes et externes de votre ordinateur afin de charger des échantillons, séquences, chansons, etc. Appuyer sur cette touche tout en maintenant la touche Shift enfoncée permet de passer au dossier précédent dans le navigateur.
  • Page 20: Panneau Arrière

    29. Stop : Cette touche permet d’arrêter la lecture. Vous pouvez appuyer deux fois sur cette touche afin de mettre en sourdine l’audio qui continu de jouer après que la note cesse de jouer. Maintenir la touche Shift enfoncée puis appuyer sur cette touche permet de repositionner le curseur de lecture sur 1:1:0.
  • Page 21: Contenuti Della Confezione

    Guida rapida Istruzioni di sicurezza e garanzia Importante: recarsi su akaipro.com e trovare la pagina di MPC Studio mk2 per scaricare la guida per l’uso completa. Assistenza Per le ultime informazioni in merito a questo prodotto (documentazione, specifiche tecniche, requisiti di sistema, informazioni sulla compatibilità, ecc.) e per effettuarne la registrazione, recarsi alla pagina...
  • Page 22: Primi Passi

    Se ancora non si dispone di un account Akai Professional, verrà richiesto di crearne uno. 2. Nel proprio account Akai Professional, scaricare il pacchetto software MPC. 3. Aprire il file e fare doppio clic sull'applicazione di installazione.
  • Page 23: Pannello Superiore

    Caratteristiche Pannello superiore Comandi di navigazione e inserimento dei dati 1. Display: questo display LCD RGB mostra informazioni specifiche sull’operazione corrente dell’MPC Studio. Molte di queste informazioni sono anche illustrate nel software. Servirsi dei tasti Mode e Select per modificare ciò che viene mostrato a display e servirsi della manopola data o dei tasti -/+ per regolare l’impostazione/parametro selezionato correntemente.
  • Page 24 9. Copy/Delete: premere questo tasto per copiare un pad su un altro. Servirsi del campo Copy from pad per selezionare il pad “fonte” (quello che si desidera copiare) e del campo Copy to pad per selezionare il pad di “destinazione”. Si possono selezionare più pad di destinazione ed è possibile selezionare pad in diversi banchi pad.
  • Page 25 19. Sample Select: premere questo tasto e utilizzare la manopola data o i tasti -/+ per cambiare il campione selezionato per il pad corrente. Premere nuovamente il tasto per scorrere tra gli strati 1–4 del pad. 20. Sample Start / Loop Start: premere questo tasto e utilizzare la manopola data o i tasti -/+ per cambiare il punto di inizio del campione sul pad selezionato.
  • Page 26: Pannello Posteriore

    33. Bar <</>> (Start/End): servirsi di questi tasti per spostare il puntatore audio a sinistra/destra di una battuta alla volta. Tenere premuto Locate e premere uno di questi tasti per spostare il puntatore audio all’inizio o alla fine della griglia della sequenza. 34.
  • Page 27: Lieferumfang

    Schnellstart-Anleitung Sicherheitshinweise und Garantieinformationen Wichtig: Besuchen Sie akaipro.com und suchen Sie die Webseite für MPC Studio mk2, um das komplette Benutzerhandbuch herunter zu laden. Kundendienst Für die neuesten Informationen zu diesem Produkt (Dokumentation, technische Daten, Systemanforderungen, Informationen zur Kompatibilität etc.) und zur Produktregistrierung besuchen Sie bitte: akaipro.com.
  • Page 28: Erste Schritte

    Sie Ihr Produkt. Wenn Sie noch kein Akai Professional Konto haben, werden Sie aufgefordert, eines zu erstellen. 2. Laden Sie in Ihrem Akai Professional-Konto das Softwarepaket MPC herunter. 3. Öffnen Sie die Datei und doppelklicken Sie auf das Installationsprogramm.
  • Page 29 Funktionen Oberseite Navigation & Dateneingabe 1. Display: Diese RGB-LCD-Anzeige zeigt Informationen an, die für den aktuellen Betrieb von MPC Studio relevant sind. Ein großer Teil dieser Informationen wird auch in der Software angezeigt. Verwenden Sie die Tasten Modus und Auswählen, um die Anzeige auf dem Display zu ändern, und passen Sie mit dem Datenrad oder den Tasten -/+ die aktuell ausgewählten Einstellungen/Parameter an.
  • Page 30 8. Full Level (Volle Lautstärke) / Half Level (Halbe Lautstärke): Drücken Sie diese Taste, um die volle Lautstärke zu aktivieren/deaktivieren. Ist diese Funktion aktiviert, werden die Pads ihre Samples immer bei maximaler Anschlaggeschwindigkeit (127) triggern und zwar unabhängig davon, wie schnell Sie sie anschlagen. Halten Sie die Umschalttaste und drücken diese Taste zum Aktivieren/Deaktivieren der Funktion „Halbe Lautstärke“.
  • Page 31 17. Programm-Auswahl / Track-Typ: Drücken Sie diese Taste und ändern Sie mit dem Datenrad oder den Tasten -/+ das Programm für den ausgewählten Track. Halten Sie Shift gedrückt, drücken Sie diese Taste und ändern Sie den Track-Typ für den ausgewählten Track mit dem Datenrad oder den Tasten -/+. Drum, Keygroup, Plugin, MIDI, Clip oder CV.
  • Page 32 29. Stopp: Drücken Sie diese Taste, um die Wiedergabe zu stoppen. Sie können zweimal auf diese Taste drücken, um Audiosignale zu stoppen, die noch nachklingen, auch wenn die Note nicht mehr abgespielt wird. Halten Sie die Shift gedrückt und drücken Sie diese Taste, um den Abspielkopf auf 1:1:0 zurückzusetzen.
  • Page 34: Appendix (English)

    Specifications are subject to change without notice. Trademarks & Licenses Akai Professional and MPC are trademarks of inMusic Brands, Inc., registered in the U.S. and other countries. All other product names, company names, trademarks, or trade names are those of their respective owners.
  • Page 36 Manual Version 1.2...

Table des Matières