Publicité

Les langues disponibles

Les langues disponibles

Liens rapides

Page 2-16
Installation Manual
IP Video Indoor Station
A1101 Series
Seite 17-32
Installationsanleitung
IP Video Innenstation
A1101 Serie
Page 33-48
Manuel d´installation
Moniteur intérieur IP
Série A1101
A1101
VERSION 1.4, MIN. HW 1.4

Publicité

Table des Matières
loading

Sommaire des Matières pour DoorBird A1101

  • Page 1 Page 2-16 Installation Manual IP Video Indoor Station A1101 Series Seite 17-32 Installationsanleitung IP Video Innenstation A1101 Serie Page 33-48 Manuel d´installation Moniteur intérieur IP Série A1101 A1101 VERSION 1.4, MIN. HW 1.4...
  • Page 2 To make things easier we use the term “device” for regulation could result in the risk of serious the product “DoorBird IP Video Indoor Station A1101” damage to health or fatal injury due to electric and “mobile device” for a smartphone or tablet.
  • Page 3 ̵ Places subject to dust, oil, chemicals, hydrogen WARNING sulfide (hot spring). ̵ Places subject to moisture and humidity • Do not install or make any wire terminations extremes, such as bathrooms, cellars, while power supply is plugged in. It can cause greenhouses, etc.
  • Page 4 We recommend that you For information about the device warranty, see change the Password on a regular basis. www.doorbird.com/warranty • We will, under no circumstances, be liable for damage that occurs due to failures in power supply, network equipment or terminal devices;...
  • Page 5 11) Microphone Back 12) Mounting points To mount the device on the mounting bracket 13) Screw connection terminal 14) Setup button (SET) of the device, to e.g. configure the WiFi interface of the device using the DoorBird App 15) Cable clamp...
  • Page 6: Installation Examples

    High-speed Internet (via landline): DSL, cable or optical fibre Network: Ethernet, with DHCP Storey-call button Indoor Station DoorBird IP Video Door Station Electric door or gate opener. Can be secured required via DoorBird I/O Door Controller if (remote safety relay)
  • Page 7 SWITCHING OFF POWER One indoor station via WiFi Switch off the power to all wires leading to the assembly location, i.e. the door chime, electric door opener, power supply unit, PoE-Switch/ PoE-Injector etc. DISMANTLING THE EXISTING INDOOR STATION Should there already be an indoor station on the wall, please remove it.
  • Page 8 Ensure that no cables are to be found in the wall or ceiling behind the boreholes. As an alternative to wall mounting, you can also mount the device on a table stand (DoorBird A8003 Table Stand for IP Video Indoor Station A1101). DOWELS OPTION 2 WIFI 2.4 GHz...
  • Page 9 802.3af Mode A or an appropriate DIN rail power supply. To power the device via a PoE-Switch (e.g. D-Link DGS-1008P) or PoE-Injector (e.g. DoorBird Gigabit PoE Planning information to power multiple devices Injector A1091), use a CAT.5 cable or higher in accor- with a single DIN rail power supply unit dance with the PoE standard IEEE 802.3af Mode A.
  • Page 10 INFORMATION FOR PLANNERS OF The wire diameter is the inner metal core EXISTING BUILDINGS only, not the inner metal core plus the jacket. The length of the cables in existing buildings is often unknown and can only be roughly estimated. The Often more than two wires are available diameter of the wires and the loop resistance (ohm) on-site for the connection of an indoor station.
  • Page 11: Connecting The Device

    CONNECTING THE DEVICE It is possible to connect the cables and wires to the device conveniently and safely via the labelled screw connection terminal. You can connect all necessary cables and wires to the device now. For easier installation we strongly Please remove any cables and wires from the NOTI CE recommend to remove the plug from screw...
  • Page 12 You can configure the default state of the relay (open/ close) via the DoorBird App. These ports can be used to connect e.g. an electric door opener or to call an elevator. The device does not supply power to the connected device. The power supply for the electric door opener must be installed separately.
  • Page 13: Downloading And Installing The App

    Put the device on the mounting bracket. If you use WiFi for connecting the device to your Internet Router, first go to the DoorBird App ” > WiFi Setup” and follow the instructions. If you have finished the WiFi setup or have connected the device to your Internet Router by means of >...
  • Page 14 The device does not connect to Internet supports the PoE Standard IEEE 802.3af Mode (”No Internet“ diagnosis sound) A, see also www.doorbird.com/poe In most cases, your Internet is down or your If the device is to be supplied with power by a router blocks Internet access for the device.
  • Page 15: Technical Specifications

    DHCP • Digital input (0 V, 0 A (NO)) #2, e.g. for a second storey-call button Supported door Any DoorBird IP Video Door • Bi-stable latching relay #1, stations Station max. 24 VDC / VAC, 1 A, DISPLAY e.g.
  • Page 16: Legal Notes

    Bird Home Automation cannot be held responsible for damages caused by improper existing installations or improper installation. General remarks 1. DoorBird is a registered trademark of Bird Home Automation GmbH. Software and operating system’s updates (so-called “firmware updates”) are generally automatically installed on the products 2.
  • Page 17 Geräts unterstützen. finden Sie unter www.doorbird.com/de/support Zur Vereinfachung der Begriffe verwenden wir „Gerät“ für das Produkt „DoorBird IP Video Innenstation Gefahrenhinweise A1101“ sowie „mobiles Endgerät“ für ein Smartphone/ Tablet. WARNUNG Haftung • Einbau, Montage und Servicearbeiten Die Erstellung dieses Dokuments wurde sorgfältig elek trischer Geräte dürfen ausschließlich...
  • Page 18 WARNUNG • Gerätemontage an Wand oder Decke: Vermeiden Sie Installationsorte, an denen das Gerät Erschütterungen oder Stößen ausgesetzt für Kinder zu einem gefährlichen Spielzeug ist. werden. • Bei Geräten mit Erdungsklemmen muss eine • Verlegen Sie Kabel stets so, dass diese keine Erdung angeschlossen werden.
  • Page 19 WARNUNG • Installieren Sie das Gerät in einem Bereich, der für zukünftige Inspektionen, Reparaturen und • Bei Sach- oder Personenschäden, die durch Wartungen zugänglich ist. unsachgemäße Hand habung oder Nichtbe- • Wenn das Gerät in der Nähe eines achten der Gefahrenhinweise verursacht Mobiltelefons verwendet wird, kann das Gerät werden, übernehmen wir keine Haftung.
  • Page 20 Bei den örtlichen Behörden erhalten Sie genauere Informationen zu Ihrer nächsten zuständigen Gewährleistung Sammelstelle. Abhängig von der nationalen Informationen zur Gewährleistung des Geräts finden Gesetzgebung können für die unvorschriftsmäßige Sie unter www.doorbird.com/de/warranty Entsorgung solcher Abfälle Strafen verhängt werden. KOMPONENTEN 1x Gerät 1x Installationsanleitung 1x Quickstartanleitung...
  • Page 21 13) Schraubanschlussklemmen 14) Setup Taste (SET) Setup Taste (SET) des Geräts, um z.B. die WLAN Schnittstelle des Geräts mit Hilfe der DoorBird App zu konfigurieren 15) Kabelklemme VIDEOS Netzwerkgeschwindigkeit und Netzwerkkomponenten Stellen Sie sicher, dass Ihre Internetverbindung über Sie können die Installation durch unsere mindestens 0,5 Mbit/s Uploadgeschwindigkeit verfügt.
  • Page 22 Drei Innenstationen per Netzwerkkabel Drei Innenstationen per WLAN Etagenruftaste Innenstation DoorBird IP Video Türstation Elektrischer Tür- oder Toröffner. Kann über DoorBird I/O Door Power over Ethernet Controller gesichert werden (abgesetztes Sicherheitsrelais) (PoE) Switch Router mit High-speed Separate Stromver sorgung, Separate Stromver sorgung,...
  • Page 23 Leitungen in der Hauswand befinden. Türöffner, PoE-Switch/PoE-Injektor etc.. Alternativ zur Montage an einer Wand DEMONTAGE DER können Sie das Gerät auch auf einem Tischständer montieren (DoorBird A8003 BESTEHENDEN INNENSTATION Tischständer für IP Video Innenstation A1101). Demontieren Sie, falls bereits vorhanden, die bestehende Innenstation.
  • Page 24 OPTION 2 Stromversorgung und Netzwerkanschluss per Poe (Power Over Ethernet) Zur Stromversorgung des Geräts per PoE-Switch (z.B. D-Link DGS-1008P) oder PoE-Injektor (z.B. DoorBird Gigabit PoE Injektor A1091) verwenden Sie ein Cat.5 Netzwerkkabel oder besser gemäß PoE Standard IEEE 802.3af Mode A.
  • Page 25 Planungsinformationen zur Stromversorgung unterstützen, wird das Gerät nicht starten. mehrerer Geräte mit einem einzigen DIN Hutschienennetzteil Bitte überprüfen Sie www.doorbird.com/de/poe auf bekannte Inkompatibilitäten. Wenn Sie mehr als ein Gerät in Ihrem Gebäude mit einem einzigen Hutschienennetzteil mit Strom ver- Wenn Sie mehr als ein Gerät mit einem sorgen wollen, müssen Sie die Verkabelung für die...
  • Page 26 INFORMATIONEN FÜR PLANER VON Aderdurchmesser NEUBAUTEN 0,8 mm Wenn Sie wissen, wie viele Geräte installiert werden müssen und Sie die Länge der Kabel kennen, können 0,6 mm Sie in der folgenden Tabelle nachschauen, welcher Aderdurchmesser benötigt wird. 0,5 mm Das folgende grafisch dargestellte Szenario wurde unter der Worst-Case Annahme berechnet, dass alle Geräte an das hinterste Ende des Kabels im Gebäude angeschlossen...
  • Page 27: Gerät Anschliessen

    GERÄT ANSCHLIESSEN Das Gerät verfügt für ein komfortables und sicheres Anschließen der Kabel und Drähte über beschriftete Schraubanschlussklemmen. Sie können alle erforderlichen Kabel und Adern jetzt anschließen. Zur einfacheren Installation empfehlen Entfernen Sie bitte die Kabel und Drähte von NOTI CE wir dringend, die Schraubanschluss- den Schraubanschlussklemmensteckern des klemmenstecker von der...
  • Page 28 Bi-stabiles selbsthaltendes Schaltrelais #1, max. 24 VDC / VAC, 1 A. Sicherheitsfeature: Das Relais behält den Zustand auch bei Spannungsverlust. Sie können den Standardzustand des Relais (geöffnet/ geschlossen) über die DoorBird App konfigurieren. Diese Anschlüsse können verwendet werden, um z.B. einen elektrischen Türöffner oder Aufzugruf anzuschließen.
  • Page 29: Installation Der App

    Dies kann bis zu 5 Minuten dauern. DOWNLOAD UND INSTALLATION DER APP Laden Sie sich die App „DoorBird“ von Bird Home Automation aus dem Apple App Store bzw. Google Play Store auf Ihr mobiles Endgerät herunter. Die stets aktuelle Version der App Bedienungsanleitung finden Setzen Sie das Gerät auf den Montagehalterung auf.
  • Page 30 Diagnoseton). FEHLERBEHEBUNG In den meisten Fällen ist Ihr WLAN-Signal zu schwach. Bitte führen Sie das WLAN-Setup mit der DoorBird App erneut durch. Das Gerät startet nicht Sie können das WLAN-Signal verstärken, indem Wenn das Gerät per Steckernetzteil mit Sie sogenannte „WLAN-Repeater“ verwenden, Strom versorgt werden soll, stecken die Ihr WLAN-Signal verstärken können.
  • Page 31: Technische Daten

    Netzwerk: Ethernet Netzwerk, mit Schaltrelais #1, max. 24 VDC / VAC, DHCP 1 A, z.B. für elektrischen Unterstützte Türöffner oder Fahrstuhl Jede DoorBird IP Video Türstation Anschlüsse Türstationen • Bi-stabiles selbsthaltendes DISPLAY Schaltrelais #2, max. 24 VDC / VAC, 1 A, z.B. für elektrischen Abmessung 4“...
  • Page 32: Rechtliche Hinweise

    Weisen Sie bei Erfordernis an geeigneter Stelle und in geeigneter Form auf das Vorhandensein des Geräts hin. Allgemeines 1. DoorBird ist ein registriertes Warenzeichen der Bird Home Automation GmbH. Beachten Sie alle am Installationsort geltenden relevanten landespezifischen gesetzlichen Regelungen für den Einsatz von 2.
  • Page 33 également ce manuel. Indications de danger Vous trouverez la toute dernière version du manuel d’installation à l’adresse www.doorbird.com/fr/ MISE EN GARDE support ∙ L’installation, le montage et les travaux d’entretien des appareils électriques doivent Pour simplifier les termes, nous utiliserons le mot être exclusivement réalisés par un spécialiste...
  • Page 34 ∙ Cet appareil n’est pas un jouet ! Ne laissez ∙ N’introduisez pas de matériaux métalliques ou pas les enfants jouer avec celui-ci. Ne laissez inflammables dans l’appareil. Cela pourrait pas traîner le matériel d’emballage, les films provoquer un incendie, des décharges électriques et sachets en plastique, les morceaux de ou des dysfonctionnements au niveau de polystyrène, etc.
  • Page 35 gradateurs ou des appareils électriques à GmbH. ondulateur. • Utilisez exclusivement des pièces de rechange - emplacements soumis à de fréquentes fournies ou recommandées par Bird Home vibrations ou chocs. Automation GmbH. • N’essayez pas de réparer l’appareil vous-même. ∙ Pour les appareils avec fonction interphone, Pour toute réparation et pour tout entretien, assurez-vous d’effectuer un test d’appel avec un adressez-vous à...
  • Page 36: Contenu De La Livraison

    Au besoin, transportez l’appareil dans son 3x Connecteurs à vis Petits éléments N OT IC E emballage d’origine ou dans un emballage adapté, afin d’éviter tout dommage. Garantie Vous trouverez les informations relatives à la garantie en consultant la page www.doorbird.com/fr/warranty...
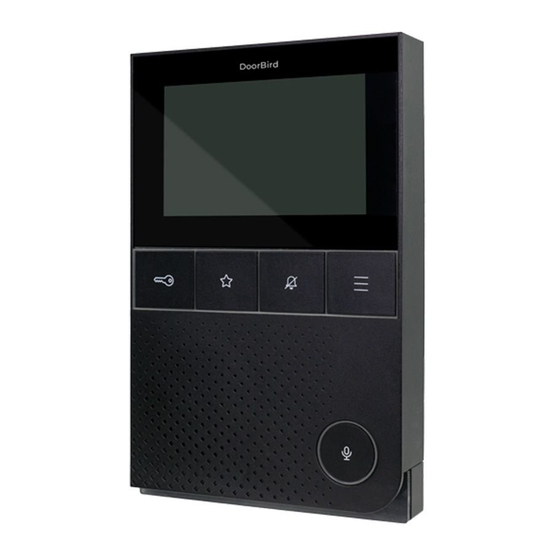
  • Page 37: Face Avant

    Pour monter l'appareil sur le support de montage 13) Borne de raccordement à vis 14) Bouton de configuration (SET) de l'appareil, par ex. pour configurer l'interface WiFi de l'appareil à l'aide de l'application DoorBird 15) Serre-câble VIDÉOS Vitesse du réseau et composants du réseau Veuillez vous assurer que la vitesse de téléchargement...
  • Page 38: Exemples D'installation

    Trois moniteurs intérieurs par WiFi Bouton d'appel Moniteur Commutateur Power over Ethernet (PoE) d'étage intérieur Routeur avec Internet haute vitesse, DHCP Portier Vidéo IP DoorBird Alimentation Alimentation séparée séparée Ouvre-porte/portail électrique. 12 V DC, 1 A 15 V DC, 1 A Peut être sécurisé...
  • Page 39: Coupez Le Courant

    PoE / Comme alternative au montage mural, vous injecteur PoE, etc. pouvez également monter l'appareil sur un socle de table (DoorBird A8003 pour DÉMONTAGE DU MONITEUR moniteur intérieur IP 1101). INTÉRIEUR EXISTANT Veuillez démonter un éventuel moniteur intérieur CHEVILLES placé...
  • Page 40: Préparez L'alimentation

    à l'intérieur de votre maison et près de un injecteur PoE (par ex. Injecteur PoE Gigabit l'appareil. DoorBird A1091), utilisez un câble CAT.5 ou supérieur, conformément à la norme PoE IEEE 802.3af Mode A. Utilisez uniquement un câble CAT.5 ou supérieur car les signaux réseau ne peuvent être transmis que par...
  • Page 41 Le courant Vous trouverez de plus amples informations sur le PoE maximum peut être doublé pour augmenter ici : https://www.doorbird.com/fr/poe le nombre maximum de dispositifs installables en utilisant deux fils pour une 1. Débranchez le commutateur PoE ou seul âme.
  • Page 42: Information Pour Les Concepteurs De Nouveaux Bâtiments

    INFORMATION POUR LES CONCEPTEURS INFORMATION POUR LES ARCHITECTS DE NOUVEAUX BÂTIMENTS DE BÂTIMENTS EXISTANTS Si vous connaissez le nombre d'appareils devant être La longueur des câbles dans les bâtiments existants installés ainsi que la longueur des câbles, vous pouvez est souvent inconnue et ne peut être estimée consulter le tableau suivant afin de connaître le qu'approximativement.
  • Page 43 Max 0V Max 0V Max 24V Max 24V Max 24V 15VDC 0 A (NO) 0 A (NO) LAN/POE T+ T- R+ R- E1 E1 E2 E2 R1 R1 R2 R2 R3 R3 V- V+ PORT DESCRIPTION LAN/POE L’appareil n’est pas équipé d’une prise RJ45 standardisée intégrée afin de garantir ... •...
  • Page 44 état même en cas de coupure de courant. Vous pouvez configurer l’état par défaut du relais (ouvert/fermé) via l’application DoorBird. Ces ports peuvent être utilisés pour connecter par ex. un ouvre-porte électrique ou pour appeler un ascenseur. L’appareil n’alimente pas l’appareil connecté.
  • Page 45: Montez L'appareil Sur Le Support De Montage

    Placez l'appareil sur le support de montage. Si vous connectez l'appareil à votre routeur Internet via WiFi, allez d'abord dans l'application DoorBird " > Paramètres WiFi" et suivez les instructions. Si vous avez terminé la configuration WiFi ou si vous avez connecté...
  • Page 46: Guide De Dépannage

    Dans la plupart des cas, votre signal WiFi est s'allument aussitôt après la mise sous tension. faible. Veuillez réexécuter la configuration WiFi à l'aide de l'application DoorBird. SONS DE CONTRÔLE Vous pouvez augmenter le signal WiFi en Lorsque l’appareil a été connecté à l'alimentation utilisant des "répéteurs WiFi", qui peuvent...
  • Page 47: Caractéristiques Techniques

    Humidité relative de l'air 0 % à 85 %. service ACCESSOIRES SUPPLÉMENTAIRES (sans condensation) Vendu 1 x Moniteur intérieur IP Voir www.doorbird.com/fr/buy séparément 1 x Support de montage 1x Adaptateur RJ45 Sous réserve d'erreurs et d'omissions. 1 x Adaptateur secteur...
  • Page 48: Mentions Légales

    MENTIONS LÉGALES Généralités Veuillez respecter les dispositions légales spécifiques à chaque 1. DoorBird est une marque déposée de Bird Home Automation pays conceernant l‘utilisation des composants et caméras de GmbH. surveillance applicables sur le site di‘installation. Veuillez vérifier auprès du propriétaire et de votre Syndic si vous êtes autorisé...
  • Page 52 www.doorbird.com...

Ce manuel est également adapté pour:

A1101 série

Table des Matières