Publicité
Liens rapides
WARNING
!
•
Failure to position the logs in accordance with these diagrams or failure to use only logs specifi cally approved
with this appliance may result in property damage or personal injury.
•
Logs must be placed in their exact location in the appliance. Do not modify the proper log positions, since
appliance may not function properly and delayed ignition may occur.
•
The logs are fragile and should be handled with care.
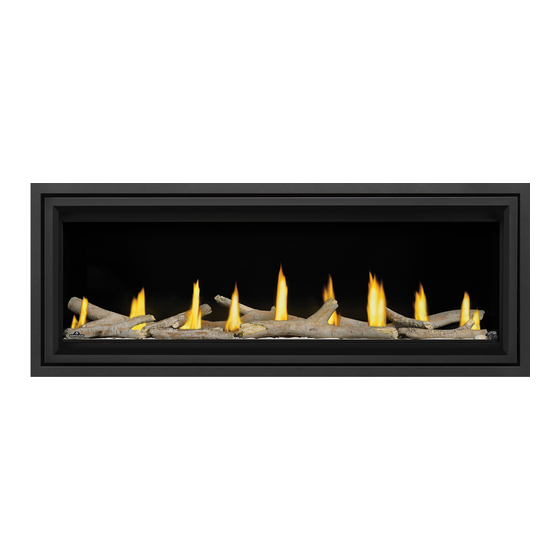
PHAZER™ logs and glowing embers, exclusive to Napoleon, provide a unique and realistic glowing effect that is differ-
"PHAZER™ logs [and glowing embers], exclusive to Napoleon/Continental, provide a unique and realistic
ent in every installation. Take the time to carefully position the glowing embers for a maximum glowing effect. Log colours
glowing effect that is different in every installation. Take the time to carefully position the glowing embers for a
may vary. During the initial use of the appliance, the colours will become more uniform as colour pigments burn in during
maximum glowing effect. Log colours may vary. During the initial use of the appliance, the colours will become
the heat-activated curing process.
more uniform as colour pigments burn in during the heat-activated curing process."
Insert only if
applicable ---->
1
Log Number
1
1
2
3
4
5
6
7
8
9
10
Ensure to separate the 2 locating brackets.
2
1
2
1
6
6
3
IF APPLICABLE, INSERT DRAWING OF BURNER/SUPPORT WITH APPROPRIATE LA-
3
Once apart, using a pair of pliers bend the 10 locating tabs to 90°.
IF NOT APPLICABLE, HIDE THIS SECTION AND USE BOXES BELOW.
Wolf Steel Ltd., 24 Napoleon Rd., Barrie, ON L4M 0G8 Canada
DLKTLV50 Driftwood Log Placement
For Model TLV50
If applicable, insert the following statement:
note:
Log numbers are located on the bottom or back of the logs.
Part Number
LEFT BRACKET
LEFT BRACKET
2
2
7
8
7
8
BELS (I.E. STUDS, PILOT SHIELD, BURNER PORTS, ETC.).
Description
RIGHT BRACKET
RIGHT BRACKET
3
3
9
10
9
10
1(866)820-8686
4
5
4
5
W415-4159 / - / 04.20.23
www.napoleon.com
Publicité

Sommaire des Matières pour Napoleon DLKTLV50
- Page 1 The logs are fragile and should be handled with care. If applicable, insert the following statement: PHAZER™ logs and glowing embers, exclusive to Napoleon, provide a unique and realistic glowing effect that is differ- “PHAZER™ logs [and glowing embers], exclusive to Napoleon/Continental, provide a unique and realistic ent in every installation.
- Page 2 Repeat the process for the right side. Ensure the mesh covers are secured back in place. Burner Overview W415-4159 / - / 04.20.23 Wolf Steel Ltd., 24 Napoleon Rd., Barrie, ON L4M 0G8 Canada 1(866)820-8686 www.napoleon.com...
- Page 3 With the charred side facing the burner, place the smaller end of Log #7 to the left of locating tab #1. Ensure the log is against the tab. Rest the opposite end onto Log #9. W415-4159 / - / 04.20.23 Wolf Steel Ltd., 24 Napoleon Rd., Barrie, ON L4M 0G8 Canada 1(866)820-8686 www.napoleon.com...
- Page 4 With the split end facing the burner, place the split end of Log #5 on the media tray in front of locating tab #10. Rest the curved end onto Log #3. W415-4159 / - / 04.20.23 Wolf Steel Ltd., 24 Napoleon Rd., Barrie, ON L4M 0G8 Canada 1(866)820-8686 www.napoleon.com...
- Page 5 Ensure that no logs are covering any burner ports. Also, ensure there is no impingement of the flame with the logs. W415-4159 / - / 04.20.23 Wolf Steel Ltd., 24 Napoleon Rd., Barrie, ON L4M 0G8 Canada 1(866)820-8686 www.napoleon.com...
- Page 6 Une fois séparées, plier les 10 languettes de positionnement à 90° à l’aide d’une pince. IF NOT APPLICABLE, HIDE THIS SECTION AND USE BOXES BELOW. W415-4159 / - / 04.20.23 Wolf Steel Ltd., 24 Napoleon Rd., Barrie, ON L4M 0G8 Canada 1(866)820-8686 www.napoleon.com...
- Page 7 à l’aide des vis qui viennent d’être retirées. Répétez l’opération pour le côté droit. Veillez à ce que les couvercles des grilles soient remis en place. Vue d’Ensemble de Brûleur W415-4159 / - / 04.20.23 Wolf Steel Ltd., 24 Napoleon Rd., Barrie, ON L4M 0G8 Canada 1(866)820-8686 www.napoleon.com...
- Page 8 1. Veillez à ce que la bûche soit contre la languette. Posez l’extrémité opposée sur la bûche n° 9. W415-4159 / - / 04.20.23 Wolf Steel Ltd., 24 Napoleon Rd., Barrie, ON L4M 0G8 Canada 1(866)820-8686 www.napoleon.com...
- Page 9 Avec l’extrémité fendue tournée vers le brûleur, placez l’extrémité fendue de la bûche n° 5 sur le plateau devant la languette de positionnement n° 10. Posez l’extrémité courbée sur la bûche n° 3. W415-4159 / - / 04.20.23 Wolf Steel Ltd., 24 Napoleon Rd., Barrie, ON L4M 0G8 Canada 1(866)820-8686 www.napoleon.com...
- Page 10 Veillez à ce qu’aucune bûche ne recouvre les orifices du brûleur. Veillez également à ce que les bûches n’empiètent pas sur la flamme. W415-4159 / - / 04.20.23 Wolf Steel Ltd., 24 Napoleon Rd., Barrie, ON L4M 0G8 Canada 1(866)820-8686 www.napoleon.com...


