Publicité
Les langues disponibles
Les langues disponibles
Centronic TimeControl TC445
Bedienungsanleitung
Operating Instructions
Notice d utilisation
Gebruiksaanwijzing
Zeitschaltuhr im Handsender
mit Display
Timer in handheld transmitter
featuring display
Télécommande
avec horloge intégrée avec écran
Tijdschakelklok in handzender
met display
Bitte bewahren Sie die Anleitung auf!
Please keep these instructions in a safe place!
Prière de conserver ces instructions d'utilisation!
De handleiding goed bewaren!
DE
GB
FR
NL
TC 30
1
M
Reset
-
+
OK
Publicité
Chapitres

Manuels Connexes pour Becker Centronic TimeControl TC445


Sommaire des Matières pour Becker Centronic TimeControl TC445
- Page 1 Centronic TimeControl TC445 Bedienungsanleitung Operating Instructions Notice d utilisation Gebruiksaanwijzing TC 30 Zeitschaltuhr im Handsender mit Display Timer in handheld transmitter Reset featuring display Télécommande avec horloge intégrée avec écran Tijdschakelklok in handzender met display Bitte bewahren Sie die Anleitung auf! Please keep these instructions in a safe place! Prière de conserver ces instructions d’utilisation!
-
Page 2: Table Des Matières
Inhaltsverzeichnis Gewährleistung ............................4 Sicherheitshinweise ........................... 5 Anzeigen- und Tastenerklärung ......................6 Allgemeines ..............................7 Bestimmungsgemäße Verwendung ...................... 7 Erklärungen ..............................8 Einlernen des Funks ..........................13 Inbetriebnahme ............................14 Werkseinstellung ............................14 Programmierung ............................15 Montage Wandhalterung ........................24 Batteriewechsel ............................ - Page 3 Sommaire Prestation de Garantie ..........................52 Consignes de sécurité ..........................53 Explication des textes d’affichage et des touches ............... 54 Généralités ..............................55 Utilisation conforme aux prescriptions .................... 55 Explications ..............................56 Programmation de la radio ........................61 Mise en service ............................62 Paramétrage usine ............................
-
Page 4: Gewährleistung
Allgemeine Konformitätserklärung ....................25 Was tun, wenn...? ............................. 26 Gewährleistung Becker-Antriebe GmbH ist von der gesetzlichen und vertraglichen Gewährleistung für Sachmängel und Produkthaftung befreit, wenn ohne unsere vorherige Zustimmung eige- ne bauliche Veränderungen und/oder unsachgemäße Installationen gegen unsere vorge- gebenen Montagerichtlinien vorgenommen, ausgeführt oder veranlasst werden. -
Page 5: Sicherheitshinweise
Vorsicht Bitte bewahren Sie die Anleitung auf! • Nur in trockenen Räumen verwenden. • Verwenden Sie nur unveränderte Becker Originalteile. • Halten Sie Personen aus dem Fahrbereich der Anlagen fern. • Halten Sie Kinder von Steuerungen fern. • Beachten Sie Ihre landesspezifischen Bestimmungen. -
Page 6: Anzeigen- Und Tastenerklärung
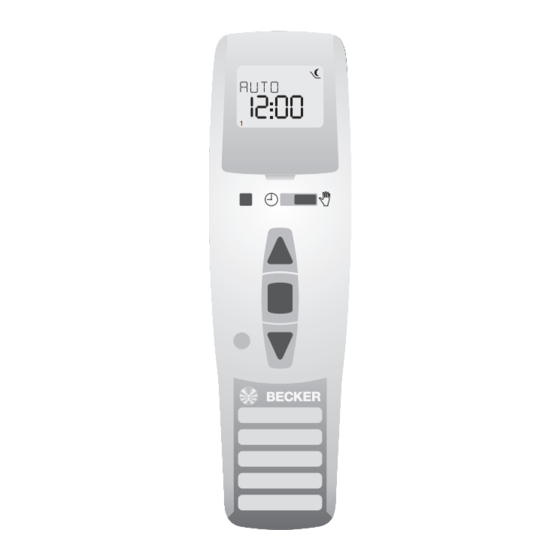
Bedienungsanleitung Anzeigen- und Tastenerklärung TC 30 Hand- / Automatik- Abdeckklappe Schiebeschalter Reset Sendekontrollleuchte AUF-Taste STOPP-Taste Gruppentaste AB-Taste Einlerntaste Batteriefach Gruppenkontrollleuchten Tasten unter der Abdeckklappe MENUE-Taste OK-Taste - Taste + Taste Displaysymbolik RESET-Taste Programm Einstellung Funktion Uhr/Datum TC445 Astro-Abend Textzeile Auffahrt Ziffernanzeige 1 2 3 4 5 6 7 Wochentage (Mo.-So.) -
Page 7: Allgemeines
Bedienungsanleitung Allgemeines Die vom Werk mit aktuellem Datum und Uhrzeit (MEZ) ausgelieferte TC445 steuert den Antrieb morgens zur programmierten Schaltzeit und abends zur Astrozeit (Sonnenuntergangszeit). Eine manuelle Bedienung die TC445 ist jederzeit möglich. Mit der TC445 können bis zu 5 Empfänger einzeln oder alle zusammen angesteuert werden. -
Page 8: Erklärungen
Bedienungsanleitung Erklärungen Hand/Auto Schiebeschalter In der Schiebeschalterstellung „Hand“ werden nur manuelle Fahrbefehle ausgeführt (z.B.: AUF, STOPP, AB per Tastendruck). In der Schiebeschalterstellung „Auto“ werden automatische Fahrbefehle ausgeführt (z.B.: Zeit, Astro Abend Funktion,...) Sendekontrollleuchte Ein Funksignal wird durch das Aufleuchten der Sendekontrollleuchte signalisiert. Lässt die Leistung der Batterie nach, blinkt die Sendekontrollleuchte beim Senden. -
Page 9: Reset-Taste
Bedienungsanleitung +/- Tasten Folgende Bedienungen sind über + und - möglich: • Menü ➔ Wert verändern • Auto-Betrieb ➔ Informationen abfragen • + Taste ➔ Nächste automatische Schaltzeit ▲ • - Taste ➔ Nächste automatische Schaltzeit ▼ • - Taste und OK Taste ➔ Astrozeit ▼ MENUE-Taste Durch Drücken der MENUE-Taste gelangen Sie in die Menüübersicht oder in den Betriebsmodus. - Page 10 Bedienungsanleitung ASTRO ABEND Steuert die Auffahrt nach der eingestellten Schaltzeit. Abfahrt nach Astrofunktion. Winterzeit Sommerzeit Winterzeit Sonnenaufgang 05:00 Uhr 07:00 Uhr 9:00 Uhr Jan. Feb. Mär. Apr. Jun. Jul. Aug. Sep. Okt. Nov. Dez. 15:00 Uhr 18:30 Uhr 22:00 Uhr Sonnenuntergang Winterzeit Sommerzeit...
- Page 11 Bedienungsanleitung Menü Einstellungen EINSTELLUNG Im Menü EINSTELLUNG haben Sie folgende Möglichkeiten: • URLAUB • ZWISCHENPOSITION • LUEFTUNG/WENDUNG • PROG (ENDLAGE, ZWISCHENPOSITION, LUEFTUNG/WENDUNG) • Sprachauswahl (DEUTSCH) • ASTROVERSCHIEBUNG ▼ • Städteauswahl (KASSEL) • LAENGE (Erscheint nur bei EXPERT-MOD ON) • BREITE (Erscheint nur bei EXPERT-MOD ON) •...
- Page 12 Bedienungsanleitung ASTROVERSCHIEBUNG Durch die Einstellung der Astroverschiebung kann die Astrozeit ▼ verschoben werden (max. +/- 120 Min.). Jan. Feb. Mär. Apr. Jun. Jul. Aug. Sep. Okt. Nov. Dez. Astro-Verschiebung 15:00 Uhr Schliessen z.B. 1 Stunde vor Sonnenuntergang bei Astroverschiebung von -1 h 18:30 Uhr 22:00 Uhr Sonnenuntergang...
-
Page 13: Einlernen Des Funks
Bedienungsanleitung Einlernen des Funks 1) Mastersender einlernen a) Empfänger in Lernbereitschaft bringen Hinweis Beachten Sie die Betriebsanleitung des Empfängers. • Schalten Sie die Spannungsversorgung des Empfängers aus und nach 5 Sekunden wieder ein. oder • Betätigen Sie die Lerntaste bzw. den Funkschalter des Empfängers. Der Empfänger befindet sich nun für 3 Minuten in Lernbereitschaft. -
Page 14: Inbetriebnahme
Bedienungsanleitung Inbetriebnahme die Sprache wählen und diese mir der OK Taste übernehmen. Die Uhr befindet sich im Automatikmodus. UHR/DAT: aktuelle MEZ und aktuelles Datum Werkseinstellung PROGRAMM: ASTRO ABEND ➔ Schaltzeiten Montag-Freitag (1-5) ▲ 7.00 Uhr, ▼ ASTRO ABEND Schaltzeiten Samstag, Sonntag (6,7) ▲... -
Page 15: Menüübersicht
Bedienungsanleitung Programmierung Menüübersicht Betriebsmodus UHR/DAT PROGRAMM EINSTELLUNG FUNKTION 1. Drücken Sie die MENUE-Taste UHR/DAT erscheint. 2. Um weitere Menüs auszuwählen, drücken Sie die +/- Tasten. 3. Drücken Sie die MENUE-Taste, um in den Betriebsmodus zu gelangen. UHR/DAT (Uhrzeit und Datum einstellen) UHR/DAT UHRZEIT JAHR... - Page 16 Bedienungsanleitung PROGRAMM ASTRO ABEND (Auffahrt ➔ Schaltzeit, Abfahrt ➔ Sonnenuntergang) PROGRAMM ASTRO SCHALTZEIT ▲ SPERRZEIT ▼ ABEND SCHALTZEIT ▲ SPERRZEIT ▼ PROGRAMM 1. Drücken Sie die MENUE-Taste. 2. Um das Menü PROGAMM auszuwählen, drücken Sie die + Taste bis PROGAMM er- scheint.
- Page 17 Bedienungsanleitung PROGRAMM INDIVIDUELL (Auf-/Abfahrt ➔ Schaltzeiten) PROGRAMM INDIVIDUELL SCHALTZEIT ▲ SCHALTZEIT ▼ SCHALTZEIT ▲ SCHALTZEIT ▼ PROGRAMM 1. Drücken Sie die MENUE-Taste. 2. Um das Menü PROGAMM auszuwählen, drücken Sie die + Taste bis PROGAMM er- scheint. 3. Bestätigen Sie mit OK. 4.
- Page 18 Bedienungsanleitung EINSTELLUNG URLAUB (Urlaub OFF/ON) EINSTELLUNG URLAUB OFF URLAUB ON 1. Drücken Sie die MENUE-Taste. 2. Um das Menü EINSTELLUNG auszuwählen, drücken Sie die + Taste bis EINSTELLUNG erscheint. 3. Bestätigen Sie mit OK. URLAUB ON/OFF erscheint. 4. Mit der +/- Taste können sie die Urlaubsfunktion auf ON oder OFF stellen. 5.
- Page 19 Bedienungsanleitung EINSTELLUNG ZWISCHENPOSITION, LUEFTUNG/WENDUNG, Prog ENDLAGE (Zeit/Lageprogrammierung) ZWISCHEN- LUEFTUNG PROG POSITION (WENDUNG) ENDLAGE PROG ZWISCHEN- POSITION PROG LUEFTUNG 1. Sie haben die Funktion URLAUB bestätigt. ZWISCHENPOSITION erscheint. 2. Mit der +/- Taste können Sie die Fahrzeit zur ZWISCHENPOSITION einstellen. Die An- gabe der Fahrzeit erfolgt in Sekunden oder Sie fahren die ZWISCHENPOSITION mit der AB-/AUF-Taste aus der oberen Endlage an.
- Page 20 Bedienungsanleitung EINSTELLUNG DEUTSCH/ASTROVERSCHIEBUNG ▼ (Sprachauswahl, Astroverschiebung) ASTROVER- DEUTSCH SCHIEBUNG M Sie haben die Funktion PROG ENDLAGE bestätigt. DEUTSCH erscheint. 1. Mit der +/- Taste können Sie die gewünschte Sprache einstellen. 2. Bestätigen Sie Ihre Sprachauswahl mit OK. 3. ASTROVERSCHIEBUNG ▼ erscheint. 4.
- Page 21 Bedienungsanleitung EINSTELLUNG (Städteauswahl, EXPERTEN MODUS (LAENGE, BREITE, ZEITZONE) EXPERTEN KASSEL MODUS ON/OFF LAENGE BREITE ZEITZONE 1. Sie haben die Funktion ASTROVERSCHIEBUNG ▼ bestätigt. Stadtauswahl (KASSEL) erscheint. 2. Mit der +/- Taste können Sie die nächstgelegene Stadt einstellen. 3. Betätigen Sie mit OK. Hinweis Diese Dialogfenster werden nur angezeigt, wenn im Funktionsmenü...
- Page 22 Bedienungsanleitung EINSTELLUNG SO/WI (Automatische Sommer-/Winterzeitumstellung) SO/WI EINSTELLUNG SO/WI 1. Sie haben die Funktion ZEITZONE bestätigt. SO/WI erscheint. 2. Mit der +/- Taste können Sie SO/WI ein- oder ausschalten. 3. Bestätigen Sie Ihre Auswahl mit OK. 4. Drücken Sie die MENUE-Taste, um in den Betriebsmodus zu gelangen.
- Page 23 Bedienungsanleitung FUNKTION ROLLLADEN/JALOUSIE, ERSTINBETRIEBNAHME (Auswahl des Behanges, Datum der Erstinbetriebnahme) FUNKTION ROLLLADEN/ EXPERTEN MODUS ERSTINBETRIEB JALOUSIE OFF/ON NAHME FUNKTION 1. Drücken Sie die MENUE-Taste. 2. Um das Menü FUNKTION auszuwählen, drücken Sie die + Taste bis FUNKTION er- scheint. 3. Bestätigen Sie mit OK. ROLLLADEN/JALOUSIE erscheint. 4.
-
Page 24: Montage Wandhalterung
Bedienungsanleitung Montage Wandhalterung • Prüfen Sie vor der Montage an der ge- wünschten Montageposition die ein- wandfreie Funktion von Sender und Empfänger. • Befestigen Sie die Halterung mit den 38,5 zwei beigelegten Schrauben an der Wand. 43,6 Batteriewechsel Hinweis Wechseln Sie die Batterien innerhalb einer Minute und drücken Sie dabei keine Tasten. -
Page 25: Technische Daten
Funkfrequenz 868,3 MHz Allgemeine Konformitätserklärung Hiermit erklärt die Firma Becker-Antriebe GmbH, dass sich das Gerät Centronic TimeControl TC445 in Übereinstimmung mit den grundlegenden Anforderungen und den anderen relevanten Vorschriften der Richtlinie 1999/5/EG befindet. Bestimmt für den Gebrauch in folgenden Ländern: DE, BE, FR, NL, AT, LU, IT, GB, ES, CH,... -
Page 26: Was Tun, Wenn
Bedienungsanleitung Was tun, wenn...? ö t e f l e i r u ä , t h i r e . r e i r e l l l i e l i r e i r e c i r . - Page 27 Bedienungsanleitung ö t e f l l l l h ä i t i i t i ü n . t l l e l l e i r c ü i t k u l l ü r . s r...
- Page 28 What to do if...? ............................50 Warranty Becker-Antriebe GmbH will be released from all warranty and product liability obliga- tions if the customer modifies the equipment without prior approval from Becker- Antriebe GmbH or if the equipment is installed incorrectly and/or contrary to the speci- fied installation instructions, by the customer or a third party.
-
Page 29: Safety Instructions
Warning Please keep the instructions in a safe place! • Use in dry rooms only. • Use unmodified Becker original parts only. • Keep persons away from the system guide track. • Keep children away from controls. • Please comply with national stipulations. -
Page 30: Explanation Of Displays And Buttons
Operating Instructions Explanation of displays and buttons TC 30 Manual / automatic Cover sliding switch Reset Transmission control light UP button STOP button Group pushbutton DOWN button Programming pushbutton Battery compartment Group control lights Buttons under the cover MENU button OK button - button + button... -
Page 31: General Information
Operating Instructions General information The TC445, which is supplied ex works with current date and time settings (CET), operates the receiver in the morning at the pre-programmed switching time and in the evening at the astro time (sunset). The TC445 can be operated manually at any time. With the TC445 up to 5 receivers can be operated individually or together. -
Page 32: Explanations
Operating Instructions Explanations Manual/Automatic sliding switch When the sliding switch is switched to MAN, only manual control commands are carried out (e.g. by pressing the UP, STOP and DOWN buttons). When the sliding switch is switched to AUTO, automatic control commands are carried out (e.g. -
Page 33: Menu Button
Operating Instructions +/- Buttons The following features can be operated using the + and - buttons: • Menu ➔ Change setting • AUTO mode ➔ Request information • + Button ➔ Next automatic switching time ▲ • - Button ➔ Next automatic switching time ▼ •... - Page 34 Operating Instructions ASTRO EVENING Shutters are raised according to the set switching time. Shutters are lowered according to the astro function. winter time summer time winter time sun rise 05:00 h 07:00 hrs 09:00 hrs Jan. Feb. Mar. Apr. Jun. Jul.
-
Page 35: Menu Settings
Operating Instructions Menu Settings SETTINGS The following settings can be made via the SETTING menu: • HOLIDAY • INTERMEDIATE POSITION • VENTILATION/REVERSE • PROG (END LIMIT, INTERMEDIATE POSITION, VENTILATION/REVERSE) • Select language (ENGLISH GB) • ASTRO SHIFT ▼ • Select town/city (LONDON) •... - Page 36 Operating Instructions ASTRO SHIFT The astro time ▲ can be shifted (max. +/- 120 mins.) using the astro shift setting. astro shift Mar. Jan. Feb. Apr. Jun. Jul. Aug. Sep. Oct. Nov. Dec. 15:00 hrs closing , e.g. 1 hour before sundown astro shift of - 1hr 18:30 hrs...
-
Page 37: Programming The Remote Control
Operating Instructions Programming the remote control 1) Learning the master transmitter a) Put receiver into learn mode Note Please refer to the operating instructions for the receiver. • Switch off the receiver’s power supply and reconnect after 5 seconds. • Activate the “Learn” key or the radio-controlled receiver switch. The receiver will then be in “Learn”... -
Page 38: Initial Operation
Operating Instructions Initial operation Press the button once to “wake up” the timer. Now you can select the language with the +/- buttons and accept it with the OK button. The clock is in automatic mode. Factory settings TIME/DATE: Current CET and current date PROGRAMME: ASTRO EVENING ➔... -
Page 39: Programming
Operating Instructions Programming Overview of menu Operating mode TIME/DATE PROGRAMME SETTING FUNCTION 1. Press the MENU button until TIME/DATE appears. 2. To select further menus, press the +/- buttons. 3. Press the MENU button to switch to operating mode. TIME/DATE (to set the time and date) TIME/DATE TIME YEAR... - Page 40 Operating Instructions PROGRAMME ASTRO EVENING (UP ➔ switching time, DOWN ➔ sunset) PROGRAMME BLOCKING ASTRO SWITCHING TIME ▼ EVENING TIME ▲ BLOCKING SWITCHING TIME ▼ TIME ▲ PROGRAMME 1. Press the MENU button. 2. To select the PROGAMME menu, press the + button until PROGAMME appears. 3.
- Page 41 Operating Instructions PROGRAMME SEPARATE (UP/DOWN command ➔ switching times) 1. Press the MENU button. 2. To select the PROGAMME menu, press the + button until PROGAMME appears. 3. Press OK to confirm. 4. Press the + button again until SEPARATE appears. 5.
- Page 42 Operating Instructions SETTING HOLIDAY (Holiday OFF/ON) SETTING HOLIDAY OFF HOLIDAY ON 1. Press the MENU button. 2. To select the SETTING menu, press the + button until SETTING appears. 3. Press OK to confirm. HOLDAY ON/OFF appears. 4. The holiday function can be set to ON or OFF using the +/- buttons. 5.
- Page 43 Operating Instructions SETTING INTERMEDIATE POSITION, VENTILATION/REVERSE, PROG END LIMIT (Time/position programming) INTERMEDIATE VENTILATION PROG POSITION (REVERSE) END LIMIT PROG INTERMEDIATE POSITION PROG VENTILATION 1. You have confirmed the HOLIDAY function. INTERMEDIATE POSITION appears. 2. The switching time for the INTERMEDIATE POSITION can be set using the +/- buttons. The switching time can be set in a few seconds.
- Page 44 Operating Instructions SETTING ENGLISH GB/ASTRO SHIFT ▼ (Language selection, astro shift) ENGLISH GB ASTRO SHIFT ▼ You have confirmed the PROG END LIMIT function. ENGLISH GB appears. 1. You can select the desired language using the +/- buttons. 2. Confirm your language selection by pressing OK. 3.
- Page 45 Operating Instructions SETTING (City, EXPERT MODE (LONGITUDE, LATITUDE, TIME ZONE)) EXPERT LONDON MODE ON/OFF LONGITUDE LATITUDE TIME ZONE 1. You have confirmed the function ASTRO SHIFT ▼. The city selected (LONDON) will appear. 2. You can set the nearest town using the +/- button. 3.
- Page 46 Operating Instructions SETTING SUMMER/WINTER (Automatic clock adjustment for daylight saving changes) SUMMER/WINTER Operating mode SUMMER/WINTER 1. You have confirmed the TIME ZONE function. SUMMER/WINTER will appear. 2. The SUMMER/WINTER setting can be switched on or off using the +/- button. 3.
- Page 47 Operating Instructions FUNCTION ROLLER SHUTTER/BLIND, INITIAL OPERATION (Shutter/blind selection, date of initial operation) FUNCTION ROLLER SHUTTER/ EXPERT MODE INITIAL BLIND OFF/ON OPERATION FUNCTION 1. Press the MENU button. 2. To select the FUNCTION menu, press the + button until FUNCTION appears. 3.
-
Page 48: Installing The Wall Mount
Operating Instructions Installing the wall mount • Before installing in the position re- quired, check that the transmitter and receiver are functioning properly. • Fix the mount to the wall with the two screws provided. 38,5 43,6 Changing the battery Note Change the batteries within one minute, ensuring that you do not press... -
Page 49: Technical Data
868.3 MHz General declaration of conformity Becker hereby declares that the Centronic TimeControl TC445 complies with the basic requirements and other relevant regulations of the EC Directive 1999/5/EC. For use in the following countries: DE, BE, FR, NL, AT, LU, IT, GB, ES, CH, CZ, DK, FI, HU,... -
Page 50: What To Do If
Operating Instructions What to do if...? i r e i r e . s e i s s l o r g i l . t i l i r e y l t i r e . y l i s t t s i i s s... - Page 51 Operating Instructions e l l t i s . t e i t i . t i t t i i t t i r e...
-
Page 52: Prestation De Garantie
Que faire quand...? ........................... 74 Prestation de Garantie Becker-Antriebe GmbH est dégagé de la garantie et de la responsabilité du fait du pro- duit si, sans notre autorisation préalable, des modifications de construction sont effec- tuées et/ou des installations inadéquates sont exécutées ou engagées, à l'encontre de nos directives de montage prescrites. -
Page 53: Consignes De Sécurité
Prière de conserver cette notice d’utilisation! • A utiliser uniquement dans des locaux secs. • Utilisez uniquement des pièces originales de Becker qui n’ont subi aucune mo- dification. • Veillez à ce que personne ne se tienne dans la zone de déploiement des installa- tions. -
Page 54: Explication Des Textes D'affichage Et Des Touches
Notice d’utilisation Explication des textes d’affichage et des touches TC 30 Curseur Couvercle rabattable Manuel/Automatique Reset Témoins de contrôle d émission Touche MONTEE Touche STOP Touche de groupe Touche DESCENTE Touche de programmation Compartiment à piles Témoin de contrôle de groupe Touches sous le couvercle rabattable Touche MENU Touche OK... -
Page 55: Généralités
Notice d’utilisation Généralités La TC445, livrée avec des réglages usine avec la date et l’heure actuelles (heure de l’Eu- rope centrale), pilote le récepteur aux horaires programmés le matin et le soir au temps astro (heure de coucher du soleil). Une commande manuelle de la TC445 est toujours possible. -
Page 56: Explications
Notice d’utilisation Explications Curseur Manuel / Auto Lorsque le curseur est en position « Manuel », seules les commandes de marche manuel- les sont exécutées (p. ex. : en appuyant sur la touche MONTEE, STOP, DESCENTE). Lorsque le curseur est en position « Auto », les commandes de marche automatiques sont exécutées (p. -
Page 57: Touche Menu
Notice d’utilisation Touches +/- Les touches + et - permettent les actions suivantes : • Menu ➔ Modification de la valeur • Service Auto ➔ Demande d’informations • Touche + ➔ Horaire ▲ automatique suivant • Touche - ➔ Horaire ▼ automatique suivant •... - Page 58 Notice d’utilisation ASTRO SOIR Pilote la montée selon l’horaire réglé. Descente selon fonction astro. Heure d’hiver Heure d’été Heure d’hiver Coucher du soleil 05 00 07h00 09h00 Jan. Feb. Mar. Apr. Jun. Jul. Aug. Sep. Oct. Nov. Dec. 15h00 18h30 22h00 Coucher du soleil Heure d’hiver...
-
Page 59: Menu Réglages
Notice d’utilisation Menu Réglages REGLAGE Le menu REGLAGE vous offre les possibilités suivantes : • VACANCES • POS. INTERM. • AERATION/INVERSION • PROG1 (POSITION FINALE, POS. INTERM, AERATION/INVERSION) • Sélection de la langue (FRANÇAIS) • DECALAGE ASTRO ▼ • Sélection de la ville (PARIS) •... -
Page 60: Longitude/Latitude/Zone Horaire (Seulement Avec Mode Expert On)
Notice d’utilisation DECALAGE ASTRO Le réglage du décalage astro permet de décaler le temps astro ▼ (maximum +/- 120 minutes). Décalage astro Jan. Feb. Mar. Apr. Jun. Jul. Aug. Sep. Oct. Nov. Dec. 15h00 Fermeture p. ex. 1h avant le coucher du soleil avec un décalage astro de -1h 18h30 Coucher du soleil... -
Page 61: Programmation De La Radio
Notice d’utilisation Programmation de la radio 1) Programmation de l’émetteur maître a) Préparer le récepteur en mode de programmation. Remarque Suivez la notice de service du récepteur. • Coupez la tension d’alimentation du récepteur et connectez-la de nouveau au bout de 5 secondes. -
Page 62: Mise En Service
Notice d’utilisation Mise en service En appuyant une première fois sur la touche, vous « réveillez » l’horloge. Vous pouvez maintenant sélectionner la langue avec les touches +/- et la confirmer avec la touche OK. L’horloge est en mode Automatique. Paramétrage usine HEURE/DATE : heure de l’Europe centrale actuelle et date actuelle... -
Page 63: Vue D'ensemble Du Menu
Notice d’utilisation Programmation Vue d’ensemble du menu Mode de service HEURE/DATE PROGRAMME REGLAGE FONCTION 1. Appuyez sur la touche MENU, HEURE/DATE apparaît. 2. Pour sélectionner d’autres menus, appuyez sur les touches +/-. 3. Appuyez sur la touche MENU pour accéder au mode de service. HEURE/DATE (régler l’heure et la date) HEURE/DATE HEURE... - Page 64 Notice d’utilisation PROGRAMME ASTRO SOIR (montée ➔ horaire, descente ➔ coucher du soleil) PROGRAMME ASTRO TEMPS HORAIRE ▲ SOIR DE BLOCAGE ▼ TEMPS HORAIRE ▲ DE BLOCAGE ▼ PROGRAMME 1. Appuyez sur la touche MENU. 2. Pour sélectionner le menu PROGAMME, appuyez sur la touche + jusqu’à ce que PRO- GRAMME apparaisse.
- Page 65 Notice d’utilisation PROGRAMME INDIVIDUEL (montée/descente ➔ horaires) PROGRAMME INDIVIDUEL HORAIRE ▲ HORAIRE ▼ HORAIRE ▲ HORAIRE ▼ PROGRAMME 1. Appuyez sur la touche MENU. 2. Pour sélectionner le menu PROGAMME, appuyez sur la touche + jusqu’à ce que PRO- GRAMME apparaisse. 3.
- Page 66 Notice d’utilisation REGLAGE VACANCES (Vacances OFF/ON) REGLAGE VACANCES OFF VACANCES ON 1. Appuyez sur la touche MENU. 2. Pour sélectionner le menu REGLAGE, appuyez sur la touche + jusqu’à ce que REGLAGE apparaisse. 3. Confirmez avec OK. VACANCES ON / OFF apparaît. 4.
- Page 67 Notice d’utilisation REGLAGE POS. INTERM., AERATION/INVERSION, POSITION FINALE (programmation temps/position) POS. AERATION PROG INTERM (INVERSION) POS. FINALE PROG POS. INTERM PROG AERATION 1. Vous avez confirmé la fonction VACANCES. POS. INTERM. apparaît. 2. Vous pouvez régler les horaires de marche pour la POS. INTERM. avec les touches +/-.
- Page 68 Notice d’utilisation REGLAGE FRANÇAIS/ DECALAGE ASTRO ▼ (sélection de la langue, décalage astro) DECALAGE FRANÇAIS ASTRO ▼ Vous avez confirmé la fonction PROG POSITION FINALE. FRANÇAIS apparaît. 1. Vous pouvez régler la langue désirée avec les touches +/-. 2. Confirmez le choix de la langue en appuyant sur OK. 3.
- Page 69 Notice d’utilisation REGLAGE (Sélection de la ville, MODE EXPERT (LONGITUDE, LATITUDE, ZONE HORAIRE) MODE PARIS EXPERT ON/OFF LONGITUDE LATITUDE ZONE HORAIRE 1. Vous avez confirmé la fonction DECALAGE ASTRO ▼. Sélection de la ville (PARIS) apparaît. 2. Vous pouvez régler la ville la plus proche avec la touche +/-. 3.
- Page 70 Notice d’utilisation REGLAGE ETE/HIVER (commutation automatique été/hiver) ETE/HIV REGLAGE ETE/HIV 1. Vous avez confirmé la fonction ZONE HORAIRE. ETE/HIVER apparaît. 2. Vous pouvez activer ou désactiver ETE/HIVER avec les touches +/-. 3. Confirmez votre sélection avec OK. 4. Appuyez sur la touche MENU pour accéder au mode de service.
- Page 71 Notice d’utilisation FONCTION VOLET ROULANT/STORE, 1 ère MISE EN SERVICE (sélection du tablier, date de la 1 ère mise en service) FONCTION VOLET ROULANT/ MODE EXPERT PREMIERE STORES ON/OFF MISE EN SERVICE FONCTION 1. Appuyez sur la touche MENU. 2. Pour sélectionner le menu FONCTION, appuyez sur la touche + jusqu’à ce que FONC- TION apparaisse.
-
Page 72: Montage Du Support Mural
Notice d’utilisation Montage du support mural • Assurez-vous avant de monter l’appareil à l’endroit désiré du bon fonctionne- ment de l’émetteur et du récepteur. • Fixez le support au mur au moyen des deux vis jointes à la fourniture. 38,5 43,6 Remplacement des piles Remarque... -
Page 73: Caractéristiques Techniques
Fréquence radio 868,3 MHz Déclaration de conformité générale La société Becker-Antriebe GmbH, déclare par la présente que l’appareil Centronic TimeControl TC445 est en conformité avec les exigences fondamentales et les autres prescriptions pertinentes de la directive 1999/5/CE. Est destiné à une utilisation dans les pays suivants: DE, BE, FR, NL, AT, LU, IT, GB, ES, CH,... -
Page 74: Que Faire Quand
Notice d’utilisation Que faire quand...? e i l à l i p é d é g . s e l l e l i p . s e , s a é t ô r é ’ i s s l i p l i p a ’... - Page 75 Notice d’utilisation e i l à i t i e ’ g é r e l i t i t a ’ i e t g é é l i t i . e l a é i t c t é...
- Page 76 Algemene conformiteitsverklaring ..................... 97 Wat te doen, als ...? ..........................98 Garantieverlening Becker-Antriebe GmbH is van de garantieverlening en de productaansprakelijkheid be- vrijd, wanneer zonder onze voorafgaande toestemming eigen bouwkundige constructie-wijzigingen zijn aangebracht en/of onvakkundige installaties worden door- gevoerd of in opdracht worden gegeven, die in strijd zijn met onze voorgeschreven montagerichtlijnen.
-
Page 77: Aanwijzingen Voor De Veiligheid
Waarschuwing Bewaar deze gebruiksaanwijzing goed! • Uitsluitend in droge ruimtes gebruiken. • Maakt u uitsluitend gebruik van ongewijzigde Becker originele delen. • Houd personen buiten het bereik van de installaties. • Laat kinderen niet met de installatie spelen. • Houdt u rekening met de landspecifieke bepalingen. -
Page 78: Verklaring Van Displays En Toetsen
Gebruiksaanwijzing Verklaring van displays en toetsen TC 30 Hand / Automatisch Afdekklep schuifschakelaar Reset Zendcontrolelampje OP toets STOP-toets Groepentoets NEER toets Programmeringstoets Batterijvak Groepencontrolelampje Toetsen onder de afdekklep MENU-toets OK-toets - toets + toets Displaysymbolen Reset-toets Programma Instelling Functie Tijd/Datum TC445 Astro avond Tekstregel... -
Page 79: Algemeen
Gebruiksaanwijzing Algemeen De door de fabriek met actuele datum en tijd (MET) afgeleverde TC445 bestuurt de ontvanger 's morgens op de geprogrammeerde schakeltijd en 's avonds op de Astrotijd (tijdstip van zonsondergang). Handmatige bediening van de TC445 is altijd mogelijk. Met de TC445 kunnen maximaal 5 ontvangers afzonderlijk of allemaal tegelijk worden aangestuurd. -
Page 80: Verklaringen
Gebruiksaanwijzing Verklaringen Hand/ Auto schuifschakelaar In de stand „Hand“ van de schuifschakelaar worden uitsluitend handmatige commando’s uitgevoerd (bijv.: OP, STOP, NEER met een druk op de toets). In de stand „Auto“ van de schuifschakelaar worden automatische commando’s uitge- voerd (bijv. Tijd, Astro avondfunctie…) Zendcontrolelampje Een commando versturen wordt door het opflikkeren van de zendcontrolelamp duidelijk gemaakt. -
Page 81: Menu Programma
Gebruiksaanwijzing +/—toetsen De volgende bediening is met + en - mogelijk: • Menu ➔ Waarde veranderen • Auto-stand ➔ Informatie opvragen • +-toets ➔ Volgende automatische schakeltijd ▲ • - toets ➔ Volgende automatische schakeltijd ▼ • - toets en OK -toets ➔ Astrotijd ▼ MENU-toets Door het indrukken van de MENU-toets komt men in het menuoverzicht of de bedrijfs- modus. - Page 82 Gebruiksaanwijzing ASTRO AVOND Stuurt het omhoog lopen na de ingestelde schakeltijd. Omlaag lopen volgens astrofunctie. Wintertijd Zomertijd Wintertijd Zonsopgang 05:00 uur 07:00 uur 09:00 uur Jan. Feb. Mrt. Apr. Jun. Jul. Aug. Sep. Okt. Nov. Dec. 15:00 uur 18:30 uur Zonsondergang 22:00 uur Wintertijd...
-
Page 83: Menu Instellingen
Gebruiksaanwijzing Menu Instellingen INSTELLING In het menu INSTELLING zijn de volgende mogelijkheden: • VAKANTIE • TUSSENPOSITIE • VENTILATIE/KANTELEN • PROG (EINDSTAND, TUSSENPOSITIE, VENTILATIE/KANTELEN) • Taalkeuze (NEDERLANDS) • ASTROVERSCHUIVING ▼ • Stadkeuze (AMSTERDAM) • LENGTE (Verschijnt alleen bij EXPERT-MOD ON) • BREEDTE (Verschijnt alleen bij EXPERT-MOD ON) •... - Page 84 Gebruiksaanwijzing ASTROVERSCHUIVING Door de instelling van de astroverschuiving kan de astrotijd ▼ onafhankelijk van elkaar worden verschoven (max. +/- 120 Min.). Astroverschuiving Jan. Feb. Mrt. Apr. Jun. Jul. Aug. Sep. Okt. Nov. Dec. 15:00 uur Sluiten bijv. 1 uur voor zonsondergang bij astroverschuiving van -1 uur 18:30 uur...
-
Page 85: Programmeren Van De Zender
Gebruiksaanwijzing Programmeren van de zender 1) Masterzender programmeren a) Ontvanger in programmeergereedheid brengen Opmerking Houdt u alstublieft rekening met de gebruiksaanwijzing van de ontvanger. • Schakelt u de voedingsspanning van de ontvanger uit en na 5 seconden weer in. • Druk op de programmeertoets resp. de schakelaar van de ontvanger. De ontvanger bevindt zich nu 3 minuten lang in programmeergereedheid. -
Page 86: Ingebruikname
Gebruiksaanwijzing Ingebruikname Met de eerste druk op de toets wordt de klok „gewekt“. Kies met de +/—toetsen de taal en neem deze over met de OK toets. De klok bevindt zich in de automatische modus. Fabrieksinstelling TIJD/DAT: actuele MET en actuele datum PROGRAMMA: ASTRO AVOND ➔... -
Page 87: Menuoverzicht
Gebruiksaanwijzing Programmering Menuoverzicht Bedrijfsmodus TIJD/DAT PROGRAMMA INSTELLING FUNCTIE 1. Druk op de MENU-toets TIJD/DAT verschijnt. 2. Druk op de +/- toetsen om meer menu’s te selecteren. 3. Druk op de MENU-toets, om in de bedrijfsmodus terecht te komen. TIJD/DAT (tijd en datum instellen) TIJD/DAT TIJD JAAR... - Page 88 Gebruiksaanwijzing PROGRAMMA ASTRO AVOND (Op ➔ Schakeltijd, Neer ➔ Zonsondergang) PROGRAMMA ASTRO SCHAKELTIJD ▲ SPERTIJD ▼ AVOND SCHAKELTIJD ▲ SPERTIJD ▼ PROGRAMMA 1. Druk op de MENU-toets. 2. Om het nieuwe PROGAMMA te selecteren, op de + toets drukken tot PROGRAMMA verschijnt. 3.
- Page 89 Gebruiksaanwijzing PROGRAMMA INDIVIDUEEL (Op-/Neer ➔ schakeltijden) PROGRAMMA INDIVIDUEEL SCHAKELTIJD ▲ SCHAKELTIJD ▼ SCHAKELTIJD ▲ SCHAKELTIJD ▼ PROGRAMMA 1. Druk op de MENU-toets. 2. Om het nieuwe PROGAMMA te selecteren, op de + toets drukken tot PROGRAMMA verschijnt. 3. Bevestig met OK. 4.
- Page 90 Gebruiksaanwijzing INSTELLING VAKANTIE (Vakantie OFF/ON) INSTELLING VAKANTIE OFF VAKANTIE ON 1. Druk op de MENU-toets. 2. Om het menu INSTELLING te selecteren, op de + toets drukken tot INSTELLING ver- schijnt. 3. Bevestig met OK. VAKANTIE ON / OFF verschijnt. 4.
- Page 91 Gebruiksaanwijzing INSTELLING TUSSENPOSITIE, VENTILATIE/KANTELEN, PROG EINDSTAND (Tijd/ Standprogrammering) TUSSEN- VENTILATIE/ PROG POSITIE KANTELEN EINDSTAND PROG TUSSEN- POSITIE PROG VENTILATIE 1. De functie VAKANTIE is bevestigd. TUSSENPOSITIE verschijnt. 2. Gebruik de +/- toets om de looptijd naar de TUSSENPOSITIE in te stellen. De opgave van de looptijd vindt plaats in seconden of u loopt naar de TUSSENPOSITIE met de NEER-/OP-toets vanuit de bovenste eindstand.
- Page 92 Gebruiksaanwijzing INSTELLING NEDERLANDS/ ASTROVERSCHUIVING ▼ (Taalkeuze, Astroverschuiving) ASTROVER- NEDERLANDS SCHUIVING De functie PROG EINDSTAND is bevestigd. NEDERLANDS verschijnt. 1. Gebruik de +/- toets om de gewenste taal in te stellen. 2. Bevestig de taalkeuze met OK. 3. ASTROVERSCHUIVING ▼ Verschijnt. 4.
- Page 93 Gebruiksaanwijzing INSTELLING (Stadkeuze, EXPERT MODUS (LENGTE, BREEDTE, TIJDZONE)) EXPERT AMSTERDAM MODUS ON/OFF LENGTE BREEDTE TIJDZONE 1. De functie ASTROVERSCHUIVING ▼ is bevestigd. Stadkeuze (AMSTERDAM) ver- schijnt. 2. Gebruik de +/- toets om de dichtst bij gelegen stad in te stellen. 3.
- Page 94 Gebruiksaanwijzing INSTELLING ZO/WI (Automatische zomer-/wintertijd omschakeling) ZO/WI INSTELLING ZO/WI 1. De functie TIJDZONE is bevestigd. ZO/WI verschijnt. 2. Gebruik de +/- toets om ZO/WI in- of uit te schakelen. 3. Bevestig de keuze met OK. 4. Druk op de MENU-toets, om in de bedrijfsmodus terecht te komen.
- Page 95 Gebruiksaanwijzing FUNCTIE ROLLUIKEN/JALOEZIE, EERSTE INGEBRUIKNAME (Selectie type raambekleding, de datum van de eerste ingebruikname) FUNCTIE ROLLUIKEN/ EXPERT MODUS EERSTE JALOEZIE OFF/ON INGEBRUIKNAME FUNCTIE 1. Druk op de MENU-toets. 2. Om het menu FUNCTIE te selecteren, op de + toets drukken tot FUNCTIE verschijnt. 3.
-
Page 96: Montage Van De Wandhouder
Gebruiksaanwijzing Montage van de wandhouder • Controleert u vóór de montage ter plekke van de gewenste montagepositie de foutloze werking van zender en ont- vanger. • Bevestigt u de houder met de twee inge- 38,5 sloten schroeven aan de wand. 43,6 Vervangen van de batterijen Aanwijzing... -
Page 97: Technische Gegevens
Radiofrequentie 868,3 MHz Algemene conformiteitsverklaring Hiermee verklaart de firma Becker dat het apparaat Centronic TimeControl TC445 in overeenstemming is met de basisvereisten en andere relevante voorschriften volgens richtlijn 1999/5/EG. Bepaalt voor het gebruik in de volgende landen: DE, BE, FR, NL, AT, LU, IT, GB, ES, CH, CZ,... -
Page 98: Wat Te Doen, Als
Gebruiksaanwijzing Wat te doen, als ...? i r o t i a , t e j i r j i r i l b t f j . t i j i r t e i j i r . t s t i a , t e o . - Page 99 Gebruiksaanwijzing i r o i u l t e i . d l e l l j i r i l l e i t . r e...
- Page 100 Becker-Antriebe GmbH 35764 Sinn/Germany...