BaSt-ING ValFix Notice D'utilisation

Cale de broche pour la récolte du bois

Publicité

Les langues disponibles

Les langues disponibles

Liens rapides

DE
Bedienungsanleitung
Spindelkeil für die Holzernte
EN
Operating manual
Spindle wedge for timber harvest
FR
Notice d'utilisation
Cale de broche pour la récolte du bois
ValFix
Seite 2
Page 14
Page 26

Publicité

Table des Matières
loading

Sommaire des Matières pour BaSt-ING ValFix

  • Page 1: Masse Solo, Ohne Antriebsgerät (Kg)

    ValFix Bedienungsanleitung Seite 2 Spindelkeil für die Holzernte Operating manual Page 14 Spindle wedge for timber harvest Notice d‘utilisation Page 26 Cale de broche pour la récolte du bois...
  • Page 2: Table Des Matières

    Gewährleistung Bedienung Wartung/Prüfung Störung und Reparatur Entsorgung 10. Kundendienst und Anwendungsberatung 11. EG-Konformitätserklärung Technische Daten Bezeichnung ValFix Max. Druckkraft (to) Masse solo, ohne Antriebsgerät (kg) 1,35 Länge (mm) Breite (mm) Höhe (mm) Hub/Umdrehung (mm) Max. Drehmoment Schlagschrauber (Nm) Max. Drehmoment statisch (Nm)
  • Page 3: Produktbeschreibung

    Produktbeschreibung Tragegriff Rändelschraube Schlagschrauberhalterung Seitenabdeckung Freiliegende Spindel Noppen (10) Antriebssechskant 10 mm Schmiernippel – innenliegende Spindel (11) Hilfsantrieb Halteschrauben – Keilspitze (12) Schmiernippel – freiliegende Spindel Kunststoffkeilspitze mit Fettaustritts- öffnung an der Keilgleitfläche – 3 –...
  • Page 4: Bestimmungsmäßige Verwendung

    Baumstamm verklemmt haben. Der ValFix ersetzt weder Seilwinde noch Seilzug. Setzen Sie ihn nur ein, wenn Sie der Meinung sind, dass Sie diesen Baum auch mit klassischem Keilen zu Fall bringen würden. Ausgeprägte Rück- oder Seithänger dürfen nicht mit dem mechanischen Fällkeil gefällt werden, da dieser überlastet werden...
  • Page 5 Verwenden sie bei Arbeit mit dem ValFix grundsätzlich Kunststoff- oder Alukeile als Siche- rungskeile. Schieben Sie beim Bedienen des ValFix die Keile zur Sicherheit immer in die Sägefuge nach. Sollten Beschädigungen am ValFix vorhanden sein, darf der ValFix nicht weiter verwendet werden.
  • Page 6: Gewährleistung

    Tipp: Lesen Sie erst die Bedienungsanleitung, bevor Sie das System nutzen! Vor Beginn der Fällung sind folgende Arbeiten auszuführen: • Der ValFix ist an den beiden Schmiernippeln (6) & (10) zu schmieren. Hierzu ist die Rändelschraube (7) zu lösen und die Seitenabdeckung (8) zur Seite zu drehen. In den Schmiernippel für die innenliegende Spindel ist so lange Fett zu pumpen, bis an der...
  • Page 7 Die Hinweise gelten für das Fällen von regulär ausgeformten Bäumen. Inhalt dieses Kapitels ist es nicht, verschiedene Fälltechniken aufzuzeigen und zu erläutern (Vorhänger, Rückhänger. . . ) etc. Inhalt dieser Anleitung ist, wie der ValFix bei einem höhenversetzten Stützbandfällschnitt angewendet werden kann.
  • Page 8 Baum schieben und den Fällschnitt aus der Baummitte heraus erweitern. Es ist grundsätzlich zu vermeiden, den Fällschnitt von „Außen“ zu erweitern: Achtung: Wird der Schnitt nicht gleichmäßig nach oben und unten erweitert, sondern nur einseitig, kann es vorkommen, dass sich die Spindel des ValFix verbiegt. – 8 –...
  • Page 9 Nun wird der Keil auseinandergefahren bis der ValFix fest sitzt. Das Vorspannen des Keils verhindert zum einen ein Einklemmen der Säge beim Durchtrennen des Stützbandes. Zum anderen stellt es sicher, dass der ValFix richtig angesetzt ist und sich nicht leicht aus dem Holz schiebt.
  • Page 10: Wartung/Prüfung

    Hubhöhe zu erreichen. Dabei ist darauf zu achten, dass der Kunst- stoffkeil nicht an der Bruchleiste ansteht! Ein Unterbauen des ValFix in der Bruchleiste ist nur zulässig, wenn der Baum nicht mehr in die entgegengesetzte Richtung zum Fällkerb fallen kann. Dies ist z.B. der Fall, wenn er sich in starker Schräglage zur Fällrichtung in Nachbarbäumen verhakt hat.
  • Page 11: Störung Und Reparatur

    • Halteschrauben der Keilspitze (11) eindrehen. • Keilspitze in umgekehrter Reihenfolge zur Demontage montieren, dabei ist auf die korrekte Position des Schmiernipppels (10) zu achten. • Es ist darauf zu achten, dass die Keilspitze als auch das ValFix-Gehäuse gleichermaßen eingedreht werden. Keilspitze bewegt sich links/rechts •...
  • Page 12: Entsorgung

    Entsorgung Entsorgen Sie den ValFix fachgerecht, z.B. Wertstoffhof. Demontieren Sie die Seitenabdeckungen (8) sowie der Keilspitze (12). Die Kunststoffteile (Polyethylen) sowie die Metallteile können nun material- spezifisch recycelt werden. Es sind keine bedenklichen Gefahrstoffe verbaut. Kundendienst und Anwendungsberatung Der Kundendienst beantwortet Ihre Fragen zu Betrieb, Wartung, Reparatur und Entsorgung des Produktes.
  • Page 13 – 13 –...
  • Page 14: Technical Data

    Operation Maintenance/Examination Malfunction and repair Proper disposal 10. Customer service and application advice 11. EC Statement of Conformity Technical data Term ValFix Max. lifting capacity (to) Mass (kg) 1.35 Length (mm) Width (mm) Height (mm) Lift/Turn (mm) Max torque impact drive (Nm) Max torque static (Nm) –...
  • Page 15: Max. Druckkraft (To)

    Product description Handle Knurled screw Impact wrench holder Side cover Exposed spindle Knobs (10) Drive hexagon 10 mm Grease nipple – internal spindle (11) Auxiliary drive Retaining screws – wedge tip (12) Grease fitting – exposed spindle Plastic wedge tip with grease outlet opening on the wedge sliding surface –...
  • Page 16: Intended Use

    Intended use The intended use of the ValFix is the harvesting of timbers. Here it is used to lift trees on the side turned away from the fall candle and thus cut the tree in the desired direction. It can also be used to loosen chainsaws.
  • Page 17 The maximum lifting capacity of the ValFix is 15 t. The ValFix does not replace a winch or cable. Only use this device if this tree could also be wedged over. Pronounced back or side hangers must not be felled with the ValFix, as this can be overloaded.
  • Page 18: Guarantee

    The following work must be carried out before the start of felling: • The ValFix must be lubricated at the two grease nipples (6) & (10). To do this, loosen the knurled screw (7) and turn the side cover (8) to the side. Pump grease into the grease nipple for the internal spindle until the grease emerges from the grease outlet opening (12).
  • Page 19 The clues apply to the case of regularly-shaped trees. The content of this chapter is not to show and explain different forgery techniques (foreheads, back supporters...) etc. The content of this guide is how the ValFix can be applied to a shifted support band cut. In principle, a technical forgery technique appropriate to the tree should be applied! Felling cut technique: Highs shifted support band cut Preparation of the tree...
  • Page 20 You should not saw the extension similar to the direction cut, means from the outside of the tree. This would cause unsimilar extension. Warning: If the cut is not extended similar upwards and downwards it can happen that the spindle of the ValFix bends. – 20 –...
  • Page 21 Then saw fall cut with a offset in height to the first cut. Due to the height offset, it is assured that the chainsaw does not get in contact with the steel parts of the ValFix. Do not cut directly above or below the ValFix! Lifting the tree by means of ValFix By further turning the ValFix apart, the tree is raised until it finally falls.
  • Page 22: Maintenance/Examination

    •    L ubrication of the threaded spindle: The ValFix is to be lubricated by one of the two grease nipples (6) & (10). To do this, close the knurled screw (7) and turn the side cover (8) to the side. Pump grease into the grease nipple for the internal spindle until the grease emerges from the grease outlet opening (12).
  • Page 23: Malfunction And Repair

    (3) with the auxiliary drive (5) until it is completely removed from the ValFix housing. • The assembly is carried out in reverse order. It must be ensured that the chisel tip and the ValFix housing are screwed in equally.
  • Page 24: Proper Disposal

    Proper disposal Dispose of the ValFix properly, e.g. recycling center. Remove the side covers (8) and the chisel tip (12). The plastic parts (polyethylene) and the metal parts can now be recycled depending on the material. There are no questionable hazardous substances installed.
  • Page 25 – 25 –...
  • Page 26: Caractéristiques Techniques

    Utilisation Maintenance / contrôle Dysfonctionnement et réparation Élimination appropriée 10. Service client et conseils d’application 11. Déclaration de conformité CE Caractéristiques techniques Désignation ValFix Force de pression max. (t) Masse (kg) 1,35 Longueur (mm) Largeur (mm) Hauteur (mm) Course/tour (mm) Couple max.
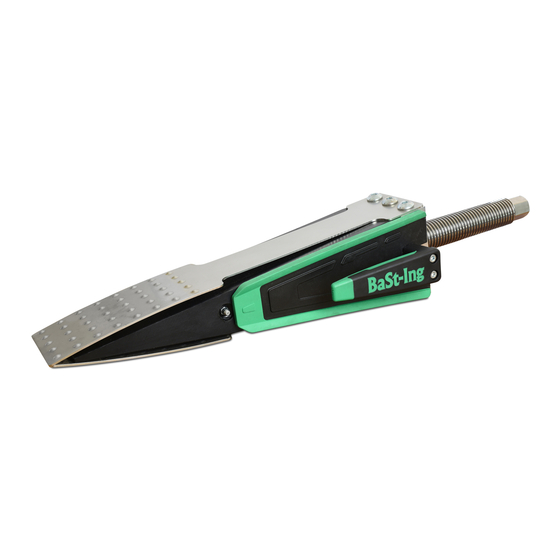
  • Page 27: Description Du Produit

    Description du produit Poignee de transport Vis moletée Support de clé à chocs Couvercle latéral Broche exposée Boutons (10) Hexagone d‘entraînement 10 mm Graisseur – broche interne (11) Entraînement auxiliaire Vis de retenue – pointe de coin Graisseur – broche exposée (12) Pointe de coin en plastique avec ouverture de sortie de graisse sur la...
  • Page 28: Utilisation Conforme

    Par ailleurs, il peut être utilisé pour débloquer des tronçonneuses coincées dans un tronc d‘arbre couché. Le ValFix ne se substitue pas à un treuil à câble ou à un palan. Utilisez-le uniquement si vous pensez que vous feriez chuter cet arbre également à l‘aide de coins classiques. Des arbres fortement penchés latéralement ou à...
  • Page 29 La capacité de levage maximale du ValFix est de 15 t. Le ValFix ne remplace pas un treuil ou un câble. N‘utilisez cet appareil que si cet arbre peut également être coincé. Les suspensions arrières ou latérales prononcées ne doivent pas être abattues avec le ValFix, car elles peuvent être surchargées.
  • Page 30: Garantie

    Garantie Pour le ValFix, nous accordons une garantie de 12 mois à compter de la date de livraison sur le fonc- tionnement et l‘absence de défauts du matériel. Celle-ci ne s‘étend pas aux conséquences de l‘usure habituelle, d‘une surcharge, d‘une manipulation incorrecte ou du montage de pièces de rechange de tiers.
  • Page 31 à montrer ni à expliquer différentes techniques d’abattage (arbres penchés devant ou à l’opposé de la chute), etc. Le contenu de cette notice vise à expliquer comment le ValFix peut être utilisé lors d’une coupe d’abattage avec bande d’appui placée en hauteur.
  • Page 32 Il faut en principe éviter d‘élargir la coupe d‘abattage par l‘extérieur : Attention : Si la coupe n’est pas élargie uniformément vers le haut et le bas, mais d’un seul côté, il peut arriver que la broche du ValFix se torde. – 32 –...
  • Page 33 Le coin peut être écarté uniquement jusqu’à atteindre la longueur d’extension maximale. Si la longueur d’extension devait être atteinte, mais que l’arbre n’est pas encore tombé, il est interdit de continuer à tourner le ValFix. L’arbre doit être abattu à l’aide de coins supplémentaires.
  • Page 34: Maintenance / Contrôle

    •    L ubrification de la broche filetée : Le ValFix doit être lubrifié au niveau des deux graisseurs (6) et (10). Pour ce faire, desserrez la vis moletée (7) et tournez le couvercle latéral (8) sur le côté. Pomper de la graisse dans le graisseur de la broche interne jusqu‘à...
  • Page 35: Dysfonctionnement Et Réparation

    • Montez la pointe du burin dans l’ordre inverse du démontage, en vous assurant que le graisseur (10) est dans la bonne position. • Assurez-vous que la pointe du burin et le boîtier ValFix sont vissés de manière égale. La pointe du coin se déplace vers la gauche / droite •...
  • Page 36: Élimination Appropriée

    Élimination appropriée Éliminez le ValFix de manière appropriée, par exemple dans un centre de recyclage. Retirez les couvercles latéraux (8) et la pointe biseautée (12). Les pièces en plastique (polyéthylène) et les pièces métalliques peuvent désormais être recyclées en fonction du matériau.

Table des Matières