
Manuels Connexes pour NORDFOREST 1800

Sommaire des Matières pour NORDFOREST 1800
- Page 1 FR Treuil à friction 1800, 1200, 400 – Mode d’emploi EN Capstan winch 1800, 1200, 400 – Operating manual P R O F I...
- Page 2 L’original du mode d’emploi a été élaboré en langue allemande. The original operating manual is in German.
-
Page 3: Table Des Matières
Dispositifs de sécurité Équipement de protection individuelle Structure et fonctionnement Aperçu au-dessus du treuil à friction 1800 Aperçu du treuil à friction 1200 et 400 avec moteur Active Aperçu du treuil à friction 1200 et 400 avec moteur Kawasaki Fonctionnement Pièces d’usure... - Page 4 Mise hors service et élimination Stockage Dysfonctionnements Caractéristiques techniques Caractéristiques générales Moteur Câble de traction Accessoires et pièces de rechange Service après-vente Déclaration de conformité CE Garantie Garantie Index 900012 rév. 01 | 09.2017 Treuil à friction 1800, 1200, 400...
-
Page 5: À Propos De Ce Mode D'emploi
À propos de ce mode d’emploi À propos de ce mode d’emploi Validité Ce mode d’emploi concerne les treuils à friction Nordforest dans les variantes suivantes : Machine Type Treuil à friction 1800 Puissance de traction max. 1800/900 kg (deux vitesses) Treuil à... -
Page 6: Symboles Utilisés Dans Ce Mode D'emploi
Symboles utilisés dans ce mode d'emploi Symbole Signification Le non-respect de ces informations peut nuire au fonctionnement. › Instruction de manipulation : Décrit des opérations qui doivent être exécutées. 900012 rév. 01 | 09.2017 Treuil à friction 1800, 1200, 400... -
Page 7: Consignes De Sécurité
• dans les opérations de sauvetage, afin de treuiller des véhicules acci- dentés ou enlisés ; • pour le sauvetage du gibier abattu ; • dans le secteur de la construction, afin de treuiller des matériaux de construction, câbles ou conduites. Treuil à friction 1800, 1200, 400 900012 rév. 01 | 09.2017... -
Page 8: Utilisation Non Conforme
En cas d'utilisation non conforme de la machine, tous les droits à garantie sont annulés. Le fabricant décline toute responsabilité quant aux dommages survenant sur la machine et aux blessures qui seraient dus à une utili- sation non conforme. 900012 rév. 01 | 09.2017 Treuil à friction 1800, 1200, 400... -
Page 9: Qualification Du Personnel
› Rangez l’outil nécessaire de manière à pouvoir rapidement le prendre en main. › Veillez à ce que l’outil nécessaire ne vous gêne pas. Treuil à friction 1800, 1200, 400 900012 rév. 01 | 09.2017... -
Page 10: Consignes De Sécurité Pour La Fixation
› N'ouvrez pas l'engrenage sous peine de perte de la garantie. › Ne démontez pas le cabestan de la bride sur le treuil à friction 1800 sous peine de perte de la garantie. › Arrimez toujours le treuil à friction afin qu'il puisse penduler pour qu'il puisse pivoter dans la direction de la charge. -
Page 11: Consignes De Sécurité Concernant Le Poste De Travail
› Tenez-vous à au moins 5 m de distance de sécurité du treuil à friction et de la ligne de câble lors de la commande du dispositif. Treuil à friction 1800, 1200, 400 900012 rév. 01 | 09.2017... - Page 12 Zone de danger en cas de défaillance du câble du treuil Treuil à friction Zone de danger en cas de défaillance de la poulie de renvoi Poulie de renvoi 900012 rév. 01 | 09.2017 Treuil à friction 1800, 1200, 400...
-
Page 13: Comportement À Adopter En Cas D'urgence
Lorsque vous utilisez le coin, portez impérativement l'équipement de protection individuelle suivant : • Chaussures de sécurité • Gants de protection • Vêtements près du corps • Casque • Protection oculaire ou du visage • Protection auditive Treuil à friction 1800, 1200, 400 900012 rév. 01 | 09.2017... -
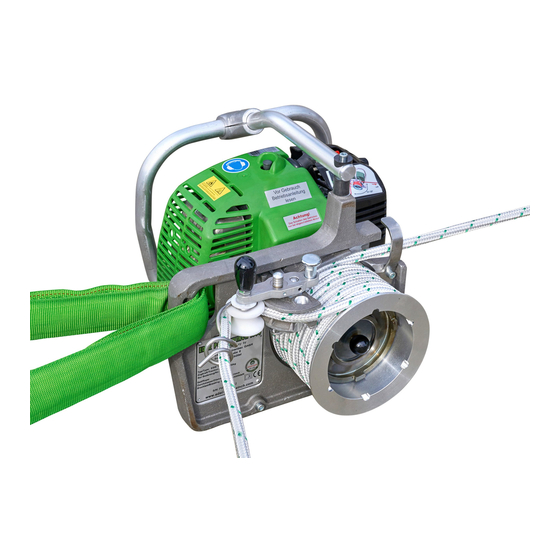
Page 14: Structure Et Fonctionnement
Structure et fonctionnement Structure et fonctionnement Aperçu au-dessus du treuil à friction 1800 Fig. 2: Aperçu au-dessus du treuil à friction 1800 12 Crochet de passage du câble Capot du moteur avec anti-dérailleur Poignée de l'unité de 13 Levier de vitesse sécurité... -
Page 15: Aperçu Du Treuil À Friction 1200 Et 400 Avec Moteur Active
Excentrique avec de tige 19 Étrier de protection du moteur de mi-régime avec poignée de transport et tampon en caoutchouc 10 Poignée de l'unité de sécurité du câble Treuil à friction 1800, 1200, 400 900012 rév. 01 | 09.2017... -
Page 16: Aperçu Du Treuil À Friction 1200 Et 400 Avec Moteur Kawasaki
Crochet de passage du 17 Bougie d'allumage câble avec anti-dérailleur Excentrique avec de tige 18 Étrier de protection du moteur de mi-régime avec poignée de transport et tampon en caoutchouc 900012 rév. 01 | 09.2017 Treuil à friction 1800, 1200, 400... -
Page 17: Fonctionnement
4 niveaux avec deux vitesses commutables est intégré dans le tambour cabestan du treuil à friction. La force de traction en première est de max.1800 kg et la vitesse du câble de 12 m/min., et de max. 900 kg et 24 m/min. en seconde. -
Page 18: Pièces D'usure
Utilisation dans des pièces fermées interdite ! Interdiction de faire le plein lorsque le moteur est chaud ! Interdiction de lever des charges ! Porter des protections auditives ! 900012 rév. 01 | 09.2017 Treuil à friction 1800, 1200, 400... -
Page 19: Contenu De La Livraison
Contenu de la livraison Vérifiez que la livraison est complète. Les éléments suivants sont livrés avec le treuil à friction : • un treuil à friction • un mode d’emploi Treuil à friction 1800, 1200, 400 900012 rév. 01 | 09.2017... -
Page 20: Contrôle Visant À Repérer Les Dommages Liés Au Transport
Les assurances des expéditeurs réagissent souvent avec beaucoup de méfiance et refusent les remboursements. Par conséquent, tentez de justifier de manière indéniable les dommages (éventuellement en joignant des photos). 900012 rév. 01 | 09.2017 Treuil à friction 1800, 1200, 400... -
Page 21: Transport Jusqu'au Poste De Travail
Le bruit généré dans la zone de travail peut causer de sévères lésions auditives. › Portez une protection auditive pour tous les travaux pendant lesquels le moteur est en marche. Treuil à friction 1800, 1200, 400 900012 rév. 01 | 09.2017... -
Page 22: Plein Du Réservoir
Effets nocifs sur la santé résultant de l'inhalation de vapeurs de mélange d'essence ! Le mélange essence-huile contient des gaz toxiques qui peuvent causer de graves problèmes de santé chroniques. › Ne respirez pas les vapeurs de mélange d'essence. 900012 rév. 01 | 09.2017 Treuil à friction 1800, 1200, 400... -
Page 23: Désignation
Oest Oecomix 2T disponible chez votre revendeur Stihl Motomix Carburant spécial Aspen 2T Si vous désirez modifier le type de mélange, videz d'abord le réservoir jusqu'à ce que le moteur s'arrête. Treuil à friction 1800, 1200, 400 900012 rév. 01 | 09.2017... -
Page 24: Arrimage Du Treuil À Friction
Ne fixez jamais le treuil à friction sur la poignée de transport ou l'étrier de protection du moteur. › N'arrimez le treuil à friction que sur l'œillet de fixation. 900012 rév. 01 | 09.2017 Treuil à friction 1800, 1200, 400... -
Page 25: Fixation De La Charge
Observez les indications du type de câble de traction correct sur la plaque signalétique. › N'utilisez que les accessoires recommandés. › Respectez les limites de puissance de la machine et du câble de traction (voir « Caractéristiques techniques » à la page 146). Treuil à friction 1800, 1200, 400 900012 rév. 01 | 09.2017... -
Page 26: Fixation De La Poulie De Renvoi
Pour fixer la poulie de renvoi : › Passez l'élingue ronde autour d'un arbre. › Passez l'élingue ronde dans la poulie de renvoi. › Raccordez l'élingue ronde au crochet de charge. 900012 rév. 01 | 09.2017 Treuil à friction 1800, 1200, 400... -
Page 27: Placement Du Câble De Traction
à friction risque de faire un nœud au démarrage et endommager des pièces mécaniques. › Attention en positionnant le câble traction autour du tambour cabestan que les enroulements du câble ne se chevauchent pas. Treuil à friction 1800, 1200, 400 900012 rév. 01 | 09.2017... - Page 28 Uniquement treuil à friction 1800 : Tirez simultanément le boulon de verrouillage vers le haut et l'unité de sécurité du câble vers l'avant. › Uniquement treuil à friction 1800 : Relâchez le boulon de verrouillage. 900012 rév. 01 | 09.2017 Treuil à friction 1800, 1200, 400...
- Page 29 Placez le câble de traction autour de tout le serre-câble. › Uniquement treuil à friction 1800 : Tirez à nouveau le boulon de verrouillage vers le haut et repoussez l'unité de sécurité du câble en arrière afin que le câble de traction se trouve autour du rouleau guide-câble blanc.
-
Page 30: Passage De Vitesse (Treuil À Friction 1800)
Mise en service et commande Passage de vitesse (treuil à friction 1800) ATTENTION Engrenage endommagé en raison d'une mauvaise commande du levier de vitesse ! Si vous passez les vitesses en forçant, la transmission peut être gravement endommagée. Le levier de vitesse doit pouvoir être déplacé... -
Page 31: Démarrage Du Moteur
ATTENTION Endommagement de l'engrenage du treuil à friction 1800 ! Si le levier de vitesse ne se trouve pas en position de départ au démarrage du moteur, la transmission peut être considérablement endommagée. -
Page 32: Démarrage Du Moteur Active
à démarrer. Dans ce cas, mettez le levier de starter sur la position « | | » et répétez le démarrage. Si le moteur ne démarre toujours pas, nettoyez la bougie d'allumage et répétez le démarrage au bout d'env. 20-30 min. 900012 rév. 01 | 09.2017 Treuil à friction 1800, 1200, 400... -
Page 33: Démarrage Du Moteur Kawasaki
Si le moteur ne démarre que brièvement et s'éteint : › Placez le levier de starter sur la position « ouverte » et tirez à nouveau sur la poignée de démarrage. Treuil à friction 1800, 1200, 400 900012 rév. 01 | 09.2017... -
Page 34: Démarrage Du Moteur En Position De Mi-Régime
› Tenez-vous à au moins 5 m de distance de sécurité du treuil à friction et de la ligne de câble lors de la commande du treuil à friction. 900012 rév. 01 | 09.2017 Treuil à friction 1800, 1200, 400... - Page 35 Tirez le câble de traction au niveau de l'extrémité libre du câble jusqu'à la butée. L'unité de sécurité est débloquée et le câble de traction est libéré du serre-câble. L'accélérateur peut être activé. Treuil à friction 1800, 1200, 400 900012 rév. 01 | 09.2017...
-
Page 36: Abaissement De La Charge
Détendez le câble dans vos mains. L'accélérateur revient au ralenti. › Laissez le moteur refroidir quelques secondes au ralenti. › Mettez l'interrupteur marche-arrêt sur la position « 0 ». Le moteur s'arrête. 900012 rév. 01 | 09.2017 Treuil à friction 1800, 1200, 400... -
Page 37: Réglage Du Régime Du Moteur Au Ralenti
› N'utilisez à cet effet qu'un outillage approprié comme par ex. un tournevis. › Resserrez la vis sans tête au niveau du levier de commande. Treuil à friction 1800, 1200, 400 900012 rév. 01 | 09.2017... -
Page 38: Nettoyage Et Maintenance
Utilisez uniquement des accessoires et pièces de rechange d’origine présentant un état technique impeccable. Pour d'autres informations sur les accessoires et les pièces de rechange, consultez notre site Internet www.grube.de. Au besoin, adressez-vous à votre revendeur. 900012 rév. 01 | 09.2017 Treuil à friction 1800, 1200, 400... -
Page 39: Contrôle
Ne nettoyez le treuil à friction qu'avec un chiffon sec. › N’utilisez jamais de produits de nettoyage dégraissants, corrosifs et agressifs. › Nettoyez les résidus de bois et autres salissures sur le treuil à friction. Treuil à friction 1800, 1200, 400 900012 rév. 01 | 09.2017... -
Page 40: Lubrification Des Pièces Mobiles
Le filtre du réservoir se trouve dans le réservoir. Vérifiez une fois par mois l'état du filtre du réservoir. Pour remplacer le filtre du réservoir : › Dévissez le couvercle du filtre. 900012 rév. 01 | 09.2017 Treuil à friction 1800, 1200, 400... -
Page 41: Nettoyage Du Capot Du Moteur
Éponge du filtre à air L'éponge du filtre à air se trouve sous le cache du filtre à air. Vérifiez une fois par jour travaillé l'état de l'éponge du filtre à air. Treuil à friction 1800, 1200, 400 900012 rév. 01 | 09.2017... -
Page 42: Nettoyage De L'éponge Du Filtre À Air
N'utilisez à cet effet qu'un outillage approprié comme par ex. un tournevis cruciforme. › Retirez l'éponge du filtre à air endommagée ou usée. › Placez la nouvelle éponge du filtre à air. › Resserrez la vis. 900012 rév. 01 | 09.2017 Treuil à friction 1800, 1200, 400... -
Page 43: Câble De Traction
Si la bougie d'allumage et la distance des électrodes sont correctes : › Resserrez la bougie d'allumage avec la clé à bougie. › Replacez le capuchon de la bougie d'allumage sur la bougie. Treuil à friction 1800, 1200, 400 900012 rév. 01 | 09.2017... -
Page 44: Remplacement De La Bougie D'allumage
Une fois la bougie d'allumage remplacée : › Placez le levier de starter sur la position « | | ». › Démarrez le moteur en tirant sur la poignée de démarrage. Le moteur démarre. 900012 rév. 01 | 09.2017 Treuil à friction 1800, 1200, 400... -
Page 45: Mise Hors Service Et Élimination
Après la désactivation et le blocage des pièces mobiles, aucune risque résiduel ne perdure. Lorsque vous éliminez le treuil à friction ou ses composants : › Respectez les dispositions de votre pays. Treuil à friction 1800, 1200, 400 900012 rév. 01 | 09.2017... -
Page 46: Stockage
Utilisez l'emballage d'origine du treuil à friction. Si vous entreposez temporairement le treuil à friction dans son emballage d’origine, vous le protégez des dommages liés à l’encrassement, à la poussière ou à l’humidité. 900012 rév. 01 | 09.2017 Treuil à friction 1800, 1200, 400... -
Page 47: Dysfonctionnements
Le tableau suivant répertorie les erreurs possibles, leurs causes et leur résolution. Lors de toutes les interventions de nettoyage, de maintenance et de réparation, vous devez respecter les consignes de sécurité. Treuil à friction 1800, 1200, 400 900012 rév. 01 | 09.2017... - Page 48 Nettoyage du câble de traction Nettoyage du treuil à friction Tambour cabestan bloqué Passage de vitesse (treuil à friction 1800) – Vitesse non passée Réparation par un atelier – Transmission défectueuse 900012 rév. 01 | 09.2017...
-
Page 49: Caractéristiques Techniques
Puissance de max. max. 1200 max. 400 max. 1200 max. 400 traction [kg] 1800 / 900 Vitesse [m/min] max. 12 / 24 max. 14 max. 40 max. 10 max. 29 Treuil à friction 1800, 1200, 400 900012 rév. 01 | 09.2017... -
Page 50: Moteur
8500 max. 8500 [tr/min] Carburateur Carburateur à membrane Walbro WYK 60 Primer Type Capacité du réservoir [l] Embrayage Embrayage centrifuge Accélérateur Avec position de mi-régime Volume sonore [dB(A)] 900012 rév. 01 | 09.2017 Treuil à friction 1800, 1200, 400... -
Page 51: Câble De Traction
Utilisez uniquement des accessoires et pièces de rechange d’origine présentant un état technique impeccable. Pour d'autres informations sur les accessoires et les pièces de rechange, consultez notre site Internet www.grube.de ou adressez-vous à votre revendeur. Treuil à friction 1800, 1200, 400 900012 rév. 01 | 09.2017... -
Page 52: Service Après-Vente
Le fabricant : EDER Maschinenbau GmbH, Schweigerstraße 6, 38302 Wolfenbüttel déclare, sous sa responsabilité exclusive par la présente que le produit suivant treuil à friction Nordforest 1800, modèle NF 1800, numéro de série commençant à : NF18-002030 treuil à friction Nordforest 1200, modèle NF 1200, numéro de série commençant à : NF12-001000... -
Page 53: Garantie
• l'inobservation du mode d'emploi et un entretien insuffisant ou incorrect • les conséquences de mesures de maintenance et de réparation incorrectes • les dommages résultant d'une manipulation non conforme et d'une commande incorrecte Treuil à friction 1800, 1200, 400 900012 rév. 01 | 09.2017... -
Page 54: Garantie
Les défauts qui surviennent pendant la durée de la garantie en raison d’erreurs de matériau ou de fabrication, dans la mesure où ils survi- ennent en dépit d'une utilisation et d'un entretien conformes de la machine, feront l’objet d'une réparation. 900012 rév. 01 | 09.2017 Treuil à friction 1800, 1200, 400... -
Page 55: Index
Placement du câble de générales 146 traction 124 moteur 147 Filtre du réservoir 137 Plein du réservoir 119 Changement de vitesse 127 remplacer 137 Fixation de la poulie de Qualification du renvoi 123 personnel 106 Fonctionnement 114 Treuil à friction 1800, 1200, 400 900012 rév. 01 | 09.2017... - Page 56 Stockage 143 Structure 111 Symboles dans le mode d’emploi 103 pour le treuil à friction 115 Transport 118 Utilisation 118 Utilisation conforme 104 Utilisation non conforme 105 Validité du mode d’emploi 102 900012 rév. 01 | 09.2017 Treuil à friction 1800, 1200, 400...
- Page 57 Safety devices Personal protective equipment Design and function Overview of the capstan winch 1800 Overview of the capstan winch 1200 and 400 with Active motor Overview of the capstan winch 1200 and 400 with Kawasaki motor 64 Mode of operation...
- Page 58 – Inspecting the spark plug – Replacing the spark plug Decommissioning and disposal Storage Faults Technical specifications General specifications Motor Pulling rope Accessories and spare parts Service EC Declaration of Conformity Warranty Guarantee Index 900012 Rev. 01 | 09.2017 Capstan winch 1800, 1200, 400...
-
Page 59: About This Manual
About this manual About this manual Validity This manual is applicable for the following Nordforest capstan winch variants: Machine Type Capstan winch 1800 Traction max. 1800/900 kg (two-speed) Capstan winch 1200 Traction max. 1200 kg Capstan winch 400 Traction max. 400 kg... -
Page 60: Symbols In This Manual
Keep the manual in a safe place so that it is in a legible condition. › Make sure that the manual is always available to all users. › Always ensure that this manual is passed on to third parties together with the capstan winch. 900012 Rev. 01 | 09.2017 Capstan winch 1800, 1200, 400... -
Page 61: Intended Use
"Intended use", • using the capstan winch under operating conditions that depart from those specified in this manual. Improper use of the machine voids all guarantee claims. Capstan winch 1800, 1200, 400 900012 Rev. 01 | 09.2017... -
Page 62: Qualification Of Personnel
Make sure that the required tools do not get in your way. › Before all pulling operations, always ensure that the capstan winch and the necessary tools are in faultless condition. 900012 Rev. 01 | 09.2017 Capstan winch 1800, 1200, 400... -
Page 63: Safety Instructions For Fastening
› Do not open the gearbox; this will void the guarantee. › With the capstan winch 1800, do not detach the capstan from the flange; this will void the guarantee. › Always anchor the capstan winch such that it hangs freely, so that it can turn in the direction of the load. -
Page 64: Safety Instructions Regarding The Workplace
› When operating the capstan winch, maintain a safe distance of at least 5 m from the capstan winch and rope. 900012 Rev. 01 | 09.2017 Capstan winch 1800, 1200, 400... - Page 65 Safety instructions Fig. 1: Danger zones Operator Danger zone if the lifting tackle fails Load Danger zone if the winch rope fails Capstan winch Danger zone if the pulley fails Pulley Capstan winch 1800, 1200, 400 900012 Rev. 01 | 09.2017...
-
Page 66: Behaviour In Emergencies
Personal protective equipment › Always wear the following personal protective equipment: • Safety footwear • Protective gloves • Tight-fitting clothing • Hard hat • Eye protection or face protection • Hearing protection 900012 Rev. 01 | 09.2017 Capstan winch 1800, 1200, 400... -
Page 67: Design And Function
Design and function Design and function Overview of the capstan winch 1800 Fig. 2: Overview of the capstan winch 1800 Motor cover 12 Rope hook with rope deflector Handle for rope locking 13 Gear lever mechanism Fastening eye 14 On/off switch... - Page 68 17 Spark plug Rope hook with rope 18 Decompression button deflector Eccentric with half- 19 Motor guard with carry handle throttle pin and rubber buffer 10 Handle for rope locking mechanism 900012 Rev. 01 | 09.2017 Capstan winch 1800, 1200, 400...
- Page 69 16 Starter handle of the manually- operated turning gear Rope hook with rope 17 Spark plug deflector Eccentric with half- 18 Motor guard with carry handle throttle pin and rubber buffer Capstan winch 1800, 1200, 400 900012 Rev. 01 | 09.2017...
-
Page 70: Mode Of Operation
A 4-stage planetary gear with two speeds is integrated in the capstan drum of the capstan winch. The traction in first gear is max. 1800 kg and the rope speed is 12 m/min, and in second gear max. 900 kg and 24 m/min. -
Page 71: Symbols On The Capstan Winch
Attention! Flammable substances! Read and comply with the operating manual before commissioning! Use in enclosed rooms prohibited! Refuelling with a hot motor prohibited! Lifting loads prohibited! Wear hearing protection! Caution! Hot surface Capstan winch 1800, 1200, 400 900012 Rev. 01 | 09.2017... -
Page 72: Scope Of Delivery
Scope of delivery Check that scope of delivery is complete The capstan winch scope of delivery includes: • one capstan winch • an operating manual 900012 Rev. 01 | 09.2017 Capstan winch 1800, 1200, 400... -
Page 73: Checking For Transport Damage
Close the tank cap fully, in order to prevent an unnecessary loss of the petrol mixture during transport. The capstan winch is very easily transported to the workplace: › Carry the capstan winch by the transport handle or the motor guard. Capstan winch 1800, 1200, 400 900012 Rev. 01 | 09.2017... -
Page 74: Commissioning And Operation
Fill the tank at a distance of at least 3 m from the workplace. Hearing damage due to noise! Noise arising in the working area can cause serious hearing damage. › Wear hearing protection during all work with a running motor. 900012 Rev. 01 | 09.2017 Capstan winch 1800, 1200, 400... - Page 75 Stihl Motomix Aspen 2T special fuel If you wish to change the type of mixture, you must first run the tank empty until the motor switches off. Capstan winch 1800, 1200, 400 900012 Rev. 01 | 09.2017...
-
Page 76: Anchoring The Capstan Winch
In order to establish force to counter the pulled load, you must anchor the capstan winch on a sufficiently load-bearing tree or another fixed object such that it can move freely. 900012 Rev. 01 | 09.2017 Capstan winch 1800, 1200, 400... -
Page 77: Fastening The Load
Observe the information on the type plate regarding the correct type of pulling rope. › Only use the recommended accessories. › Observe the performance limits of the machine and the pulling rope (see “Technical specifications” on page 94). Capstan winch 1800, 1200, 400 900012 Rev. 01 | 09.2017... -
Page 78: Fastening The Pulley
› Observe the performance limits of the machine and the pulling rope (see “Technical specifications” on page 94). › Only use the pulling rope if it is in faultless condition. 900012 Rev. 01 | 09.2017 Capstan winch 1800, 1200, 400... - Page 79 Wind at least 5 rope windings around the capstan drum. › Draw the pulling rope into the rope clamp cut-out, to prevent the pulling rope springing out of the guide. Capstan winch 1800, 1200, 400 900012 Rev. 01 | 09.2017...
- Page 80 Wind the pulling rope around the entire rope clamp. › Only capstan winch 1800: Draw the locking pin up again and guide the rope locking mechanism back again, so that the pulling rope lies around the white rope guide pulley.
-
Page 81: Changing Gear (Capstan Winch 1800)
Commissioning and operation Changing gear (capstan winch 1800) ATTENTION Damage to the transmission due to incorrect operation of the gear lever! If the gear is changed forcefully, this can cause significant damage to the transmission. It must be possible to move the gear lever easily. -
Page 82: Starting The Motor
ATTENTION Damage to the transmission of the capstan winch 1800! If the gear lever is not in the initial position when the motor is started, this can cause significant damage to the transmission. -
Page 83: Starting The Active Motor
“| |” position and repeat the start process. If the motor still fails to start, clean the spark plug and repeat the start process after approx. 20-30 min. Capstan winch 1800, 1200, 400 900012 Rev. 01 | 09.2017... -
Page 84: Starting The Kawasaki Motor
After starting, gradually move the choke lever to the “open” position. If the motor starts briefly and then switches off again: › Set the choke lever to the “open” position and pull on the starter handle again. 900012 Rev. 01 | 09.2017 Capstan winch 1800, 1200, 400... -
Page 85: Starting The Motor In The Half-Throttle Position
› Never pull forcefully on the pulling rope. › Make sure that the capstan winch is lined up precisely with the load. Capstan winch 1800, 1200, 400 900012 Rev. 01 | 09.2017... - Page 86 If the traction is insufficient, you can draw one to two further rope windings onto the capstan drum (see "Drawing in the pulling rope"). 900012 Rev. 01 | 09.2017 Capstan winch 1800, 1200, 400...
-
Page 87: Slackening The Load
In order to reduce the motor speed whilst idling: › Turn the set screw anticlockwise. In order to increase the motor speed whilst idling: › Turn the set screw clockwise. Capstan winch 1800, 1200, 400 900012 Rev. 01 | 09.2017... -
Page 88: Adjusting The Motor Speed In The Half-Throttle Position
In order to increase the motor speed in the half-throttle position, turn the eccentric with half-throttle pin clockwise. › To do so use a suitable tool, such as a screwdriver. › Retighten the grub screw on the control lever. 900012 Rev. 01 | 09.2017 Capstan winch 1800, 1200, 400... -
Page 89: Cleaning And Maintenance
You must perform the following work if necessary: › Check capstan winch for external damage and clean, › Lubricate all moving parts if necessary, › Check tank filter and replace, › Clean the motor cover, Capstan winch 1800, 1200, 400 900012 Rev. 01 | 09.2017... -
Page 90: Inspection
The capstan winch transmission is lifetime lubricated. It is possible that the capstan winch may lose a little lubricant during the first hours of operation. The lubricant must first distribute through the transmission. 900012 Rev. 01 | 09.2017 Capstan winch 1800, 1200, 400... -
Page 91: Replacing The Tank Filter
If the motor cover is not cleaned correctly, this can result in damage to the motor. › Do not clean the motor cover with fluid cleaning products or oiled paper. › Clean the motor cover with a brush or compressed air. Capstan winch 1800, 1200, 400 900012 Rev. 01 | 09.2017... -
Page 92: Air Filter Sponge
To do so use a suitable tool, such as a Phillips screwdriver. › Remove the air filter sponge. › Only clean the air filter sponge with compressed air. › Reinsert the clean air filter sponge. › Retighten the screws. 900012 Rev. 01 | 09.2017 Capstan winch 1800, 1200, 400... -
Page 93: Replacing The Air Filter Sponge
Inspecting the spark plug Inspect the spark plug at least every 50 operating hours. Be aware of the electrode spacing. The electrode spacing must be 0.5–0.6 mm. Capstan winch 1800, 1200, 400 900012 Rev. 01 | 09.2017... -
Page 94: Replacing The Spark Plug
MR 80 211103 Kawasaki motor NGK BPMR8Y 220704 › Screw the spark plug tight again with the spark plug wrench. › Place the spark plug cap back on the spark plug. 900012 Rev. 01 | 09.2017 Capstan winch 1800, 1200, 400... -
Page 95: Decommissioning And Disposal
Drain the petrol mixture from the tank and dispose of the petrol mixture in an environmentally friendly manner. › Block all moving machine parts. › Disassemble all rubber parts from the machine and take these to a designated collection point. Capstan winch 1800, 1200, 400 900012 Rev. 01 | 09.2017... -
Page 96: Storage
In order to distribute the oil, vigorously pull the starter handle a few times. › Screw the spark plug back in (see “Inspecting the spark plug” on page 88). › Only store the capstan winch in enclosed rooms. 900012 Rev. 01 | 09.2017 Capstan winch 1800, 1200, 400... -
Page 97: Faults
The possible faults, causes and remedies are listed in the table below. The safety regulations must be observed for all cleaning, maintenance and repair work. Capstan winch 1800, 1200, 400 900012 Rev. 01 | 09.2017... - Page 98 – Lubricant (oil, grease on the capstan drum) Cleaning the pulling rope Cleaning the capstan winch Capstan drum blocked Changing gear (capstan winch 1800) – Gear not engaged Repair by repair workshop – Transmission defective 900012 Rev. 01 | 09.2017...
-
Page 99: Technical Specifications
10400 max. 10400 max. 8500 max. 8500 [rpm] Carburettor Diaphragm carburettor Walbro WYK 60 primer type Tank capacity [l] Clutch Centrifugal clutch Throttle lever With half-throttle position Noise level [dB(A)] Capstan winch 1800, 1200, 400 900012 Rev. 01 | 09.2017... -
Page 100: Pulling Rope
Only use technically faultless accessories and original spare parts. Only use technically faultless accessories and original spare parts. You can obtain further information on the accessories and spare parts on our website www.grube.de. Alternatively, please contact your dealer. 900012 Rev. 01 | 09.2017 Capstan winch 1800, 1200, 400... -
Page 101: Service
2006/42/EC The manufacturer: EDER Maschinenbau GmbH, Schweigerstraße 6, 38302 Wolfen- büttel, herewith declares under its sole responsibility that the product Nordforest capstan winch 1800, Model NF 1800, serial number starting from: NF18-002030 Nordforest capstan winch 1200, Model NF 1200, serial number starting from: NF12-001000... -
Page 102: Warranty
Defects occurring during the guarantee period due to faults in material or manufacture shall be remedied by repairs if they have arisen in spite of proper operation and maintenance of the machine. 900012 Rev. 01 | 09.2017 Capstan winch 1800, 1200, 400... -
Page 103: Index
Drawing in the pulling Spark plug 88 rope 73 throttle position 83 inspecting 88 adjusting whilst idling 82 replacing 89 Fastening the pulley 73 Storage 91 Faults 92 Operation 69 Symbols Filling the tank 69 in the manual 55 on the capstan winch 66 Guarantee 97 Capstan winch 1800, 1200, 400 900012 Rev. 01 | 09.2017... - Page 104 Index Tank filter 86 replacing 86 Technical specifications 94 general 94 Motor 94 Rope 95 Transport 68 Transport damage 68 Validity of the guide 54 Warnings Presentation 54 Warranty 97 Wearing parts 65 900012 Rev. 01 | 09.2017 Capstan winch 1800, 1200, 400...
- Page 105 900012 Rev. 01 | 09.2017 Spillwinde 1800, 1200, 400...
- Page 106 900012 Rev. 01 Grube KG Hützeler Damm 38 · 29646 Bispingen Tel. +49-5194 900-0 · Fax +49-5194 900-270 · www.grube.de Geschäftsführender Gesellschafter: Dr. Gunther Grube Amtsgericht Lüneburg, HRA 100717 · USt-Id-Nr. DE 116 380 250...