Télécharger Imprimer la page

Publicité

Les langues disponibles

Les langues disponibles

Liens rapides

• Centrale per il controllo di 3 guppi luce
• Auto-apprendimento della soglia di luce
Ingresso 230 Vac da rete
Gruppo Luci 3
Comune Luci
Gruppo Luci 2
Gruppo Luci 1
+ Antenna
- Antenna / Com. Servizi
Out 12 Vac (J1-AC)
Out 12Vac (J1-AC) / +12Vdc (J1-DC)
- 12 Vdc (J1-DC) Comune ingressi
Comando Luci 2
Comando Luci 1
Comando Luci 3 o sensore luce
BUS-DATI
All manuals and user guides at all-guides.com
START-S0XL
-1-
-2-
-3-
-4-
-5-
-6-
-7-
-8-
-9-
-10-
-11-
-12-
-13-
-14-
-15-
N.A.
-16-
CONTATTO
CONTATTO 17-
N.A.
N.A.
Istruzioni ed avvertenze
230 Vac
LUCE 3
230 Vac
LUCE 2
230 Vac
LUCE 1
230 Vac
BUS-DATI

Publicité

loading

Sommaire des Matières pour EB TECHNOLOGY START-S0XL

  • Page 1 All manuals and user guides at all-guides.com • Centrale per il controllo di 3 guppi luce • Auto-apprendimento della soglia di luce START-S0XL Istruzioni ed avvertenze Ingresso 230 Vac da rete Ingresso 230 Vac da rete 230 Vac Gruppo Luci 3...
  • Page 2 La START-S0XL è una scheda elettronica della nuova genera- zione con conteggio dei tempi in digitale. Nel progetto sono state adottate le più avanzate tecniche per ga- rantire la massima immunità nei confronti dei disturbi, la migliore flessibilità d’uso e la più vasta scelta di funzioni disponibili. Campi di applicazione La centralina START-S0XL è in grado di gestire 3 gruppi luce separatamente con tensione di 230 Vac. Piccola legenda START comando (alternate current) corrente alternata...
  • Page 3 All manuals and user guides at all-guides.com Installazione: Schema della centrale Ponticellare se non usato 10 11 12 13 14 15 16 17 Gruppo Luci 3 In alternativa al comando NA, è possibile collegare al morsetto 14 DIP A DIP B un sensore di luce. JUMPER J1 DC - 12 Vdc AC - 12 Vac...
  • Page 4 Dopo 6 secondi il LED L1 si spegnerà e solo a questo punto rilasciare il pulsante P1. Il LED L1 subito darà 4 lampeggi diversi fra loro, poi ritornerà ad un lampeggio costante pronto per la gestione dei codici fissi (1 solo lampeggio costante vedi prossimo capitolo). La memoria è cancellata! Radiocomandi: Attivazione della gestione dei codici La ricevente incorporata nella centrale START-S0XL può gestire oltre ai codici fissi anche i codici rolling-code HCS, vediamo quindi come è possibile gestire i seguenti codici. Le uscite della centrale devono essere disattivate, quindi nessun contatto attivo, eventuali luci collegate devono essere spente. L’operazione è possibile solo ad automazione in posizione di chiuso.
  • Page 5 All manuals and user guides at all-guides.com Radiocomandi: L’apprendimento dei codici La centrale dispone di un PULSANTE P1 per la programmazione dei tempi e per l’apprendimento dei codici. Se per l’apprendimento si utilizza un radiocomando vergine a codice fisso tipo lo SMILE-C, assicurarsi che abbia un codice su tutti i pulsanti, altrimenti provvedere con l’autogenerazione del codice. Nel caso si volesse apprendere un radiocomando rolling-code tipo SMILE-H è evidente che questo non serve. Le uscite della centrale devono essere disattivate, quindi nessun contatto attivo, eventuali luci collegate devono essere spente.
  • Page 6 All manuals and user guides at all-guides.com Logiche di funzionamento: DIP A - DIP B Vediamo ora le logiche di funzionamento della centrale, impostabili tramite i DIP A e il DIP B: Tramite il DIP A è possibile impostare l’ID della centrale sul DIP A ID Linea BUS bus, viene cosi consentito il collegamentodi al massimo 15 1-2-3-4 dispositivi sulla stessa linea bus. DIP A DIP B DIP B In ON attiva la funzione crepuscolare sull’uscita LUCE 1, Luce Crepusolare 1 ON il sensore PASSIVO va collegato ai morsetti 11-14.
  • Page 7 All manuals and user guides at all-guides.com Apprendimento TEMPORIZZAZIONE Le uscite LUCE1 e LUCE2 possono essere impostate per autodisattivarsi. Il tempo impostabile per la disattivazione va da un minimo di 6 secondi ad un massimo di circa 18 ore. Assicurarsi che tutte le uscite siano disattivate. Porre in ON il DIPB 3 per LUCE 1 mentre il DIPB 4 per LUCE 2 DIP B Attivare l’uscita che si vuole temporizzare Ora premere il pulsante P1...
  • Page 8 All manuals and user guides at all-guides.com Dichiarazione CE di conformità (secondo Direttiva 2006/42/CE, Allegato II, parte B) Azienda: EB TECHNOLOGY SRL Indirizzo: Corso Sempione 172/5 Il sottoscritto Ernestino Bandera , 21052 Busto Arsizio VA Italia Amministratore Nome prodotto: START-S0XL...
  • Page 9 All manuals and user guides at all-guides.com • Control unit for lights • Self installation of the twin light START-S0XL Manual and awainings 230 Vac Input 230 Vac Input 230 Vac Group of lights 3 -16- CONTACT Light common CONTACT 17-...
  • Page 10 All manuals and user guides at all-guides.com Index Foreword This manual provides all the specific information you need to fa- Installation of the control unit miliarize yourself with and correctly operate your unit. Read it Connection of the antenna very carefully when you purchase the instrument and consult it whenever you have doubts regarding use and before performing Remote control: any maintenance operations. cancellation of the mEmoRy Safety precautions code MANAGING mEmoRIzATIoN of the CODES Using the unit improperly and performing repairs or modifications Logic DIP A - DIP B...
  • Page 11 All manuals and user guides at all-guides.com Installation of the control unit make a link if not used 10 11 12 13 14 15 16 17 230 Vac Group no.3 alternatively to a N.o. command, you can connect a light sensor. DIP A DIP B JUMPER J1 DC - 12 Vdc AC - 12 Vac mors 10-11 mors 9-10 FUSE - 4A...
  • Page 12 All manuals and user guides at all-guides.com Connection of the antenna If you use only a small cable for the antenna, for the frequency 433.92 mhz, cut it at 17cm and connect it to the terminal board no.7 Remote control: cancellation of the memory The control unit dispose of a BUTTON P1 for different operation and to cancel all the codes. To do this operation make as follow: The output shuold be deactivated (no contacts) lights have to be turned off. This operation is possible only when the automation is closed. Press and keep pressed the BUTTON P1, LED L1 will fix After 6 seconds LED 1 turn off and then you can release BUTTON P1.
  • Page 13 All manuals and user guides at all-guides.com Remote Control: memorization of the codes The control unit dispose of P1 button to memorize the codes. If you memorize a SmILE-C make sure that all buttons has a code otherwise it need to be generated. In case you want to memorize a SmILE-H (rolling code remote control) you don’t need to generate any code. All outputs should be deactivated, all lights should be turn off. LED L1 should flash constantly (see Activation of the codes in the following chapter) . memorize the first channel of the remote control for the LIGHT GROUP no.1 Press and release BUTTON P1 in the control unit, LED L1 will lit for 6 seconds. Press in 6 seconds time the button of the remote control (we suggest the first channel).
  • Page 14 All manuals and user guides at all-guides.com Logic DIP A - DIPB We can see the function of the control unit with DIP A and DIP B: you can enter the ID of the control unit with DIPA, DIP A Bus Data System you can connect maximum 15 devices in the same 1-2-3-4 BUS DATA SYSTEM. DIP A DIP B DIP B If you put in oN you can have the twilight function in the Twilight 1 ON output LIGHT1. DIP B DIP A DIP B Automatic The intput of LIGHT1 works forced activation,...
  • Page 15 All manuals and user guides at all-guides.com Time memorization Outputs LIGHT 1 and LIGHT 2 can be automatically deactivated. The time is between 6 secons up to 18 hours. make sure the outputs are not activated Put in ON the DIPB 3 for LIGHT 1 while put in ON the DIPB 4 for LIGHT 2 DIP B Activate the output LIGHT 1 or LIGHT 2 Press and release BUTTON P1 and while away the time in which the output should remain on.
  • Page 16 All manuals and user guides at all-guides.com Declaration of CE conformity (according to EC Directive 2006/42, Attachment II, part 1, ses. A) Company: EB TECHNOLOGY SRL Adress: Corso Sempione 172/5 The undersigned Ernestino Bandera, 21052 Busto Arsizio VA Italy Administrator Product’s name: START-S0XL Control unit for lights DECLARES THAT: THE PRODUCT COMPLIES with what is outlined in the European Community directive:...
  • Page 17 All manuals and user guides at all-guides.com • Centrale pour le contrôle de trois circuits d’éclairage • Auto-apprentissage du seuil de luminosité START-S0XL Manuel Entrée 230 Vac Entrée 230 Vac 230 Vac Circuit Lumière 3 -16- CONTACT Commun Lumière CONTACT -17- Circuit Lumière 2...
  • Page 18 START-S0XL est une carte électronique de nouvelle génération avec compte des temps en digitale. Dans le project on a adoptés les técniques plus innovatives pour garantir aucune interference, la meilleur fléxibilité d’utilisation et une grande gamme des fon- ctionnements disponibles. Champs d’application START-S0XL peut gérer maximum 3 circuits de lumière séparés sous une tension de 230 Vac. Légende START Commande Courant alternatif Courant continu Normalement fermé...
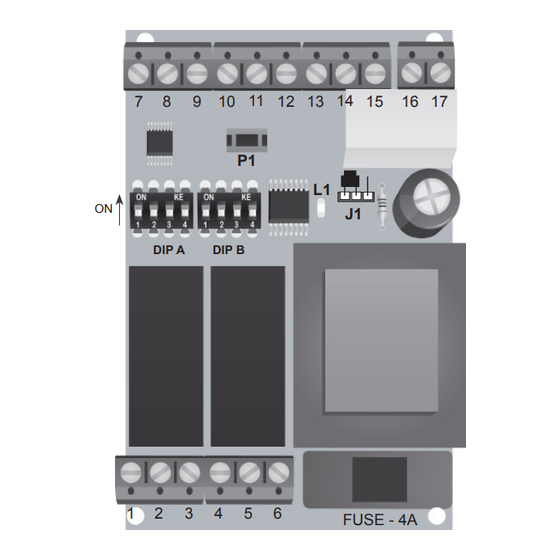
  • Page 19 All manuals and user guides at all-guides.com Installation: Schéma de l’armoire Faire un pont si non utilisé 10 11 12 13 14 15 16 17 Circuit Lumière 3 Dépend de la commande NA, il est possible de brancher à la borne 14 DIP A DIP B une sonde crépusculaire JUMPER J1...
  • Page 20 Après 6 secondes LED L1 s’éteint et seulement à ce moment il faut relâcher P1 la LED L1 clignote 4 fois, puis clignote lentement, prête pour l’effacement des codes fixes (1 éclat lent voir prochain chapitre). La mémoire est effacée! Emetteurs: Gestion des codes Le récepteur intégré dans l’armoire START-S0XL peut gérer des codes fixes et des codes Rolling-code HCS. Les sorties de l’armoire sont désactivées, aucun contact activé, toutes les lumières sont éteintes. La programmation est possible seulement quand l’automatisme est arrété. Appuyer et relâcher le touche P1, la LED L1 reste allumée fixe pendant 6 secondes.
  • Page 21 All manuals and user guides at all-guides.com Emetteurs: Apprentissage des codes L’armoire dispose d’un touche P1 pour la programmation des temps et des codes. Si l’on enregistre un émetteur vierge à code fixe (par exemple SMILE-C), il faut s’assurer que toutes les touches ont un code, sinon il faut générer un code. Dans le cas où l’on enregistre un émetteur rolling-code (par exemple SMILE-H) il est évident qu’il ne faut pas générer un code. Les sorties de l’armoire sont désactivées, aucun contact activé, les lumières sont éteintes. La LED L1 clignote lentement, comme indiqué sur “ Activation gestion des codes” dans le paragraphe précédent. Enregistrement du premier bouton de l’émetteur pour commander le CIRCUIT LUMIERE 1 Appuyer et relâcher la touche P1 sur la carte, la LED L1 reste allumée fixe pendant 6 secondes Pendant ces 6 secondes appuyer sur la touche de l’émetteur associé au circuit lumière 1 (on conseille le premier bouton). Pour confirmer, la LED 1 clignote 5 fois et ensuite clignote lentement comme au début.
  • Page 22 All manuals and user guides at all-guides.com Logique fonction: DIP A - DIP B Logiques de fonction avec DIP A et DIP B: Avec le DIP A il est de programmer l’ID de l’armoire sur la DIP A ID Ligne BUS sortie BUS, on peut brancher un maximum de 15 disposi- 1-2-3-4 tifs sur la même ligne BUS. DIP B DIP A DIP B Lumière ON: active la sonde crépusculaire sur la sortie LUMIERE...
  • Page 23 All manuals and user guides at all-guides.com Apprentissage TEMPORISE Les sorties LUMIERE 2 et LUMIERE 3 peuvent être programmées pour se désactiver automatiquement. Le temps pour la désactivation va 6 secondes jusqu’à 18 heures S’assurer que les sorties soient désactivées. Placer sur ON le DIPB 3 pour LUMIERE 1 et le DIPB 4 pour LUMIERE 2 DIP B Activer la sortie qui doit être temporisée Appuyer le bouton P1 et laisser passer le temps pour lequel la sortie doit être activée.
  • Page 24 All manuals and user guides at all-guides.com Déclaration CE de conformité (selon la diréctive 2006/42/CE, Attaché II, partie B) Société: EB TECHNOLOGY SRL Adresse: Corso Sempione 172/5 Le sousigné Ernestino Bandera, 21052 Busto Arsizio VA Italia Administrateur Nom du produit: START-S0XL Centrale pour le contrôle de 3 DECLARE QUE: circuits de lumière...