Table des Matières

Manuels Connexes pour Royalty Line PKM-1900.7BG


Sommaire des Matières pour Royalty Line PKM-1900.7BG
- Page 1 Bedienungsanleitung Instruction Manual Handleiding Mode d’emploi Manuale Di Istruzioni Standrührgerät Stand Mixer Staande mixer Mixeur sur socle Miscelatore di verticale PKM-1900.7BG...
- Page 2 Standrührgerät PKM-1900.7BG Deutsch Lesen Sie alle Anweisungen vor Gebrauch dieses Produktes...
-
Page 3: Wichtige Sicherheitshinweise
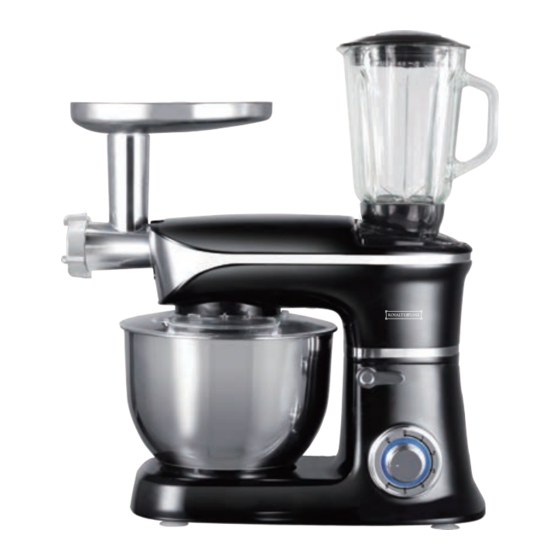
1. Ringmutter 2. Feine Mahlscheibe 3. Mittlere Mahlscheibe 4. Grobe Mahlscheibe 5. Messer 6. Silikon-Verbindungsstück 7. Schnecke 8. Fleischwolf 9. Schale 10. Stopfer 11. Schutzabdeckung 12. Zubehöranschluss 13. Schwenkarm 14. Schutzabdeckung 15. Oberes Verbindungsstück 16. Sicherheitsschalter 17. Entriegelungstaste 18. Stufenregler 19.Motorgehäuse 20. - Page 4 ● Nicht im Freien verwenden. ● Das Kabel darf nicht über die Tisch- oder Arbeitsplattenkante hängen. ● Halten Sie während der Verarbeitung von Lebensmitteln Hände und Utensilien von sich bewegenden Klingen oder Scheiben fern, um das Risiko einer schweren Körperverletzung oder Beschädigung des Mixers zu reduzieren.
- Page 5 unbeaufsichtigt bleibt sowie vor der Montage, der Demontage oder Reinigung. ● Dieses Gerät kann von Kindern ab acht Jahren und älter sowie von Personen mit eingeschränkten physischen, sensorischen oder mentalen Fähigkeiten bzw. Mangel an Erfahrung und Kenntnissen verwendet werden, sofern sie zuvor in der sicheren Benutzung des Geräts unterwiesen worden sind und die einhergehenden Gefahren verstehen.
- Page 6 8 Eiweiß oder 6 Schneebesen 10 min ml Sahne 10 min Fleischwolf Mixer 5-6,P 2 min 1.5 L max Bedienpositionen Warnung! Betreiben Sie das Gerät nur, wenn Zubehörteil/Aufsatz gemäß dieser Tabelle befestigt ist und sich in der Betriebsstellung befindet. Zubehör Wert Position Je Nach Bedarf Knethaken, Rührhaken oder...
- Page 7 Knethaken , Rührhaken , Schneebesen verwenden 1. Stellen Sie das Gerät auf eine ebene Fläche, z. B. eine Küchenarbeitsplatte und stellen Sie sicher, dass es stabil steht. 2. Stellen Sie sicher, dass die Schutzabdeckung (11) an den Zubehöranschluss (12) angebracht ist 3.
- Page 8 1. Das benötigte Zubehör (25 mit 24, 23 oder 26) auf die Motorspindel (21) auf der Unterseite des Schwenkarms (13) aufsetzen. 2. A. Der Knethaken (26) wird für feste Teigmassen, Hackfleisch oder andere anspruchsvolle Knetarbeiten verwendet. B. Der flache Rührhaken (25) wird für leichte Teigmischungen verwendet.
- Page 9 1. Schalten Sie das Gerät aus, wenn Sie fertig sind. Schalten Sie das Gerät am Schalter aus und ziehen Sie den Netzstecker, bevor Sie ein Zubehör austauschen, vor der Reinigung und wenn das Gerät nicht verwendet wird. 2. Die Entriegelungstaste (17) im Uhrzeigersinn drehen.
- Page 10 1. Bringen Sie die Schnecke (7) am Fleischwolf (8) an. 2. Bringen Sie das Silikon-Verbindungsstück (6) am Schneckenanschluss an (siehe Abbildung). 3. Bringen Sie das Messer (5) am Schneckenanschluss an (siehe Abbildung). Die scharfen Messerkanten müssen in Richtung der Mahlscheibe zeigen. 4.
- Page 11 1. Die Schale (9) so auf den Fleischwolf (8) aufsetzen, dass der breite Teil über dem Motorgehäuse sitzt. 2. Die Rührschüssel (27) oder ein ähnliches Gefäß unter die Öffnung des Fleischwolfs stellen. 3. Das Gerät ist nun betriebsbereit. 1. Das Netzkabel an die Steckdose anschließen und das Gerät anschalten.
-
Page 12: Sicherheitshinweise
Zum Abnehmen den Fleischwolf so drehen, dass der Pfeil am Kreis ausgerichtet ist. Die Schutzabdeckung am Zubehöranschluss anbringen. Sicherheitshinweise: Knochen, Knorpel, Sehnen und Rinde vor dem Mahlen des Fleisches immer entfernen. Gefrorene Lebensmittel müssen vor dem Mahlen vollständig aufgetaut sein. Der Fleischwolf darf nur zum Mahlen von Fleisch verwendet werden. - Page 13 Mixer 1. Stellen Sie das Gerätegehäuse auf eine ebene Fläche, z. B. eine Küchenarbeitsplatte und stellen Sie sicher, dass es stabil steht. 2. Stellen Sie sicher, dass die Schutzabdeckung (11) an den Zubehöranschluss (12) angebracht ist 3. Die Schutzabdeckung (14) vom Schwenkarm abnehmen (siehe Abbildung).
- Page 14 Die Schutzabdeckung wieder an den Schwenkarm anbringen. Sicherheitshinweise: 1. Um beim Pürieren fester Zutaten optimale Ergebnisse zu erzielen, nach und nach kleine Portionen in den Glaskrug geben, anstatt eine große Menge auf einmal zu verarbeiten. 2. Beim Verarbeiten fester Zutaten, diese zuerst in kleine Stücke (2 - 3 cm) schneiden.
- Page 15 • Ziehen Sie den Netzstecker aus der Steckdose und lassen Sie das Gerät abkühlen, bevor Sie es reinigen. • Tauchen Sie die Motoreinheit des Gerätes nicht in Wasser und stellen Sie sicher, dass kein Wasser in das Gerät gelangt. • Reinigen Sie die Motoreinheit, indem Sie es mit einem feuchten Tuch abwischen.
-
Page 16: Technische Daten
Zerkleinerung von Mandeln 200g Mandeln Eiswürfel Gewicht eines Eiswürfels: ~ 12g - 16g/Stück 140g = ~ 9 Stück Eiweiß schlagen 8 Eiweiß in die SCHÜSSEL geben und mit dem SCHNEEBESEN auf Stufe 5 schlagen. Sahne schlagen 600g Sahne mit dem FLACHEN RÜHRHAKEN in der SCHÜSSEL auf Stufe 4 schlagen. -
Page 17: Umweltgerechte Entsorgung
UMWELTGERECHTE ENTSORGUNG Dieses Symbol auf dem Produkt zeigt an, dass Ihr Elektro- oder Elektronik-Altgerät von Haushaltsabfällen getrennt entsorgt werden muss. Die WEEE-Richtlinie (von engl.: Waste of Electrical and Electronic Equipment; deutsch: Elektro- und Elektronikgeräte-Abfall) (2012/19/EU) wurde etabliert, um Produkte unter Verwendung der bestmöglichen Recyclingtechniken wiederzuverwerten, um die Auswirkungen auf die Umwelt zu minimieren, gefährliche Substanzen zu behandeln und weitere Deponien zu vermeiden. - Page 18 Stand Mixer PKM-1900.7BG English Read all instructions before use this product...
- Page 19 1. Ring nut 2. Fine mincing disk 3. Medium mincing disk 4. Coarse mincing disk 5. Cutter 6. Silicon coupling 7. Scroll 8. Meat grinder body 9. Meat tray 10. Tamper 11. Protective cover 12. Accessory socket 13. Swivel arm 14.
- Page 20 ● To reduce the risk of injury, never place cutting blades or discs on base. ● Be certain is securely locked in place before operating the appliance. ● Never feed food by hand, always use food pusher. ● Do not attempt to defeat the lid interlock mechanism. ●...
- Page 21 timer or separate remote-control system. ● If the supply cord is damaged, it must be replaced by the manufacturer, its service agent or similarly qualified persons in order to avoid a hazard. Save these instructions Control panel speed setting 0 -----Stop Setting1-6-----Operating speed Setting1-----Minimum speed—slow Setting6-----Maximum speed—fast...
-
Page 22: Operating Positions
Operating positions Warning! Operate the appliance only when the accessory/tool is attached according to this table and is in the operating position. Item Accessory Position Set up Kneading Hook,Mixing Hook, Wisk,according to your desire。 Risk of injury from the rotating tools! While the appliance is operating, keep fingers clear of the mixing bowl. - Page 23 Turn the arm release button (17) clockwise. at the same time lift the swivel arm(13) with hand so that it locks into place with a click, The swivel arm tilts up. Fit the bowl cover (23) onto the swivel arm(13) and turn it slightly clockwise, so that it locks into position securely.
-
Page 24: Important
1. Lower the swivel arm so that it locks into place with a click. The lid(23) must fit tightly with the mixing bowl(27), otherwise it is fitted incorrectly. The appliance is now ready for use. 2. Plug the power cord into main power outlet and switches it ON. -
Page 25: Meat Grinder
Meat Grinder 1. Place the appliance on a flat surface, e.g. a kitchen counter, and make sure it is standing firmly. 2. Ensure that the protective cover (11) is fitted to the Accessory socket (12) 3. Place the blender protective cover (14)into the swivel arm(13).(see illustration) 1. - Page 26 It the meat grinder body(8) in the accessory socket (12),so that the arrow is aligned with the circle. Turn it to the vertical position, so the arrow is aligned with the arrow. 1. Fit the meat tray (9) onto the meat grinder body (8) so that the wide part is positioned over the motor house of the appliance.
-
Page 27: Safety Instructions
1. Switch off the appliance when you have finished grinding the meat.Switch off the appliance at the switch and unplug it before you change the accessories, or before you take the appliance apart or when not in use. 2.Remove pusher and meat tray. To detach the meat grinder, turn the body so the arrow is aligned with the circle and then remove. - Page 28 Blender 1. Place the motor section on a flat surface, e.g. a kitchen counter, and make sure it is standing firmly. 2. Ensure that the protective cover (11) is fitted to the accessory socket (12). 3. Remove the blender protective cover(14) from the swivel arm(see illustration).
- Page 29 Fit the blender protective cover to the swivel arm again. Safety instructions: 1. To achieve the best results when pureeing solid ingredients, place small portions into the jar one by one instead of placing a large quantity all at once. 2.
- Page 30 before cleaning it. • Do not immerse the motor section of the appliance in water and make sure no water enters the appliance. • Clean the motor section by wiping it with a damp cloth. A little detergent can be added if the appliance is heavily soiled. •...
-
Page 31: Environment Friendly Disposal
Ice-cubes Weight of one ice-cube:~12g-16g/piece 140g=~9 pieces Beating of egg-white 8 egg-white in the BOWL with the WHISK at speed 5. Beating of cream 600g cream with the FLAT BEATER in the BOWL at speed 4. Kneading of dough 1000g flour 200g chopped almonds 15g salt 28g butter... - Page 32 Staande mixer PKM-1900.7BG Dutch Lees alle instructies voor het gebruik van dit product...
- Page 33 1. Moer 2. Fijne maalschijf 3. Gemiddelde maalschijf 4. Grove maalschijf 5. Snijmes 6. Siliconen koppeling 7. Wormschroef 8. Behuizing vleesmolen 9. Vleesschaal 10. Stopper 11. Afdekkapje 12. Aansluiting voor accessoires 13. Zwenkarm 14. Afdekkapje blender 15. Bovenste koppeling 16. Veiligheids microschakelaar 17.
- Page 34 ● Niet buitenshuis gebruiken. ● Laat het snoer niet over de rand van de tafel of het aanrecht hangen. ● Houd tijdens het gebruik handen en keukengerei weg van bewegende bladen of schijven om het risico op ernstige verwondingen of schade aan de mixer te voorkomen.
- Page 35 personen goed zijn voorgelicht over het veilige gebruik van het apparaat en de mogelijke gevaren ervan begrijpen. ● Kinderen mogen niet met het apparaat spelen. ● Het reinigen en onderhoud mag niet door kinderen gedaan worden tenzij zij ouder zijn dan 8 jaar en onder toezicht staan. ●...
- Page 36 10 min Vleesmolen Blender 5-6,P 2 min max. 1,5 L Gebruiksposities Waarschuwing! Gebruik de machine alleen als de hulpstukken volgens deze tabel geplaatst zijn en zich in de gebruikspositie bevinden. Onderdeel Hulpstuk Positie Plaats de deeghaak, Bisschop of Garde naar wens. Risico op letsel door draaiende hulpstukken! Als het apparaat in gebruik is dient u uw vingers uit de buurt van de mengkom te houden.
-
Page 37: Hoe Gebruik Ik De Deeghaak, De Bisschop En De Garde
Hoe gebruik ik de deeghaak, de bisschop en de garde 1. Plaats het apparaat op een vlak oppervlak, bijv. een aanrecht en zorg dat het stevig staat. 2. Zorg dat de beschermkap (11) is geplaatst in de aansluiting voor accessoires (12) 3. - Page 38 1. Plaats de benodigde accessoire (25 met 24, 23 of 26) op de motoras (21) aan de onderkant van de zwenkarm (13). 2. A. De deeghaak (26) wordt gebruikt voor zwaar deeg, gehakt of ander zwaar kneedwerk. B. De bisschop (25) wordt gebruikt voor lichtere soorten deeg.
- Page 39 1. Zet het apparaat uit als u klaar bent. Zet de machine uit met de schakelaar en haal de stekker uit het stopcontact voor u de hulpstukken wisselt, voor u de machine uit elkaar haalt of wanneer het apparaat niet gebruikt wordt. 2.
- Page 40 1. Plaats de wormschroef (7) in de gehaktmolen(8). 2. Plaats de siliconen koppeling (6) op de aansluiting van de wormschroef (zie afbeelding). 3. Plaats het snijmes (5) op de aansluiting van de wormschroef (zie afbeelding). De scherpe kanten van het mes dienen in de richting van de maalschijf te wijzen.
- Page 41 1. Plaats de vleesschaal (9) op de vleesmolenbehuizing (8) zodat het brede deel boven de motorbehuizing zit. 2. Plaats de mengkom (27) onder de opening van de vleesmolen. 3. Het apparaat is nu gereed voor gebruik. 1. Steek de stekker in het stopcontact en zet de machine AAN.
-
Page 42: Veiligheidsinstructies
Om de vleesmolen te verwijderen, draait u de behuizing zodat de pijl in lijn ligt met de cirkel. Plaats het afdekkapje terug op de aansluiting voor hulpstukken. Veiligheidsinstructies: Verwijder altijd botjes, kraakbeen, pezen en zwoerd voor u het vlees maalt. Bevroren voedsel dient helemaal ontdooid te zijn voor het malen. - Page 43 Blender 1. Plaats het apparaat op een vlak oppervlak, bijv. een aanrecht en zorg dat het stevig staat. 2. Zorg dat de beschermkap (11) is geplaatst in de aansluiting voor accessoires (12) 2. Verwijder de beschermkap (14) van de zwenkarm (zie afbeelding).
- Page 44 1. Zet de machine uit en haal de stekker uit het stopcontact voor u de hulpstukken wisselt, voor u de machine uit elkaar haalt of wanneer het apparaat niet gebruikt wordt. 2. Om de kan te verwijderen, draait u de kan zodat de pijl in lijn ligt met de cirkel en verwijder de kan.
- Page 45 Inhoud van de kan 1500mL REINIGEN Bij het reinigen van de machine dient u op het volgende te letten: • Haal de stekker uit het stopcontact en laat het apparaat afkoelen voor u het schoonmaakt. • Dompel het motorgedeelte en mengkom nooit onder in water en zorg dat er geen water in het apparaat binnendringt.
-
Page 46: Technische Gegevens
VULDOP gieten. Meng zolang de mayonaise emulgeert. Wortelen 400 g wortelen Hakken van amandelen 200g amandelen. IJsblokjes Gewicht van een ijsblokje: ~12-16g/st 140g=~9 st Eiwit stijfslaan 8 eiwitten in de KOM met de GARDE op stand 5. Room stijfslaan 600g room in de KOM met de BISSCHOP op stand 4. Deeg kneden 1000g bloem 200 g gehakte amandelen... -
Page 47: Milieuvriendelijke Afvalverwerking
MILIEUVRIENDELIJKE AFVALVERWERKING Het symbool boven en op het apparaat houdt in dat het product geclassificeerd is als elektrische of elektronische apparatuur en niet met het huishoudelijke of bedrijfsafval dient te worden afgevoerd wanneer het niet meer bruikbaar is.De Waste of Electrical and Electronic Equipment (WEEE) richtlijn (2012/19/EU) is opgesteld om producten te recyclen met de beste beschikbare terugwinnings en recycling technieken om zo de invloed op het milieu te minimaliseren, gevaarlijke stoffen te... - Page 48 Mixeur sur socle PKM-1900.7BG France Lire toutes les instructions avant d'utiliser ce produit...
- Page 49 1. Anneau écrou 2. Disque de hachage fin 3. Disque de hachage moyen 4. Disque de hachage grossier 5. Lame 6. Coupleur en silicone 7. Spirale 8. Boîtier du hachoir à viande 9. Plateau à viande 10. Cheminée 11. Couvercle de protection 12.
- Page 50 mouvement lors du traitement des aliments pour éviter les risques de blessures sérieuses ou d'endommager le mixeur. ● Les lames sont tranchantes, manipulez-les avec soin. ● Pour réduire les risques de blessure, ne jamais poser les lames de découpe ou les disques sur la base. ●...
- Page 51 d’expérience limité, tant qu’elles ont reçu des instructions d'utilisation détaillées et les comprennent parfaitement. ● Il est interdit aux enfants d'utiliser l'appareil sans surveillance. ● Le nettoyage et l'entretien peuvent être effectués par les enfants âgés de plus de 8 ans et s'ils le font sous surveillance. ●...
-
Page 52: Positions De Fonctionnement
10 min Vleesmolen Blender 5-6,P 2 min 1,5L max Positions de fonctionnement Avertissement ! Ne faites fonctionner l'appareil que si un accessoire ou un outil est attaché, comme décrit dans ce tableau. Élément Accessoire Position Installez le crochet à pâte, le crochet à mixer ou le fouet comme nécessaire. -
Page 53: Utilisation Du Crochet À Pâte , Batteur Plat Et Du Fouet
Utilisation du Crochet à pâte , Batteur plat et du Fouet 1. Positionnez l'appareil sur une surface plate, par exemple un comptoir de cuisine et assurez-vous qu'il ne risque pas de bouger. 2. Assurez-vous que le couvercle de protection (11) est bien présent dans le Port d'accessoires (12) 3. - Page 54 1. Installez l'accessoire désiré (25 avec 24, 23 ou 26) sur l'axe du moteur (21) situé sous le bras pivotant (13). 2. A. Le crochet à pâte (26) est à utiliser avec la pâte épaisse, la viande hachée ou d'autres tâches lourdes. B.
-
Page 55: Hachoir À Viande
1. Éteignez l'appareil lorsque vous avez terminé. Éteignez l'appareil au niveau du bouton et débranchez-le avant de changer des accessoires, avant de démonter l'appareil et après utilisation. 2. Faites tourner le bouton de libération du bras (17) dans le sens horaire. Soulevez en même temps le bras pivotant (13) à... - Page 56 1. Installez la spirale (7) dans le boîtier du hachoir (8). 2. Insérez le coupleur de silicone (6) dans la connexion de la spirale (voir illustration). 3. Insérez la lame (5) dans la connexion de la spirale (voir illustration). Les bords coupants de la lame doivent être orientés dans la direction du disque à...
- Page 57 1. Placez le plateau à viande (9) sur le boîtier du hachoir (8) de manière à ce que la partie la plus large se trouve au-dessus du boîtier de l'appareil. 2. Positionnez le bol de mixage (27) ou un autre récipient sous l'ouverture du hachoir.
- Page 58 Pour détacher le hachoir, faites tourner le boîtier de manière à faire correspondre la flèche avec le cercle, puis retirez-le. Remettez le couvercle de protection sur le port à accessoires. Instructions de sécurité : Retirez toujours les os, les nerfs, les tendons et la couenne avant de hacher la viande.
- Page 59 Mixeur 1. Positionnez le bloc moteur sur une surface plate, par exemple un comptoir de cuisine et assurez- vous qu'il ne risque pas de bouger. 2. Assurez-vous que le couvercle de protection (11) est bien présent dans le Port d'accessoires (12) 3.
-
Page 60: Instructions De Sécurité
1. Éteignez l'appareil au niveau du bouton et débranchez-le avant de changer des accessoires, avant de démonter l'appareil et après utilisation. 2. Pour détacher la carafe, faites-la tourner de manière à faire correspondre la flèche avec le cercle, puis retirez-la. 3. -
Page 61: Nettoyage
tenir le bouton pour activer le mode « P ». Capacité de la carafe 1500 mL NETTOYAGE Faites particulièrement attention aux points suivants : • Débranchez l'appareil de la prise murale et attendez que l'appareil refroidisse complètement. • N'immergez pas la section motorisée de l'appareil dans l'eau et assurez- vous qu'aucun liquide n'y pénètre. -
Page 62: Exemples D'utilisation
Exemples d'utilisation Émulsion : 2 œufs, 2 cuillers à café de vinaigre et 250 g d'huile. Sélectionnez la vitesse 5 et versez l'huile doucement par le bouchon du milieu. Mixez jusqu'à ce que la mayonnaise se forme. Carottes 400 g de carottes, une quantité appropriée d'eau Broyer des amandes 200g d'amandes. -
Page 63: Appareil Respectueux De L'environnement
APPAREIL RESPECTUEUX DE L’ENVIRONNEMENT Le symbole ci-dessus et apposé sur le produit indique que ce dernier appartient à la catégorie des équipements électriques et électroniques et ne doit donc pas être mis au rebut avec les autres déchets domestiques ou commerciaux en fin de vie utile.La directive Waste of Electrical and Electronic Equipment (WEEE) Directive (2012/19/EU) a été... - Page 64 Miscelatore di verticale PKM-1900.7BG Italiano Prima di utilizzare questo prodotto, si prega di leggere attentamente tutte le istruzioni...
- Page 65 1.Ghiera 2.Bene di tritare disco 3.Medio di tritare disco 4.Grossolano di tritare disco 5.Fresa 6.Accoppiamento silicon 7.Scorrere 8.Corpo di tritacarne 9.Vassoio di carne 10.Manomettere 11.Copertura di protettiva 12.Presa accessori 13.Braccio orientabile 14.Miscelatore di .copertura protettiva 15.Accoppiatore superiore 16.Sicuro microinterruttore 17.Pulsante di rilascio 18.Manopola di controllo velocità...
- Page 66 per ridurre il rischio di lesioni gravi alle persone o danni al frullatore. ● Lama affilata, maneggiarlo con cura. ● Per ridurre il rischio di lesioni, non posizionare mai lama o dischi di taglio sulla base. ● Saldamente bloccato in posizione prima di azionare l'apparecchiatura. ●...
- Page 67 meno che non sono più vecchi di 8 anni e monitorati. ● E cablare il prodotto su bambini sotto gli 8 anni della portata. ● Il dispositivo non può essere un timer esterno o un'operazione separata sistema di controllo remoto. ●...
-
Page 68: Posizione Di Funzionamento
Posizione di funzionamento ATTENZIONE! Solo quando l'operazione di fissaggio del dispositivo/e strumento di installazione nella posizione operativa secondo la tabella. Accessorio Articolo Posizione A seconda della necessità di impostare l'impasto gancio, mescolando gancio, agitatore. Utensile rotante Pericolo di lesioni! Quando l'apparecchio è in funzione, tenere le dita lontano dal mixer. Prima di apparecchiature tempi di inattività... - Page 69 La rotazione oraria del pulsante di rilascio della maniglia (17). E una mano sollevare il braccio rotante (13) per bloccare in posizione per click. Braccio rotante inclinazione verso l'alto. Montare il coperchio della ciotola (23) sul braccio orientabile (13) e ruotarla leggermente in senso orario, in modo che si blocca in posizione in modo sicuro.
- Page 70 1. Giù braccio rotante scatta in posizione. Il coperchio (23) deve essere strettamente allineata con il mixer (27), oppure non è installato correttamente. È ora possibile utilizzare il dispositivo. 2. Collegare il cavo di alimentazione alla presa di corrente e aprirlo. La manopola di controllo della velocità...
- Page 71 Tritacarne. 1. Il dispositivo è posizionato su una superficie piana, come un contatore di cucina, e assicurarsi che ferma. 2. Copertura di protezione (11) alla slitta accessori (12). 3. Posizionare il coperchio di protezione frullatore (14) nel braccio orientabile (13). (Vedi figura) 1.
- Page 72 1. Montare il rotolo (7) nel corpo della macinaia (8) con il sottile filo metallico verso l'esterno e premere saldamente in posizione. 2. Montare lo spianatore per pasta (34) e il contenitore di salsiccia (35) sul collegamento a scorrimento (vedere l'illustrazione). Toglietelo in modo che i due indentazioni siano allineati con i perni sul corpo della macinaia.
- Page 73 1. Collegare il cavo di alimentazione alla presa di corrente principale e lo accende. 2. Ruotare la manopola di controllo della velocità di velocità1 (o qualsiasi impostazione di velocità) sarà ora illuminato spia sul pannello di controllo. 3. Tagliare la carne in pezzi più piccoli, in modo che i pezzi si incastrano nel tubo di alimentazione.
- Page 74 Reinstallare il coperchio di protezione sulla slitta accessori. Codice di sicurezza: Cancella le ossa, criniera, tendini, e macinare la carne prima. Alimenti congelati devono essere completamente scongelati prima della macinazione. Solo tritacarne per macinare la carne. Evitare cibi pasta abrasiva come ad esempio: gli alimenti contenenti briciole di pane, in quanto ciò...
- Page 75 1. Posizionare il prodotto alimentare che si desidera elaborare nel barattolo (31). 2. Mettere il coperchio frullatore (30) nel barattolo e assicurarsi che copre bene. 3. Posizionare il tappo centrale (29) nel foro del coperchio frullatore. 1. La bottiglia è stata collocata nella camera di montaggio del motore, in modo che la freccia è...
- Page 76 Codice di sicurezza: 1. Per ottenere i migliori risultati nella produzione di contenuto solido, una piccola porzione di uno a uno nel serbatoio, indecenti volta posizionato troppo. 2. Se si elaborano ingredienti solidi, prima tagliato in piccoli pezzi (2-3 cm). 3.
- Page 77 • Il dispositivo a parte e pulire tutti allegato separato. Tritacarne, e altre parti del corpo possono essere lavate in acqua tiepida e sapone o la lavastoviglie. Per assicurarsi che nessun membro è saldamente fissato nella lavastoviglie, in quanto ciò potrebbe cambiare la sua forma. •...
- Page 78 Battito di crema 600g crema con la FRUSTA PIATTA nella CIOTOLA a velocità 4. Impastare di pasta 1000g farina 200g mandorle tritate 15g sale 28g burro 28g zucchero Circa 500g acqua (Temperatura 40 +/- 5 ℃.) Dati di technici Tensione di alimentazione: 220-240 V ~ 50Hz Ingresso di alimentazione: 1300W Smaltimento di apparecchiature e batterie Il simbolo sopra e sul prodotto indica che è...
- Page 79 PKM-1900.7BG...
- Page 92 1300...