Télécharger Imprimer la page

Publicité

Les langues disponibles
  • FR

Les langues disponibles

  • FRANÇAIS, page 82

Liens rapides

All manuals and user guides at all-guides.com
• FCXP676
OVENS
USER INSTRUCTIONS
FORNI
ISTRUZIONI PER L'USO
HORNOS EMPOTRABLES
INSTRUCCIONES DE USO
PIEKARNIKI DO ZABUDOWY
INSTRUKJA OBSŁUGI
TROUBY
NÁVOD K OBSLUZE
ДУХОВКИ
РУКОВОДСТВО ПОЛЬЗОВАТЕЛЯ
PEČICE
NAVODILA ZA UPORABO
BACKOFEN
BEDIENUNGSANLEITUNG
DESFOURSENCASTRABLES
NOTICE D'EMPLOI ET D'INSTALLATION
OVEN
GEBRUIKSAANWIJZING
ANKASTRE FIRIN
KULLANIM KILAVUZU
PEĆNICE
KORIŠTENJE PRIRUČNIK
Candy Hoover Group S.R.L. • Via Comolli 16 • 20861 Brugherio (MB) Italy
02
EN
12
IT
22
ES
32
PL
42
CZ
52
RU
62
SL
72
DE
82
FR
92
NL
TR
102
113
102
HR

Publicité

loading

Sommaire des Matières pour Candy FCXP676

  • Page 1 TROUBY NÁVOD K OBSLUZE ДУХОВКИ РУКОВОДСТВО ПОЛЬЗОВАТЕЛЯ PEČICE NAVODILA ZA UPORABO BACKOFEN BEDIENUNGSANLEITUNG DESFOURSENCASTRABLES NOTICE D'EMPLOI ET D'INSTALLATION OVEN GEBRUIKSAANWIJZING ANKASTRE FIRIN KULLANIM KILAVUZU PEĆNICE KORIŠTENJE PRIRUČNIK Candy Hoover Group S.R.L. • Via Comolli 16 • 20861 Brugherio (MB) Italy...
  • Page 2 All manuals and user guides at all-guides.com Safety Indications • During cooking, moisture may condense inside colour. This operation should be carried out by a the oven cavity or on the glass of the door. This is suitably qualified professional. ln case of a normal condition.
  • Page 3 All manuals and user guides at all-guides.com frequencies. • .WARNING: before initiating the automatic cleaning cycle: - Clean the oven door; - Remove large or coarse food residues from the inside of the oven using a damp sponge. Do not use detergents;...
  • Page 4 All manuals and user guides at all-guides.com Summary General Instructions 1.1 Safety indications 1.2 Electrical safety 1.3 Recommendations 1.4 Installation 1.5 Waste management 1.6 Conformity declaration 2.1 Overview Product Description 2.2 Accessories 2.3 First use Use of the Oven 3.1 Display description 3.2 Cooking modes Oven Cleaning and Maintenance 4.1 General notes on cleaning...
  • Page 5 All manuals and user guides at all-guides.com 1. General Instructions We thank you for choosing one of our products. For the best results with your oven, you should read this manual carefully and retain it for future reference. Before installing the oven, take note of the serial number so that you can give it to customer service staff if any repairs are required.
  • Page 6 All manuals and user guides at all-guides.com 2. Product Description 2.1 Overview 1. Control panel 2. Shelf positions (lateral wire grid if included) 3. Metal grill 4. Drip pan 5. Fan (behind the steel plate) 6. Oven door 2.2 Accessories Drip pan Rotisserie No pre-heating is required for rotisserie cooking.
  • Page 7 All manuals and user guides at all-guides.com 3. Use of the Oven 3.1 Display description 1. Minute minder WARNING : the first operation to carry out after the oven has 2. Clock setting been installed or following the interruption of power supply 3.
  • Page 8 All manuals and user guides at all-guides.com 3.2 Cooking Modes T °C T °C range default LAMP: Turns on the oven light. DEFROST: When the dial is set to this position. The fan circulates air at room temperature around the frozen food so that it defrosts in a few minutes without the protein content of the food being changed or altered.
  • Page 9 All manuals and user guides at all-guides.com 4. Oven cleaning and maintenance 4.1 General notes on cleaning The lifecycle of the appliance can be extended through regular cleaning. Wait for the oven to cool before carrying out manual cleaning operations. Never use abrasive detergents, steel wool or sharp objects for cleaning, so as to not irreparably damage the enamelled parts. Use only water, soap or bleach-based detergents (ammonia).
  • Page 10 All manuals and user guides at all-guides.com REMOVAL AND CLEANING OF THE GLASS DOOR 1. Open the oven door. 2.3.4. Lock the hinges, remove the screws and remove the upper metal cover by pulling it upwards. 5.6. Remove the glass, carefully extracting it from the oven door (NB: in pyrolytic ovens, also remove the second and third glass (if present)). 7.
  • Page 11 All manuals and user guides at all-guides.com CHANGING THE BULB 1. Disconnect the oven from the mains supply. 2. Undo the glass cover, unscrew the bulb and replace it with a new bulb of the same type. 3. Once the defective bulb is replaced, replace the glass cover. 5.
  • Page 12 All manuals and user guides at all-guides.com Indicazioni di Sicurezza • Durante la cottura, l'umidità può condensarsi • Collegare al cavo di alimentazione una spina all'interno del vano cottura o sul vetro della porta. dimensionata per la tensione, la corrente e la Questa è...
  • Page 13 All manuals and user guides at all-guides.com • Quando si posiziona uno scaffale all’interno, accertarsi che il blocco sia rivolto verso l’alto e nella parte posteriore della guida. Lo scaffale deve essere inserito completamente nella guida • AVVERTENZA: Non rivestire le pareti del forno con fogli di alluminio o protezioni monouso disponibili nei negozi.
  • Page 14 All manuals and user guides at all-guides.com Sommario Avvertenze Generali 1.1 Suggerimenti sulla sicurezza 1.2 Sicurezza elettrica 1.3 Raccomandazioni 1.4 Installazione 1.5 Gestione dei rifiuti 1.6 Dichiarazione di conformità Descrizione del Prodotto 2.1 Panoramica 2.2 Accessori 2.3 Primo utilizzo Utilizzo del Forno 3.1 Descrizione del display 3.2 Modalità...
  • Page 15 All manuals and user guides at all-guides.com 1. Avvertenze Generali Vi ringraziamo per aver scelto uno dei nostri prodotti. Per utilizzare il forno in modo ottimale è consigliabile leggere con attenzione questo manuale e conservarlo con cura per ogni ulteriore consultazione. Prima di installare il forno, prendere nota del numero di serie in modo da poterlo comunicare al personale del servizio di assistenza in caso di richiesta di intervento.
  • Page 16 All manuals and user guides at all-guides.com 2. Descrizione del Prodotto 2.1 Panoramica 1. Pannello di controllo 2. Posizioni ripiani (castelletto se previsto) 3. Griglia metallica 4. Leccarda 5. Ventola (dietro alla piastra di acciaio) 6. Porta forno 2.2 Accessories Leccarda Funzione girarrosto Per arrostire non è...
  • Page 17 All manuals and user guides at all-guides.com 3. Utilizzo del Forno 3.1 Descrizione del display ATTENZIONE: la prima operazione da eseguire dopo 1- Timer contaminuti l’installazione o dopo una interruzione di corrente (tali 2- Regolazione dell'ora situazioni si riconoscono perchè sul dispay lampeggia l’ora 12:00 ) è...
  • Page 18 All manuals and user guides at all-guides.com 3.2 Modalità di cottura T °C Manopola Intervallo Funzione (a seconda del modello) predefinito commutatore di T° LAMPADA: accende la luce interna. SCONGELAMENTO: questa posizione permette di far circolare l’aria a temperatura ambiente intorno al cibo surgelato facendolo così...
  • Page 19 All manuals and user guides at all-guides.com 4. Pulizia e manutenzione del forno 4.1 Note generiche di pulizia La vita di servizio dell’apparecchio si allunga se questo viene pulito ad intervalli regolari. Attendere che il forno si raffreddi prima di effettuare le operazioni di pulizia manuali.
  • Page 20 All manuals and user guides at all-guides.com RIMOZIONE E PULIZIA DELLA PORTA IN VETRO 1. Aprile la porta del forno. 2.3.4. Bloccare le cerniere, rimuovere le viti e rimuovere la copertura metallica superiore tirandola verso l’alto. 5.6. Rimuovere il vetro, estraendolo con molta cura, dalla controporta del forno (NB: nei forni pirolitici, rimuovere anche il secondo e terzo vetro (se presente)).
  • Page 21 All manuals and user guides at all-guides.com SOSTITUZIONE DELLA LAMPADINA 1. Scollegare il forno alla rete. 2. Allentare la copertura in vetro, svitare la lampadina e sostituirla con una nuova dello stesso modello. 3. Una volta sostituita la lampadina difettosa, riavvitare la copertura in vetro. 5.
  • Page 22 All manuals and user guides at all-guides.com Indicaciones de seguridad • Durante la cocción, podría condensarse • Conecte un enchufe en el cable que transporta humedad dentro de la cavidad del horno o en el la tensión, la corriente y la carga indicadas en la cristal de la puerta.
  • Page 23 All manuals and user guides at all-guides.com de dirigir el tope hacia arriba en la parte trasera de la cavidad. La bandeja debe introducirse por completo en la cavidad • ATENCIÓN: No forre las paredes del horno con aluminio u otras protecciones comercializadas. El aluminio o los protectores podrían derretirse al entrar en contacto directo con el esmalte caliente y deteriorar el esmalte del interior.
  • Page 24 All manuals and user guides at all-guides.com Resumen Advertencias generales 1.1 Recomendaciones de seguridad 1.2 Seguridad eléctrica 1.3 Recomendaciones 1.4 Instalación 1.5 Gestión de residuos 1.6 Declaración de conformidad Descripción del producto 2.1 Descripción general 2.2 Accesorios 2.3 Primer uso Utilización del horno 3.1 Descripción de la pantalla 3.2 Modalidades de cocción...
  • Page 25 All manuals and user guides at all-guides.com 1. Advertencias Generales Le agradecemos que haya elegido uno de nuestros productos. Para utilizar el horno de forma óptima es aconsejable leer con atención este manual y conservarlo para poder consultarlo en el futuro.
  • Page 26 All manuals and user guides at all-guides.com 2. Descripción del producto 2.1 Descripción general 1. Panel de control 2. Posiciones de las bandejas (y del soporte elevado si corresponde) 3. Rejilla metálica 4. Bandeja 5. Ventilador (detrás de la placa de acero) 6.
  • Page 27 All manuals and user guides at all-guides.com 3. Uso del horno 3.1 Descripción de la pantalla ATENCIÓN: la primera operación que hay que efectuar 1- Temporizador después de la instalación o después de una interrupción de 2- Configuración del reloj la corriente (este tipo de situaciones se reconocen al 3- Tiempo de cocción observar que en la pantalla de visualización parpadea la hora...
  • Page 28 All manuals and user guides at all-guides.com 3.2 Modalidades de cocción Defecto Mando Rango FUNCIÓN (dependiendo del modelo) T°C selector de T°C LAMPARA: Conecta la luz interior DESCONGELACIÓN: Funcionamiento de la turbina de cocción que hace circular el aire dentro del espacio del horno.
  • Page 29 All manuals and user guides at all-guides.com 4. Limpieza y mantenimiento del horno 4.1 Notas genéricas de limpieza La vida útil del aparato se prolonga si se limpia a intervalos regulares. Espere a que el horno se enfríe antes de llevar a cabo las operaciones de limpieza manuales.
  • Page 30 All manuals and user guides at all-guides.com EXTRACCIÓN Y LIMPIEZA DE LA PUERTA DE VIDRIO 1. Abra la puerta del horno. 2.3.4. Bloquee las bisagras, desenrosque los tornillos y extraiga la cubierta metálica superior tirando hacia arriba. 5.6. Extraiga el vidrio con mucho cuidado de la contrapuerta del horno (N. B.: si se trata de un horno pirolítico, extraiga también el segundo y el tercer vidrio si los hubiera).
  • Page 31 All manuals and user guides at all-guides.com SUSTITUCIÓN DE LA BOMBILLA 1. Desenchufe el horno de la red eléctrica. 2. Suelte la cubierta de vidrio, desenrosque la bombilla y sustitúyala por una nueva del mismo modelo. 3. Una vez sustituida la bombilla defectuosa, vuelva a atornillar la cubierta de vidrio. 5.
  • Page 32 All manuals and user guides at all-guides.com Instrukcje Bezpieczeństwa • Podczas gotowania wilgoć może skraplać się • Do czyszczenia nie używać myjki parowej. do komory piekarnika lub na szybkę drzwiczek. • Podłączyć wtyczkę do kabla zasilającego Jest to zjawisko normalne. Aby je ograniczyć, odpowiedniego do wymaganego napięcia, prądu należy poczekać...
  • Page 33 All manuals and user guides at all-guides.com • Aby uniknąć przegrzewania się, urządzenia tego nie należy instalować za panelem dekoracyjnym. • W razie umieszczania we wnętrzu półki należy się upewnić, że ogranicznik jest skierowany w górę i w stronę tylną komory. Półka musi być włożona całkowicie do komory.
  • Page 34 All manuals and user guides at all-guides.com Spis treści Instrukcje ogólne 1.1 Wskazówki dotyczące bezpieczeństwa 1.2 Bezpieczeństwo elektryczne 1.3 Zalecenia 1.4 Instalacja 1.5 Zarządzanie odpadami 1.6 Deklaracja zgodności 2.1 Informacje ogólne Opis produktu 2.2 Akcesoria 2.3 Pierwsze użycie Obsługa piekarnika 3.1 Opis wyświetlacza 3.2 Tryby pieczenia Czyszczenie i konserwacja piekarnika...
  • Page 35 All manuals and user guides at all-guides.com 1. Wskazówki Ogólne W celu pełnego wykorzystania możliwości piekarnika dokładnie zapoznaj się z niniejszą instrukcją. Przechowuj instrukcję w dostępnym miejscu, aby w razie potrzeby zawsze można było skorzystać z zawartych w niej wskazówek. Przed zainstalowaniem piekarnika spisz jego numer seryjny na wypadek konieczności skorzystania z pomocy serwisu.
  • Page 36 All manuals and user guides at all-guides.com 2. Opis produktu 2.1 Informacje ogólne 1. Panel sterowania 2. Pozycje półek (kratka boczna, zależnie od wyposażenia) 3. Metalowy ruszt 4. Taca na tłuszcz 5. Wentylator (za stalową płytą) 6. Drzwiczki piekarnika 2.2 Akcesoria (w zależności od modelu) Taca na tłuszcz Rożen (w zależnoścı...
  • Page 37 All manuals and user guides at all-guides.com 3. Obsługa piekarnika 3.1 Opis wyświetlacza (w pełni dotykowy, piekarnik dwukomorowy) UWAGA Pierwszą czynnością po zainstalowaniu piekarnika lub po przerwie w 1. Minutnik dopływie prądu jest ustawienia zegara. (brak ustawienia jest 2. Ustawianie zegara sygnalizowany znakiem 12:00 na wyświetlaczu) Aby ustawić...
  • Page 38 All manuals and user guides at all-guides.com 3.2 Tryby pieczenia T °C ustaw. T°C oraz zakres ustawienie model z program model z elektron. termostatem (Type A) LAMPA ROZMRAŻANIE STATYCZNY 50 ÷ 280 WIELOPOZIOMOWO 50 ÷ 240 50 ÷ 240 GRZANIE DOLNE + TERMOOBIEG 50 ÷...
  • Page 39 All manuals and user guides at all-guides.com 4. Czyszczenie i konserwacja piekarnika 4.1 Ogólne informacje dotyczące czyszczenia Żywotność urządzenia będzie dłuższa, jeśli będzie ono regularnie czyszczone. Należy poczekać na ochłodzenie się piekarnika przed wykonaniem czyszczenia ręcznego. Nie używać nigdy do czyszczenia ściernych detergentów, myjek drucianych lub ostrych przedmiotów, aby nie uszkodzić...
  • Page 40 All manuals and user guides at all-guides.com WYJMOWANIE I CZYSZCZENIE SZYBY DRZWICZEK 1.Otworzyć drzwiczki piekarnika. 2.3.4. Zablokować zawiasy, wyjąć śruby i metalową górną pokrywę, ciągnąc ją do góry. 5.6. Wyjąć szybę, wysuwając ją bardzo ostrożnie z drzwiczek piekarnika (UWAGA: w piekarnikach z funkcją czyszczenia pyrolitycznego należy wyjąć...
  • Page 41 All manuals and user guides at all-guides.com WYMIANA ŻARÓWKI 1. Odłączyć piekarnik od zasilania. 2. Odłączyć pokrywę szklaną, odkręcić żarówkę i wymienić ją na nową tego samego typu. 3. Po wymienieniu przepalonej żarówki włożyć na miejsce szklaną pokrywę. 5. Rozwiązywanie problemów 5.1 Często zadawane pytania PROBLEM MOŻLIWA PRZYCZYNA...
  • Page 42 All manuals and user guides at all-guides.com Bezpečnostní pokyny • Během vaření může v dutině trouby nebo na podle pokynů. skle dvířek docházet ke kondenzaci vlhkosti. • Používejte pouze sondu na maso Jedná se o normální stav. Chcete-li tento doporučenou pro tuto troubu. efekt omezit, počkejte po zapnutí...
  • Page 43 All manuals and user guides at all-guides.com obraťte na zákaznický servis. • Spotřebič nesmí být instalován za ozdobnými dvířky, aby nedocházelo k přehřátí. • Když dovnitř umístíte polici, ujistěte se, že zarážka směřuje nahoru a dozadu do dutiny. Police musí být zcela zasunuta do dutiny. •...
  • Page 44 All manuals and user guides at all-guides.com Shrnutí Obecné pokyny 1.1 Bezpečnostní pokyny 1.2 Elektrická bezpečnost 1.3 Doporučení 1.4 Instalace 1.5 Odpadové hospodářství 1.6 Prohlášení o shodě Popis výrobku 2.1 Přehled 2.2 Příslušenství 2.3 První použití Použití trouby 3.1 Popis displeje 3.2 Režimy vaření...
  • Page 45 All manuals and user guides at all-guides.com 1. Obecné pokyny Děkujeme Vám, že jste si zvolili jeden z našich výrobků. Pro dosažení nejlepších výsledků s troubou byste si měli pečlivě přečíst tento návod a uschovat jej pro budoucí použití. Před instalací...
  • Page 46 All manuals and user guides at all-guides.com 2. Popis výrobku 2.1 Přehled 1. Ovládací panel 2. Polohy polic (podélný drátěný rošt, je-li součástí dodávky) 3. Kovový rošt 4. Odkapávací plech 5. Ventilátor (za ocelovou deskou) 6. Dvířka trouby 2.2 Příslušenství Rožeň...
  • Page 47 All manuals and user guides at all-guides.com 3. Použití trouby 3.1 Popis displeje VAROVÁNÍ: první operace lze provádět když trouba byla 1- Doba pečení nainstalována nebo po přerušení napájení (když je displej pulzující – bliká a ukazuje 12:00) je nastavení funkce správného času. Toho je 2- Nastavení...
  • Page 48 All manuals and user guides at all-guides.com 3.2 Režimy vaření Volič T °C T °C Funkce (Závisí na modelu trouby) funkc ozmezí výchozí SVĚTLO: Zapne světlo v troubě. ROZMRAZOVÁNÍ: Je-li volič nastaven do této polohy. Ventilátor dmýchá vzduch o pokojové teplotě...
  • Page 49 All manuals and user guides at all-guides.com 4. Čištění a údržba trouby 4.1 Obecné poznámky k čištění Životnost spotřebiče můžete prodloužit prostřednictvím pravidelného čištění. Před prováděním ručního čištění počkejte, až trouba vychladne. Nikdy nepoužívejte při čištění brusné mycí prostředky, drátěnku nebo ostré předměty. Předejdete tak neopravitelnému poškození...
  • Page 50 All manuals and user guides at all-guides.com DEMONTÁŽ A ČIŠTĚNÍ SKLENĚNÝCH DVÍŘEK 1. Otevřete dvířka trouby. 2.3.4. Zajistěte závěsy, vyšroubujte šrouby a demontujte horní kovový kryt vytažením směrem nahoru. 5.6. Vyjměte opatrně sklo ze dvířek trouby (Pozn: u pyrolytických trub vyjměte také druhé a třetí sklo (jsou-li osazena)). 7.
  • Page 51 All manuals and user guides at all-guides.com VÝMĚNA ŽÁROVKY 1. Odpojte troubu od síťového přívodu. 2. Sejměte skleněný kryt, vyšroubujte žárovku a vyměňte ji za novou žárovku stejného typu. 3. Jakmile je vadná žárovka vyměněna, vraťte zpět skleněný kryt. 5. Řešení potíží 5.1 Často Kladené...
  • Page 52 скребки, поскольку они могут поцарапать All manuals and user guides at all-guides.com поверхность и вызвать повреждение стекла. Правила Техники Безопасности • Перед извлечением съемных деталей • Во время приготовления пищи внутри духовку необходимо выключить. После духового шкафа или на стекле дверцы может очистки...
  • Page 53 All manuals and user guides at all-guides.com является основанием для аннулирования гарантии. • Перед очисткой необходимо удалить все излишки разлитого материала. • Длительное отключение питания во время выполнения программы приготовления может привести к неисправности монитора. В этом случае обратитесь в отдел сервисного обслуживания...
  • Page 54 All manuals and user guides at all-guides.com Заключение Общие инструкции 1.1 Указания по безопасности 1.2 Электрическая безопасность 1.3 Рекомендации 1.4 Установка 1.5 Утилизация отходов 1.6 Декларация соответствия 2.1 Общий обзор Описание изделия 2.2 Дополнительные принадлежности 2.3 Первое использование Использование печи Использование...
  • Page 55 All manuals and user guides at all-guides.com 1. Общие Меры Предосторожности Чтобы добиться наилучших результатов при эксплуатации духовки, внимательно прочтите это руководство. Рекомендуется сохранить данное руководство по установке и эксплуатации и обращаться к нему по мере необходимости. В случае обращения за помощью в сервисный центр сообщите серийной номер духовки, указанный...
  • Page 56 All manuals and user guides at all-guides.com 2. Описание изделия 2.1 Общий обзор 1. Панель управления 2. Расположение решеток - направляющих (поперечная проволочная решетка, если входит в комплект) 3. Металлическая решетка для гриля 4. Поддон для стекания капель 5. Вентилятор (за стальной пластиной) 6.
  • Page 57 All manuals and user guides at all-guides.com 3. Использование печи 3.1 Описание дисплея ПРЕДУПРЕЖДЕНИЕ: установка времени производится впервые после 1. Таймер/автоматический режим установки духовки или после отк лючения элек тричества 2. Работа вентилятора (необходимость в этом будет отображена в виде пульсирующего 3.
  • Page 58 All manuals and user guides at all-guides.com 3.2 Режимы приготовления T °C станд. ЛАМПА: Включает подсветку в камере. РАЗМОРОЗКА: При установке рукоятки в данное положение. Вентилятор гоняет воздух с окружающей температурой в камере. Такой режим разморозки позволяет минимизировать изменение свойств продуктов при размораживании. ТРАДИЦИОННАЯ...
  • Page 59 All manuals and user guides at all-guides.com 4. Очистка и уход за печью 4.1 Общие замечания по очистке Жизненный цикл прибора можно увеличить, если регулярно следить за его чистотой. Перед началом очистки печи вручную подождите, пока она остынет. Никогда не используйте для очистки абразивные растворители, металлические щетки или острые предметы, поскольку это приведет к невосстановимому...
  • Page 60 All manuals and user guides at all-guides.com СНЯТИЕ И ОЧИСТКА СТЕКЛЯННОЙ ДВЕРЦЫ 1. Откройте дверцу печи. 2.3.4. Заблокируйте шарниры, удалите винты и снимите верхнюю металлическую крышку, потянув ее вверх. 5.6. Удалите стекло, аккуратно вынув его из дверцы печи (Внимание: в пиролитических печах, также удалите второе и третье стекло (при их наличии)).
  • Page 61 All manuals and user guides at all-guides.com ЗАМЕНА ЛАМПОЧКИ 1. Отключите печь от источника питания. 2. Снимите защитное стекло, вывинтите лампочку и замените ее на новую лампочку того же типа. 3. После замены неисправной лампочки, установите на место защитное стекло. 5.
  • Page 62 All manuals and user guides at all-guides.com Varnostna Navodila • Med kuhanjem lahko vlaga kondenzira • Za čiščenje ne uporabljajte parnega znotraj odprtine pečice ali na steklu vrat. To je čistilnika. normalno stanje. Za zmanjšanje tega učinka • Vtikač napajalnega kabla priklopite v počakajte 10–15 minut po vklopu napajanja, vtičnico, ki izpolnjuje zahteve glede napetosti, preden hrano vstavite v pečico.
  • Page 63 All manuals and user guides at all-guides.com • Naprave ni dovoljeno namestiti za dekorativnimi vrati, sicer lahko pride do pregrevanja. • Pri vstavljanju polic se prepričajte, da je zaustavljalnik na zadnji strani in obrnjen navzgor. Polico morate vstaviti do konca •...
  • Page 64 All manuals and user guides at all-guides.com Povzetek Splošna navodila 1.1 Varnostna navodila 1.2 Električna varnost 1.3 Priporočila 1.4 Namestitev 1.5 Upravljanje z odpadki 1.6 Izjava o skladnosti 2.1 Pregled Opis izdelka 2.2 Dodatna oprema 2.3 Prva uporaba Uporaba pečice 3.1 Opis prikazovalnika 3.2 Načini kuhanja Čiščenje in vzdrževanje pečice...
  • Page 65 All manuals and user guides at all-guides.com 1. Splošna Opozorila Pozorno preberite navodila, da boste lahko izrabili vse možnosti, ki vam jih ponuja pečica. Priporočamo, da navodila za priključitev in uporabo shranite. Pred vgradnjo pečice si zapišite serijsko številko, saj jo boste potrebovali, ko boste potrebovali pomoč pooblaščenega servisa. Ko dobite svojo novo pečico, se najprej prepričajte, da med transportom ni prišlo do poškodb.
  • Page 66 All manuals and user guides at all-guides.com 2. Opis izdelka 2.1 Pregled 1. Krmilna plošča 2. Položaji police (prečna žična rešetka, če je priložena) 3. Kovinska rešetka 4. Ponev 5. Ventilator (za jekleno ploščo) 6. Vrata pečice 2.2 Dodatna oprema (odvisno od modela) Raženj Ponev Pri peki na ražnju predgrevanje pečice ni potrebno.
  • Page 67 All manuals and user guides at all-guides.com 3. Uporaba pečice 3.1 Opis zaslona (na dotik, dvojni predel) OPOZORILO:ko je pečica vgrajena in priklopljena na električno omrežje, oziroma po vsakem izpadu električne energije (na to vas opozori utripanje vrednosti 12:00 1. Odštevalna ura na prikazovalniku) morate nastaviti točen čas.
  • Page 68 All manuals and user guides at all-guides.com 3.2 Načini pečenja T °C Gumb Funkcije Funkcije privzeto termost. SVETILKA: Za prižiganje luči v pečici Samodejno se aktivira tudi ventilator za hlajenje (modeli z ventilatorjem) ODTALJEVANJE: Okoli živila kroži zrak sobne temperature; tako se živilo hitro odtali z ohranjanjem vseh lastnosti živila.
  • Page 69 All manuals and user guides at all-guides.com 4. Čiščenje in vzdrževanje pečice 4.1 Splošni napotki za čiščenje Življenjski cikel aparata se lahko podaljša z rednim čiščenjem. Pred izvajanjem čiščenja počakajte, da se pečica ohladi. Za čiščenje nikoli ne uporabljajte abrazivnih čistil, jeklene volne ali ostrih predmetov, saj lahko nepopravljivo poškodujete emajlirane dele. Uporabljajte samo vodo, mila ali detergente na osnovi belila (amoniak).
  • Page 70 All manuals and user guides at all-guides.com ODSTRANITEV IN ČIŠČENJE STEKLENIH VRAT 1. Odprite vrata pečice. 2.3.4. Zapahnite tečaje, odstranite vijake in odstranite zgornji kovinski pokrov tako, da ga povlečete navzgor. 5.6. Odstranite steklo, pazljivo ga povlecite iz vrat pečice (opomba: v pirolitičnih pečicah odstranite tudi drugo in tretje steklo (če je nameščeno)).
  • Page 71 All manuals and user guides at all-guides.com ZAMENJAVA ŽARNICE 1. Pečico izključite iz napajanja. 2. Odvijte stekleni pokrov, odvijte žarnico in jo nadomestite z novo žarnico istega tipa. 3. Ko ste pokvarjeno žarnico zamenjali, znova namestite stekleni pokrov. 5. Odpravljanje težav 5.1 Pogosto zastavljena vprašanja TEŽAVA MOŽNI VZROK...
  • Page 72 All manuals and user guides at all-guides.com Sicherheitshinweise • Während des Garvorgangs kann Feuchtigkeit • Schließen Sie einen Stecker an das Stromkabel im Ofenraum oder auf dem Glas der Tür an, der für die auf dem Typenschild angegebenen kondensieren. Dies ist ein normaler Zustand. Spannungs-, Strom- und Belastungswerte Um diesen Effekt zu verringern, warten Sie 10-15 geeignet ist und einen Schutzkontakt hat.
  • Page 73 All manuals and user guides at all-guides.com achten Sie darauf, dass der Anschlag nach oben und in die Rückseite des Hohlraums gerichtet ist. Der Einlegeboden muss vollständig in den Hohlraum eingesetzt werden • WARNUNG: Decken Sie die Backofenwände nicht mit Aluminiumfolie oder anderem Einwegschutz ab, der in direkten Kontakt mit der heißen Emaille kommt.
  • Page 74 All manuals and user guides at all-guides.com Zusammenfassung Allgemeine Anweisungen 1.1 Sicherheitshinweise 1.2 Elektrische Sicherheit 1.3 Empfehlungen 1.4 Installation 1.5 Abfallentsorgung 1.6 Konformitätserklärung 2.1 Übersicht Produktbeschreibung 2.2 Zubehör 2.3 Inbetriebnahme Betrieb des Backofens 3.1 Beschreibung der Anzeige 3.2 Funktionen zum Garen 4.1 Allgemeine Reinigungshinweise Reinigung und Wartung des 4.2 Aquactiva Funktion...
  • Page 75 All manuals and user guides at all-guides.com 1. Allgemeine Anweisungen Vielen Dank, dass Sie sich für eins unserer Produkte entschieden haben. Damit Sie lange Freude mit Ihrem Backofen haben, sollten Sie diese Bedienungsanleitung sorgfältig durchlesen und zum Nachschlagen in der Zukunft aufbewahren. Notieren Sie sich vor dem Anschließen des Backofens die Seriennummer, sodass Sie diese im Reparaturfall an den Kundendienst weitergeben können.
  • Page 76 All manuals and user guides at all-guides.com 2. Produktbeschreibung 2.1 Übersicht 1. Bedienfeld 2. Führungsschienen (seitlicher Metallrost, falls enthalten) 3. Backrost 4. Fettpfanne/Backblech 5. Lüfter (hinter der Stahlabdeckung) 6. Backofentür 2.2 Zubehör Fettpfanne/Backblech Grillspieß (Modellabhängig) Für das Benutzen des Grillspießes, ist das Vorheizen nicht notwendig.
  • Page 77 All manuals and user guides at all-guides.com 3. Betrieb des Backofens 3.1 Beschreibung der Anzeige HINWEIS: Das erste, was nach der Installation des Ofens 1- Timer oder nach der Unterbrechung der Stromversorgung (die am 2- Uhr einstellen blinkenden Display mir der Anzeige 12:00 zu erkennen ist) 3- Garzeit gemacht werden muss, ist die Einstellung der korrekten 4- Ende der garzeit...
  • Page 78 All manuals and user guides at all-guides.com 3.2 Touch timer Funktion T °C T °C Funktion (je nach Backofenmodell) Bereich Standard LAMPE: Schaltet das Licht im Backofen an. AUFTAUEN: Wenn die Auswahl auf diese Funktion eingestellt wird. Der Ventilator wälzt die Luft bei Raumtemperatur um, sodass das Tiefkühlprodukt innerhalb weniger Minuten aufgetaut wird, ohne dass sein Eiweißgehalt sich ändert.
  • Page 79 All manuals and user guides at all-guides.com 4.2 Aquactiva Funktion Mit der Aquactiva Funktion wird Dampf im Inneren des Backofens erzeugt um die restlichen Fett- und Speisereste aus dem Backofen zu entfernen. 1. Gießen Sie 300 ml Wasser in den Behälter Aquactiva am Boden des Ofens ein. 2.
  • Page 80 All manuals and user guides at all-guides.com ENTFERNEN UND REINIGEN DER GLASTÜR 1. Die Backofentür öffnen. 2.3.4. Scharniere sperren, Schrauben entfernen und die obere Metallkappe nach oben abziehen. 5.6. Die Glasscheibe vorsichtig aus der Ofentür ziehen (Hinweis: Bei Backöfen mit Pyrolyse-Reinigungsfunktion auch die zweite (falls vorhanden) und dritte Scheibe herausnehmen).
  • Page 81 All manuals and user guides at all-guides.com WECHSELN DER GLÜHBIRNE 1. Den Backofen von der Stromversorgung trennen. 2. Glasabdeckung abnehmen, Glühbirne herausschrauben und durch eine neue vom selben Typ ersetzen. 3. Nach dem Austausch der kaputten Glühbirne die Glasabdeckung wieder aufsetzen. 5.
  • Page 82 All manuals and user guides at all-guides.com Conseils De Securite • Pendant la cuisson, de l’humidité peut se de courant qui supporte le voltage (le courant et la condenser à l’intérieur de la cavité ou sur la vitre charge sont indiqués sur l’étiquette) et vérifiez la de la porte.
  • Page 83 All manuals and user guides at all-guides.com cavité. La grille doit être complètement insérée dans la cavité. • AVERTISSEMENT : Ne recouvrez pas les parois du four avec du papier aluminium ou une protection jetable disponible dans les magasins. Le papier d’aluminium ou toute autre protection, en contact direct avec l’émail chaud, risque de fondre et de détériorer l’émail de la cavité...
  • Page 84 All manuals and user guides at all-guides.com SOMMAIRE Instructions Générales 1.1 Indications de sécurité 1.2 Sécurité électrique 1.3 Recommandations 1.4 Installation 1.5 La gestion des déchets et la protection de l'environnement 1.6 Déclaration de conformité Description du produit 2.1 Vue d'ensemble 2.2 Accessoires 2.3 Première utilisation Utilisation du Four...
  • Page 85 All manuals and user guides at all-guides.com 1. Instructions générales Nous vous remercions d'avoir choisi un de nos produits. Pour obtenir les meilleurs résultats avec votre four, vous devez lire attentivement ce manuel et le conserver pour toute consultation ultérieure. Avant d'installer le four, notez le numéro de série, il vous sera demandé...
  • Page 86 
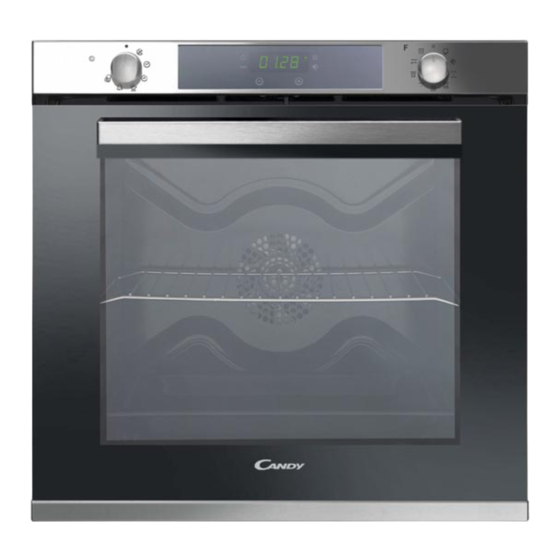
All manuals and user guides at all-guides.com 2. Description du produit 2.1. Vue d'ensemble 1. Panneau de commande 2. Positions des gradins (gradins fils si inclus) 3. Grille métalique 4. Léchefrite 5. Ventilateur (derrière la plaque d'acier) 6. Porte du four 2.2.
  • Page 87 All manuals and user guides at all-guides.com 3. Utilisation du Four 3.1 Description de l'affichage ATTENTION: la première opération à exécuter après l'installation 1- Minuteur ou après une coupure de courant (de telles situations se 2- Reglage de l'heure reconnaissent parce que le atticheur est sur 12:00 et clignote)est 3- Durèe de cuisson réglage de l'heure, comme décrit ci-dessus.
  • Page 88 All manuals and user guides at all-guides.com 3.2 Mode de cuisson Bouton de T °C T °C Fonction (selon modèle) sélection Défaut range L'ampoule: Allumage de l’éclairage du four Décongélation: fonctionnement de la turbine de cuisson qui brasse l'air dans l'enceinte du four. Idéale pour réaliser une décongélation avant une cuisson.
  • Page 89 All manuals and user guides at all-guides.com 4. Nettoyage du four et maintenance 4.1 Remarques générales sur le nettoyage Le cycle de vie de l'appareil peut être étendu grâce à un nettoyage régulier. Attendez le refroidissement du four avant de procéder à des opérations de nettoyage manuel.
  • Page 90 All manuals and user guides at all-guides.com RETRAIT ET NETTOYAGE DES VITRES 1. Ouvrez la porte du four. 2.3.4. Bloquer les charnières, enlever les vis et retirez le couvercle métallique supérieur en le tirant vers le haut. 5.6. Retirez le verre, l'extraire soigneusement de la porte du four (NB: dans les fours de pyrolyse, retirez également les deuxième et troisième verre (le cas échéant)).
  • Page 91 All manuals and user guides at all-guides.com REMPLACEMENT DE L'AMPOULE 1. Débranchez le four de la prise. 2. Défaire le couvercle en verre, dévisser l'ampoule et la remplacer par une ampoule du même modèle. 3. Une fois l'ampoule remplacée, remettre le couvercle en verre. 5.
  • Page 92 All manuals and user guides at all-guides.com Veiligheidsvoorschriften • Tijdens het koken kan vocht in de ovenruimte of • Gebruik geen stoomreiniger om de kookplaat te op het glas van de deur condenseren. Dit is reinigen. normaal. Om dit effect te verminderen, wacht u •...
  • Page 93 All manuals and user guides at all-guides.com apparaat niet achter een decoratieve deur worden geplaatst. • Als u het schap erin plaatst, moet u ervoor zorgen dat de aanslag aan de bovenkant en achterin de ovenruimte zit. Het schap moet helemaal in de ruimte worden geschoven •...
  • Page 94 All manuals and user guides at all-guides.com Overzicht Algemene Instructies 1.1 Veiligheidsaanwijzingen 1.2 Elektrische veiligheid 1.3 Aanbevelingen 1.4 Installatie 1.5 Afvalbeheer en milieubescherming 1.6 Conformiteit 2.1 Overzicht Beschrijving van het product 2.2 Accessories 2.3 Eerste gebruik Gebruik van de oven 3.1 Beschrijving van het display 3.2 Beschrijving van het display Ovenreiniging en onderhoud...
  • Page 95 All manuals and user guides at all-guides.com 1. Algemene Instructies De handleiding aandachtig lezen zodat u de oven optimaal kan gebruiken. Wij raden u aan de installatie- en gebruikshandleiding voor een latere raadpleging te bewaren en er, vóór de installatie van de oven, het serienummer van het toestel op te noteren voor de aanvraag van een eventuele interventietussenkomst door de dienst-na-verkoop.
  • Page 96 All manuals and user guides at all-guides.com 2. Beschrijving van het product 2.1 Overzicht 1. Bedieningspaneel 2. Roosterposities (zijdelingse draadstructuur, indien inbegrepen) 3. Metalen rooster 4. Lekbak 5. Ventilator (achter de stalen plaat) 6. Ovendeur 2.2 Accessories Het draaispit Lekbak Bij het draaispit moet er niet voorverwarmd worden.
  • Page 97 All manuals and user guides at all-guides.com 3. Gebruik van de oven 3.1 Beschrijving van het display 1. Minute minder WAARSCHUWING: Na installatie van de oven en na het onderbreken van de voeding (dit 2. Clock setting is te herkennen aan de knipperende cijfers 12:00 op het scherm) 3.
  • Page 98 All manuals and user guides at all-guides.com 3.2 Beschrijving van het display T °C default LAMP: Conventioneel 50 ÷ 280 Multi-niveau 50 ÷ 240 50 ÷ 240 Bodemverwarming + ventilator 50 ÷ 230 L1 ÷ L5 COOK LIGHT: Met deze functie kunt u gezonder koken, waarbij de benodigde hoeveelheid vet of olie wordt verminderd.
  • Page 99 All manuals and user guides at all-guides.com 4. Ovenreiniging en onderhoud 4.1 Algemene opmerkingen over de reiniging Door het apparaat regelmatig schoon te maken, gaat het langer mee. Wacht tot de oven is afgekoeld voordat u het met de hand gaat schoonmaken.
  • Page 100 All manuals and user guides at all-guides.com VERWIJDERRING EN REINIGING VAN DE GLAZEN DEUR 1. Open de ovendeur. 2.3.4. Blokkeer de scharnieren, verwijder de schroeven en verwijder het bovenste metalen deksel door het omhoog te trekken. 5,6. Verwijder het glas door het voorzichtig uit de ovendeur te trekken (NB: in pyrolyse ovens moeten ook het tweede en derde glaselement (indien aanwezig) worden weggehaald).
  • Page 101 All manuals and user guides at all-guides.com HET LAMPJE VERVANGEN 1. Koppel de oven af van het elektriciteitsnet. 2. Maak het glazen deksel los, schroef het lampje los en vervang het door een nieuw lampje van hetzelfde type. 3. Plaats het glazen deksel terug nadat het defecte lampje is vervangen. 5.
  • Page 102 All manuals and user guides at all-guides.com Güvenlik uyarıları • Pişirme sırasında fırın bölmesinde veya sahip personel tarafından gerçekleştirilmelidir. kapağın camında nem yoğunlaşabilir. Bu normal Prizle cihazın fişi arasında uyumsuzluk olması bir durumdur. Bu etkiyi azaltmak için yemeği durumunda, yetkin bir elektrik ustasından prizi fırının içine yerleştirmeden önce ve gücü...
  • Page 103 All manuals and user guides at all-guides.com • Cihazı nominal frekanslarda çalıştırmak için başka işleme/ayara gerek yoktur. • UYARI: Otomatik temizlik programını başlatmadan önce: - Fırın kapağını temizleyin; - Fırının içindeki iri veya kaba taneli yemek kalıntılarını, nemli bir sünger kullanarak temizleyin.
  • Page 104 All manuals and user guides at all-guides.com Özet Genel Açıklamalar 1.1 Güvenlik ipuçları 1.2 Elektriksel güvenlik 1.3 Tavsiyeler 1.4 Kurulum 1.5 Atık yönetimi 1.6 Uygunluk beyanı 2.1 Genel bakış Ürün Açıklaması 2.2 Aksesuarlar 2.3 İlk kullanım Fırının Temizlenmesi ve Bakımı 3.1 Gösterge açıklamaları...
  • Page 105 All manuals and user guides at all-guides.com 1. Genel Açıklamalar Ürünlerimizden birini tercih ettiğiniz için teşekkür ederiz. Fırınınızdan en iyi sonuçları almak için bu kılavuzu dikkatle okuyun ve daha sonra başvurmak için saklayın. Fırının montajından önce, herhangi bir onarım gerekmesi halinde müşteri hizmetleri personeline vermek üzere seri numarasını...
  • Page 106 All manuals and user guides at all-guides.com açılışında ısı kaybı oluşur. Önemli oranda enerji tasarrufu için, fırını planlanan pişirme süresinden 5 ile 10 dakika daha önce kapatın ve fırının üretmeye devam edeceği artakalan ısıyı kullanın. Isının hazne dışına kaçmaması için contaları temiz ve düzgün tutun. Eğer saatlik bir tarife ile ücretlendirilen bir elektrik sözleşmeniz varsa, pişirmeye başlama saatini indirimli fiyat tarifesinin saatine taşıyan "gecikmeli pişirme"...
  • Page 107 All manuals and user guides at all-guides.com 3. Fırın Kullanımı 3.1 Gösterge açıklamaları UYARI: Fırın yerine monte edilip elektrik bağlantısı yapıldığında 1- Dakika hatırlatıcı veya elektrik beslemesi kesilip tekrar geri geldiğinde, gösterge 2- Saat ayarı yanıp sönmeye başlar. Bu aşamada saatin ( 12:00 ) ayarlanması 3- Pişirme suresi gerekir.
  • Page 108 All manuals and user guides at all-guides.com 3.2 Pişirme Modları Termostat Varsayılan Fonksiyon Fonksiyon ayarı sıcaklık °C LAMBA: Fırın lambasını yakar. Aynı zamanda soğutucu fan otomatik olarak devreye girer (Sadece soğutucu fanlı modellerde). BUZ ÇÖZDÜRME FONKSİYONU: Fonksiyon düğmesi bu konuma getirildiğinde turbo fan donmuş gıdaların protein içeriğini değiştirmeden bir kaç...
  • Page 109 All manuals and user guides at all-guides.com 4. Fırının Temizlenmesi ve Bakımı 4.1 Temizleme hakkında genel notlar Düzenli temizlik ile cihazın kullanım ömrü uzatılabilir. Elle temizlik işlemlerini yapmadan önce fırının soğumasını bekleyin. Temizlik için asla aşındırıcı deterjanlar, çelik tel veya keskin nesneler kullanmayın, aksi takdirde emaye parçalarda onarılamaz hasarlar oluşabilir. Sadece su, sabun veya ağartıcı...
  • Page 110 All manuals and user guides at all-guides.com CAMIN SÖKÜLMESİ VE TEMİZLENMESİ 1. Fırının kapağını açın. 2.3.4. Menteşeleri kilitleyin, vidaları çıkarın ve yukarı doğru çekerek üst metal kapağı çıkarın. 5.6. Camı dikkatli bir şekilde fırın kapağından çekerek çıkarın (Not: pirolitik fırınlarda ikinci ve üçüncü camı (eğer varsa) da çıkarın). 7.
  • Page 111 All manuals and user guides at all-guides.com AMPULÜN DEĞİŞTİRİLMESİ 1. Fırını elektrik beslemesinden ayırın. 2. Cam kapağı sökün, ampulü sökün ve aynı türde yeni bir ampul ile değiştirin. 3. Arızalı ampul değiştirildikten sonra cam kapağı yerine takın. 5. Sorun Giderme 5.1 Sorun giderme SORUN OLASI NEDENİ...
  • Page 112 şartıyla bütün parçaları dahil olmak üzere tamamı malzeme, işçilik ve üretim hatalarına karşı ürünün teslim tarihinden itibaren 3 ( ÜÇ ) YIL SÜRE İLE CANDY HOOVER EUROASIA A.Ş. TARAFINDAN GARANTİ EDİLMİŞTİR. Malın bütün parçaları dahil olmak üzere tamamı garanti kapsamındadır.
  • Page 113 All manuals and user guides at all-guides.com Sigurnosne upute • Tijekom kuhanja vlaga se može kondenzirati spojen i radi. unutarpećnice ili na staklu vrata. Riječ je o Vodič za uzemljenje je žuto-zelene boje. Ovu normalnoj pojavi.Kako biste smanjili ovaj učinak, radnju treba obaviti primjereno kvalificirani pričekajte 10 do 15 profesionalac.
  • Page 114 All manuals and user guides at all-guides.com može dovesti do otapanja ili propadanja emajla. • UPOZORENJE: Nikada nemojte skidati brtvu vrata pećnice. • OPREZ: Nemojte dolijevati vodu na dno unutrašnjosti pećnice tijekom kuhanja ili dok je pećnica vruća. • Nisu potrebne daljnje mjere/postavke kako biuređaj radio pri nominalnim frekvencijama.
  • Page 115 All manuals and user guides at all-guides.com Sadržaj Opće upute 1.1 Sigurnosne indikacije 1.2 Električna sigurnost 1.3 Preporuke 1.4 Instalacija 1.5 Gospodarenje otpadom i zaštita okoliša 1.6 Izjava o Sukladnosti 2.1 Pregled Opis proizvoda 2.2 Pribor (ovisno o modelu) 2.3 Prvo Korištenja Uporaba pećnice 3.1 Opis zaslona 3.2 Upute Za Uporabu...
  • Page 116 All manuals and user guides at all-guides.com 1. Opće upute Hvala što ste odabrali jedan od naših proizvoda. Za najbolje rezultate s vašom pećnicom trebate pažljivo pročitati ovaj priručnik i spremiti ga za buduću uporabu. Prije instalacije pećnice zabilježite serijski broj kako biste ga mogli navesti osoblju servisa u slučaju popravaka. Nakon što izvadite pećnicu iz pakiranja, uvjerite se da se nije oštetila tijekom transporta.
  • Page 117 All manuals and user guides at all-guides.com 1.6 Izjava o Sukladnosti Postavljanjem oznake na ovaj proizvod, potvrđujemo da ovaj proizvod udovoljava svim relevantnim europskim sigurnosnim, zdravstvenim i ekološkim zahtjevima primjenjivima u propisima zaovaj proizvod. 2. Opis proizvoda 2.1 Pregled 1. Upravljačka ploča 2.
  • Page 118 All manuals and user guides at all-guides.com 3. Uporaba pećnice 3.1 Opis zaslona UPOZORENJE: prvi zadatak koji treba obaviti nakon instalacije 1. Minuta promatrača pećnice ili prekida napajanja (na to ukazuje pulsiranje zaslona i 2. Postavke sata prikazano je 12:00) je određivanje točnog vremena. To se radi na 3.
  • Page 119 All manuals and user guides at all-guides.com 3.2 Upute Za Uporabu T ° C Regulator Regulator Funkcija (Ovisi o modelu pećnice) opseg funkcije termostata LÁMPA: Kiderült a sütő világítása. ODLEĐIVANJE - kada je gumb za izbor funkcija podešen na ovaj položaj, ventilator okreće zrak na sobnoj temperaturi oko zaleđene hrane tako da se odledi za nekoliko minuta bez da sadržaj bjelančevina u hrani bude promijenjen.Temperatura je unaprijed podešena na 40°...
  • Page 120 All manuals and user guides at all-guides.com 4. Čišćenje i održavanje pećnice 4.1 Opće napomene o čišćenju Radni vijek uređaja može se produljiti redovitim čišćenjem. Pričekajte da se pećnica ohladi prije ručnog čišćenja. Pri čišćenju nikada nemojte koristiti abrazivne deterdžente, čeličnu vunu ni oštre kako ne biste nepovratno oštetili emajlirane dijelove. Koristite samo vodu, sapun ili deterdžente na osnovi bjelila (amonijak).
  • Page 121 All manuals and user guides at all-guides.com UKLANJANJE I ČIŠĆENJE STAKLENIH VRATA 1. Otvorite vrata pećnice. 2.3.4. Blokirajte šarke, uklonite vijke i uklonite gornji metalni poklopac tako da ga povučete prema gore. 5.6. Uklonite staklo tako da ga pažljivo izvučete iz vrata pećnice (napomena: u pirolitičkim pećnicama uklonite i drugo i treće staklo (ako postoji)).
  • Page 122 All manuals and user guides at all-guides.com ZAMJENA ŽARULJICE IZ SVJETILJKE 1. Válassza le a sütőt az erősáramú. 2. Az üveg borítás, csavarja ki az izzót és cserélje ki egy új izzót az azonos típusú. 3. Ha a hibás izzót cserélni, helyére az üvegbura. 5.
  • Page 123 All manuals and user guides at all-guides.com INSTALLATION INSTALACE INSTALLATION DU FOUR INSTALLAZIONE INSTALLATIE УСТАНОВКА INSTALACIÓN VGRADNJA PEČICE KURULUM INSTALACJA INSTALLATION UGRADNJA 560 mm Opening / Apertura / Apertura Otwór / Otvor / Отверстие Odprtina / Öffnung / Ouverture Opening / Açıklık / Otvor 595 mm 580 mm 460 mm x 15 mm...
  • Page 124 All manuals and user guides at all-guides.com The manufacturer will not be responsible for any inaccuracy resulting from printing or transcript errors contained in this brochure. We reserve the right to carry out modifications to products as required, including the interests of consumption, without prejudice to the characteristics relating to safety or function. Il produttore declina ogni responsabilità...