
Manuels Connexes pour Beko GN1416233ZXN


Sommaire des Matières pour Beko GN1416233ZXN
- Page 1 Refrigerator User Manual Réfrigérateur Manuel d’utilisation Chłodziarka Instrukcja użytkowania GN1416233ZXN EN/FR/PL 58 4260 0000/AC- EN-FR-PL...
- Page 2 Please read this manual before using the product! Dear Customer, We'd like you to make the best use of our product, which has been manufactured in modern facilities with care and meticulous quality controls. Thus, we advice you to read the entire user manual before you use the product. In case the product changes hands, do not forget to hand the guide to its new owner along with the product.
-
Page 3: Table Des Matières
1- Safety Instructions 5 Operating the product 5.1 Indicator panel ..... .15 2 Your Refrigerator 5.2 Indicator panel.....20 5.3 Freezing fresh food. -
Page 4: 1- Safety Instructions
1- Safety Instructions This section contains safety instructions that will - Areas used by customers at hotels, motels help get protected against risks of personal injury and other types of accommodation, or property damage. - Bed&breakfast type hotels, boardinghouses, Our company shall not be responsible for - Catering and similar non-retail applications. -
Page 5: Important Instructions Regarding Safety And Environment
Important instructions regarding safety and environment 1.3 - Electrical safety 1.5 - Installation safety The product must be unplugged during Call the authorised service agent for installation installation, maintenance, cleaning, repairing and of the product. To make the product ready for moving procedures. -
Page 6: Operational Safety
Important instructions regarding safety and environment If it is inevitable to install the product close to a heat source, a suitable insulation plate must 1.6- Operational safety be used in between and the following minimum Never use chemical solvents on the product. distances must be kept to the heat source: There is the risk of explosion! - Minimum 30 cm away from heat sources... -
Page 7: For Products With A Water Dispenser/Ice Machine
Important instructions regarding safety and environment Do not place containers filled with liquid onto If the product is damaged and you see the product. Splashing water on an electrical refrigerant leak, please stay away from the part may cause electric shock or the risk of refrigerant. - Page 8 Important instructions regarding safety and environment Make sure that no water enters the electronic circuits or lighting elements of the product. Use a clean and dry cloth to wipe the foreign materials or dust on the pins of the plug. Do not use a wet or damp cloth to clean the plug.
-
Page 9: Your Refrigerator
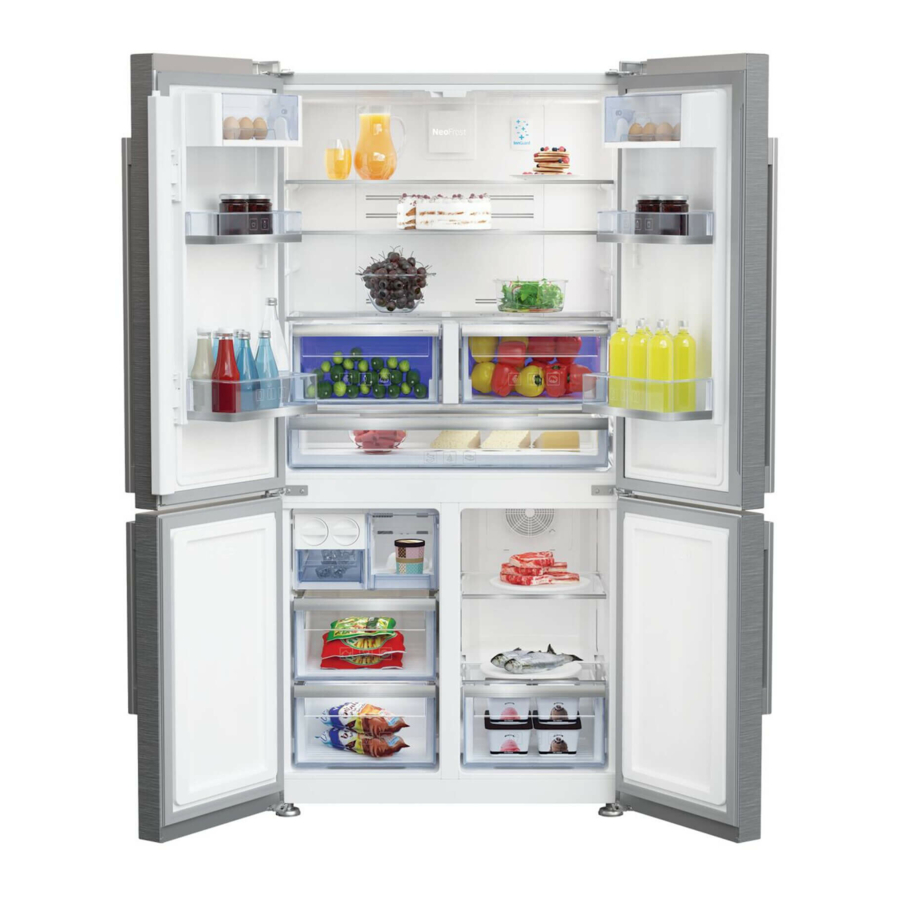
Your Refrigerator 1- Control and indicator panel 7- Chiller compartment 2- Butter & Cheese section 8- Icebox drawer 3- 70 mm moving door shelf 9- Multizone compartment glass shelf/cooler 4- Fridge compartment glass shelf 10- Freezer compartment drawers 5- Fridge compartment crisper 11- Multizone Compartment's drawer 6- Gallon door shelf * OPTIONAL... - Page 10 Your Refrigerator 1- Control and indicator panel 7- Chiller compartment 2- Butter & Cheese section 8- Icebox drawer 3- 70 mm moving door shelf 9- Multizone compartment glass shelf/cooler 4- Fridge compartment glass shelf 10- Freezer compartment drawers 5- Fridge compartment crisper * OPTIONAL 6- Gallon door shelf Figures in this user manual are schematic and may not match the product exactly.
-
Page 11: Installation
Installation fallen, position the product so that at least 5 cm 3.1 Appropriate location clearance shall be left be-tween the rear surface for installation of the product and the wall of the room. The Contact an Authorized Service for the installation clearance at the rear is im-portant for efficient of the product. -
Page 12: Adjusting The Feet
Installation To adjust the doors vertically, Loosen the fixing nut located at the bottom. Rotate the adjusting nut according to the position of the door (clockwise/counter-clockwise). Tighten the fixing nut in order to fix the position. To adjust the doors horizontally, Loosen the fixing nut located at the top. -
Page 13: Electric Connection
Installation -Upper hinge group is fixed with 3 screws. 3.4 Electric connection -The hinge cover is attached after the sockets are installed. WARNING: Do not make connections via - Then the hinge cover is fixed with two screws. extension cables or multi-plugs. WARNING: Damaged power cable must be replaced by the Authorized Service... -
Page 14: Preparation
Preparation 4.1 Things to be done for Thawing the frozen foods in the fridge saving energy compartment both saves energy and reserves the quality of the foods. Connecting your refrigerator to systems Temperature of the room where your that save energy is dangerous as they may refrigerator is located should at least cause damage on the product. -
Page 15: Initial Use
Preparation 4.3 Initial use Before using the product, make sure that all preparations have been made in accordance with the instructions given in the "Important instructions regarding safety and environment" and "Installation" chapters. Clean the interior of the refrigerator as recommended in the “Maintenance and cleaning”... -
Page 16: Operating The Product
Operating the product 5.1 Indicator panel Touch-controlled indicator panel allows you to set the temperature and control the other functions related to the refrigerator without opening the door of the product. Just press the relevant buttons for function settings. 10 11 Quick Cool Quick Freeze 3 “... - Page 17 Operating the product 1. Quick cooling function indicator 8. Joker freezer icon It turns on when the quick fridge function is Hover over the Joker freezer icon using the FN button; the activated. icon will start to flash. When you press the OK key, joker 2.
- Page 18 Operating the product 21. Setting the Celsius and Fahrenheit 14. FN button indicator Using this key, you can switch between the Hover over this key using the FN key and select functions that you want to select. Upon pressing Fahrenheit and Celsius via the OK key. When this key, the icon, whose function is required to be the relevant temperature type is selected, the activated or deactivated, and this icon's indicator...
-
Page 19: Select Button
Operating the product 29. Temperature change cabin icon hover over the icon and the indicator again and press the OK key. Thus, both the eco fuzzy function Indicates the cabin whose temperature is to be icon and the indicator will start flashing. If you do changed. - Page 20 Operating the product Use quick cooling function when you want to quickly cool the food placed in the fridge compartment. If you want to cool large amounts of fresh food, activate this function before putting the food into the product. If you do not cancel it, quick cooling will cancel itself automatically after 1 hours at the most or when the fridge...
-
Page 21: Indicator Panel
Operating the product 5.2 Indicator panel Touch-control indicator panel allows you to set the temperature and control the other functions related to the refrigerator. Just press the relevant buttons for function settings. 26 25 25, 24 ). Whichever cabin icon is power on, the cabin, whose temperature set value you want to 1-On/Off function change, is selected. - Page 22 Operating the product 9. Joker fridge icon this key, the icon, whose function is required to be When you select the joker fridge icon using the FN activated or deactivated, and this icon’s indicator button (16) and press the OK button (17) the joker starts flashing.
-
Page 23: Freezing Fresh Food
Operating the product 5.3 Freezing fresh food icon start flashing when you hover over it, thus you can understand whether the ice machine will be In order to preserve the quality of the food, it turned on or off. When you press the OK button, shall be frozen as quickly as possible when it is the ice machine icon lights continuously during placed in the freezer compartment, use the fast... -
Page 24: Recommendations For Preserving The Frozen Food
Operating the product Freezer Fridge Compartment Compartment Remarks Setting Setting -18°C 4°C This is the normal recommended setting. -20, -22 or These settings are recommended when the ambient temperature 4°C -24°C exceeds 30°C. Use when you wish to freeze your food in a short time. Your product Quick Freeze 4°C will return to its previous mode when the process is over. -
Page 25: Placing The Food
Operating the product Boil the vegetables and drain their water in order 5.9 Humidity-controlled crisper to store vegetables for a longer time as frozen. (FreSHelf) After draining their water, put them in air-proof packages and place them inside the freezer. Food (This feature is optional) such as bananas, tomatoes, lettuce, celery, boiled Humidity rates of fruits and vegetables are kept... -
Page 26: Cool Control Storage Compartment
Operating the product 1- Sealing is provided when the gaskets on the compartment is provided by a cooling element door presses on the surface of the movable middle located in the closed section (Compressor section while the fridge compartment doors are Compartment) behind the refrigerator. - Page 27 Operating the product 2- Suggested optimum service temperatures Our advice: If you mix different types of wines, choose a 12 ° Celsius setting just like in a real cellar. For white wines, which are to be served between 6 and 10 °, think of putting your bottles in the refrigerator 1/2 hour before serving, the refrigerator will be able to maintain the bottles at the preferred temperature.
- Page 28 Operating the product 3- Suggestions relating to the opening of a wine bottle before tasting: White wines About 10 minutes before serving Young red wines About10 minutes before serving Thick and mature red wines About 30 to 60 minutes before serving 4- How long can an open bottle be preserved? Unfinished bottles of wine must be cocked properly and can be preserved in a cold and dry place during the following periods:...
-
Page 29: Use Of Internal Water Dispenser And Water Dispenser At The Door
Operating the product 5.16 Use of internal water dispenser 5.17 Dispensing water and water dispenser at the door Hold a container under the dispenser spout while pressing the dispenser pad. (in some models) Release the dispenser pad to stop dispensing. After connecting the refrigerator to a water source Quick Cool Quick Freeze... -
Page 30: For Using Water Dispenser
Operating the product 5.19 Icematic 5.18 For using water dispenser (in some models) Before using your fridge first time and To get ice from the icematic, fill the water tank after replacing your water filter, water in the fridge compartment with water up to the dispenser may drip drops of water. -
Page 31: Icematic And Ice Storage Container
Operating the product 5.20 Icematic and ice storage container (in some models) Using the Icematic Fill the Icematic with water and place it into its seat. Your ice will be ready approximately in two hours. Do not remove the Icematic from its seating to take ice. -
Page 32: Maintenance And Cleaning
Maintenance and cleaning Cleaning your fridge at regular intervals will Remove the door shelves by pulling extend the service life of the product. them up. After cleaning, slide them from top to bottom to install. Never use cleaning agents or water that contain chlorine to clean the WARNING: outer surfaces and chromium coated... -
Page 33: Troubleshooting
Troubleshooting Check this list before contacting the service. The product’s operating performance may vary Doing so will save you time and money. This list depending on the ambient temperature variations. includes frequent complaints that are not related to This is normal and not a malfunction. faulty workmanship or materials. - Page 34 Troubleshooting The temperature in the cooler or the freezer The door may be ajar. >>> Fully close the door. is too high. There is condensation on the product’s exterior or The cooler compartment temperature is set to between the doors. a very high degree.
- Page 35 Moreover, to ensure product safety and to prevent risk of serious injury, the mentioned self-repair shall be done following the instructions in the user manual for self-repair or which are available in support.beko.com. For your safety, unplug the product before attempting any self-repair.
- Page 36 Therefore, it is highly recommended that end-users refrain from the attempt to carry out repairs falling outside the mentioned list of spare parts, contacting in such cases authorized professional repairers or registered professional repairers. On the contrary, such attempts by end-users may cause safety issues and damage the product and subsequently cause fire, flood, electrocution and serious personal injury to occur.
-
Page 37: Explication Des Symboles
Veuillez d’abord lire ce manuel d’utilisation ! Chère cliente, cher client, Nous espérons que votre produit, qui a été fabriqué dans des usines modernes et vérifié au terme des procédures de contrôle de qualité les plus méticuleuses, vous aidera efficacement. Le présent manuel vous permettra d'utiliser votre appareil rapidement et en toute sécurité. - Page 38 Table des matières 1. Consignes de sécurité 5 Fonctionnement de l’appareil 5.1 Ecran en façade....15 A 1.1 Utilisation prévue ....3 5.2 Congélation des aliments frais .
-
Page 39: Consignes De Sécurité
1. Consignes de sécurité Cette section contient des consignes de - Cuisines du personnel dans les magasins, sécurité qui vous aideront à vous protéger bureaux et autres environnements de travail, contre les risques de dommages corporels ou - Exploitations agricoles, matériels. -
Page 40: Instructions Importantes En Matière De Sécurité Et D'environnement
Instructions importantes en matière de sécurité et d'environnement réglementation électrique et qui déconnecte tous Avant de se débarrasser du produit ancien ou les pôles du réseau. obsolète : Il ne faut pas toucher la prise de courant avec les 1. Débranchez le produit en le saisissant par la fiche. mains mouillées. -
Page 41: A 1.6- Sécurité Opérationnelle
Instructions importantes en matière de sécurité et d'environnement L'exposition des pièces sous tension ou du câble Il ne faut pas que le produit soit connecté à des d'alimentation à l'humidité peut provoquer un systèmes d'alimentation tels que les alimentations court-circuit. Par conséquent, n'installez pas le solaires. - Page 42 Instructions importantes en matière de sécurité et d'environnement Il faut éviter de toucher les parois intérieures ou Changez la position des étagères / porte- les parties métalliques du congélateur ou les bouteilles sur la porte de votre réfrigérateur aliments qui y sont stockés lorsque vous avez uniquement lorsqu'ils sont vides.
-
Page 43: A 1.7- Sécurité De Maintenance Et De
Instructions importantes en matière de sécurité et d'environnement Il ne faut jamais utiliser de la vapeur ou Pour les produits avec distributeur des nettoyeurs à vapeur pour nettoyer ou d'eau / machine à glaçons décongeler le produit. La vapeur entre en contact avec les pièces sous tension de votre N'utilisez que de l'eau potable. -
Page 44: Votre Réfrigérateur
Votre réfrigérateur 1- Ecran de contrôle 6- Balconnet grande capacité 2- Balconnet pour bac à oeufs 7- Compartiment Zone fraîcheur 3- Balconnet ajustable de 70 mm 8- Twist ice maker 4- Clayette en verre du compartiment 9- Tiroirs du compartiment multizone réfrigérateur 10- Tiroirs du compartiment congélateur 5- Bac à... - Page 45 Votre réfrigérateur* 1- Ecran de contrôle 6- Balconnet grande capacité 2- Balconnet pour bac à oeufs 7- Compartiment Zone fraîcheur 3- Balconnet ajustable de 70 mm 8- Tiroir de la fabrique automatique de glaçons 4- Clayette en verre du compartiment 9- Clayette en bois du compartiment cave à...
-
Page 46: Installation
Installation parois latérales. Vérifiez que l’élément de 3.1 Emplacement approprié protection d’espace de la façade arrière est pour l’installation présent à son emplacement (au cas où il Contactez un service autorisé pour installer est fourni avec l’appareil). Si l’élément n’est l'appareil. -
Page 47: Réglage Des Pieds
Installation -Fixez la charnière supérieure à l'aide de 3 vis -Fixez ensuite les caches après l’installation des supports -Serrez alors les caches à l'aide de 2 vis. 3.3. *Réglage des pieds Si après l’installation l’appareil est en déséquilibre, ajustez les pieds avant en les tournant vers la droite ou vers la gauche. -
Page 48: Branchement Électrique
Installation 3.4. Branchement électrique AVERTISSEMENT : Ne réalisez pas de branchements en utilisant des rallonges ou des multiprises. AVERTISSEMENT : Les câbles d’alimentation endommagés doivent être remplacés par des prestataires de services agréés. Si deux réfrigérateurs sont installés côte à côte, laissez une distance minimale de 4 cm entre les deux. -
Page 49: Préparation
Préparation 4.1 Mesures d’économie d’énergie Pour conserver le maximum d’aliments dans le compartiment congélateur de votre Il est dangereux de brancher votre réfrigérateur, enlevez l’étagère supérieure et réfrigérateur aux systèmes électriques placez-la au-dessus de la clayette en verre. La d'économie d'énergie, car ils pourraient consommation en énergie prévue pour votre l'endommager. -
Page 50: Première Utilisation
Préparation 4.3 Première utilisation Avant d’utiliser cet appareil, rassurez-vous que toutes les préparations sont effectuées conformément aux instructions contenues dans les chapitres « Instructions importantes en matière de sécurité et d’environnement » et « Installation ». Nettoyez l’intérieur du réfrigérateur comme indiqué... -
Page 51: Fonctionnement De L'appareil
Fonctionnement de l’appareil 5.1 Ecran en façade L’écran de contrôle à commandes tactiles vous permet de régler la température et de contrôler les autres fonctions liées au réfrigérateur sans ouvrir la porte de l’appareil. Appuyez simplement sur le bouton approprié pour régler des fonctions. 10 11 Quick Cool Quick Freeze... - Page 52 Fonctionnement de l’appareil 1. Indicateur de fonction de refroidissement Veuillez consulter la section « Solutions conseillées rapide pour le dépannage » de votre manuel si vous Il s’allume lorsque la fonction de réfrigération constatez que cet indicateur est allumé. rapide est activée. 6.
- Page 53 Fonctionnement de l’appareil 17. Icône de changement de température du Utilisez la fonction de congélation compartiment congélateur* rapide lorsque vous souhaitez congeler Indique le compartiment dont la température doit rapidement les aliments placés dans être modifiée. Lorsque l’icône de changement de le compartiment congélateur.
- Page 54 Fonctionnement de l’appareil et l’indicateur continue de clignoter pendant le lorsque vous les effleurez. Ainsi, vous saurez si processus. Si vous n’appuyez sur aucun bouton la fonction Vacances est activée ou désactivée. après 20 secondes, l’icône et l’indicateur restent Lorsque vous appuyez sur le bouton OK, l’icône de allumés.
-
Page 55: Avertissement D'alarme Désactivée
Fonctionnement de l’appareil 30. Verrouillage des commandes 33. Bouton de fonction de refroidissement Appuyez sur le bouton Verrouillage des com- rapide mandes et maintenez-le enfoncé pendant Ce bouton est doté de deux fonctions. Appuyez 3 secondes. Le symbole de verrouillage des brièvement sur ce bouton pour activer ou commandes désactiver la fonction de refroidissement rapide. -
Page 56: Congélation Des Aliments Frais
Fonctionnement de l’appareil 5.2 Congélation des aliments frais 5.3 Recommandations relatives Pour préserver la qualité des aliments, il faut à la conservation des les congeler aussi rapidement que possible aliments congelés lorsqu’ils sont placés dans le compartiment Le compartiment doit être réglé à au moins -18 °C congélateur, pour cela, utilisez la fonction de congélation rapide. -
Page 57: Disposition Des Aliments
Fonctionnement de l’appareil Réglage du Réglage du compartiment compartiment Remarques congélateur réfrigérateur -18 °C 4°C Voici le réglage normal recommandé. -20, -22 ou Ces réglages sont recommandés lorsque la température 4°C -24 °C ambiante dépasse 30 °C. Cet indicateur est utilisé lorsque vous voulez congeler vos Congélation denrées pendant une courte période. -
Page 58: Bac À Légumes
Fonctionnement de l’appareil 5.8 Bac à légumes 5.10 Casier à œufs Le bac à légumes du réfrigérateur a été Vous pouvez installer le support à œufs sur un spécialement conçu pour vous aider à conserver balconnet de la porte ou de l'intérieur de votre vos denrées au frais sans que celles-ci n'aient à... -
Page 59: Lumière Bleue/Harvestfresh
Fonctionnement de l’appareil 5.13 Lumière bleue/HarvestFresh *Peut ne pas être disponible sur tous les modèles À propos de la lumière bleue, Les fruits et légumes stockés dans les bacs à légumes éclairés par une lumière bleue continuent leur photosynthèse grâce à l’effet de longueur d’onde de la lumière bleue et préservent ainsi leur teneur en vitamine. -
Page 60: Compartiment Cave À Vin
Fonctionnement de l’appareil 5.15 Compartiment cave à vin* (Cette caractéristique est en option) 1 – Charger votre cave Le compartiment cave à vins a été conçu pour charger jusqu’à 28 bouteilles de front + 3 bouteilles accessibles par une clayette télescopique. Ces quantités maximales annoncées sont données à titre indicatif et correspondent a des tests effectués avec une bouteille étalon, de type «... -
Page 61: Utilisation Du Distributeur D'eau Interne Et Du Distributeur D'eau À La Porte
Fonctionnement de l’appareil 3- Suggestions relatives à l’ouverture d’une bouteille de vin avant la dégustation : Vins blancs Environ 10 minutes avant de servir Vins rouges jeunes Environ 10 minutes avant de servir Vins rouges denses et matures Environ 30 à 60 minutes avant de servir 4- Combien de temps se conserve une bouteille ouverte ? Les bouteilles de vin que vous n’avez pas terminées doivent être fermées correctement et peuvent être conservées dans un endroit frais et sec pendant les périodes suivantes :... -
Page 62: Distributeur D'eau Intégré
Fonctionnement de l’appareil Lors de la première utilisation, patientez pendant 5.18 Utilisation du distributeur d’eau environ 24 heures afin que l’eau refroidisse. Avant d'utiliser votre réfrigérateur pour Enlevez le verre peu de temps après avoir tiré sur la première fois, et une fois le filtre à eau la gâchette. -
Page 63: Distributeur De Glaçons
Fonctionnement de l’appareil 5.19 Distributeur de glaçons 5.20 Distributeur et récipient de (pour certains modèles) conservation de glaçons Pour obtenir des glaçons grâce à cette machine, (dans certains modèles) remplissez le réservoir d'eau du compartiment réfrigérateur jusqu'au niveau maximum. Utilisation du distributeur Après environ 15 jours, les glaçons se trouvant Remplissez le distributeur de glaçons avec de à... -
Page 64: Entretien Et Nettoyage
Entretien et nettoyage N’utilisez pas d’eau contenant du chlore, ou des produits de nettoyage Le nettoyage régulier du produit prolonge sa durée pour les surfaces externes et les de vie. pièces chromées de l’appareil. Le AVERTISSEMENT: Débranchez chlore entraîne la corrosion de ce type l’alimentation avant de nettoyer le de surfaces métalliques. -
Page 65: Dépannage
Dépannage Vérifiez la liste suivante avant de contacter le Le dispositif de protection thermique du service après-vente. Cela vous permet de gagner compresseur sautera en cas de coupures du temps et de l’argent. Cette liste contient les soudaines du courant ou de débranchement problèmes fréquemment rencontrés qui ne sont intempestif, en effet la pression du liquide pas le résultat d'un défaut de fabrication ou d'une... - Page 66 Dépannage vivo La température du congélateur est Votre nouveau réfrigérateur est peut-être plus adéquate, mais la température du grand que l’ancien. Les grands réfrigérateurs réfrigérateur est très basse. durent plus longtemps. Le réfrigérateur est réglé à une température La température de la pièce est probablement très basse.
- Page 67 Dépannage Le réfrigérateur produit des bruits L’appareil n’a peut-être pas été nettoyé régulièrement. Nettoyez l’intérieur du semblables à de l’eau qui coule ou à la réfrigérateur avec une éponge, de l’eau tiède pulvérisation d’un liquide. ou de l’eau gazeuse. Les écoulements de liquide et de gaz Certains récipients ou matériaux d'emballage surviennent conformément aux principes peuvent provoquer des odeurs.
-
Page 68: Clause De Non-Responsabilité / Avertissement
L’utilisateur final peut lui-même réparer les pièces de rechange ci-après : poignées de porte,charnières de porte, plateaux, paniers et joints de porte (une liste mise à jour est également disponible à l'adresse support.beko.com au 1er mars 2021). En outre, pour garantir la sécurité du produit et éviter tout risque de blessure grave, l'autoréparation mentionnée doit être effectuée en suivant les instructions... - Page 69 à des problèmes de sécurité non imputables à Beko, et annulera la garantie du produit.
- Page 70 Drogi kliencie, Chcemy, abyś mógł uzyskać optymalną efektywność naszego produktu, który został wyprodukowany w nowoczesnym zakładzie i przy drobiazgowej kontroli jakości. W tym celu prosimy przeczytać całą instrukcję obsługi przed użyciem produktu i przechowywać ją do ewentualnego użycia w przyszłości. Jeśli ten produkt zostanie przekazany innej osobie, prosimy przekazać...
- Page 71 Spis treści 1- Instrukcje bezpieczeństwa 5.10 Pojemnik na świeże warzywa z kontrolowaną wilgotnością..... . . 24 2 Lodówka (FreSHelf) ......24 5.11 Tacka na jaja .
-
Page 72: 1- Instrukcje Bezpieczeństwa
Instrukcje bezpieczeństwa Ta część zawiera instrukcje bezpieczeństwa, - Gospodarstwach agroturystycznych, które pomogą zabezpieczyć się przed ryzykiem - Obszarach wykorzystywanych przez klientów obrażeń ciała lub szkód materialnych. w hotelach, motelach i innych rodzajach zakwate- Nasza firma nie ponosi odpowiedzialności za rowania, szkody, które mogą... -
Page 73: Instrukcje Dotyczące Bezpieczeństwa I Środowiska
Instrukcje dotyczące bezpieczeństwa i środowiska 5. Produkt należy przechowywać w taki sposób, aby się nie przewrócił. 1.4 - Bezpieczeństwo 6. Nie pozwalaj dzieciom bawić się starym produktem. transportu Nigdy nie wrzucaj produktu do ognia w celu Produkt jest ciężki; nie przenoś go sam. utylizacji. -
Page 74: Bezpieczeństwo Podczas Użytkowania
Instrukcje dotyczące bezpieczeństwa i środowiska Im więcej czynnika chłodniczego zawiera garaże lub pralnie, w których wilgotność jest lodówka, tym większe musi być miejsce insta- wysoka lub woda może pryskać. Jeśli lodówka lacji. Jeśli miejsce instalacji jest zbyt małe, w zostanie zamoczona wodą, odłącz ją od zasila- przypadku wycieku czynnika chłodniczego w nia i skontaktuj się... - Page 75 Instrukcje dotyczące bezpieczeństwa i środowiska Nie umieszczaj puszek lub butelek spowodować obrażenia i / lub szkody materi- zawierających napoje gazowane lub płyny do alne. zamrażania w komorze zamrażarki. Puszki i Układ chłodzenia twojego produktu zawiera butelki mogą pęknąć. Istnieje ryzyko obrażeń i czynnik chłodniczy R600a: Rodzaj czynnika szkód materialnych! chłodniczego zastosowanego w produkcie...
- Page 76 Instrukcje dotyczące bezpieczeństwa i środowiska 1.7- Bezpieczeństwo podc- 1.9- Oświetlenie Skontaktuj się z autoryzowanym serwisem, zas konserwacji i czyszczenia gdy konieczna jest wymiana diody LED/żarówki Nie ciągnij za uchwyt drzwi, jeśli chcesz używanej do oświetlenia. przenieść produkt w celu wyczyszczenia. Uchwyt może pęknąć...
-
Page 77: Lodówka
Lodówka 1- Panel sterowania i wskaźników 6- Półka w drzwiach (galon) 2- Miejsce na masło i sery 7- Komora schładzania 3- Ruchoma półka w drzwiach 70 mm 8- Szuflada z pudełkiem na kostki lodu 4- Szklana półka w komorze chłodniczej 9- Półka szklana do komory wielostrefowej / 5- Pojemnik na świeże warzywa w komorze chłodziarka... - Page 78 Lodówka 6- Półka w drzwiach (galon) 1- Panel sterowania i wskaźników 7- Komora schładzania 2- Miejsce na masło i sery 8- Szuflada z pudełkiem na kostki lodu 3- Ruchoma półka w drzwiach 70 mm 9- Półka szklana do komory wielostrefowej / 4- Szklana półka w komorze chłodniczej chłodziarka 5- Pojemnik na świeże warzywa w komorze...
-
Page 79: Instalacja
Instalacja 3.1. Odpowiednie miejsce instalacji a ścianami. Odstęp z tyłu jest ważny dla efektywnego działania produktu. Skontaktuj się z autoryzowanym serwisem w sprawie instalacji produktu. Aby przygotować produkt do instalacji, zapoznaj się z informacjami temperaturze poniżej -5°C. w instrukcji obsługi i upewnij się, że zasilanie 3.2. -
Page 80: Podłączenie Zasilania
Instalacja – Górna grupa zawiasów jest zamocowana 3 śrubami. – Pokrywa zawiasu jest zaczepiana po zainstalowaniu gniazd. – Następnie pokrywa zawiasu jest mocowania dwiema śrubami. W celu regulacji drzwiczek w pionie Poluzuj dolną nakrętkę mocującą Przykręć nakrętkę regulacyjną (w prawo/lewo), w zależności od położenia drzwiczek Dokręć... -
Page 81: Przygotowanie
Przygotowanie 4.1. Co robić, aby zaoszczędzić energię mehmet Podłączenie produktu do elektronicznych układów oszczędzania energii jest szkodliwe, ponieważ może uszkodzić produkt. W przypadku urządzenia wolnostojącego; „Urządzenie chłodnicze nie jest przeznaczone do stosowania jako urządzenie wbudowane”. Nie zostawiaj drzwiczek lodówki otwartych na dłużej. -
Page 82: Pierwsze Użycie
Przygotowanie 4.3 Pierwsze użycie Temperatura w pomieszczeniu, w którym Zanim zaczniesz używać urządzenie, upewnij znajduje się lodówka, powinna wynosić 10ºC /50°F co najmniej . Ze względu się, że wszystkie przygotowania przeprowadzono na wydajność lodówki nie zaleca się zgodnie z instrukcjami zawartymi w rozdziałach użytkowania jej w niższych temperaturach. -
Page 83: Korzystanie Z Produktu
Korzystanie z produktu 5.1. Panel wskaźników Panele wskaźników mogą się różnić w zależności od modelu produktu. Funkcje dźwiękowe i optyczne panelu wskaźników pomagają korzystać z lodówki. 10 11 Quick Cool Quick Freeze 3 “ Select 3 “ *34.1 *34.2 Quick Cool Quick Freeze 3 “... - Page 84 Korzystanie z produktu zacznie migać, oznacza to, że właściwa kabina 1. Wskaźnik funkcji szybkiego chłodzenia została wybrana. Włącza się, kiedy aktywna jest funkcja szybkiego chłodzenia. 8. Ikona zamrażalnika Joker 2. Wskaźnik temperatury w komorze Najedź na ikonę zamrażalnika Joker za pomocą przycisku FN;...
- Page 85 Korzystanie z produktu 14. Przycisk FN 21. Ustawienie wskaźnika skali Celsjusza i Tym klawiszem można przełączać funkcje do Fahrenheita wybrania. Po naciśnięciu tego klawisza zacznie Najedź na ten przycisk za pomocą przycisku FN, migać ikona, której funkcja jest wymagana do a następnie wybierz skalę...
-
Page 86: Blokada Klawiszy
Korzystanie z produktu 29. Ikona zmiany temperatury w kabinie będą nadal świecić. Funkcja eco fuzzy zostaje Wskazuje kabinę, której temperaturę należy aktywowana. Aby anulować funkcję eco fuzzy, zmienić. Jeżeli ikona zmiany temperatury w kabinie najedź ponownie na ikonę i wskaźnik, a następnie zacznie migać, oznacza to, że właściwa kabina naciśnij przycisk OK. - Page 87 Korzystanie z produktu Korzystaj z funkcji szybkiego chłodzenia, kiedy chcesz szybko schłodzić żywność umieszczoną w komorze chłodzenia. Jeśli schłodzona ma być znaczna ilość świeżej żywności, zaleca się uruchomienie tej funkcji przed włożeniem żywności do chłodziarki. Jeśli nie wyłączysz szybkiego chłodzenia, funkcja wyłączy się automatycznie po 8 godzinach lub gdy temperatura w komorze chłodziarki osiągnie żądaną...
-
Page 88: Panel Wskaźników
Korzystanie z produktu 5.2. Panel wskaźników Panele wskaźników mogą się różnić w zależności od modelu produktu. Funkcje dźwiękowe i optyczne panelu wskaźników pomagają korzystać z lodówki. 26 25 1. Funkcja włączania/wyłączania która ikona kabiny jest włączona, kabina, której Przytrzymaj przycisk On/Off (Wł./Wył.) przez 3 wartość... - Page 89 Korzystanie z produktu 9. Ikona lodówki Joker 16. Przycisk FN Po wybraniu ikony lodówki Joker przyciskiem FN Tym klawiszem można przełączać funkcje do (16) i naciśnięciu przycisku OK (17) kabina Joker wybrania. Po naciśnięciu tego klawisza zacznie zmieni się w kabinę chłodzenia i będzie działać migać...
- Page 90 Korzystanie z produktu nie naciśniesz żadnego przycisku przez 20 sekund, 26. Wskaźnik komory zamrażalnika ikona zgaśnie, a funkcja eco fuzzy zostanie Jeżeli ten wskaźnik jest aktywny, temperatura anulowana. komory zamrażalnika jest wyświetlana na 22. Ikona wyłączenia maszyny do lodu wskaźniku wartości temperatury. Komora zamrażalnika może być...
-
Page 91: Zamrażanie Świeżej Żywności
Korzystanie z produktu 5.3. Zamrażanie świeżej żywności “24 godziny przez zamrożeniem świeżej żywności aktywuj “”funkcję szybkiego Aby zachować jakość żywności, żywność zamrażania””. umieszczona w komorze zamrażarki musi Opakowania ze świeżą żywnością należy zostać jak najszybciej zamrożona , w tym celu umieszczać... -
Page 92: Informacje O Głębokim Zamrażaniu
Korzystanie z produktu 5.5. Informacje o głębokim 5.6. Rozmieszczanie żywności zamrażaniu Różne zamrożono produkty Półki komory Zgodnie z normą IEC 62552 zamrażarka musi łącznie z mięsem, rybami, zamrażarki umożliwiać zamrożenie 4,5 kg żywności do lodami, warzywami itd. temperatury -18°C lub niższej w ciągu 24 Żywność... -
Page 93: Pojemnik Na Świeże Warzywa Z Kontrolowaną Wilgotnością
Korzystanie z produktu 5.10 Pojemnik na świeże warzywa Nie umieszczać gruszek, moreli, brzoskwiń itd., z kontrolowaną wilgotnością a zwłaszcza owoców wytwarzających dużą ilość etylenu, w tym samym pojemniku na świeże (FreSHelf) warzywa co inne owoce i warzywa. Etylen (Funkcja jest opcjonalna) wydzielany przez te owoce może spowodować... -
Page 94: Komora Z Regulowanym Chłodzeniem
Korzystanie z produktu 5.13 Komora z regulowanym 5.14 Niebieskie światło/Harvest Fresh chłodzeniem * Funkcja nie jest dostępna w niektórych Komorę Cool Control tej chłodziarki można używać modelach w dowolnym wybranym trybie, nastawiając ją na temperatury chłodzenia (2/4/6/8 °C) lub W przypadku niebieskiego światła, zamrażania (-18/-20/-22/-24). -
Page 95: Komora Piwniczki Winnej
Korzystanie z produktu 5.16 Komora piwniczki winnej (Funkcja jest opcjonalna) 1 – Wypełnianie komory piwniczki winnej Piwniczka winna została skonstruowana na maksymalnie 28 butelek z przodu + 3 butelki dostępne dzięki uchwytowi teleskopowemu. Maksymalna zadeklarowana liczbą jest podawana tylko do celów informacyjnych i jest zgodna z testami wykonanymi ze standardową... -
Page 96: Zastosowanie Wewnętrznego Dozownika Wody I Dozownika Wody Przy Drzwiach
Korzystanie z produktu 3- Sugestie dotyczące otwierania butelki wina przed spróbowaniem: Białe wina Około 10 minut przed podaniem Młode wina czerwone Około 10 minut przed podaniem Gęste i dojrzałe wina czerwone Około 30–60 minut przed podaniem 4- Jak długo otwarta butelka jest przydatna do spożycia? Nieopróżnione butelki wina należy prawidłowo zatkać... -
Page 97: Dozowanie Wody
Korzystanie z produktu 5.19 Używanie dozownika wody Przed użyciem chłodziarki po raz pi- erwszy i po wymianie filtra wody Quick Cool Quick Freeze 3 “ z dozownika mogą ściekać krop- Select 3 “ le wody. Aby nie dopuścić do kapa- nia lub ściekania wody z dozowni- ka, należy usunąć... -
Page 98: Kostkarka Do Lodu Icematic I Pojemnik Na Lód
Korzystanie z produktu 5.21 Kostkarka do lodu Icematic Dziwne dźwięki, które rozlegają się z i pojemnik na lód lodówki w 120-minutowych odstępach (w niektórych modelach) czasu, to dźwięki wytwarzania lodu i wysypywania. Jest to normalne zjawisko. Obsługa kostkarki do lodu Icematic Napełnij Icematic wodą... -
Page 99: Konserwacja I Czyszczenie
Konserwacja i czyszczenie Regularne czyszczenie produktu przedłuży jego 6.1. Unikanie nieprzyjemnych okres eksploatacji. zapachów Wyprodukowany produkt jest wolny od OSTRZEŻENIE: Przed czyszczeniem wszelkich materiałów zapachowych. Jednak lodówki należy wyłączyć zasilanie. przechowywanie żywności w nieodpowiednich komorach i niepoprawne czyszczenie powierzchni wewnętrznych może wywoływać nieprzyjemne Do czyszczenia nie wolno używać... -
Page 100: Rozwiązywanie Problemów
Rozwiązywanie problemów Przed skontaktowaniem się z serwisem należy W przypadku nagłej awarii zasilania lub sprawdzić tę listę. Umożliwi to zaoszczędzenie wyciągnięcia kabla zasilającego z gniazda czasu i pieniędzy. Ta lista zawiera często spotykane i podłączenia go z powrotem ciśnienie problemy niezwiązane z wadami jakości wykonania gazu w układzie chłodzenia produktu jest lub materiałów. - Page 101 Rozwiązywanie problemów Nowy produkt może być większy niż Temperatura komory chłodziarki jest poprzedni. Większe produkty pracują dłużej. ustawiona bardzo nisko. >>> Ustaw wyższą Temperatura w pomieszczeniu może być temperaturę komory chłodziarki i sprawdź wysoka. >>> Produkt będzie normalnie działał ponownie. przed dłuższy czas przy wyższej temperaturze w Żywność...
- Page 102 Rozwiązywanie problemów Produkt nie jest regularnie czyszczony. >>> Podłoże nie jest poziome lub wytrzymałe. Czyść wnętrze regularnie za pomocą gąbki, >>> Jeśli produkt się kołysze podczas ciepłej wody i wody z węglanem. powolnego przemieszczania, wyreguluj nóżki Niektóre pojemniki i opakowania mogą w celu zrównoważenia produktu.
-
Page 103: Gwarancja Jakości
. Zarejestruj swój produkt. Załóż konto oraz zarejestruj teraz swój produkt marki BEKO objęty gwarancją na naszej stronie internetowej www.beko.pl w sekcji serwis. Dzięki temu nie będziesz musiał się martwić w sytuacji gdy zgubisz dowód zakupu. Ponadto będziesz miał możliwość... - Page 104 "Samodzielna naprawa" lub dostępnymi w support.beko.com Dla własnego bezpieczeństwa, przed samodzielną naprawą, odłącz urządzenie od zasilania. Naprawy i próby naprawy dokonywane przez użytkowników końcowych w przypadku części niewymienionych na liście i/lub nieprzestrzeganie wskazówek zawartych w rozdziale „Samodzielna naprawa” lub dostępnych w support.beko.
- Page 105 Beko, oraz spowodują utratę gwarancji. W związku z tym zdecydowanie zaleca się, aby użytkownicy końcowi powstrzymali się od podejmowania prób wykonywania napraw spoza wymienionego wykazu części zamiennych, kontaktując się w takich przypadkach z autoryzowanymi warsztatami lub profesjonalnymi warsztatami.