JVC RC-EX30B Manuel D'instructions
Masquer les pouces
Voir aussi pour RC-EX30B:
- Manuel d'instructions (145 pages) ,
- Manuel d'instructions (29 pages)
Table des Matières
Les langues disponibles
Les langues disponibles
CD PORTABLE SYSTEM
CHAINE PORTABLE A CD
RC-EX30B
STANDBY/ON
CD/
TUNER/
RANDOM
BAND
TAPE
1
2
3
DISPLAY
4
5
6
HBS/
PRESET EQ
7
8
9
FM MODE
OVER
/BEAT CUT
0
PROGRAM/
+
UP
INTRO
CLOCK SET
PRESET
GROUP
REPEAT
MUTING
–
DOWN
VOLUME
RM-SRCEX30J REMOTE CONTROL
INSTRUCTIONS
MANUEL D'INSTRUCTIONS
PUSH
REMOTE
DISPLAY
SENSOR
LVT1213-002A
[C]
Table des Matières
Dépannage

Manuels Connexes pour JVC RC-EX30B


Sommaire des Matières pour JVC RC-EX30B
- Page 1 CD PORTABLE SYSTEM CHAINE PORTABLE A CD RC-EX30B STANDBY/ON TUNER/ RANDOM BAND TAPE PUSH DISPLAY HBS/ PRESET EQ FM MODE OVER /BEAT CUT PROGRAM/ INTRO CLOCK SET PRESET GROUP REPEAT MUTING – DOWN REMOTE DISPLAY SENSOR VOLUME RM-SRCEX30J REMOTE CONTROL INSTRUCTIONS MANUEL D’INSTRUCTIONS...
-
Page 27: Caractéristiques
TABLE DES MATIÈRES CARACTÉRISTIQUES ..........1 AJUSTER LE SON ............. 8 CONSIGNES DE SÉCURITÉ ........1 LECTURE DE DISQUES COMPACTS ....9 CONSIGNES D’UTILISATION ........ 2 RÉCEPTION RADIO ..........15 ALIMENTATION ............3 LECTURE DE CASSETTES ........17 DESCRIPTION ET COMMANDES ......4 ENREGISTREMENT .......... -
Page 28: Consignes D'utilisation
CONSIGNES D’UTILISATION 5 Mécanisme de sécurité N’exposez pas cette unité aux rayons directs du soleil L’unité intègre un mécanisme de verrouillage de ou ne laissez pas cette unité dans une voiture fermée sécurité qui désactive le rayon laser lorsque la porte (ou dans un bateau, etc.) où... -
Page 29: Alimentation
éviter un ou d’endommager l’unité. disfonctionnement ou des dommages à l’unité. Enlevez les piles pendant l’utilisation du cordon • Quand le cordon d’alimentation JVC fourni avec d’alimentation. l’unité est raccordé, l’alimentation passe • Assurez-vous de débrancher le cordon d’alimentation automatiquement des piles à... -
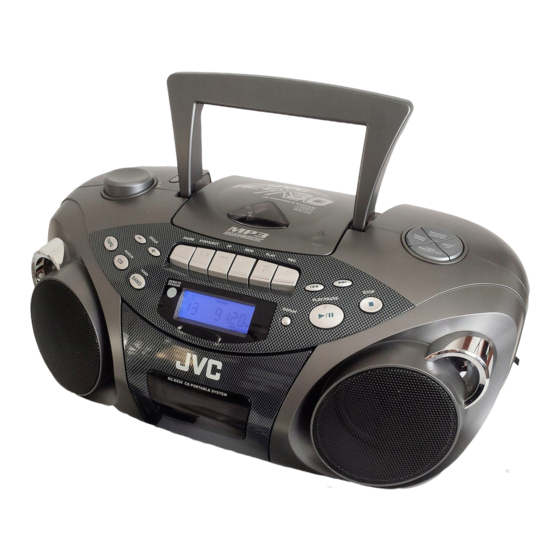
Page 30: Description Et Commandes
DESCRIPTION ET COMMANDES Faces supérieure et avant PUSH REMOTE DISPLAY SENSOR 1 Bouton VOLUME 8 Touche PRESET UP 2 Touche STANDBY/ON 9 Touche TAPE 3 Touche GROUP – Touche CD/RANDOM Touche GROUP + Touche BAND/TUNER 4 Touches de commande cassette 10 REMOTE CONTROL (capteur de télécommande) Touche PAUSE 8... -
Page 31: Face Arrière
Face arrière 16 Antenne téléscopique 18 Couvercle du logement à piles 19 Prise ÓAC IN (entrée secteur) 17 Prise PHONES Raccordez des mini-écouteurs stéréo (diamètre 3,5- mm, impédance entre 16 Ω et 32 Ω) à cette prise. La sortie des enceintes est désactivée si des écouteurs sont raccordés. -
Page 32: Noms Des Touches
Noms des touches 1 Touche STANDBY/ON 2 Touche DISPLAY STANDBY/ON TUNER/ RANDOM BAND TAPE Touche HBS/PRESET EQ Touche FM MODE/BEAT CUT DISPLAY HBS/ PRESET EQ 3 Touches PRESET UP/DOWN FM MODE OVER /BEAT CUT 4 Touche PROGRAM/CLOCK SET PROGRAM/ INTRO CLOCK SET Touche INTRO PRESET... -
Page 33: Réglage De L'horloge
RÉGLAGE DE L’HORLOGE 2,3,4 2,3,4 STANDBY/ON TUNER/ RANDOM BAND TAPE DISPLAY PUSH HBS/ PRESET EQ FM MODE OVER /BEAT CUT PROGRAM/ CLOCK SET INTRO PRESET GROUP REPEAT MUTING – DOWN REMOTE VOLUME DISPLAY SENSOR RM-SRCEX30J REMOTE CONTROL Remarque: Avant d’utiliser davantage cette unité, réglez d’abord l’horloge intégrée à... -
Page 34: Ajuster Le Son
AJUSTER LE SON PHONES (on the rear) PHONES (à l’arriere) HBS/PRESET EQ MUTING VOLUME HBS/PRESET EQ VOLUME +/– STANDBY/ON TUNER/ RANDOM BAND TAPE DISPLAY PUSH HBS/ PRESET EQ FM MODE OVER /BEAT CUT PROGRAM/ CLOCK SET INTRO PRESET GROUP REPEAT MUTING –... -
Page 35: Lecture De Disques Compacts
LECTURE DE DISQUES COMPACTS Manipulation des disques Remarques sur les disques Puisque des disques sales, abîmés ou voilés peuvent compacts endommager l’unité, il est important de respecter les Cette unité a été conçue uniquement pour lire les CD consignes suivantes: suivants. -
Page 36: Fonctionnement De Base
Fonctionnement de base TUNER/ STANDBY/ON RANDOM BAND TAPE DISPLAY PUSH HBS/ PRESET EQ FM MODE OVER /BEAT CUT PROGRAM/ INTRO CLOCK SET PRESET REPEAT MUTING GROUP – DOWN REMOTE VOLUME DISPLAY SENSOR RM-SRCEX30J REMOTE CONTROL 1 Appuyez sur CD/RANDOM pour entrer dans le Quand un disque MP3 est chargé, après l’affichage du mode CD, si l’unité... - Page 37 Pour mettre la lecture en pause Sélection d’un groupe (album) ou d’une piste particulière (disque MP3 seulement) Appuyez sur PLAY/PAUSE 3/8 pendant la lecture. Vous pouvez appuyer sur 3/8 sur la télécommande pour 1 Dans le mode arrêt, appuyez plusieurs fois sur arrêter la lecture.
-
Page 38: Lecture Répétée/Aléatoire
Lecture répétée/aléatoire CD/RANDOM REPEAT CD/RANDOM STANDBY/ON TUNER/ RANDOM BAND TAPE DISPLAY PUSH HBS/ PRESET EQ FM MODE OVER /BEAT CUT PROGRAM/ INTRO CLOCK SET PRESET GROUP REPEAT MUTING – DOWN REMOTE VOLUME DISPLAY SENSOR RM-SRCEX30J REMOTE CONTROL Lecture répétée Lecture aléatoire Appuyez sur la touche REPEAT de la télécommande Appuyez sur CD/RANDOM dans le mode CD jusqu’à... -
Page 39: Lecture Programmée
Lecture programmée Vous pouvez programmer un maximum de 40 pistes à lire dans n’importe quel ordre souhaité. 2,4,5 6 2,4,5 1 3 STANDBY/ON TUNER/ RANDOM BAND TAPE DISPLAY PUSH HBS/ PRESET EQ FM MODE OVER /BEAT CUT PROGRAM/ INTRO CLOCK SET PRESET GROUP REPEAT... -
Page 40: Lecture Programmée D'un Disque Mp3
Lecture programmée d’un disque MP3 Vous pouvez programmer un maximum de 40 pistes à lire dans n’importe quel ordre souhaité. 1 Appuyez sur PROGRAM/CLOCK SET dans le Pour vérifier le contenu d’un programme mode arrêt. Appuyez plusieurs fois sur PROGRAM/CLOCK SET L’indicateur PROGRAM apparaît à... -
Page 41: Réception Radio
RÉCEPTION RADIO Réglage d’une station STANDBY/ON TUNER/ RANDOM BAND TAPE DISPLAY PUSH HBS/ PRESET EQ FM MODE OVER /BEAT CUT PROGRAM/ CLOCK SET INTRO PRESET GROUP REPEAT MUTING – DOWN REMOTE VOLUME DISPLAY SENSOR RM-SRCEX30J REMOTE CONTROL 1 Appuyez sur BAND/TUNER pour entrer dans le Utilisation des antennes mode tuner. -
Page 42: Préréglage Des Stations
Préréglage des stations Vous pouvez prérégler 20 stations FM et 10 stations AM. 3,5,6 4,6 3,5,6 STANDBY/ON TUNER/ RANDOM BAND TAPE DISPLAY PUSH HBS/ PRESET EQ FM MODE OVER /BEAT CUT PROGRAM/ INTRO CLOCK SET PRESET GROUP REPEAT MUTING – DOWN REMOTE VOLUME... -
Page 43: Lecture De Cassettes
LECTURE DE CASSETTES Remarques sur les bandes cassettes Insertion d’une cassette • Utilisez uniquement des bandes normales de type I. 1 Appuyez sur STOP/EJECT § pour ouvrir le Les caractéristiques d’enregistrement/lecture de cette logement à cassette. unité sont celles prévues pour les bandes normales, qui 2 Insérez une cassette avec le côté... - Page 44 Fonctionnement de base STANDBY/ON TUNER/ RANDOM BAND TAPE DISPLAY PUSH HBS/ PRESET EQ FM MODE OVER /BEAT CUT PROGRAM/ INTRO CLOCK SET PRESET GROUP REPEAT MUTING – DOWN REMOTE VOLUME DISPLAY SENSOR RM-SRCEX30J REMOTE CONTROL 1 Appuyez sur TAPE pour entrer dans le mode Pour rembobiner rapidement une bande cassette.
-
Page 45: Enregistrement
ENREGISTREMENT Fonctionnement de base STANDBY/ON TUNER/ RANDOM BAND TAPE DISPLAY PUSH HBS/ PRESET EQ FM MODE OVER /BEAT CUT PROGRAM/ CLOCK SET INTRO PRESET GROUP REPEAT MUTING – DOWN REMOTE VOLUME DISPLAY SENSOR RM-SRCEX30J REMOTE CONTROL Enregistrement standard Utilisation de la fonction de coupure de pulsation (beat-cut) 1 Préparez la source d’enregistrement. -
Page 46: Enregistrement Synchronisé Avec La Lecture D'un Cd
Enregistrement synchronisé avec la lecture d’un CD Vous pouvez faire en sorte que le lecteur CD lance la lecture lorsque la platine cassette démarre le mode enregistrement. STANDBY/ON TUNER/ RANDOM BAND TAPE DISPLAY PUSH HBS/ PRESET EQ FM MODE OVER /BEAT CUT PROGRAM/ INTRO... -
Page 47: Entretien
ENTRETIEN Nettoyage des têtes, du cabestan et Nettoyage de la lentille du lecteur CD du galet d’entraînement Si la lentille du lecteur CD est sale, le son peut être dégradé. Le nettoyage est important! Lorsqu’une bande défile, il est naturel que de la poudre Ouvrez le logement du disque et nettoyez la lentille. -
Page 48: Dépannage
DÉPANNAGE • Si vous avez un problème avec votre appareil, vérifiez • Si vous ne pouvez pas résoudre le problème à partir la présence dans cette liste d’une solution éventuelle des conseils qui figurent ici ou si l’unité a été avant d’appeler le service après-vente. -
Page 49: Spécifications
SPÉCIFICATIONS Lecteur CD Général : Cone de 9 cm × 2 Capacité de CD : 1 CD Enceintes Impédance de l’enceinte : 4 Ω Rapport signal-bruit : 75 dB Plage dynamique : 60 dB Puissance de sortie : 2 W par canal, RMS min., sous 4 Ω... - Page 50 EN, FR © 2004 Victor Company of Japan, Limited 0504MZMBICORI...