Télécharger Imprimer la page

Publicité

Les langues disponibles
  • FR

Les langues disponibles

  • FRANÇAIS, page 39

Liens rapides

KREUZLINIENLASER / CROSS LINE LASER /
NIVEAU LASER EN CROIX PKLL 8 A2
KREUZLINIENLASER
Originalbetriebsanleitung
NIVEAU LASER EN CROIX
Traduction des instructions d'origine
KŘÍŽOVÝ LINIOVÝ LASER
Překlad originálního provozního návodu
LASER DE LINHAS
CRUZADAS
Tradução do manual de instruções original
IAN 304474
CROSS LINE LASER
Translation of the original instructions
KRUISLIJNLASER
Vertaling van de originele gebruiksaanwijzing
NIVEL LÁSER DE LÍNEAS
CRUZADAS
Traducción del manual de instrucciones original

Publicité

loading

Sommaire des Matières pour Parkside PKLL 8 A2

  • Page 1 KREUZLINIENLASER / CROSS LINE LASER / NIVEAU LASER EN CROIX PKLL 8 A2 KREUZLINIENLASER CROSS LINE LASER Originalbetriebsanleitung Translation of the original instructions NIVEAU LASER EN CROIX KRUISLIJNLASER Traduction des instructions d‘origine Vertaling van de originele gebruiksaanwijzing KŘÍŽOVÝ LINIOVÝ LASER NIVEL LÁSER DE LÍNEAS...
  • Page 2 DE / AT / CH Originalbetriebsanleitung Seite GB / IE Translation of the original instructions Page FR / BE Traduction des instructions d‘origine Page NL / BE Vertaling van de originele gebruiksaanwijzing Pagina Překlad originálního provozního návodu Strana Traducción del manual de instrucciones original Página Tradução do manual de instruções...
  • Page 3 1 1a...
  • Page 4 1 1a...
  • Page 5 Legende der verwendeten Piktogramme ..............Seite Einleitung ................Seite Bestimmungsgemäßer Gebrauch ........... Seite Teilebeschreibung ..............Seite Lieferumfang ................Seite Technische Daten ..............Seite Sicherheitshinweise ............ Seite Sicherheitshinweise für Batterien / Akkus ....... Seite 11 Inbetriebnahme ............. Seite 12 Batterien einsetzen / wechseln ..........Seite 13 Ein- / Ausschalten..............
  • Page 6 Schutzhandschuhe tragen! Achtung! Schützen Sie sich vor Laserstrahlung! Nicht in den Laserstrahl blicken! Kreuzlinienlaser PKLL 8 A2 Einleitung Wir beglückwünschen Sie zum Kauf Ihres neuen Produkts. Sie haben sich damit für ein hochwertiges Produkt entschieden. Die Bedienungsanleitung ist Teil dieses Produkts. Sie enthält wichtige Hinweise für Sicherheit, Gebrauch und Entsorgung.
  • Page 7 Bestimmungsgemäßer Gebrauch Das Produkt eignet sich zum Ermitteln und Überprüfen von waagrech- ten und senkrechten Linien. Das Produkt ist ausschließlich für den Betrieb an geschlossenen Einsatzorten geeignet. Jede andere Verwen- dung oder Veränderung des Produkts gilt als nicht bestimmungsgemäß und birgt erhebliche Unfallgefahren. Für aus bestimmungswidriger Verwendung entstandene Schäden übernimmt der Hersteller keine Haftung.
  • Page 8 Sicherungsschraube (zum Einstellen der Höhe der Mittelsäule) Kunststoffring Arretierhebel (zum Einstellen der Höhe der Beine) Stativbeine Stativ-Flachkopf Schnellwechselplatte Lieferumfang 1 Kreuzlinienlaser 1 Stativ 2 1,5 V-Batterien, Typ AA 1 Bedienungsanleitung Technische Daten Betriebsspannung: (Gleichstrom) Arbeitsbereich mindestens Nivelliergenauigkeit: +/- 0,5 mm / m Selbstnivellierbereich typisch: ±...
  • Page 9 Gewicht Stativ: 330 g Maße Produkt: ca. 77 x 61 x 90 mm Maße Stativ: 65 cm 1) Der Arbeitsbereich kann durch ungünstige Umgebungsbedingungen (z. B. direkte Sonneneinstrahlung) verringert werden. Sicherheitshinweise ERSTICKUNGSGEFAHR! Verpackungsmaterialien (z. B. Folien oder Polystyrol) dürfen nicht zum Spielen verwendet werden. Halten Sie Kinder stets von Verpackungsmaterial fern.
  • Page 10 Setzen Sie das Produkt keinen extremen Temperaturen oder Tem- peraturschwankungen aus. Lassen Sie es z. B. nicht längere Zeit im Auto liegen. Lassen Sie das Produkt bei größeren Temperatur- schwankungen erst austemperieren, bevor Sie es in Betrieb nehmen. Bei extremen Temperaturen oder Temperaturschwankungen kann die Präzision des Produkts beeinträchtigt werden.
  • Page 11 Schauen Sie nicht direkt in den Laserstrahl bzw. in die Laseraustritt- söffnung Das Betrachten des Laserstrahls mit optischen Instrumenten (z. B. Lupe, Vergrößerungsgläsern u. ä.) ist mit einer Augengefährdung verbunden. VORSICHT! Wenn andere als die hier angegebenen Bedienungs- oder Justiereinrichtungen benutzt oder andere Verfahrensweisen ausgeführt werden, kann dies zu gefährlicher Strahlungseinwir- kung führen.
  • Page 12 Wenn Batterien / Akkus ausgelaufen sind, vermeiden Sie den Kontakt von Haut, Augen und Schleimhäuten mit den Chemikalien! Spülen Sie die betroffenen Stellen sofort mit klarem Wasser und suchen Sie einen Arzt auf! SCHUTZHANDSCHUHE TRAGEN! Ausgelaufene oder beschädigte Batterien / Akkus können bei Berüh- rung mit der Haut Verätzungen verursachen.
  • Page 13 Batterien einsetzen / wechseln Öffnen Sie das Batteriefach Setzen Sie die Batterien ein. Achten Sie dabei auf die richtige Polung entsprechend der Darstellung auf der Innenseite des Batteriefachs. Schließen Sie das Batteriefach Hinweis: Bei geringem Batteriezustand blinkt die LED-Kontroll- leuchte rot.
  • Page 14 Nach dem Einschalten gleicht die Nivellierautomatik Unebenhei- ten innerhalb des Selbstnivellierbereiches von ±4° automatisch aus. Die Nivellierung ist abgeschlossen, sobald sich die Laserlinien nicht mehr bewegen und die LED-Kontrollleuchte grün leuchtet. Ist die automatische Nivellierung nicht möglich, z. B. weil die Un- terseite des Messwerkzeugs mehr als 4°...
  • Page 15 Waagerechten abweicht (grüne LED ein), halten Sie die H-Taste gedrückt, bis die LED-Kontrollleuchte rot wird. Nun ist die auto- matische Nivellierung ausgeschaltet und die gekreuzten Linien sind permanent eingeschaltet – auch wenn die Unterseite des Messwerkzeugs mehr als 4° von der Waagerechten abweicht. Sie können diesen Modus wieder ausschalten, indem Sie die H-Taste drücken und halten, bis die LED-Kontrollleuchte...
  • Page 16 Mit dem Stativ arbeiten Aufbau und Ausrichtung 1. Ziehen Sie die drei Beine des Stativs auseinander. Der Kunst- stoffring , der alle drei Quergelenke verbindet, wird zum Ende der Mittelsäule bewegt. 2. Lösen Sie die Arretierhebel und verlängern Sie die Beine, bis zu der gewünschten Höhe.
  • Page 17 gewünschten Winkel erreicht haben, ziehen Sie die Sicherungs- schraube fest. Befestigen des Kreuzlinienlasers Richten Sie das 1/4“-Gewinde des Kreuzlinienlasers an der 1/4“-Schraube der Schnellwechselplatte aus und stellen Sie sicher, dass die Schraube festgezogen ist, indem Sie den Metallschlüssel im Uhrzeigersinn drehen. Der Metallschlüssel befindet sich auf der Unterseite der Schnellwechselplatte Schnellwechselplatte vom Stativ entfernen...
  • Page 18 Wartung und Reinigung Das Produkt ist wartungsfrei. ACHTUNG! Tauchen Sie das Produkt niemals in Wasser oder andere Flüssigkeiten. Beim Reinigen darf keine Feuchtigkeit in das Produkt dringen. Halten Sie das Produkt sauber, um gut und sicher zu arbeiten. Verwenden Sie zum Reinigen des Gehäuses ein trockenes Tuch. Reinigen Sie die Laseraustrittsöffnung mit einem sanften Luft- strahl.
  • Page 19 Beachten Sie die Kennzeichnung der Verpackungsmateria- lien bei der Abfalltrennung, diese sind gekennzeichnet mit Abkürzungen (a) und Nummern (b) mit folgender Bedeu- tung: 1–7: Kunststoffe / 20–22: Papier und Pappe / 80– 98: Verbundstoffe. Das Produkt und die Verpackungsmaterialien sind recycelbar, entsorgen Sie diese getrennt für eine bessere Abfallbehand- lung.
  • Page 20 folgt: Cd = Cadmium, Hg = Quecksilber, Pb = Blei. Geben Sie deshalb verbrauchte Batterien / Akkus bei einer kommunalen Sammelstelle ab. Garantie Das Produkt wurde nach strengen Qualitätsrichtlinien sorgfältig produ- ziert und vor Anlieferung gewissenhaft geprüft. Im Falle von Mängeln dieses Produkts stehen Ihnen gegen den Verkäufer des Produkts gesetzliche Rechte zu.
  • Page 21 Vorgehen im Garantiefall Um eine schnelle Bearbeitung Ihres Falles zu garantieren, beachten Sie bitte die folgenden Anweisungen: Halten Sie bitte den Kassenbon als Kaufnachweis sowie die Produktnummer (z. B. IAN 12345) bereit. Sie finden die Produktnummer auf dem Typenschild, vorne links auf der Titelseite der Bedienungsanleitung oder auf einem Aufkleber auf der Produktunterseite.
  • Page 22 Service Service Deutschland Tel.: 0800 5435 111 (kostenfrei aus dem dt. Festnetz / Mobilfunknetz) E-Mail: owim@lidl.de Service Österreich Tel.: 0820 201 222 (0,15 EUR/Min.) E-Mail: owim@lidl.at Service Schweiz Tel.: 0842 665566 (0,08 CHF/Min., Mobilfunk max. 0,40 CHF/Min.) E-Mail: owim@lidl.ch 22 DE/AT/CH...
  • Page 23 List of pictograms used ..........Page 24 Introduction ............... Page 24 Intended use ................Page 25 Description of parts ..............Page 25 Scope of delivery ..............Page 26 Technical data ................. Page 26 Safety notes ..............Page 27 Safety instructions for batteries / rechargeable batteries ..Page 29 Initial use ................
  • Page 24 Attention! Protect yourself from laser radiation! Do not stare into the laser beam! Cross Line Laser PKLL 8 A2 Introduction We congratulate you on the purchase of your new product. You have chosen a high quality product. The instructions for use are part of the product.
  • Page 25 Intended use The product is suitable for the the determination and verification of horizontal and vertical lines. The product is exclusively suitable for use in enclosed operating sites. Any other use or modification of the product shall be considered improper use and may result in serious accidents. The manufacturer assumes no liability for damages due to improper use.
  • Page 26 Legs of the tripod Tripod flat head Quick shoe Scope of delivery 1 Cross line laser 1 Tripod 2 1.5 V-Batteries, Type AA 1 Set of instructions for use Technical data Operating voltage: (direct current) Working area at least Levelling accuracy: +/- 0.5 mm / m Typical self-levelling range: ±...
  • Page 27 1) The operating range can be reduced by unfavourable environmen- tal conditions (e.g. direct sunlight). Safety notes DANGER OF SUFFOCATION! Packaging materials (e.g. films or polystyrene) can not be used as toys. Always keep children away from the packaging material. The packaging material is not a toy. Do not work with the measuring tool in an environment where there is a danger of explosion, where there are flammable liquids, gasses or dusts.
  • Page 28 compare the laser line with a known vertical or horizontal refer- ence line to check it. Turn the measuring tool off when you transport it. When it is switched off the pendulum unit is locked, which otherwise can be damaged in strong movements.
  • Page 29 Never direct the laser beam at people, animals or reflective sur- faces. Even looking briefly into the laser beam can cause damage to the eyes. Safety instructions for batteries / rechargeable batteries DANGER TO LIFE! Keep batteries / rechargeable batteries out of reach of children.
  • Page 30 In the event of a leakage of batteries / rechargeable batteries, immediately remove them from the product to prevent damage. Only use the same type of batteries / rechargeable batteries. Do not mix used and new batteries / rechargeable batteries. Remove batteries / rechargeable batteries if the product will not be used for a longer period.
  • Page 31 Close the battery compartment Note: when the battery is low, the LED indicator blinks red. Always replace all batteries at the same time. Only use batteries from the same manufacturer and with the same capacity. Remove the batteries from the product if it will not be in use for a prolonged period of time.
  • Page 32 Note: operation without automatic levelling will always be indi- cated via the red LED indicator Note: if the product is agitated or its position is changed during operation, the product will automatically re-level. After re-levelling check the positions of the horizontal and vertical laser lines against reference points to avoid errors.
  • Page 33 Working without the automatic levelling system Put the LOCK switch into the position . Hold down the H-button until the red LED indicator comes on. Now the product will release two laser lines from the laser beam opening that are not levelled. Operation without automatic levelling will always be indicated via the red LED indicator Practical guidance Always use only the middle of the laser line for markings.
  • Page 34 6. For a horizontal alignment of the tripod flat head , loosen the long handle by turning anti-clockwise and move the handle up or down as desired. If the air bubble of the spirit level is located exactly in the middle of the circle, the tripod flat head is aligned horizontally.
  • Page 35 4. If want to put back the cross line laser on the tripod again, pull the lever on the tripod flat head and place the quick shoe 1 1a back firmly on the tripod flat head . Then, release the lever to bring back to original position and to firmly hold the quick 1 1a shoe (see fig.
  • Page 36 Disposal The packaging is made entirely of recyclable materials, which you may dispose of at local recycling facilities. Observe the marking of the packaging materials for waste separation, which are marked with abbreviations (a) and numbers (b) with following meaning: 1–7: plastics / 20–22: paper and fibreboard / 80–98: composite materials.
  • Page 37 Batteries / rechargeable batteries may not be disposed of with the usual domestic waste. They may contain toxic heavy metals and are subject to hazardous waste treatment rules and regulations. The chemi- cal symbols for heavy metals are as follows: Cd = cadmium, Hg = mercury, Pb = lead.
  • Page 38 Warranty claim procedure To ensure quick processing of your case, please observe the following instructions: Please have the till receipt and the item number (e.g. IAN 123456) available as proof of purchase. You will find the item number on the type plate, an engraving on the front page of the instructions (bottom left), or as a sticker on the rear or bottom of the appliance.
  • Page 39 Légende des pictogrammes utilisés ....Page 40 Introduction ............... Page 40 Utilisation conforme ..............Page 41 Descriptif des pièces ............... Page 41 Contenu de la livraison ............Page 42 Caractéristiques techniques ............ Page 42 Consignes de sécurité ..........Page 43 Consignes de sécurité...
  • Page 40 Attention ! Protégez-vous contre les rayons laser ! Ne regardez pas le rayon laser ! Niveau laser en croix PKLL 8 A2 Introduction Nous vous félicitons pour l‘achat de votre nouveau produit. Vous avez opté pour un produit de grande qualité. Le mode d‘emploi fait partie intégrante de ce produit.
  • Page 41 aux instructions et dans les domaines d‘application spécifiés. Lors d‘une cession à tiers, veuillez également remettre tous les documents. Utilisation conforme Le produit est adapté pour déterminer et vérifier les lignes horizontales et verticales. Ce produit est exclusivement conçu pour un usage dans des locaux fermés.
  • Page 42 
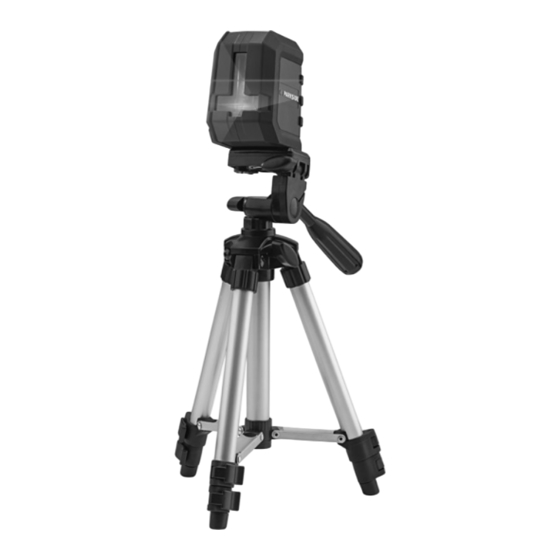
Niveau à bulle Levier (pour la fixation de la plaque à changement rapide) 1 1a Longue poignée Vis de fermeture (pour tourner la tête plate de trépied jusqu‘à 360 degrés à l‘horizontale) Vis de fermeture (pour le réglage en hauteur de la colonne centrale) Bague en plastique Leviers de blocage (pour le réglage en hauteur des pieds) Pieds du trépied...
  • Page 43 Classe de laser : Longueur d’ondes (λ) : 635 nm Puissance P max. : 1 mW Prise avec trépied : Piles : 2 x piles 1,5 V, type AA Poids du produit : 250 g (sans piles) Poids du trépied : 330 g Dimensions du produit : env. 77 x 61 x 90 mm Taille du pied : 65 cm 1) La plage de fonctionnement peut être réduite en raison de conditions...
  • Page 44 Ne jamais laisser le produit sans surveillance et éteignez-le après l’avoir utilisé. D’autres personnes pourraient être aveuglées par le faisceau laser. Risque de lésion oculaire. Protégez le produit contre l’humidité et les rayons solaires directs. Ne pas exposer le produit à des variations de température ou tem- pératures extrêmes.
  • Page 45 LASER < 1 mW λ = 635 nm EN 60825-1:2014 Ne regardez pas directement dans le faisceau laser ou dans l’ouverture du laser Regarder le faisceau laser à l’aide d’instru- ments optiques (par ex. loupe, loupe grossissante, etc.) peut repré- senter un risque pour les yeux.
  • Page 46 vous risquez de provoquer une surchauffe, un incendie ou une ex- plosion. Ne jetez jamais des piles / piles rechargeables au feu ou dans l’eau. Ne pas soumettre les piles / piles rechargeables à une charge mécanique. Risque de fuite des piles / piles rechargeables Évitez d’exposer les piles / piles rechargeables à...
  • Page 47 Nettoyez les contacts de la pile / pile rechargeable et du compar- timent à pile avant d‘insérer la pile ! Retirez immédiatement les piles / piles rechargeables usées du produit. Mise en service Vérifiez que les éléments de la livraison sont au complet, et constatez si des dommages sont visibles.
  • Page 48 Mise en marche / arrêt Pour allumer le produit, mettez le bouton de verrouillage LOCK en position . Le produit envoie deux lignes laser à partir de l’ou- verture de sortie laser immédiatement après la mise en marche. Pour éteindre le produit, mettez le bouton de verrouillage LOCK en position .
  • Page 49 Utilisation de lignes uniques ou croisées Si le produit est en nivellement automatique et que la partie inférieure de l’outil de mesure est inférieure à 4 ° de l’horizontale (LED verte allumé), appuyez sur le bouton H pour activer ou désactiver la ligne horizontale.
  • Page 50 Travailler sans nivellement automatique Basculez le bouton de verrouillage LOCK en position . Maintenez le bouton H enfoncé jusqu’à ce que le voyant lumi- neux LED rouge s’allume. Maintenant, le produit envoie deux lignes laser à partir de l’ouverture de sortie laser , qui ne sont pas nivelées.
  • Page 51 6. Pour un alignement horizontal de la tête plate de trépied , dé- bloquez la poignée longue en la tournant dans le sens anti- horaire et en la déplaçant vers le haut ou le bas. La tête plate de trépied est alignée à l‘horizontale lorsque la bulle d‘air du niveau se trouve exactement au centre du cercle.
  • Page 52 est fermement vissé sur la plaque à changement rapide. Le laser en croix peut maintenant être retiré facilement du trépied. 4. Si vous souhaitez de nouveau fixer le laser en croix sur le trépied, tirez le levier de tête plate de trépied et fixez de nouveau 1 1a la plaque à...
  • Page 53 Rangement Si vous n’utilisez plus le produit pendant une longue période, enle- vez les piles et stockez-le dans un endroit propre, sec et protégé des rayons directs du soleil. Mise au rebut L’emballage se compose de matières recyclables pouvant être mises au rebut dans les déchetteries locales.
  • Page 54 Les piles / piles rechargeables défectueuses ou usagées doivent être recyclées conformément à la directive 2006/66/CE et ses modifica- tions. Les piles et / ou piles rechargeables et / ou le produit doivent être retournés dans les centres de collecte proposés. Pollution de l’environnement par la mise au re- but incorrecte des piles / piles rechargeables ! Les piles / piles rechargeables ne doivent pas être mises au rebut avec...
  • Page 55 La garantie prend fin si le produit est endommagé suite à une utilisation inappropriée ou à un entretien défaillant. La garantie couvre les vices matériels et de fabrication. Cette garantie ne s’étend ni aux pièces du produit soumises à une usure normale (p. ex.
  • Page 56 Service après-vente Service après-vente France Tél.: 0800 919270 E-Mail: owim@lidl.fr Service après-vente Belgique Tél.: 070 270 171 (0,15 EUR/Min.) E-Mail: owim@lidl.be 56 FR/BE...
  • Page 57 Legenda van de gebruikte pictogrammen ..............Pagina 58 Inleiding ................Pagina 58 Correct gebruik ..............Pagina 59 Beschrijving van de onderdelen ..........Pagina 59 Omvang van de levering .............Pagina 60 Technische gegevens ............Pagina 60 Veiligheidsinstructies ..........Pagina 61 Veiligheidsinstructies voor batterijen / accu‘s .....Pagina 63 Ingebruikname ............Pagina 64 Batterijen plaatsen / vervangen ...........Pagina 65...
  • Page 58 Veiligheidshandschoenen dragen! Opgelet! Bescherm u tegen laserstraling! Niet in de laserstraal kijken! Kruislijnlaser PKLL 8 A2 Inleiding Hartelijk gefeliciteerd met de aankoop van uw nieuwe pro- duct. U heeft voor een hoogwaardig product gekozen. De gebruiksaanwijzing is een deel van het product. Deze bevat belangrijke aanwijzingen voor veiligheid, gebruik en verwijdering.
  • Page 59 beschreven en voor de aangegeven toepassingsgebieden. Overhandig alle documenten bij doorgifte van het product aan derden. Correct gebruik Het product is geschikt voor het bepalen en controleren van horizon- tale en verticale lijnen. Het product is uitsluitend bedoeld voor gebruik in gesloten ruimtes.
  • Page 60 Borgschroef (voor het draaien van de statief-kop tot max. 360 gra- den horizontaal) Borgschroef (voor het instellen van de hoogte van de middenkolom) Kunststof ring Vergrendeling (voor het instellen van de hoogte van de poten) Statiefpoten Statief-kop Snelwisselplaat Omvang van de levering 1 kruislijnlaser 1 statief 2 1,5 V-batterijen, type AA...
  • Page 61 Gewicht product: 250 g (zonder batterijen) Gewicht statief: 330 g Afmetingen product: ca. 77 x 61 x 90 mm Afmetingen statief: 65 cm 1) Het werkbereik kan door ongunstige omgevingsfactoren (bijv. direct zonlicht) verminderd worden. Veiligheidsinstructies VERSTIKKINGSGEVAAR! Verpakkingsmateriaal (bijv. folie of polystyreen) mag niet worden gebruikt om ermee te spelen.
  • Page 62 Stel het product niet bloot aan extreme temperaturen of temperatuur- schommelingen. Laat het bijvoorbeeld niet voor lange tijd in de auto liggen. Laat het product bij grote temperatuurschommelingen eerst acclimatiseren alvorens het in bedrijf te nemen. Bij extreme tempe- raturen of temperatuurschommelingen kan de nauwkeurigheid van het product beïnvloed worden.
  • Page 63 Het observeren van de laserstraal met optische instrumenten (bijv. loep, vergrootglas e. d.) is schadelijk voor de ogen. VOORZICHTIG! Als er andere dan de hier genoemde bedienings- of afstelfuncties worden gebruikt of andere handelingen worden uitgevoerd, kan dit tot gevaarlijke blootstelling aan straling leiden. Richt de laserstraal nooit op reflecterende oppervlakken, personen of dieren.
  • Page 64 DRAAG VEILIGHEIDSHANDSCHOENEN! Lekkende of beschadigde batterijen / accu‘s kunnen in geval van huidcontact chemische brandwonden veroorzaken. Draag daarom in dit geval geschikte veiligheidshandschoenen. Als de batterijen / accu‘s lekken, dient u deze direct uit het product te halen om beschadigingen te vermijden. Gebruik alleen batterijen / accu‘s van hetzelfde type.
  • Page 65 Batterijen plaatsen / vervangen Open het batterijvak Plaats de batterijen. Let daarbij op de juiste polariteit overeenkomstig de afbeelding aan de binnenkant van het batterijvak. Sluit het batterijvak Opmerking: bij sterk ontladen batterijen knippert het led-contro- lelampje rood. Vervang altijd alle batterijen gelijktijdig. Gebruik alleen batterijen van dezelfde fabrikant en met gelijke capaciteit.
  • Page 66 Na het inschakelen compenseert de automatische nivelleerfunctie ongelijkheden binnen het zelfnivelleringsbereik van ±4° automatisch. De nivellering is klaar zodra de laserlijnen niet meer bewegen en het led-controlelampje groen oplicht. Als de automatische nivellering niet mogelijk is, bijv. omdat de on- derkant van het meetapparaat niet waterpas staat en daar meer dan 4°...
  • Page 67 afwijkt (groene led aan), houdt u de H-knop ingedrukt tot het led-controlelampje rood wordt. De automatische nivellering is nu uitgeschakeld en de gekruiste lijnen zijn permanent ingeschakeld – ook als de onderkant van het meetapparaat meer dan 4° van waterpas afwijkt. U kunt deze modus weer uitschakelen door de H-knop in te drukken en deze ingedrukt te houden tot het led-controlelampje...
  • Page 68 Met het statief werken Opbouw en afstelling 1. Klap de drie poten van het statief uit elkaar. De kunststof ring die de drie dwarsstangen verbindt, wordt naar het uiteinde van de middenkolom geschoven. 2. Maak de vergrendeling los en verleng de poten tot op de gewenste hoogte.
  • Page 69 Bevestigen van de kruislijnlaser Breng de -schroefdraad van de kruislijnlaser in lijn met de -schroef van de snelwisselplaat en controleer of de schroef goed is vastgedraaid door de metalen slotplaat rechtsom te draaien. De metalen slotplaat bevindt zich aan de onderkant van de snelwissel- plaat Snelwisselplaat van het statief verwijderen Als u de kruislijnlaser op een andere plek wilt gebruiken of deze apart...
  • Page 70 Houd het product schoon om goed en veilig te kunnen werken. Gebruik voor het reinigen van de behuizing een droge doek. Reinig de opening van de laserstraal met een zachte luchtstroom. Bij sterkere verontreinigingen het vuil verwijderen met een licht voch- tig gemaakt wattenstaafje.
  • Page 71 Het product en de verpakkingsmaterialen zijn recyclebaar; verwijder deze afzonderlijk voor een betere afvalbehandeling. Het Triman-logo geldt alleen voor Frankrijk. Informatie over de mogelijkheden om het uitgediende product na gebruik te verwijderen, verstrekt uw gemeentelijke over- heid. Gooi het afgedankte product omwille van het milieu niet weg via het huisvuil, maar geef het af bij het daarvoor bestemde depot of het gemeentelijke milieupark.
  • Page 72 Garantie Het product wordt volgens strenge kwaliteitsrichtlijnen zorgvuldig ge- produceerd en voor levering grondig getest. In geval van schade aan het product kunt u rechtmatig beroep doen op de verkoper van het product. Deze wettelijke rechten worden door onze hierna vermelde garantie niet beperkt.
  • Page 73 Garantieprocedure Om bij aanspraak op garantie een snelle afhandeling te kunnen waar- borgen, dient u de volgende aanwijzingen in acht te nemen: Houd de kassabon als aankoopbewijs en het productnummer (bijv. IAN 12345) bij de hand. U vindt het productnummer op het typeplaatje, linksvoor op de titelpagina van de gebruiksaanwijzing of op een sticker op de onderkant van het product.
  • Page 74 Legenda použitých piktogramů ....Strana 75 Úvod ..................Strana 75 Použití ke stanovenému účelu..........Strana 76 Popis dílů ................Strana 76 Obsah dodávky ..............Strana 77 Technické údaje ..............Strana 77 Bezpečnostní upozornění ........Strana 78 Bezpečnostní pokyny pro baterie a akumulátory ....Strana 80 Uvedení...
  • Page 75 Noste ochranné rukavice! Pozor! Chraňte se před laserovým zářením! Nedívat se do laserového paprsku! Křížový liniový laser PKLL 8 A2 Úvod Blahopřejeme Vám ke koupi nového výrobku. Rozhodli jste se pro kvalitní produkt. Návod k obsluze je součástí tohoto výrobku. Obsahuje důležité pokyny pro bezpečnost, použití...
  • Page 76 Použití ke stanovenému účelu Výrobek je vhodný na určení a kontrolu vodorovných a svislých linií. Výrobek je určen výhradně k použití v uzavřených místnostech. Jaké- koli jiné použití nebo úprava výrobku je v  rozporu s předpokládaným použitím a skrývá značné nebezpečí zranění. Výrobce neručí za škody vzniklé...
  • Page 77 Nohy stativu Plochá hlava stativu Rychlovýměnná deska Obsah dodávky 1 křížový laser 1 stativ 2 baterie 1,5 V, typ AA 1 návod k obsluze Technické údaje Provozní napětí: (stejnosměrný proud) Pracovní oblast nejméně Přesnost nivelace: +/- 0,5 mm/m Rozsah samočinné nivelace typický: ± 4° Doba nivelace typická: cca 4 vteřiny Provozní...
  • Page 78 1) Pracovní dosah se může vlivem nepříznivých podmínek zmenšit (např. vlivem slunečního záření). Bezpečnostní upozornění NEBEZPEČÍ UDUŠENÍ! S obalovými materiály (např. s fóliemi nebo polystyrolem) si děti nesmí hrát. Držte neustále obalový materiál mimo dosah dětí. Obalový materiál není hračkou. Nepracujte s výrobkem ve výbušném prostředí, ve kterém se na- cházejí...
  • Page 79 zkontrolujte laserové linie s referenčními vodorovnými a svislými liniemi. Před transportem výrobek vypněte. Po vypnutí se zablokuje kyvadlová jednotka, která by se mohla pohyby při transportu poškodit. Nepřibližujte výrobek do blízkosti kardiostimulátorů. Magnet uvnitř výrobku vytváří magnetické pole, které může negativně ovlivnit funkci kardiostimulátorů.
  • Page 80 Nemiřte laserovým paprskem na plochy, které ho odráží, osoby nebo zvířata. Již krátký pohled do laserového paprsku může vést ke zranění zraku. Bezpečnostní pokyny pro baterie a akumulátory NEBEZPEČÍ OHROŽENÍ ŽIVOTA! Uchovávejte baterie a akumulátory mimo dosah dětí. V případě spolknutí okamžitě vyhledejte lékařskou pomoc! NEBEZPEČÍ...
  • Page 81 Používejte jen baterie nebo akumulátory stejného typu. Nekombi- nujte staré baterie nebo akumulátory s novými! Odstraňte baterie nebo akumulátory při delším nepoužívání z výrobku. Nebezpečí poškození výrobku Používejte jen udaný typ baterie nebo akumulátoru! Nasazujte baterie nebo akumulátory podle označení polarity (+) a (-) na bateriích nebo akumulátorech a na výrobku.
  • Page 82 Při delším nepoužívání výrobku vyjměte baterie. Při delším sklado- vání baterie korodují a vybíjí se. Zapínání a vypínání K zapnutí výrobku posuňte spínač LOG do polohy . Ihned po zapnutí vysílá výrobek z výstupního otvoru dvě laserové linie. K vypnutí výrobku posuňte spínač LOG do polohy .
  • Page 83 Použití jedné a křížených linií Jestliže se výrobek automaticky niveluje a jeho spodní strana je méně než 4° od vodorovné polohy (zelená LED svítí), stiskněte pro zapnutí resp. vypnutí opatrně tlačítko H Pro zapnutí resp. vypnutí svislé linie stiskněte odpovídajícím způso- bem tlačítko V Překřížené...
  • Page 84 Pracovní pokyny Na označení používejte vždy jen střed laserové linie. Šířka lase- rové linie se mění se vzdáleností. Práce se stativem Postavení a seřízení 1. Roztáhněte nohy stativu . Umělohmotný kroužek , spojující všechny tři příčné klouby, se pohybuje směrem ke konci středního sloupku.
  • Page 85 8. Ke svislému nastavení ploché hlavy stativu až o 90 stupňů, k dosažení požadovaného úhlu povolte nejdříve jistící šroub . Po nastavení požadovaného úhlu utáhněte pevně jistící šroub Připevnění křížového laseru Nastavte závit 1/4“ křížového laseru na šroub 1/4“ rychlovýměnné desky a utáhněte pevně...
  • Page 86 Údržba a čištění Výrobek nevyžaduje údržbu. POZOR! Neponořujte výrobek nikdy do vody nebo jiných tekutin. Při čištění nesmí vniknout do výrobku vlhkost. Udržujte výrobek v čistotě pro dobrou a bezpečnou práci. Na čištění tělesa používejte suchý hadr. Výstupní otvor pro laserový paprsek čistěte mírným proudem vzduchu.
  • Page 87 ateriálů zkratkami (a) a čísly (b), s následujícím významem: 1–7: umělé hmoty / 20–22: papír a lepenka / 80–98: složené látky. Výrobek a obalové materiály jsou recyklovatelné, zlikvidujte je odděleně pro lepší odstranění odpadu. Logo Triman platí jen pro Francii. O možnostech likvidace vysloužilých zařízení...
  • Page 88 Záruka Výrobek byl vyroben s nejvyšší pečlivostí podle přísných kvalitativních směrnic a před odesláním prošel výstupní kontrolou. V případě závad máte možnost uplatnění zákonných práv vůči prodejci. Vaše práva ze zákona nejsou omezena naší níže uvedenou zárukou. Na tento artikl platí 3 záruka od data zakoupení. Záruční lhůta začíná od data zakoupení.
  • Page 89 Číslo výrobku najdete na typovém štítku, vlevo na titulní stránce návodu k obsluze nebo na nálepce, na spodní straně výrobku. Jestliže je výrobek vadný, kontaktujte e-mailem nebo telefonicky udaný servis. Obdržíte adresu servisu a pak můžete vadný výrobek bezplatně zaslat. Přiložte k zásilce důkaz o zakoupení (pokladní stvrzenku) a informaci o závadě...
  • Page 90 Leyenda de pictogramas utilizados ..Página Introducción ..............Página Uso adecuado ..............Página Descripción de los componentes ........Página Volumen de suministro ............Página Características técnicas ............Página Aviso sobre seguridad ........Página Indicaciones de seguridad sobre las pilas / baterías ..Página Puesta en funcionamiento ......Página Colocar / cambiar las pilas ..........Página Encendido / apagado ............Página Utilizar nivelación automática ..........Página Utilización de una línea única y de líneas cruzadas ..Página...
  • Page 91 ¡Atención! ¡Protéjase de la radiación láser! ¡No mire directamente al láser! Nivel láser de líneas cruzadas PKLL 8 A2 Introducción Enhorabuena por la adquisición de su nuevo producto. Ha optado por un producto de alta calidad. El manual de ins- trucciones forma parte de este producto.
  • Page 92 continuación y para las aplicaciones indicadas. Adjunte igualmente toda la documentación en caso de entregar el producto a terceros. Uso adecuado El producto sirve para emitir y revisar líneas horizontales y verticales. El producto es apto exclusivamente para su uso en espacios cerrados. Cualquier otro uso o modificación del producto se considerará...
  • Page 93 Mango largo Tornillo de seguridad (para girar el cabezal plano del trípode hasta 360 grados en horizontal) Tornillo de seguridad (para ajustar la altura de la columna central) Anillo de plástico Palanca de bloqueo (para ajustar la altura de las patas) Patas del trípode Cabezal plano del trípode Zapata rápida...
  • Page 94 Sujeción de trípode: 1/4“ Pilas: 2 x pilas 1,5 V, tipo AA Peso del producto: 250 g (sin pilas) Peso del trípode: 330 g Dimensiones del producto: aprox. 77 x 61 x 90 mm Dimensiones del trípode: 65 cm 1) El área de trabajo puede disminuir si las condiciones ambientales no son favorables (por ej.
  • Page 95 No deje el producto encendido sin supervisión y el producto des- pués de su uso. Es posible que otras personas queden deslumbra- das por el láser. Riesgo de lesiones en los ojos. Proteja el producto de la humedad y la exposición directa a la radiación solar.
  • Page 96 LASER < 1 mW λ = 635 nm EN 60825-1:2014 No mire directamente al haz de láser ni al orificio de salida de este Observar el láser con instrumentos ópticos (por ej. lupas, lentes de aumento, etc.) va relacionado con riesgos para los ojos.
  • Page 97 Nunca arroje pilas / baterías al fuego o al agua. No aplique cargas mecánicas sobre las pilas / baterías. Riesgo de sulfatación de las pilas / baterías Evite condiciones y temperaturas extremas que puedan influir en el funcionamiento de las pilas / baterías, por ejemplo, acercarlas a un radiador o exponerlas directamente a la luz solar.
  • Page 98 Puesta en funcionamiento Compruebe que la entrega esté completa y busque posibles daños visibles. Retire completamente el material de embalaje del producto. Colocar/cambiar las pilas Abra el compartimento de las pilas Coloque las pilas. Al hacerlo, asegúrese de que la polaridad sea correcta de acuerdo con la imagen del interior del compartimento de las pilas.
  • Page 99 Utilizar nivelación automática Para trabajar con la nivelación automática coloque el producto sobre una superficie horizontal y firme, o fíjelo mediante la rosca 1/4“ a un trípode. Una vez encendida, la nivelación automática iguala todas las irre- gularidades dentro del rango de ±4° de forma automática. La ni- velación concluye en cuanto las líneas láser dejen de moverse y el LED de control se ilumina en verde.
  • Page 100 Las líneas cruzadas pueden fijarse con este producto: Si el producto se encuentra en modo de nivelación automática y la parte inferior de la herramienta de medición difiera de la hori- zontal menos de 4º (LED verde encendido), mantenga pulsado el botón H hasta que el LED de control se ilumine en rojo.
  • Page 101 Trabajar con el trípode Montaje y ajuste 1. Despliegue las patas del trípode. El anillo de plástico , que une las tres articulaciones, se desplaza hasta el final de la columna central. 2. Abra las palancas de bloqueo y alargue las patas hasta la altura deseada.
  • Page 102 Fijación del láser de líneas cruzadas Ajuste la rosca de 1/4“ del láser de líneas cruzadas al tornillo de 1/4“ de la zapata rápida y asegúrese de que el tornillo esté bien apretado girando la llave metálica en el sentido de las agujas del reloj.
  • Page 103 Mantenimiento y limpieza El producto no requiere mantenimiento. ¡ATENCIÓN! Nunca sumerja el producto en agua o en otros líquidos. Al limpiar el producto no debe caer ningún líquido en su interior. Mantenga el producto siempre limpio para trabajar adecuada- mente y de forma segura. Para limpiar la carcasa, utilice un paño seco.
  • Page 104 Tenga en cuenta el distintivo del embalaje para la separa- ción de residuos. Está compuesto por abreviaturas (a) y números (b) que significan lo siguiente: 1–7: plásticos / 20–22: papel y cartón / 80–98: materiales compuestos. El producto y el material de embalaje son reciclables. Separe los materiales para un mejor tratamiento de los residuos.
  • Page 105 mercurio, Pb = plomo. Las pilas / baterías deben reciclarse en un punto de recolección específico para ello. Garantía El producto ha sido fabricado cuidadosamente siguiendo exigentes normas de calidad y ha sido probado antes de su entrega. En caso de defecto del producto, usted tiene derechos legales frente al vende- dor del mismo.
  • Page 106 Tramitación de la garantía Para garantizar una rápida tramitación de la garantía, tenga en cuenta las siguientes indicaciones: Tenga disponible el recibo de compra como comprobante, así como el número de producto (por ej. IAN 12345). Encontrará el número del producto en la placa de características, a la izquierda en la portada del manual de instrucciones o en una pegatina en la zona inferior del producto.
  • Page 107 Legenda dos pictogramas utilizados ..Página 108 Introdução ..............Página 108 Utilização correta ..............Página 109 Descrição das peças ............Página 109 Material fornecido .............Página 110 Dados técnicos ..............Página 110 Indicações de segurança ........Página 111 Indicações de segurança relativas às pilhas / baterias ...Página 113 Colocação em funcionamento ......Página 115 Colocar / substituir as pilhas ..........Página 115...
  • Page 108 Utilizar luvas de proteção! Atenção! Proteja-se dos raios laser! Não olhar diretamente para o raio laser! Laser de linhas cruzadas PKLL 8 A2 Introdução Damos-lhe os parabéns pela aquisição do seu novo pro- duto. Acabou de adquirir um produto de grande quali- dade.
  • Page 109 descrito e para as áreas de aplicação indicadas. Se transmitir o ar- tigo a terceiros, entregue também os respectivos documentos. Utilização correta O produto é apropriado para identificar e verificar linhas horizontais e verticais. Esse produto destina-se exclusivamente a ser utilizado em locais fechados.
  • Page 110 Nível de bolha de ar Alavanca (para fixação da placa de encaixe rápido) 1 1a Pega comprida Parafuso de fixação (para rodar a cabeça plana do tripé até 360 graus na horizontal) Parafuso de fixação (para ajustar a coluna central) Anel de plástico Alavanca de bloqueio (para ajustar a altura das pernas) Pernas do tripé...
  • Page 111 Amplitude de onda (λ): 635 nm Potência máxima P máx: 1 mW Recepção do suporte: 1/4“ Pilhas: 2 x 1,5 V-Pilhas, Tipo AA Peso produto: 250 g (sem pilhas) Peso suporte: 330 g Dimensões produto: cerca de 77 x 61 x 90 mm Dimensões suporte: 65 cm 1) A área de trabalho pode ser limitada através de condições am-...
  • Page 112 Não deixe o produto ligado sem supervisão e desligue o produto após a utilização. Outras pessoas podem ficar encadeadas com o raio laser. Perigo de ferimentos nos olhos. Proteja o produto de humidade e raios solares diretos. Não exponha o produto a temperaturas elevadas ou a grandes variações de temperatura.
  • Page 113 LASER < 1 mW λ = 635 nm EN 60825-1:2014 Não olhe diretamente para a abertura de saída do laser Olhar para o raio de laser com instrumentos óticos (p. ex. lupa, lentes de ampliação e semelhantes) representa perigo de lesões oculares. CUIDADO! A utilização de dispositivos de comando e ajuste que não é...
  • Page 114 Não exponha as pilhas ou baterias a uma carga mecânica dema- siada elevada. Risco de derrame das pilhas / baterias Evite condições e temperaturas extremas que possam ter efeito sobre as pilhas ou baterias, por ex. elementos de aquecimento / radiação solar direta.
  • Page 115 Colocação em funcionamento Verifique a entrega em relação à sua totalidade e a danos visíveis. Remova todo o material da embalagem do produto. Colocar/substituir as pilhas Abra o compartimento das pilhas Insira as pilhas. Tenha em atenção a polaridade correta conforme ilustração no interior do compartimento de pilhas.
  • Page 116 Utilizar automação de nivelamento Para trabalhar com a automação de nivelamento, coloque o pro- duto em uma superfície horizontal plana ou fixe no suporte com a rosca de suporte 1/4”- Após ligar, a automação de nivelamento iguala irregularidades dentro do espectro de auto-nivelamento de ±4° automaticamente. O nivelamento está...
  • Page 117 As linhas cruzadas podem ser identificadas neste produto: Se o produto se encontra no nivelamento automático e o lado in- ferior da ferramenta de medição estiver desviado em menos de 4° da horizontal (LED verde ligado), mantenha a tecla H primada até...
  • Page 118 Indicações de trabalho Sempre utilize o meio da linha do laser para marcar. A largura da linha do laser se altera com a distância. Trabalhar com o suporte Montagem e alinhamento 1. Abra as pernas do tripé . O anel de plástico , que liga to- das as três juntas transversais é...
  • Page 119 posição desejada. Quando tiver alcançado a posição desejada, aperte o parafuso de fixação 8. Se necessário, solte o parafuso de fixação para ajustar o ângulo da cabeça plana do tripé na vertical até 90 graus e obter o ângulo desejado. Quando tiver alcançado o ângulo desejada, aperte o parafuso de fixação Fixação do laser de linhas cruzadas Alinhe a rosca 1/4“...
  • Page 120 5. Verifique se a placa de encaixe rápido na cabeça plana do tripé está bem presa. Manutenção e limpeza O produto não necessita de manutenção. ATENÇÃO! Nunca mergulhe o produto em água ou outros líqui- dos. Ao limpar não deixar entrar humidade para o produto. Mantenha o produto limpo para trabalhar de maneira segura.
  • Page 121 Eliminação A embalagem é feita de materiais não poluentes que podem ser elimi- nados nos contentores de reciclagem locais. Esteja atento à especificação dos materiais da embalagem para a separação de lixo. Estas são identificadas com abreviações (a) e números (b) com o seguinte significado: 1–7: Plásticos / 20–22: Papel e papelão / 80–98: Mate- riais compostos.
  • Page 122 As pilhas / baterias não podem ser eliminadas no lixo doméstico. Podem conter metais pesados nocivos e estão sujeitas à regulação de lixos tóxicos. Os símbolos químicos dos metais pesados são os se- guintes: Cd = cádmio, Hg = mercúrio, Pb = chumbo. Como tal, depo- site as pilhas / baterias utilizadas num ponto de recolha adequado do seu município.
  • Page 123 desgaste (por ex.º pilhas) ou a danos em peças frágeis, por ex.º inter- ruptores, baterias ou peças de vidro. Com a troca do aparelho, de acordo com DL 67/2003, o tempo de garantia se inicia novamente. Procedimento em caso de garantia Para garantir uma rápida resolução do seu caso, tenha em atenção as seguintes indicações: Guarde o talão da caixa como comprovativo da compra, bem...
  • Page 124 Assistência Técnica Serviço Portugal Tel.: 70778 0005 (0,12 EUR/Min.) E-Mail: owim@lidl.pt 124 PT...
  • Page 125 OWIM GmbH & Co. KG Stiftsbergstraße 1 DE-74167 Neckarsulm GERMANY Model-No.: HG02736 Version: 07/2018 Stand der Informationen · Last Information Update · Version des informations · Stand van de informatie · Stav informací · Estado de las informaciones · Estado das informações: 06 / 2018 ·...