Télécharger Imprimer la page

Publicité

Les langues disponibles
  • FR

Les langues disponibles

Liens rapides

User Manual - EU Version
English
Español
LASER LIGHT
AVOID DIRECT EYE EXPOSURE
Français
CLASS 3R LASER PRODUCT
Deutsch
CLASSIFIED PER EN/IEC 60825-1: 2014
Complies with FDA performance standards for
Nederlands
laser products except for deviations pursuant
to Laser Notice No. 56, dated May 8, 2019.

Publicité

loading

Sommaire des Matières pour Chauvet DJ GigBAR MOVE+ILS

  • Page 1 User Manual - EU Version English Español LASER LIGHT AVOID DIRECT EYE EXPOSURE Français CLASS 3R LASER PRODUCT Deutsch CLASSIFIED PER EN/IEC 60825-1: 2014 Complies with FDA performance standards for Nederlands laser products except for deviations pursuant to Laser Notice No. 56, dated May 8, 2019.
  • Page 2 Table of Contents TABLE OF CONTENTS 1. Before You Begin ..................What Is Included ...................... Unpacking Instructions..................... Text Conventions ..................... Symbols ........................Disclaimer ........................ FCC Compliance...................... Intellectual Property ....................Safety Notes......................Laser Safety Notes....................Laser Safety Label Reproduction................Laser Emission Data ....................Laser Compliance Statement...................
  • Page 3 Tabla de contenido TABLA DE CONTENIDO 1. Antes de Empezar ..................Qué va Incluido ......................Instrucciones de Desembalaje ................. Convenciones del Manual..................Símbolos ........................Exención de responsabilidad ................... Cumplimiento de la FCC ..................Propiedad intelectual....................Notas de Seguridad ....................Notas de Seguridad sobre Láser ................Reproducción de la Etiqueta de Seguridad del Láser..........
  • Page 4 Table des matières TABLE DES MATIÈRES 1. Avant de Commencer................... Ce Qui Est Compris ....................Instructions Relatives au Déballage................. Conventions manuelles.................... Symboles ......................... Clause de Non-Responsabilité................. Conformité FCC ....................... Propriété intellectuelle....................Consignes de Sécurité ..................... Consignes de Sécurité Relatives au Laser .............. Reproduction de l’Étiquette de Sécurité...
  • Page 5 Inhaltsverzeichnis INHALTSVERZEICHNIS 1. Erste Schritte ....................Packungsinhalt......................Anweisungen für das Auspacken................Konventionen des Handbuchs ................. Symbole ........................Haftungsausschluss ....................FCC-Konformität ...................... Geistiges Eigentum ....................Sicherheitshinweise ....................Hinweise zur Lasersicherheit ................... Warn- und Sicherheitsschilder auf dem Lasergerät ..........Laseremissionsdaten ....................Laser-Konformitätserklärung..................2.
  • Page 6 Inhoudsopgave INHOUDSOPGAVE 1. Voordat tu begint..................Wat is er inbegrepen ....................Uitpakinstructies....................... Tekstconventies ....................... Symbolen ......................... Disclaimer ........................ FCC-naleving ......................Intellectueel eigendom ..................... Veiligheidsinstructies....................Veiligheidsinstructies voor de laser................Reproductie van veiligheidsetiket voor de laser............Emissiegegevens van de laser ................Nalevingsverklaring van de laser ................2.
  • Page 7 Before You Begin 1. Before You Begin What Is Included • GigBAR MOVE + ILS • Tripod • Power cord • Tripod carrying bag • RF remote • Footswitch • Carrying bag • User manual Unpacking Instructions Carefully unpack the product immediately and check the container to make sure all the parts are in the package and are in good condition.
  • Page 8 Before You Begin Disclaimer Chauvet believes that the information contained in this manual is accurate in all respects. However, Chauvet assumes no responsibility and specifically disclaims any and all liability to any party for any loss, damage or disruption caused by any errors or omissions in this document, whether such errors or omissions result from negligence, accident or any other cause.
  • Page 9 Before You Begin Safety Notes The Safety Notes include important laser system safety information. Read and understand all instructions before powering on the laser for the first time. Knowing these safety instructions is crucial to avoiding laser eye injury and breaking the law. Keep this User Manual in a safe place for future reference. STOP AND READ ALL LASER SAFETY DATA •...
  • Page 10 Before You Begin Non-Interlocked Housing Warning • This unit contains high power laser devices internally. • Do not open the laser housing, due to potential exposure to unsafe levels of laser radiation. • The laser power levels, accessible if the unit is opened, can cause instant blindness, skin burns, and fires.
  • Page 11 Before You Begin Laser Safety Label Reproduction LASER APERTURE IEC/EN60825-1:2014 520/650/450nm CW, <5mW RoHS Lorem ipsum THIS APPLIANCE MUST BE GROUNDED CETTE UNITÉ DOIT ÊTRE RELIÉE À LA TERRE WORLDWIDE HEADQUARTERS, USE ONLY FUSE OF SAME TYPE & RATING SUNRISE, FLORIDA USA N’UTILISER QUE DES FUSIBLES DU TYPE ET DE L’AMPÉRAGE INDIQUÉ...
  • Page 12 Introduction 2. Introduction Product Overview Back Panel View Fuse Microphone display holder Safety Power port Menu loop in/out in/out buttons Front Panel View Derby 1 Derby 2 Strobes (x4) Laser Par 2 Spot 2 Spot 1 Par 1 GigBAR MOVE + ILS User Manual Rev. 7...
  • Page 13 Introduction Product Dimensions 43 in 1100 mm 17.7 in 449 mm 2.5 in 5.9 in 63 mm 152 mm 6.7 in 169 mm 5 in 126 mm GigBAR MOVE + ILS User Manual Rev. 7...
  • Page 14 Setup 3. Setup AC Power The GigBAR MOVE + ILS has an auto-ranging power supply, and it can work with an input voltage range of 100 to 240 VAC, 50/60 Hz. To determine the product’s power requirements (circuit breaker, power outlet, and wiring), use the current value listed on the label affixed to the product’s back panel, or refer to the product’s specifications chart.
  • Page 15 Setup Mounting Before mounting the product, read and follow the safety recommendations indicated in the Safety Notes. Orientation The GigBAR MOVE + ILS must be mounted in a position that includes planning for safe laser usage. In addition, make sure adequate ventilation is provided around the product. Rigging •...
  • Page 16 Operation 4. Operation This product is not designed for continual use. Make sure there are regular breaks during operation to maximize the life of the lasers. Always disconnect the GigBAR MOVE + ILS from power when not in use. Control Panel Operation To access the control panel functions, use the four buttons located underneath the display.
  • Page 17 Operation Mode Programming Levels Description 1–4 Sets mixed effects to sound mode Spots Sets moving heads to sound mode Strobe Sets strobe to sound mode Laser Sets laser to sound mode Derby Sets derby to sound mode Sets pars to sound mode S+SP Sets strobe and moving heads to sound mode L+SP...
  • Page 18 Operation Mode Programming Levels Description Derby Motor Rotates the LED clockwise or counterclockwise Laser Turns the laser on and off manually Flash Dimmer Adjusts the dimmer of the white LED Adjusts the pan angle Manual Tilt 0–255 Adjusts the tilt angle Mode Color Selects the color manually...
  • Page 19 Operation Configuration (Standalone) Set the product in one of the standalone modes to control without a DMX controller. Never connect a product that is operating in any standalone mode to a DMX string connected to a DMX controller. Products in standalone mode may transmit DMX signals that could interfere with the DMX signals from the controller.
  • Page 20 Operation Strobe To set the strobe on the GigBAR MOVE + ILS, follow the instructions below: 1. Press <MENU> to view the main menu on the display. 2. Use <UP> or <DOWN> until AUTO or SOUND is selected. 3. Press <ENTER>. 4.
  • Page 21 Operation Pan Reverse To manually set the orientation of the pan on the GigBAR MOVE + ILS, do the following: 1. Press <MENU> to view the main menu on the display. 2. Use <UP> or <DOWN> until SETUP is selected. 3.
  • Page 22 Operation Configuration (DMX) The GigBAR MOVE + ILS works with a DMX controller. Information about DMX is in the CHAUVET DMX Primer, which is available from the Chauvet website: http://www.chauvetlighting.com/downloads/DMX_Primer_rev05_WO.pdf. Starting Address When selecting a starting DMX address, always consider the number of DMX channels the selected DMX mode uses.
  • Page 23 Operation DMX Channel Assignments and Values Gobos 52 Channels Channel Function Value Percent/Setting 000  255 Par 1 red, DIM 000  255 Par 1 green, DIM 000  255 Par 1 blue, DIM 000  255 Par 1 amber, DIM Par 1 control 000 ...
  • Page 24 Operation Channel Function Value Percent/Setting 000  255 White LED 1 dimmer 000  255 White LED 2 dimmer 000  255 White LED 3 dimmer Flash 000  255 White LED 4 dimmer 000  250 Strobe speed, slow to fast 251 ...
  • Page 25 Operation Channel Function Value Percent/Setting 000  006 Open 007  011 Gobo 1 012  017 Gobo 2 018  023 Gobo 3 024  029 Gobo 4 030  035 Gobo 5 036  041 Gobo 6 042  047 Gobo 7 048 ...
  • Page 26 Operation Channel Function Value Percent/Setting 000  006 White 007  013 Red 014  020 Orange 021  027 Yellow 028  034 Green 035  041 Blue 042  048 CTO 400K Spot 2 color wheel 049  055 Cyan 056 ...
  • Page 27 Operation 30 Channels Channel Function Value Percent/Setting 000  255 Par red, DIM 000  255 Par green, DIM 000  255 Par blue, DIM 000  255 Par amber, DIM Par control 000  255 Par white, DIM 000  255 Par UV, DIM 000 ...
  • Page 28 Operation Channel Function Value Percent/Setting 000  006 White 007  013 Red 014  020 Orange 021  027 Yellow 028  034 Green 035  041 Blue 042  048 CTO 400K Spot color wheel 049  055 Cyan 056 ...
  • Page 29 Operation 3 Channels Channel Function Value Percent/Setting 000  005 Blackout 006  014 Mix 1 015  023 Mix 2 024  032 Mix 3 033  041 Mix 4 042  050 Pars + Derby Lights + Laser + Strobes 051 ...
  • Page 30 Operation Wireless Footswitch The included wireless footswitch provides quick access to preset colors, color-change programs, and sound-activation through the GigBAR MOVE + ILS microphone. To use the footswitch: Connect the GigBAR MOVE + ILS to power. Turn the wireless footswitch on. Press <MENU>...
  • Page 31 Operation GigBAR RF Remote Control The GigBAR MOVE + ILS can be operated with the GigBAR RF Remote. To enable RF wireless control, follow the instructions below. 1. Press <MENU> to view the main menu on the display. 2. Use <UP> or <DOWN> until SETUP is selected. 3.
  • Page 32 Operation Spots Program To select a program for the Spots using an RF remote: 1. Press the Spot icon button on the RF remote. 2. Press <MOVE MENT> on the RF remote. 3. Press <+> or <–> to change the movement program. Spots XY Speed To adjust the pan/tilt speed of the Spots using an RF remote: 1.
  • Page 33 Operation Master/Slave Mode The Master/Slave mode allows a single GigBAR MOVE + ILS product (the “master”) to control the actions of one or more GigBAR MOVE + ILS products (the “slaves”) without the need of a DMX controller. The master product will be set to operate in either standalone mode or with the RF remote, whereas the slave products will be set to operate in slave mode.
  • Page 34 Maintenance 5. Maintenance Product Maintenance Dust build-up reduces light output performance and can cause overheating. This can lead to reduction of the light source’s life and/or mechanical wear. To maintain optimum performance and minimize wear, clean your lighting products at least twice a month. However, be aware that usage and environmental conditions could be contributing factors to increase the cleaning frequency.
  • Page 35 Technical Specifications 6. Technical Specifications Dimensions and Weight Length Width Height Weight 43 in (1100 mm) 5.7 in (144 mm) 17.7 in (449 mm) 14 lb (31 kg) Note: Dimensions in inches are rounded. Power Power Supply Type Range Voltage Selection Switching (internal) 100 to 240 VAC, 50/60 Hz Auto-ranging...
  • Page 36 Technical Specifications Photometrics Coverage Angle (derby) Coverage Angle (laser) Field Angle (pars) Field Angle (strobe) 131° 93° 33° 62° Beam Angle (moving heads) Beam Angle (pars) Beam Angle (strobe) 17° 22° 30° Illuminance @ 2 m (pars) Illuminance @ 2 m (moving heads) Illuminance @ 2 m (strobes) 1,205 lux (per par) 5,140 lux (per head)
  • Page 37 Contact Us Contact Us General Information Technical Support Chauvet World Headquarters Address: 3360 Davie Rd. Voice: (844) 393-7575 Davie, FL 33314 Fax: (954) 756-8015 Voice: (954) 577-4455 Email: chauvetcs@chauvetlighting.com Fax: (954) 929-5560 Toll Free: (800) 762-1084 Website: www.chauvetdj.com Chauvet U.K. Address: Unit 1C Email: UKtech@chauvetlighting.eu...
  • Page 38 Antes de Empezar 1. Antes de Empezar Qué va Incluido • GigBAR MOVE + ILS • Trípode • Cable de alimentación • Bolsa de transporte de trípode • RF control remoto • Pedal • Bolsa de transporte • Manual de usuario Instrucciones de Desembalaje Desembale el producto con cuidado inmediatamente y compruebe la caja para asegurarse de que todas las partes están en el paquete y en buen estado.
  • Page 39 Antes de Empezar Exención de responsabilidad Chauvet cree que la información contenida en este manual es exacta en todos los aspectos. Sin embargo, Chauvet no asume responsabilidad alguna, y queda exenta específicamente de todas y cada una de las responsabilidades y obligaciones, de la clase que sean y para con cualquier parte, por pérdida, perjuicio o trastorno causados por cualquier error u omisión en este documento, tanto si tales errores y omisiones se deben a negligencia o accidente como a cualquier otra causa.
  • Page 40 Antes de Empezar Notas de Seguridad Las Notas de seguridad incluyen información importante sobre seguridad del sistema láser. Lea y comprenda todas las instrucciones antes de encender el láser por primera v. Conocer las instrucciones de seguridad es crucial para evitar lesiones oculares y para no infringir la ley. Mantenga este manual de usuario en un lugar seguro para futuras consultas.
  • Page 41 Antes de Empezar Advertencia sobre Carcasa no Cerrada • Esta unidad contiene internamente dispositivos láser de alta potencia. • No abra la carcasa del láser, debido a la potencial exposición a niveles no seguros de radiación láser. • Los niveles de láser a los que se tiene acceso si se abre la unidad pueden causar ceguera instantánea, quemaduras en la piel e incendios.
  • Page 42 Antes de Empezar Reproducción de la Etiqueta de Seguridad del Láser LASER APERTURE IEC/EN60825-1:2014 520/650/450nm CW, <5mW RoHS Lorem ipsum THIS APPLIANCE MUST BE GROUNDED CETTE UNITÉ DOIT ÊTRE RELIÉE À LA TERRE WORLDWIDE HEADQUARTERS, USE ONLY FUSE OF SAME TYPE & RATING SUNRISE, FLORIDA USA N’UTILISER QUE DES FUSIBLES DU TYPE ET DE L’AMPÉRAGE INDIQUÉ...
  • Page 43 Introducción 2. Introducción Vista general del producto Vista del panel posterior Micrófono Pantalla Portafusibles Puerto USB Lazo de Salida/Entrada seguridad Botones Salida/ de menú Entrada de alimentación Vista del panel frontal Derby 1 Derby 2 Estroboscopios Laser (x4) Par 2 Spot 2 Spot 1 Par 1...
  • Page 44 Introducción Dimensiones del producto 43″ 1100 mm 17,7″ 449 mm 2,5″ 5,9″ 63 mm 152 mm 6,7″ 169 mm 5″ 126 mm GigBAR MOVE + ILS Manual de Usuario Rev. 7...
  • Page 45 Instalación 3. Instalación Corriente alterna El GigBAR MOVE + ILS tiene una fuente de alimentación con detección automática que puede funcionar con un rango de tensión de entrada de 100 a 240 VCA, 50/60 Hz. Para determinar los requerimientos de alimentación (disyuntor, toma de alimentación y cableado), use el valor de tensión que aparece en la etiqueta fijada en el panel trasero del producto o consulte la tabla de especificaciones del producto.
  • Page 46 El ILS (Integrated Lighting System) dispone de 4 modos que se sincronizan con el GigBAR MOVE + ILS: los modos 1 y 3 se sincronizan con el lado 1 del GigBAR MOVE+ILS, mientras que los modos 2 y 4 se sincronizan con el lado 2 del GigBAR MOVE + ILS.
  • Page 47 Instalación Uso Adecuado Este producto es para montaje en alto solamente. Por seguridad, Chauvet recomienda montar los productos de efectos de iluminación sobre plataformas estables y elevadas, o en soportes en alto sólidos utilizando abrazaderas apropiadas para colgar. En todos los casos, utilice cables de seguridad. Obtenga el material de fijación apropiado de su proveedor de iluminación.
  • Page 48 Funcionamiento 4. Funcionamiento Este producto no está diseñado para un uso continuo. Asegúrese de que hace descansos regulares durante su funcionamiento para maximizar la vida de su láser. Desconecte siempre el GigBAR MOVE + ILS de la alimentación cuando no lo use. Funcionamiento del panel de control Para acceder a las funciones del panel de control, use los cuatro botones ubicados bajo la pantalla.
  • Page 49 Funcionamiento Niveles de Modo programación Descripción Spots XY 0–99 Ajusta la velocidad de giro e inclinación de los Spots Speed Dimmer 0–255 Ajusta el atenuador Strobe 0–20 Selecciona la luz estroboscópica Program 1–255 AUTO Establece el tiempo del programa Time (seconds) (cont.) El programa automático solo utilizará...
  • Page 50 Funcionamiento Niveles de Modo programación Descripción Sensitivity 0–99 Establece la sensibilidad del sonido Activa las cabezas móviles con sonido Spot Speed 1–99 Ajusta la velocidad del cabezal móvil, de lenta a rápida Dimmer 0–255 Ajusta el atenuador Strobe 0–20 Selecciona la luz estroboscópica Program 1–255 Establece el tiempo del programa...
  • Page 51 Funcionamiento Niveles de Modo programación Descripción Habilita el control del aparato utilizando cualquier mando a COMMON distancia por RF Habilita el control del GigBAR MOVE + ILS utilizando solo el BIND mando a distancia por RF emparejado con el aparato Apaga los infrarrojos Empareja un mando a distancia por RF con un aparato GigBAR MOVE + ILS en concreto...
  • Page 52 Funcionamiento Configuración (Independiente) Configure el producto en uno de los modos independientes para controlarlo sin controlador DMX. Nunca conecte un producto que está funcionando en cualquier modo independiente a una línea DMX conectada a un controlador DMX. Los productos en modo independiente pueden transmitir señales DMX que podrían interferir con las señales DMX del controlador.
  • Page 53 Funcionamiento Estroboscopio Para ajustar el estroboscopio en la GigBAR MOVE + ILS, siga las instrucciones siguientes: 1. Pulse <MENU> para ver el menú principal en la pantalla. 2. Utilice <UP> o <DOWN> hasta que se seleccione AUTO o SOUND. 3. Pulse <ENTER>. 4.
  • Page 54 Funcionamiento Paneo inverso Para ajustar manualmente la orientación del paneo en GigBAR MOVE + ILS, haga lo siguiente: 1. Pulse <MENU> para ver el menú principal en la pantalla. 2. Utilice <UP> o <DOWN> hasta que se seleccione SETUP. 3. Pulse <ENTER>. 4.
  • Page 55 Funcionamiento Configuración (DMX) El GigBAR MOVE + ILS funciona con un controlador DMX. La información sobre DMX se encuentra en el Manual DMX de CHAUVET, disponible desde el sitio web de Chauvet: http://www.chauvetlighting.com/ downloads/DMX_Primer_rev05_WO.pdf. Dirección de inicio Cuando seleccione una dirección DMX de inicio, tenga en cuenta siempre el número de canales DMX que usa el modo seleccionado.
  • Page 56 Funcionamiento Valores y asignaciones de canal DMX Gobos 52 canales Canal Función Valor Porcentaje/Configuración 000  255 Par 1 rojo, DIM 000  255 Par 1 verde, DIM 000  255 Par 1 azul, DIM 000  255 Par 1 ambra, DIM Control de Par 1 000 ...
  • Page 57 Funcionamiento Canal Función Valor Porcentaje/Configuración 000  255 Atenuador del LED blanco 1 000  255 Atenuador del LED blanco 2 000  255 Atenuador del LED blanco 3 Flash 000  255 Atenuador del LED blanco 4 000  250 Velocidad estroboscópio, lenta a rápida 251 ...
  • Page 58 Funcionamiento Canal Función Valor Porcentaje/Configuración 000  006 Abierto 007  011 Gobo 1 012  017 Gobo 2 018  023 Gobo 3 024  029 Gobo 4 030  035 Gobo 5 036  041 Gobo 6 042  047 Gobo 7 048 ...
  • Page 59 Funcionamiento Canal Función Valor Porcentaje/Configuración 000  006 Blanco 007  013 Rojo 014  020 Naranja 021  027 Amarillo 028  034 Verde 035  041 Azul 042  048 CTO 400K Spot 2 rueda de color 049  055 Cian 056 ...
  • Page 60 Funcionamiento 30 canales Canal Función Valor Porcentaje/Configuración 000  255 Par rojo, DIM 000  255 Par verde, DIM 000  255 Par azul, DIM 000  255 Par ambra, DIM Control de Par 000  255 Par blanco, DIM 000 ...
  • Page 61 Funcionamiento Canal Función Valor Porcentaje/Configuración 000  006 Blanco 007  013 Rojo 014  020 Naranja 021  027 Amarillo 028  034 Verde 035  041 Azul 042  048 CTO 400K Spot rueda de color 049  055 Cian 056 ...
  • Page 62 Funcionamiento 3 canales Canal Función Valor Porcentaje/Configuración 000  005 Oscuro 006  014 Composición 1 015  023 Composición 2 024  032 Composición 3 033  041 Composición 4 042  050 Focos + Derby luces + Láser + Estroboscopios 051 ...
  • Page 63 Funcionamiento Funcionamiento del Conmutador de Pie El conmutador de pie inalámbrico incluido proporciona acceso rápido a los colores preconfigurados, a los programas de cambio de color y a la activación por sonido a través del micrófono del GigBAR MOVE + ILS. Para usar el conmutador de pie: Conecte el GigBAR MOVE + ILS a la alimentación.
  • Page 64 Funcionamiento Control remoto RF El GigBAR MOVE + ILS es totalmente compatible con el control remoto RF. Para habilitar el control inalámbrico por RF, siga las instrucciones siguientes: 1. Press <MENU> para ver el menú principal en la pantalla. 2. Utilice <UP> o <DOWN> hasta que se seleccione SETUP. 3.
  • Page 65 Funcionamiento Programa de focos Para seleccionar un programa para los focos utilizando un mando a distancia por RF: 1. Pulse el botón con el icono del Spot en el mando a distancia por RF. 2. Pulse <MOVE MENT> en el mando a distancia por RF. Velocidad XY de los focos Para ajustar la velocidad de panorámica/inclinación de los focos utilizando un mando a distancia por RF:...
  • Page 66 Funcionamiento Modo Maestro/Esclavo El modo Maestro/Esclavo permite que un solo producto GigBAR MOVE + ILS (el maestro), controle las acciones de uno o más productos GigBAR MOVE + ILS (los esclavos) sin necesidad de un controlador DMX. El producto maestro se configurará para funcionar en modo Independiente o con el remoto IR, mientras que los productos esclavo se configurarán para funcionar en modo Esclavo.
  • Page 67 Mantenimiento 5. Mantenimiento Mantenimiento del producto El polvo acumulado reduce el rendimiento de la salida de luz y puede provocar sobrecalentamiento. Esto puede conducir a una reducción de la vida de la fuente de luz e incrementar el desgaste mecánico.Para mantener un rendimiento óptimo y minimizar el desgaste, debe limpiar este producto con frecuencia.
  • Page 68 Especificaciones Técnicas 6. Especificaciones Técnicas Dimensiones y Peso Longitud Anchura Altura Peso 1100 mm (43”) 144 mm (5,7”) 449 mm (17,7”) 14 kg (31 lb) Nota: Las dimensiones en pulgadas están redondeadas. Alimentación Tipo de fuente de alimentación Rango Selección de tensión Conmutación (interna) 100 a 240 VCA, 50/60 Hz Detección automática (autorango)
  • Page 69 Especificaciones Técnicas Óptica fotográfica Ángulo de cobertura Ángulo de cobertura Ángulo del campo Ángulo del campo (derby) (láser) (focos) (estroboscopio) 131° 93° 33° 62° Ángulo del haz (yugos móviles) Ángulo del haz (focos) Ángulo del haz (estroboscopio) 17° 22° 30° Illuminancia a 2 m (focos) Illuminancia a 2 m (yugos móviles) Illuminancia a 2 m (estroboscopio) 1.205 lux (por foco)
  • Page 70 Contacto Contacto Información general Servicio Técnico Oficina Central de Chauvet Dirección: 3360 Davie Rd. Voz: (844) 393-7575 Davie, FL 33314 Fax: (954) 756-8015 Voz: (954) 577-4455 Email: chauvetcs@chauvetlighting.com Fax: (954) 929-5560 Número gratuito: (800) 762-1084 Sitio web: www.chauvetdj.com Chauvet U.K. Dirección: Unit 1C Email: UKtech@chauvetlighting.eu...
  • Page 71 Avant de Commencer 1. Avant de Commencer Ce Qui Est Compris • GigBAR MOVE + ILS • Trépied • Cordon d’alimentation • Sac de transport pour le trépied • Télécommande RF • Pédale sans fil avec batterie • Sac de transport •...
  • Page 72 Avant de Commencer Clause de Non-Responsabilité Chauvet estime que les informations contenues dans ce manuel sont exactes à tous les égards. Cependant, Chauvet n'assume aucune responsabilité et décline expressément toute responsabilité envers toute partie de toute perte, dommage ou dérangement causés par des erreurs ou des omissions dans ce document, que ces erreurs ou omissions résultent d'une négligence, d'un accident ou de toute autre cause.
  • Page 73 Avant de Commencer Consignes de Sécurité Les consignes de sécurité comprennent des informations importantes sur la sécurité des systèmes laser. Veuillez lire et bien comprendre toutes les instructions avant d'allumer le laser pour la première fois. La connaissance de ces consignes de sécurité est cruciale pour éviter toute blessure aux yeux par un laser et pour ne pas enfreindre la loi.
  • Page 74 Avant de Commencer Conservez ce manuel d'utilisation pour référence future. Si vous étiez amené à vendre cet appareil à un autre utilisateur, veillez à lui remettre ce manuel également. Avertissement : Boîtier non Verrouillable • Cet appareil renferme un laser très puissant. •...
  • Page 75 Avant de Commencer Reproduction de l’Étiquette de Sécurité Laser LASER APERTURE IEC/EN60825-1:2014 520/650/450nm CW, <5mW RoHS Lorem ipsum THIS APPLIANCE MUST BE GROUNDED CETTE UNITÉ DOIT ÊTRE RELIÉE À LA TERRE WORLDWIDE HEADQUARTERS, USE ONLY FUSE OF SAME TYPE & RATING SUNRISE, FLORIDA USA N’UTILISER QUE DES FUSIBLES DU TYPE ET DE L’AMPÉRAGE INDIQUÉ...
  • Page 76 
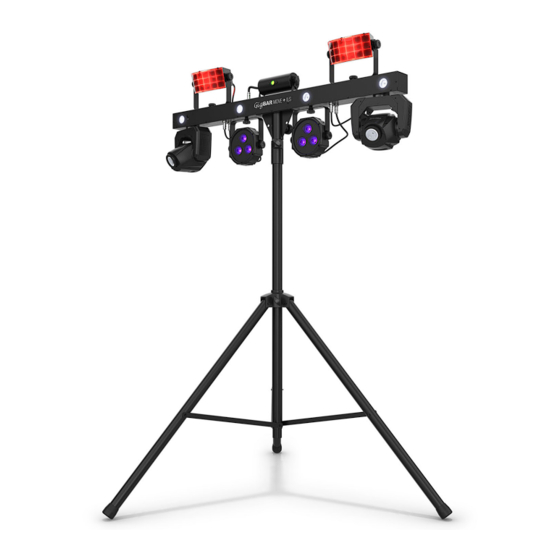
Introduction 2. Introduction Vue d'ensemble du produit Vue du panneau arrière Port- Microphone Écran fusible Port Sortie/Entrée Boucle de Sortie/Entrée Boutons d'Alimentation sécurité du menu Vue du panneau avant Derby 1 Derby 2 Stroboscopes Laser (x4) Par 2 Spot 2 Spot 1 Par 1 Manuel d’Utilisation des GigBAR MOVE + ILS Rév.
  • Page 77 Introduction Dimensions du produit 43 po 1100 mm 17,7 po 449 mm 2,5 po 5,9 po 63 mm 152 mm 6,7 po 169 mm 5 po 126 mm Manuel d’Utilisation des GigBAR MOVE + ILS Rév. 7...
  • Page 78 Configuration 3. Configuration Alimentation CA Le GigBAR MOVE + ILS est doté d'une alimentation universelle interne et il peut fonctionner avec des tensions d'entrée comprises entre 100 et 240 V CA, 50/60 Hz. Pour déterminer les besoins en énergie de l'appareil (disjoncteur, prise de courant et câblage), utilisez la valeur de courant figurant sur l'étiquette apposée sur le panneau arrière de l'appareil, ou consultez la section Spécificités Techniques...
  • Page 79 Configuration Connexion ILS ILS (Integrated Lighting System) offre 4 modes synchronisés avec le GigBAR MOVE + ILS : Les modes 1 et 3 se synchronisent avec la face 1 du GigBAR MOVE + ILS, tandis que les modes 2 et 4 se synchronisent avec la face 2.
  • Page 80 Configuration Utilisation Adéquate Cet appareil doit être monté en hauteur uniquement. Pour des raisons de sécurité, Chauvet recommande de monter vos éclairages sur une plateforme élevée stable ou des supports en hauteur renforcés au moyen de systèmes de suspension adéquats. Vous devez, dans tous les cas, utiliser des élingues de sécurité.
  • Page 81 Fonctionnement 4. Fonctionnement Cet appareil ne doit pas fonctionner de manière continue. Afin de maximiser la durée de vie de votre laser, veillez à le mettre en pause régulièrement. Débranchez toujours le GigBAR MOVE + ILS quand il n'est pas utilisé. Fonctionnement du Panneau de Commande Pour accéder aux fonctions du panneau de commande, utilisez les quatre boutons situés en dessous de l'affichage.
  • Page 82 Fonctionnement Niveaux de Mode programmation Description Permet de sélectionner le spectacle automatique par, derby et laser Permet de sélectionner le spectacle automatique derby, laser, DLS+SP stroboscope et lyre à tête mobile Permet de sélectionner le spectacle automatique par, laser, PLS+SP stroboscope et lyre à...
  • Page 83 Fonctionnement Niveaux de Mode programmation Description Paramètre les pars, les derby lumieres et les lyre à tête mobile PD+SP en activation par le son Paramètre les pars, les derby lumieres et les stroboscopes en activation par le son Paramètre les pars, les derby lumieres et les lasers en activation par le son Paramètre les derby lumieres, les lasers, les stroboscopes et DLS+SP...
  • Page 84 Fonctionnement Niveaux de Mode programmation Description 30CH Sélectionne le canal DMX 52CH Address 001–510 Sélectionne l’adresse DMX de départ Slave Mode esclave Permet de contrôler le projecteur à l'aide de n'importe quelle COMMON télécommande RF. Permet de contrôler le GigBAR MOVE + ILS en utilisant BIND uniquement la télécommande RF associée au projecteur.
  • Page 85 Fonctionnement Configuration (Autonome) Permet de paramétrer l'appareil dans l'un des modes autonomes pour permettre l'utilisation sans contrôleur DMX. Ne jamais connecter un appareil qui fonctionne en mode individuel à une chaîne DMX connectée à un contrôleur DMX. Les appareils en mode autonome peuvent émettre des signaux DMX qui interfèrent avec les signaux DMX du contrôleur.
  • Page 86 Fonctionnement Stroboscope Pour régler le stroboscope sur le GigBAR MOVE + ILS, fsuivre les instructions ci-dessous : 1. Appuyez sur la touche <MENU> pour afficher le menu principal à l'écran. 2. Utilisez les touches <UP> ou <DOWN> jusqu'à ce que AUTO ou SOUND soit sélectionné. 3.
  • Page 87 Fonctionnement Panoramique inversé Permet de définir manuellement l'orientation du panoramique sur le GigBAR MOVE + ILS, procédez comme suit : 1. Appuyez sur la touche <MENU> pour afficher le menu principal à l'écran. 2. Utilisez les touches <UP> ou <DOWN> jusqu'à ce que SETUP soit sélectionné. 3.
  • Page 88 Fonctionnement Configuration (DMX) Le GigBAR MOVE + ILS fonctionne avec un contrôleur DMX. Pour plus d'informations sur le DMX, téléchargez l'introduction au DMX de CHAUVET sur le site internet de Chauvet à l'adresse : http://www.chauvetlighting.com/downloads/DMX_Primer_rev05_WO.pdf. Adresse de départ Lors de la sélection d'une adresse DMX de départ, veillez à toujours prendre en compte le nombre de canaux DMX utilisés par le mode DMX sélectionné.
  • Page 89 Fonctionnement Affectation de canaux DMX et valeurs Gobos 52 canaux Canal Fonction Valeur Pourcentage/Paramétrage 000  255 Par 1 rouge, DIM 000  255 Par 1 vert, DIM 000  255 Par 1 bleue, DIM 000  255 Par 1 ambre, DIM Contrôle du Par 1 000 ...
  • Page 90 Fonctionnement Canal Fonction Valeur Pourcentage/Paramétrage 000  255 LED blanche 1 gradateur 000  255 LED blanche 2 gradateur 000  255 LED blanche 3 gradateur Flash 000  255 LED blanche 4 gradateur 000  250 Stroboscope, lent à rapide 251 ...
  • Page 91 Fonctionnement Canal Fonction Valeur Pourcentage/Paramétrage 000  006 Ouvert 007  011 Gobo 1 012  017 Gobo 2 018  023 Gobo 3 024  029 Gobo 4 030  035 Gobo 5 036  041 Gobo 6 042  047 Gobo 7 048 ...
  • Page 92 Fonctionnement Canal Fonction Valeur Pourcentage/Paramétrage 000  006 Blanc 007  013 Rouge 014  020 Orange 021  027 Jaune 028  034 Vert 035  041 Bleu 042  048 CTO 400K 049  055 Cyan Spot 2 roue de couleur 056 ...
  • Page 93 Fonctionnement 30 canaux Canal Fonction Valeur Pourcentage/Paramétrage 000  255 Par rouge, DIM 000  255 Par vert, DIM 000  255 Par bleue, DIM 000  255 Par ambre, DIM Contrôle du Par 000  255 Par blanc, DIM 000 ...
  • Page 94 Fonctionnement Canal Fonction Valeur Pourcentage/Paramétrage 000  006 Blanc 007  013 Rouge 014  020 Orange 021  027 Jaune 028  034 Vert 035  041 Bleu 042  048 CTO 400K 049  055 Cyan Spot roue de couleur 056 ...
  • Page 95 Fonctionnement 3 canaux Canal Fonction Valeur Pourcentage/Paramétrage 000  005 Pas de fonction 006  014 Mélange 1 015  023 Mélange 2 024  032 Mélange 3 033  041 Mélange 4 042  050 Pars + Derby lumières + Laser + Stroboscopes 051 ...
  • Page 96 Fonctionnement Utilisation de la pédale sans fil La pédale sans fil incluse permet un accès rapide aux couleurs prédéfinies, aux programmes de changement de couleurs et à l'activation par le son grâce au microphone du GigBAR MOVE + ILS. Pour utiliser la pédale: Branchez le GigBAR MOVE + ILS sur le courant.
  • Page 97 Fonctionnement Fonctionnement de la télécommande RF Noir général Pour éteindre les lasers avec la télécommande RF : • Appuyez sur la touche <BLACK OUT> sur la télécommande RF. Cela permet de désactiver tous les lasers jusqu'à ce que le bouton soit appuyé...
  • Page 98 Fonctionnement Programme pour Spots Pour sélectionner un programme pour spot à l'aide d'une télécommande RF : 1. Appuyez sur la touche Spots icon button sur la télécommande RF. 2. Appuyez sur la touche <MOVE MENT> sur la télécommande RF. 3. Appuyez sur <+> ou <–> pour modifier le programme de mouvement. Vitesse XY des Spots Pour régler la vitesse d'orientation et d'inclinaison des spots à...
  • Page 99 Fonctionnement Mode maître/esclave Le mode maître/esclave permet à un seul appareil GigBAR MOVE + ILS (le maître) de contrôler les actions d'un ou plusieurs autres appareils GigBAR MOVE + ILS (les esclaves) sans contrôleur DMX. L'appareil maître doit être réglé pour fonctionner en mode autonome ou avec la télécommande IR, tandis que les appareils esclaves doivent être paramétrés pour fonctionner en mode esclave.
  • Page 100 Entretien 5. Entretien Entretien de l'appareil L'accumulation de poussière réduit la production de lumière et peut entraîner une surchauffe de l'appareil. Cela peut entrainer une diminution de la durée de vie de la source de lumière et/ou une usure mécanique. Pour conserver des performances optimales et réduire l'usure, nettoyez vos appareils d'éclairage au moins deux fois par mois.
  • Page 101 Spécificités Techniques 6. Spécificités Techniques Dimensions et poids Longueur Largeur Hauteur Poids 1100 mm (43 po) 144 mm (5,7 po) 449 mm (17,7 po) 14 kg (31 lb) Remarque : Les dimensions en pouce sont arrondies. Alimentation Type d'alimentation Plage Sélection de tension Commutation (interne) Entre 100 et 240 VCA, 50/60 Hz...
  • Page 102 Spécificités Techniques Données photométrique Angle de couverture Angle de couverture Angle de champs Angle de champs (derby) (laser) (pars) (stroboscope) 131° 93° 33° 62° Angle de faisceau (tête mobile) Angle de faisceau (pars) Angle de faisceau (stroboscope) 17° 22° 30° Éclairement @ 2 m (pars) Éclairement @ 2 m (tête mobile) Éclairement @ 2 m (stroboscope) 1,205 lux (par tête)
  • Page 103 Nous Contacter Nous Contacter Informations Générales Support Technique Siège mondial de Chauvet Adresse : 3360 Davie Rd. Téléphone : (844) 393-7575 Davie, FL 33314 Télécopie : (954) 756-8015 Téléphone : (954) 577-4455 E-mail : chauvetcs@chauvetlighting.com Télécopie : (954) 929-5560 N° vert : (800) 762-1084 Site web : www.chauvetdj.com Chauvet U.K.
  • Page 104 Erste Schritte 1. Erste Schritte Packungsinhalt • GigBAR MOVE + ILS • Stativ • Stativtragetasche • Netzkabel • Drahtloser Fußschalter mit Batterie • Funkfernbedienung • Bedienungsanleitung • Tragetasche Anweisungen für das Auspacken Packen Sie das Produkt sofort vorsichtig aus und überprüfen Sie, ob Sie alle Teile unbeschädigt erhalten haben. Schadensmeldung Wenn die Verpackung oder die in der Verpackung befindlichen Teile (Gerät und Zubehör) beschädigt sind oder Mängel durch nicht einwandfreie Behandlung aufweisen, benachrichtigen Sie umgehend das...
  • Page 105 Erste Schritte Haftungsausschluss Chauvet geht davon aus, dass alle in diesem Handbuch enthaltenen Informationen in jeder Hinsicht sorgfältig und genau sind. Chauvet übernimmt jedoch keine Haftung und schließt speziell jegliche Verantwortung gegenüber Dritten für Verluste, Schäden oder Störungen aus, die durch Fehler oder Auslassungen in diesem Dokument entstanden sind, unabhängig davon, ob sich diese Fehler oder Auslassungen aus einer Nachlässigkeit, einem Versehen oder aus anderen Gründen ergeben haben.
  • Page 106 Erste Schritte Sicherheitshinweise Diese Anleitung enthält wichtige Sicherheits- und Betriebshinweise über das Lasersystem Alle Anweisungen vor der ersten Inbetriebnahme lesen und verstehen, um Augenverletzungen und Verstöße gegen Gesetze zu vermeiden. Die Kenntnis der Sicherheitshinweise ist wichtig, um Augenverletzungen durch Laserstrahlen und Gesetzesverstöße zu vermeiden.
  • Page 107 Erste Schritte Achtung! Kein Schutz bei geöffnetem Gehäuse • Das Gerät enthält Laser mit hohen Leistungen. • Den Laser nicht bei geöffnetem Gehäuse betreiben, da Sie sich sonst einer gesundheitsschädlichen Laserexposition aussetzen könnten. • Die Energie der Laserstrahlung kann bei einem Betrieb des Lasers bei geöffnetem Gehäuse zu Erblindung, Hautverbrennungen und Feuer führen.
  • Page 108 Erste Schritte Warn- und Sicherheitsschilder auf dem Lasergerät LASER APERTURE IEC/EN60825-1:2014 520/650/450nm CW, <5mW RoHS Lorem ipsum THIS APPLIANCE MUST BE GROUNDED CETTE UNITÉ DOIT ÊTRE RELIÉE À LA TERRE WORLDWIDE HEADQUARTERS, USE ONLY FUSE OF SAME TYPE & RATING SUNRISE, FLORIDA USA N’UTILISER QUE DES FUSIBLES DU TYPE ET DE L’AMPÉRAGE INDIQUÉ...
  • Page 109 Einleitung 2. Einleitung Produktüberblick Ansicht der Rückseite Mikrofon Sicherungshalter Anzeige USB- Sicherheitsschleife Anschluss Steuerungstasten In/Ausgang Stromzufuhr/ Stromausgang Frontplattenansicht Derby 1 Derby 2 Stroboskope Laser (x4) Par 2 Spot 2 Spot 1 Par 1 GigBAR MOVE + ILS Bedienungsanleitung Rev. 7...
  • Page 110 Einleitung Produktabmessungen 43 Zoll 1100 mm 17.7 Zoll 449 mm 2.5 Zoll 5.9 Zoll 63 mm 152 mm 6.7 Zoll 169 mm 5 Zoll 126 mm GigBAR MOVE + ILS Bedienungsanleitung Rev. 7...
  • Page 111 GigBAR MOVE + ILS synchronisiert werden. Bei einer Verknüpfung werden die Effekte mit dem ähnlichsten Effekt an der ausgewählten Seite des GigBAR MOVE+ILS synchronisiert: Kinta-Effekte werden mit einem der Kinta-Geräten synchronisiert, Moving Heads mit einem der Moving Heads und Wash-Effekte mit einer der PAR-Kannen.
  • Page 112 Einrichten des Geräts Montage Lesen Sie vor der Montage des Geräts die in den Sicherheitshinweise enthaltenen. Montagerichtung Der GigBAR MOVE + ILS muss in einer Position befestigt werden, die einen sicheren Betrieb des Lasers erlaubt. Stellen Sie außerdem sorgen Sie zudem dafür, dass das Gerät ausreichend belüftet ist. Hängende Montage •...
  • Page 113 Betrieb 4. Betrieb Dieses Produkt eignet sich nicht für den Dauereinsatz geeignet. Regelmäßige Betriebspausen sind wichtig, um die Lebensdauer dieses Geräts zu erhöhen. Immer den Netzstecker abziehen, wenn der GigBAR MOVE + ILS längere Zeit nicht benutzt wird. Betrieb des Bedienfeldes Zum Zugreifen auf das Bedienfeld verwenden Sie die vier Tasten unter der Anzeige.
  • Page 114 Betrieb Modus Programmierebenen Beschreibung Wählt die Show für PAR-Kanne + Derby + PDS+SP Stroboskop + Spot aus Program Wählt die Show für PAR-Kanne + Derby + Laser + PDL+SP (Fortserzung) Spot aus Wählt die Show für PAR-Kanne + Derby + Laser + PDLS Stroboskop aus Mode...
  • Page 115 Betrieb Modus Programmierebenen Beschreibung Stellt PAR-Kannen, Laser und Stroboskopeffekte auf Musiksteuerungs-Modus ein Stellt PAR-Kannen, Derby beleuchtung und Laser auf Musiksteuerungs-Modus ein Stellt Derby beleuchtung, Laser, Stroboskopeffekte DLS+SP und Spot auf Musiksteuerungs-Modus ein Stellt PAR-Kannen, Laser, Stroboskopeffekte und Spot Program PLS+SP auf Musiksteuerungs-Modus ein (Fortserzung) Stellt PAR-Kannen, Derby beleuchtung,...
  • Page 116 Betrieb Modus Programmierebenen Beschreibung 30CH Wählen Sie den DMX-Kanal 52CH Address 001–510 Wählt die DMX-Startadresse aus Slave Slave-Modus Ermöglicht die Steuerung des Geräts mit einer COMMON Fernbedienung Ermöglicht die Steuerung des GigBAR MOVE + ILS BIND nur mit einer Fernbedienung, die mit dem Gerät gepairt ist Schaltet Infrarot aus Pairt eine Fernbedienung mit einem bestimmten...
  • Page 117 Betrieb Konfiguration (Einzelplatzmodus) Zur Steuerung ohne einen DMX-Controller versetzen Sie das Gerät in einen der Einzelplatzmodi. Schließen Sie ein Gerät, das sich im Einzelplatzmodus befindet, an eine mit einem DMX- Controller verbundenen DMX-Leitung an. Geräte im Einzelplatzmodus können DMX- Signale aussenden, die mit den DMX-Signalen des DMX-Controllers interferieren können. Automatische-Modus Zum Betrieb des GigBAR MOVE + ILS im Automatische-Modus befolgen Sie die Anweisungen unten: 1.
  • Page 118 Betrieb Dimmer Um den Dimmer an der GigBAR MOVE + ILS einzustellen, gehen Sie wie folgt vor: 1. Drücken Sie <MENU>, um das Hauptmenü auf dem Display anzuzeigen. 2. Verwenden Sie <UP> oder <DOWN>, bis AUTO oder SOUND markiert ist. 3.
  • Page 119 Betrieb Tonausfall Einstellung der Aktion der gesamten Leiste, wenn der Ton ausgefallen ist, folgen Sie den nachstehenden Anweisungen: 1. Drücken Sie <MENU>, um das Hauptmenü auf dem Display anzuzeigen. 2. Verwenden Sie <UP> oder <DOWN>, bis SOUND markiert ist. 3. Betätigen Sie <ENTER>. 4.
  • Page 120 Betrieb Neigungsbereich Einstellung des maximalen Winkels der Neigung beim GigBAR MOVE + ILS, folgen Sie den nachstehenden Anweisungen: 1. Drücken Sie <MENU>, um das Hauptmenü auf dem Display anzuzeigen. 2. Verwenden Sie <UP> oder <DOWN>, bis SETUP markiert ist. 3. Betätigen Sie <ENTER>. 4.
  • Page 121 Betrieb DMX-Kanal – Zuordnungen und Werte Gobos 52-Kanal Kanal Funktion Wert Prozent/Einstellung 000  255 Par 1 Rot, DIM 000  255 Par 1 Grün, DIM 000  255 Par 1 Blau, DIM 000  255 Par 1 Bernsteinfarben, DIM Steuerung von PAR- Kanne 1 000 ...
  • Page 122 Betrieb Kanal Funktion Wert Prozent/Einstellung 000  255 Weiße LED 1 Dimmer 000  255 Weiße LED 2 Dimmer 000  255 Weiße LED 3 Dimmer Blitzlicht 000  255 Weiße LED 4 Dimmer 000  250 Blitzfrequenz, von langsam nach schnell 251 ...
  • Page 123 Betrieb Kanal Funktion Wert Prozent/Einstellung 000  006 Öffnen 007  011 Gobo 1 012  017 Gobo 2 018  023 Gobo 3 024  029 Gobo 4 030  035 Gobo 5 036  041 Gobo 6 042  047 Gobo 7 048 ...
  • Page 124 Betrieb Kanal Funktion Wert Prozent/Einstellung 000  006 Weiß 007  013 Rot 014  020 Orange 021  027 Gelb 028  034 Grün 035  041 Blau 042  048 CTO 400K Spot 2 Farbrad 049  055 Cyan 056 ...
  • Page 125 Betrieb 30-Kanal Kanal Funktion Wert Prozent/Einstellung 000  255 Par 1 Rot, DIM 000  255 Par 1 Grün, DIM 000  255 Par 1 Blau, DIM 000  255 Par 1 Bernsteinfarben, DIM Steuerung von PAR- Kanne 1 000  255 Par 1 Weiß, DIM 000 ...
  • Page 126 Betrieb Kanal Funktion Wert Prozent/Einstellung 000  006 Weiß 007  013 Rot 014  020 Orange 021  027 Gelb 028  034 Grün 035  041 Blau 042  048 CTO 400K Spot Farbrad 049  055 Cyan 056 ...
  • Page 127 Betrieb 3-Kanal Kanal Funktion Wert Percent/Setting 000  005 Verdunkelung 006  014 Mix 1 015  023 Mix 2 024  032 Mix 3 033  041 Mix 4 042  050 PAR-Kannen + Derby beleuchtung + Laser + Stroboskopeffekte 051 ...
  • Page 128 Betrieb Betrieb mit drahtlosem Fußschalter Über den beiliegenden drahtlosen Fußschalter haben Sie Zugriff auf voreingestellte Farben, Farbwechsel- Programme und Musiksteuerung über das Mikrofon des GigBAR MOVE + ILS. Verwendung des Fußschalter: Verbinden Sie den GigBAR MOVE + ILS mit dem Stromnetz. Schalten Sie den drahtlosen Fußschalter ein.
  • Page 129 Betrieb Bedienung der GigBAR RF-Fernbedienung Verdunkelung So verdunkeln Sie die Lasergeräte mit der Fernbedienung: To black out the lasers with the RF remote: • Drücken Sie auf der Fernbedienung auf <BLACK OUT>. Damit schalten Sie alle Lasergeräte aus, bis diese Taste erneut gedrückt wird. HINWEIS: Die Fernbedienung reagiert auf keine Eingabe, solange die „Verdunkelung“...
  • Page 130 Betrieb Punktstrahler-Programm So wählen Sie ein Programm für die Punktstrahler mit der Fernbedienung aus: 1. Drücken Sie auf der Fernbedienung auf <MOVE MENT>. Punktstrahler XY Geschwindigkeit So stellen Sie die Geschwindigkeit der Schwenkung/Neigung mit der Fernbedienung ein: 1. Drücken Sie auf der Fernbedienung auf die Symboltaste für Spot. 2.
  • Page 131 Betrieb Master/Slave-Modus Im Master/Slave-Modus lassen sich mit einem einzigen GigBAR MOVE + ILS-Gerät (das Master-Gerät) die Aktionen eines oder mehrerer GigBAR MOVE + ILS-Geräte (die Slave-Geräte) ansteuern, ohne einen DMX-Controller verwenden zu müssen. Das Master-Gerät wird so eingerichtet, dass es entweder im Einzelplatzmodus betrieben wird, während die Slave-Geräte so eingerichtet werden, dass sie im Slave- Modus arbeiten.
  • Page 132 Wartung 5. Wartung Wartung des Geräts Staubablagerungen reduzieren die Lichtabgabe und können zu Überhitzung führen. Das kann die Lebensdauer des Leuchtmittels reduzieren und/oder die mechanische Abnutzung beschleunigen. Zum Erhalt der optimalen Leistungsfähigkeit und der Minimierung der Abnutzung sollten Sie Ihren Lichteffekt mindestens zweimal pro Monat reinigen.
  • Page 133 Technische Daten 6. Technische Daten Abmessungen und Gewicht Länge Breite Höhe Gewicht 1100 mm (43 Zoll) 144 mm (5,7 Zoll) 449 mm (17,7 Zoll) 14 kg (31 lb) Hinweis: Abmessungen in Zoll sind gerundet. Leistungsaufnahme Eingangsspannung Bereich Spannungsschalter Vorschaltgerät (integriert) 100-240 V AC 50/60 Hz Autom.
  • Page 134 Technische Daten Lichttechnische Daten Abdeckungswinkel Abdeckungswinkel Bildfeldwinkel Bildfeldwinkel (Derby) (Laser) (Kannen) (Stroboskope) 131° 93° 33° 62° Abstrahlwinkel Abstrahlwinkel Abstrahlwinkel (Bewegliches joch) (Kannen) (Stroboskope) 17° 22° 30° Beleuchtungsstärke bei 2 m Beleuchtungsstärke bei 2 m Beleuchtungsstärke bei 2 m (Kannen) (Bewegliches joch) (Stroboskope) 1.205 Lux (pro Kopf) 5.140 Lux (pro Kopf)
  • Page 135 Kontaktiere Uns Kontaktiere Uns Allgemeine Information Technischer Support Chauvet World Headquarters Adresse: 3360 Davie Rd. Telefon: (844) 393-7575 Davie, FL 33314 Fax: (954) 756-8015 Telefon: (954) 577-4455 Email: chauvetcs@chauvetlighting.com Fax: (954) 929-5560 Zollfrei: (800) 762-1084 Webseite: www.chauvetdj.com Chauvet U.K. Adresse: Unit 1C Email: UKtech@chauvetlighting.eu Brookhill Road Industrial Estate...
  • Page 136 Voordat tu begint 1. Voordat tu begint Wat is er inbegrepen • GigBAR MOVE + ILS • Driepoot • Stroomsnoer • Driepoot draagzak • RF afstandsbediening • Voetschakelaar • Draagtas • Gebruikershandleiding Uitpakinstructies Pak het product direct voorzichtig uit en controleer de doos om te controleren of alle onderdelen in de verpakking zitten en in goede conditie zijn.
  • Page 137 Voordat tu begint Disclaimer Chauvet gelooft dat de informatie in deze handleiding in alle aspecten accuraat is. Chauvet aanvaardt echter geen verantwoordelijkheid en wijst alle aansprakelijkheid af jegens enige partij voor enig verlies, schade of storingen die worden veroorzaakt door fouten of omissies in dit document, ongeacht of dergelijke fouten of omissies het gevolg zijn van nalatigheid, een ongeval of enige andere oorzaak.
  • Page 138 Voordat tu begint Veiligheidsinstructies De Veiligheidsinstructies bevatten belangrijke veiligheidsinformatie met betrekking tot het lasersysteem. Zorg dat u alle instructies hebt gelezen en begrepen voordat u de laser voor de eerste keer inschakelt. Het kennen van deze veiligheidsinstructies is cruciaal voor het vermijden van oogletsel door de laser en het overtreden van de wet.
  • Page 139 Voordat tu begint Niet-bevestigde waarschuwing op de behuizing • Dit apparaat bevat intern laserapparaten met hoog vermogen. • Maak de laserbehuizing niet open, door mogelijke blootstelling aan onveilige laserstralingsniveaus. • Het vermogen van de laser, dat toegankelijk is als het apparaat is geopend, kan directe blindheid, brandwonden en branden veroorzaken.
  • Page 140 Voordat tu begint Reproductie van veiligheidsetiket voor de laser LASER APERTURE IEC/EN60825-1:2014 520/650/450nm CW, <5mW RoHS Lorem ipsum THIS APPLIANCE MUST BE GROUNDED CETTE UNITÉ DOIT ÊTRE RELIÉE À LA TERRE WORLDWIDE HEADQUARTERS, USE ONLY FUSE OF SAME TYPE & RATING SUNRISE, FLORIDA USA N’UTILISER QUE DES FUSIBLES DU TYPE ET DE L’AMPÉRAGE INDIQUÉ...
  • Page 141 Inleiding 2. Inleiding Productoverzicht Achterpaneel Aanzicht Microfoon Zekeringhouder display USB-poort Veiligheidslus In/Uitgang Bedieningsknoppen Vermogensuitgang/ Stroomingang Voorpaneel Aanzicht Derby 1 Derby 2 Stroboscoop Laser (x4) Par 2 Spot 2 Spot 1 Par 1 GigBAR MOVE + ILS Gebruikershandleiding Rev. 7...
  • Page 142 Inleiding Productafmetingen 43 in 1100 mm 17,7 in 449 mm 2,5 in 5,9 in 63 mm 152 mm 6,7 in 169 mm 5 in 126 mm GigBAR MOVE + ILS Gebruikershandleiding Rev. 7...
  • Page 143 ILS (geïntegreerd verlichtingssystseem) biedt 4 modi die synchroniseren met de GigBAR MOVE + ILS: Modi 1 en 3 synchroniseren met zijde 1 van de GigBAR MOVE+ILS, terwijl modi 2 en 4 synchroniseren met zijde 2 van de GigBAR MOVE + ILS. Wanneer ze gekoppeld zijn, wordrden de effecten...
  • Page 144 Instelling Montage Vóór montage van het product moet u de veiligheidsaanbevelingen lezen en volgen die zijn aangegeven in de Veiligheidsinstructies. Oriëntatie De GigBAR MOVE + ILS-producten moeten worden gemonteerd in een positie volgens de planning voor veilig lasergebruik. Daarnaast moet er in voldoende ventilatie rond het product zijn voorzien. Opbouw •...
  • Page 145 Werking 4. Werking Dit product is niet ontworpen voor onafgebroken gebruik. Zorg dat er regelmatige pauzes zijn tijdens het gebruik, om de levensduur van uw laser te maximaliseren. Ontkoppel de GigBAR MOVE + ILS altijd van de stroom als het niet in gebruik is. Werking van het bedieningspaneel Voor toegang tot de functies van het bedieningspaneel gebruikt u de vier knoppen onder het display.
  • Page 146 Werking Modus Programmeerniveaus Beschrijving 1–4 Selecteert de show met automatisch gemengd effect Spots Selecteert de automatische Spots show Strobe Selecteert de automatische stroboscoopshows Laser Selecteert de automatische lasershow Derby Selecteert de automatische derbyshow Selecteert de automatische Par-show S+SP Selecteert de stroboscoop- en Spots show L+SP Selecteert de laser- en Spots show Selecteert de laser- en stroboscoopshow...
  • Page 147 Werking Modus Programmeerniveaus Beschrijving Derby Draait de LED met de klok mee of tegen de klok in Motor Laser Schakelt de laser handmatig in of uit Flash Instellen van de dimmer van de witte LED Dimmer Instellen van de pan hoek Manual Mode 0–255 Tilt...
  • Page 148 Werking Configuratie (zelfstandig) Plaatst het product in een van de zelfstandige modi om te bedienen zonder een DMX-regelaar. Sluit nooit een product, die in een zelfstandige modus werkt, aan op een DMX-rij die is verbonden aan een DMX-regelaar. Producten in zelfstandige modus kunnen DMX-signalen verzenden die de DMX-signalen van de regelaar verstoren.
  • Page 149 Werking Dimmer Om de dimmer op de GigBAR MOVE + ILS in te stellen, doet u het volgende: 1. Druk op <MENU> om het hoofdmenu op het display weer te geven. 2. Gebruik <UP> of <DOWN> totdat AUTO of SOUND is geselecteerd. 3.
  • Page 150 Werking Sound Lost Om in te stellen wat de hele balk moet doen als het geluid verloren gaat, volgt u de onderstaande instructies: 1. Druk op <MENU> om het hoofdmenu op het display weer te geven. 2. Gebruik <UP> of <DOWN> totdat SOUND is geselecteerd. 3.
  • Page 151 Werking Fabrieksinstellingen Om bepaalde functies of het hele product te resetten , doet u het volgende: 1. Druk op <MENU> om het hoofdmenu op het display weer te geven. 2. Gebruik <UP> of <DOWN> totdat SETUP is geselecteerd. 3. Druk op <ENTER>. 4.
  • Page 152 Werking DMX-kanaaltoewijzingen en waarden Gobos 52-kanaals Kanaal Functie Waarde Percentage/Instelling 000  255 Par 1 rood, DIM 000  255 Par 1 groen, DIM 000  255 Par 1 blauw, DIM 000  255 Par 1 amber, DIM Par 1-bediening 000 ...
  • Page 153 Werking Kanaal Functie Waarde Percentage/Instelling 000  255 Wit-LED 1 dimmer 000  255 Wit-LED 2 dimmer 000  255 Wit-LED 3 dimmer Flits 000  255 Wit-LED 4 dimmer 000  250 Stroboscoopsnelheid, langzaam tot snel 251  255 Stroboscoop naar geluid 000 ...
  • Page 154 Werking Kanaal Functie Waarde Percentage/Instelling 000  006 Open 007  011 Gobo 1 012  017 Gobo 2 018  023 Gobo 3 024  029 Gobo 4 030  035 Gobo 5 036  041 Gobo 6 042  047 Gobo 7 048 ...
  • Page 155 Werking Kanaal Functie Waarde Percentage/Instelling 000  006 Wit 007  013 Rood 014  020 Oranje 021  027 Geel 028  034 Groen 035  041 Blauw 042  048 CTO 400K Spot 2 kleurenwiel 049  055 Cyaan 056 ...
  • Page 156 Werking 30-kanaals Kanaal Functie Waarde Percentage/Instelling 000  255 Par 1 rood, DIM 000  255 Par 1 groen, DIM 000  255 Par 1 blauw, DIM 000  255 Par 1 amber, DIM Par-bediening 000  255 Par 1 wit, DIM 000 ...
  • Page 157 Werking Kanaal Functie Waarde Percentage/Instelling 000  006 Wit 007  013 Rood 014  020 Oranje 021  027 Geel 028  034 Groen 035  041 Blauw 042  048 CTO 400K Spot kleurenwiel 049  055 Cyaan 056 ...
  • Page 158 Werking 3-kanaals Kanaal Functie Waarde Percentage/Instelling 000  005 Verduistering 006  014 Mix 1 015  023 Mix 2 024  032 Mix 3 033  041 Mix 4 042  050 Par’s + Derby's + laser + stroboscopen 051 ...
  • Page 159 Werking Bediening van de voetschakelaar De meegeleverde draadloze voetschakelaar biedt snelle toegang tot vooringestelde kleuren, kleurwisselingsprogramma's en geluidsactivering door de microfoon van GigBAR MOVE + ILS. Om de voetschakelaar te gebruiken: Sluit de GigBAR MOVE + ILS aan op de stroom. Druk op <MENU>...
  • Page 160 Werking GigBAR RF-afstandsbediening Verduisteren Om de lasers te verduisteren met de RF-afstandsbediening: • Druk op <BLACK OUT> op de RF-afstandsbediening. Dit schakelt de lasers uit totdat de knop opnieuw wordt ingedrukt. LET OP: Wanneer Black Out (verduistering) is geactiveerd zal de RF- afstandsbediening niet op invoeren reageren.
  • Page 161 Werking Spots-programma Om een programma voor de Spots te selecteren met een RF-afstandsbediening: 1. Druk op het Spot-pictogram op de RF-afstandsbediening. 2. Druk op <MOVE MENT> op de RF-afstandsbediening. 3. Druk op <+> of <–> om het bewegingsprogramma te wijzigen. Spots XY-snelheid Om de zwenk-/kantelsnelheid van de Spots aan te passen met behulp van een RF-afstandsbediening:...
  • Page 162 Werking Master/Slave-modus De Master/Slave-modus zorgt ervoor dat een enkel GigBAR MOVE + ILS-product (de “master”) de acties regelt van een of meer GigBAR MOVE + ILS-producten (de “slaves”) zonder de behoefte aan een DMX- regelaar. Het masterproduct wordt ingesteld voor gebruik in zelfstandige modus, terwijl de slaveproducten worden ingesteld voor gebruik in Slave-modus.
  • Page 163 Onderhoud 5. Onderhoud Productonderhoud De ophoping van stof verlaagt de lichtemissieprestaties en kan oververhitting veroorzaken. Dit kan leiden tot een lagere levensduur en/of mechanische slijtage van de lichtbron. Om optimale prestaties te behouden en slijtage te minimaliseren moeten uw verlichtingsproducten ten minste tweemaal per maand gereinigd worden.
  • Page 164 Technische Specificaties 6. Technische Specificaties Afmetingen en gewicht Lengte Breedte Hoogte Gewicht 1100 mm (43 in) 144 mm (5,7 in) 449 mm (17,7 in) 14 kg (31 lb) Let op: Afmetingen in inches zijn afgerond. Vermogen Ingangsspanning Bereik Spanningsselectie Schakeling (intern) 100–240 VAC, 50/60 Hz Automatisch wisselend bereik Parameter...
  • Page 165 Technische Specificaties Photometrics Dekkingsbereik Dekkingsbereik Veldstralingshoek Veldstralingshoek (Derby) (Laser) (Pars) (stroboscoop) 131° 93° 33° 62° Stralingshoek (Bewegend juk) Stralingshoek (Pars) Stralingshoek (Stroboscoop) 17° 22° 30° Verlichting @ 2 m (Pars) Verlichting @ 2 m (Bewegend juk) Verlichting @ 2 m (Stroboscoop) 1205 lux (per kop) 5140 lux (per kop) 130 lux (per zone)
  • Page 166 Neem contact Op Neem contact Op Algemene Informatie Technische support Chauvet wereldwijde hoofdkwartier Adres: 3360 Davie Rd. Bandopname: (844) 393-7575 Davie, FL 33314 Fax: (954) 756-8015 Bandopname: (954) 577-4455 E-mail: chauvetcs@chauvetlighting.com Fax: (954) 929-5560 Tolvrij: (800) 762-1084 Website: www.chauvetdj.com Chauvet U.K. Adres: Unit 1C E-mail: UKtech@chauvetlighting.eu...