Table des Matières
Publicité
Les langues disponibles
Les langues disponibles
Liens rapides
All manuals and user guides at all-guides.com
BEDIENUNGSANLEITUNG
USER MANUAL
MODE D'EMPLOI
MANUAL DEL USUARIO
LED PAR-56
RGB Spot Short
©
Für weiteren Gebrauch aufbewahren!
Copyright
Keep this manual for future needs!
Nachdruck verboten!
Gardez ce mode d'emploi pour des
Reproduction prohibited!
utilisations ultérieures!
Réproduction interdit!
Guarde este manual para posteriores usos.
Prohibida toda reproducción.
Publicité
Table des Matières

Manuels Connexes pour EuroLite LED PAR-56 RGB Spot Short


Sommaire des Matières pour EuroLite LED PAR-56 RGB Spot Short
- Page 1 All manuals and user guides at all-guides.com BEDIENUNGSANLEITUNG USER MANUAL MODE D'EMPLOI MANUAL DEL USUARIO LED PAR-56 RGB Spot Short © Für weiteren Gebrauch aufbewahren! Copyright Keep this manual for future needs! Nachdruck verboten! Gardez ce mode d’emploi pour des Reproduction prohibited! utilisations ultérieures! Réproduction interdit!
-
Page 2: Table Des Matières
All manuals and user guides at all-guides.com MULTI-LANGUAGE-INSTRUCTIONS Inhaltsverzeichnis Table of contents Sommaire Contenido EINFÜHRUNG ..............................4 SICHERHEITSHINWEISE..........................4 BESTIMMUNGSGEMÄßE VERWENDUNG..................... 6 GERÄTEÜBERSICHT............................7 INSTALLATION ..............................7 Überkopfmontage............................7 Anschluss ans Netz............................9 Anschluss an den DMX-512 Controller / Verbindung Gerät – Gerät ............. 9 BEDIENUNG .............................. - Page 3 You can find the latest update of this user manual in the Internet under: Vous pouvez trouvez la dernière version de ce mode d'emploi dans l'Internet sous: Vd. puede encontrar la versión más reciente de este manual en el Internet bajo: www.eurolite.de 3/42 00023798.DOC, Version 2.2...
-
Page 4: Einführung
- sich die letzte Version der Anleitung im Internet herunter laden EINFÜHRUNG Wir freuen uns, dass Sie sich für einen EUROLITE LED PAR-56 RGB Spot entschieden haben. Wenn Sie nachfolgende Hinweise beachten, sind wir sicher, dass Sie lange Zeit Freude an Ihrem Kauf haben werden. - Page 5 All manuals and user guides at all-guides.com Bitte überprüfen Sie vor der ersten Inbetriebnahme, ob kein offensichtlicher Transportschaden vorliegt. Sollten Sie Schäden an der Netzleitung oder am Gehäuse entdecken, nehmen Sie das Gerät nicht in Betrieb und setzen sich bitte mit Ihrem Fachhändler in Verbindung. Der Aufbau entspricht der Schutzklasse I.
-
Page 6: Bestimmungsgemäße Verwendung
All manuals and user guides at all-guides.com Kinder und Laien vom Gerät fern halten! Das Gerät darf niemals unbeaufsichtigt betrieben werden! BESTIMMUNGSGEMÄßE VERWENDUNG Bei diesem Gerät handelt es sich um einen Effektstrahler, mit dem sich dekorative Lichteffekte erzeugen lassen. Dieses Produkt ist nur für den Anschluss an 230 V, 50 Hz Wechselspannung zugelassen und wurde ausschließlich zur Verwendung in Innenräumen konzipiert. -
Page 7: Geräteübersicht
All manuals and user guides at all-guides.com Soll das Gerät transportiert werden, verwenden Sie bitte die Originalverpackung, um Transportschäden zu vermeiden. Achten Sie bitte unbedingt darauf, dass das Gerät im Lieferzustand verpackt wird. Beachten Sie bitte, dass eigenmächtige Veränderungen an dem Gerät aus Sicherheitsgründen verboten sind. - Page 8 All manuals and user guides at all-guides.com Der Unternehmer hat dafür zu sorgen, dass sicherheitstechnische und maschinentechnische Einrichtungen vor der ersten Inbetriebnahme und nach wesentlichen Änderungen vor der Wiederinbetriebnahme durch Sachverständige geprüft werden. Der Unternehmer hat dafür zu sorgen, dass sicherheitstechnische und maschinentechnische Einrichtungen mindestens alle vier Jahre durch einen Sachverständigen im Umfang der Abnahmeprüfung geprüft werden.
-
Page 9: Anschluss Ans Netz
All manuals and user guides at all-guides.com Stellen Sie den Neigungswinkel über den Hängebügel ein und ziehen Sie die Feststellschrauben gut fest. LEBENSGEFAHR! Vor der ersten Inbetriebnahme muss die Einrichtung durch einen Sachverständigen geprüft werden! Anschluss ans Netz Schließen Sie das Gerät über den Netzstecker ans Netz an. Die Belegung der Anschlussleitungen ist wie folgt: Leitung International... -
Page 10: Bedienung
All manuals and user guides at all-guides.com Achtung: Am letzten Gerät muss die DMX-Leitung durch einen Abschlusswiderstand abgeschlossen werden. Dazu wird ein 120 Widerstand in einen XLR-Stecker zwischen Signal (–) und Signal (+) eingelötet und in den DMX-Ausgang am letzten Gerät gesteckt. BEDIENUNG Wenn Sie das Gerät an die Spannungsversorgung angeschlossen haben, nimmt der Spot den Betrieb auf. -
Page 11: Adressierung Des Geräts
All manuals and user guides at all-guides.com Stellen Sie DIP-Schalter 10 auf OFF. Mindestens 1 DIP-Schalter (von 1 – 9) muss auf ON stehen. DIP-Schalter 1 – 9 stellen die DMX Adressen ein. Adressierung des Geräts Jedes Gerät belegt 6 Steuerkanäle. Damit die Steuersignale richtig an jedes Gerät adressiert werden, müssen die Geräte kodiert werden. -
Page 12: Dmx-Protokoll
All manuals and user guides at all-guides.com DMX-Protokoll CH 1 CH 1 CH 2 CH 2 CH 3 CH 3 CH 4 CH 4 CH 5 CH 5 CH 6 CH 6 MACRO MACRO MODE MODE Speed/Strobe Speed/Strobe 0 OFF 0 OFF 0 OFF 0 OFF... -
Page 13: Technische Daten
Mindestabstand zum angestrahlten Objekt: 0,1 m 0,1 m Gewicht: 1,5 kg 1,5 kg Zubehör: EUROLITE TH-90 Theaterhaken für 50mm Rohr Best.-Nr. 58000720 Best.-Nr. 58000720 EUROLITE TH-50H Theaterhaken, silber Best.-Nr. 58000653 EUROLITE TH-200 Theaterhaken, silber Best.-Nr. 58000740 Sicherungsseil AG-5 3x600mm bis 5kg Best.-Nr. -
Page 14: Introduction
- download the latest version of the user manual from the Internet INTRODUCTION Thank you for having chosen a EUROLITE LED PAR-56 RGB Spot. If you follow the instructions given in this manual, we are sure that you will enjoy this device for a long period of time. - Page 15 All manuals and user guides at all-guides.com Please make sure that there are no obvious transport damages. Should you notice any damages on the A/C connection cable or on the casing, do not take the device into operation and immediately consult your local dealer.
-
Page 16: Operating Determinations
All manuals and user guides at all-guides.com OPERATING DETERMINATIONS This device is a lighting effect for creating decorative effects. This product is only allowed to be operated with an alternating voltage of 230 V, 50 Hz and was designed for indoor use only. This device is designed for professional use, e.g. -
Page 17: Overview
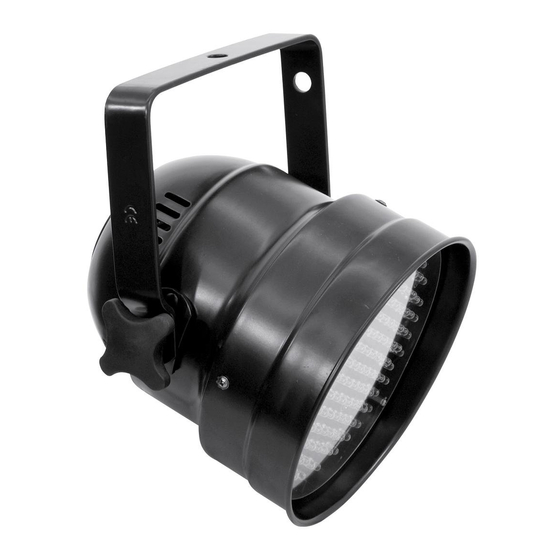
All manuals and user guides at all-guides.com OVERVIEW (1) Power cable with safety plug (2) Fixation screws Mounting-bracket with hook attachment (4) Hole for safety rope (5) LEDs INSTALLATION Overhead rigging DANGER TO LIFE! Please consider the EN 60598-2-17and the respective national standards during the installation! The installation must only be carried out by an authorized dealer! The installation of the device has to be built and constructed in a way that it can hold 10 times the weight for 1 hour without any harming deformation. - Page 18 All manuals and user guides at all-guides.com The device should be installed outside areas where persons may walk by or be seated. IMPORTANT! OVERHEAD RIGGING REQUIRES EXTENSIVE EXPERIENCE, including (but not limited to) calculating working load limits, installation material being used, and periodic safety inspection of all installation material and the device.
-
Page 19: Connection With The Mains
All manuals and user guides at all-guides.com Connection with the mains Connect the device to the mains with the power plug. The occupation of the connection cables is as follows: Cable International Brown Live Blue Neutral Yellow/Green Earth Attention! The earth has to be connected! If the device will be directly connected with the local power supply network, a disconnection switch with a minimum opening of 3 mm at every pole has to be included in the permanent electrical installation. -
Page 20: Operation
All manuals and user guides at all-guides.com OPERATION After you connected the spot to the mains, the EUROLITE LED PAR-56 RGB Spot starts running. Sound Control In order to select Sound Control, first set dipswitch 10 to ON and dipswitch 9 to OFF. Sensitivity can be adjusted with the rotary-control. -
Page 21: Addressing The Projector
All manuals and user guides at all-guides.com Addressing the Projector Set the dipswitch 10 to OFF. At least 1 dipswitch (from 1 – 9) must be set on ON. Dipswitches 1 – 9 set the DMX addresses. Addressing Each device occupies 6 channels. To ensure that the control signals are properly directed to each device, the device requires addressing. -
Page 22: Dmx-Protocol
All manuals and user guides at all-guides.com DMX-protocol CH 1 CH 1 CH 2 CH 2 CH 3 CH 3 CH 4 CH 4 CH 5 CH 5 CH 6 CH 6 MACRO MACRO MODE MODE Speed/Strobe Speed/Strobe 0 OFF 0 OFF 0 OFF 0 OFF... -
Page 23: Technical Specifications
Min. distance to lighted object: 0.1 m 0.1 m Weight: 1.5 kg 1.5 kg Accessory: EUROLITE TH-90 Theatre hook for 50mm pipe No. 58000720 No. 58000720 EUROLITE TH-50H Theatre hook, silver No. 58000653 EUROLITE TH-200 Theatre hook, silver No. 58000740 Safety bond AG-5 3x600mm up to 5kg No. -
Page 24: Introduction
- télécharger la version ultérieure du mode d'emploi d'Internet INTRODUCTION Nous vous remercions d'avoir choisi un EUROLITE Spot DEL PAR-56 RGB. Si vous respectez les instructions de service suivantes, vous allez profiter longtemps de votre achat. Sortez le Spot DEL PAR-56 RGB de son emballage. - Page 25 All manuals and user guides at all-guides.com Avant tout, assurez-vous que l'appareil n'a pas subi de dommages lors de son transport. Si l'appareil ou le câble d'alimentation est endommagé, ne jamais mettre l'appareil en service. Contactez immédiatement votre revendeur. La construction de l'appareil correspond à la classe de protection I. La fiche secteur doit être connectée uniquement à...
-
Page 26: Emploi Selon Les Prescriptions
All manuals and user guides at all-guides.com Tenir les enfants et les novices éloignées de l'appareil. Ne jamais faire marcher sans surveillance. EMPLOI SELON LES PRESCRIPTIONS Cet appareil est un effet lumineux pour créer des effets décoratifs. Cet appareil doit seulement être connecté avec une tension alternative de 230 V, 50 Hz et a été... -
Page 27: Aperçue Des Parties
All manuals and user guides at all-guides.com Si vous deviez transporter l'appareil, utilisez l'emballage d'origine pour éviter tout dommage. Assurez-vous que vous enviez l’appareil dans l’etat original. Ne nettoyez pas l'appareil avec des produits de nettoyage trop puissants ou abrasifs. Utilisez un chiffon doux, humide. - Page 28 All manuals and user guides at all-guides.com Pendant le montage, l’adaptation et le démontage, la présence inutile dans le secteur de surface de mouvement, sur des ponts d’illumination, sous des places de travail surélevées ainsi que près d’autres aires de danger est interdite. L’entrepreneur doit s'assurer que les installations concernant la sécurité...
-
Page 29: Alimentation
All manuals and user guides at all-guides.com La distance de chute maximale est de 20 cm. Une élingue de sécurité déjà utilisée ou defectueuse doit ne jamais etre réutilisée. Ajustez l'angle d'inclinaison grâce à la lyre de fixation et vissez bien les vis de fixation. DANGER DE MORT! Avant la première mise en marche, l’installation doit être contrôlé... -
Page 30: Maniement
All manuals and user guides at all-guides.com Connectez la sortie DMX du premièr appareil de la chaîne avec l'entrée DMX de l'appareil prochaine. Toujours connectez une sortie avec une entrée de l'appareil prochaine jusqu'à tous appareil soient connectés. Attention: À l‘appareil ulterieur, le câble DMX doit être obturé par une résistance de termination. Braser une résistance de 120 sur la prise XLR entre Data (-) et Data (+) et l’attacher dans la sortie DMX d‘appareil ultérieur. -
Page 31: Addressing Le Projecteur
All manuals and user guides at all-guides.com Addressing le Projecteur Mettez l‘interrupteur dip 10 à OFF. Au moins 1 interrupteur dip (à 1 de 9) doit être à ON. Les interrupteurs dip 1 – 9 codent les adresses DMX. Codage du appareil Chaque appareil occupe 6 canaux de contrôle. -
Page 32: Protocôle Dmx
All manuals and user guides at all-guides.com Protocôle DMX CH 1 CH 1 CH 2 CH 2 CH 3 CH 3 CH 4 CH 4 CH 5 CH 5 CH 6 CH 6 MACRO MACRO Speed/Strobe Speed/Strobe MODE MODE 0 OFF 0 OFF 0 OFF 0 OFF... -
Page 33: Caractéristiques Techniques
Distance minimum à l‘objet illuminé: 0,1 m 0,1 m Poids: 1,5 kg 1,5 kg Accessoires: EUROLITE TH-90 crochet p.tube dia. 50mm N° d'art. 58000720 N° d'art. 58000720 EUROLITE TH-50H crochet, argent N° d'art. 58000653 EUROLITE TH-200 crochet, argent N° d'art. 58000740 Safety bond AG-5 3x600mm up to 5kg N°... -
Page 34: Introducción
-descargar la última versión del manual del Internet INTRODUCCIÓN Gracias por haber elegido un EUROLITE LED PAR-56 RGB Spot. Si Vd. respecte las instrucciones sucesivas, aseguremos que vaya a gozarse mucho de su compra. Desembale su LED PAR-56 RGB Spot. -
Page 35: Instrucciones De Manejo
All manuals and user guides at all-guides.com Antes de la puesta en marcha inicial, por favor asegúrese de que no hay daños causados durante el transporte. Si el aparato u el cable están estropeado, consulte a su proveedor y no use el aparato. Este aparato pertenece a la clase de protección I. - Page 36 All manuals and user guides at all-guides.com Cuando buscar el sitio de instalación, por favor asegúrese de que el aparato no está expuesto a calor extremo, humedad o polvo. No debe haber cables mal instalados o no fijados correctamente. ¡Se pone usted en peligro y pone en peligro a otros! Nunca operar o almacenar el aparato en un ambiente con agua proyectada, lluvia, humedad o humo.
-
Page 37: Descripción De Las Partes
All manuals and user guides at all-guides.com DESCRIPCION DE LAS PARTES (1) Cable de conexión a la red (2) Tornillo de fijación (3) Lira de fijación (4) Orificio para cable de anclaje (5) LEDs INSTALACION Montaje por encima de la cabeza ¡PELIGRO DE MUERTE! Cuando instalar el aparato, Vd. - Page 38 All manuals and user guides at all-guides.com El empresario debe asegurar que instalaciones de seguridad y de máquinas son inspeccionados por un baquiano una vez por año. Procedimiento: El proyector debe ser instalado fuera de áreas dónde personas pueden entretenerse. IMPORTANTE! UNA MONTAJE POR ENCIMA DE LA CABEZA REQUIERA MUCHA EXPERIENCIA.
-
Page 39: Alimentación
All manuals and user guides at all-guides.com Alimentación Conectar el aparato a la red mediante la clavija de alimentación. La ocupación de los cables de conexión es: Cable Internacional Marrón Fase Azul Neutro Amarillo/Verde Tierra La tierra debe ser conectada. Cuando Vd. -
Page 40: Sound Control
All manuals and user guides at all-guides.com Sound Control Vd. puede ajustar Sound Control en colocar el interruptor dip 10 en la posición ON y el interruptor dip 9 en la posición OFF. Usted puede ajustar la sensibilidad mediante el control giratorio. Manual Mode Vd. -
Page 41: Protócolo Dmx
All manuals and user guides at all-guides.com Vd. puede colocar interruptor dip 10 en la posición OFF. Al menos 1 interruptor dip (von 1 – 9) debe ser en la posición ON. Los interruptores dip 1 – 9 sirven para ajustar la dirección DMX. Direccionamiento del aparato Cada aparato ocupa 6 canales DMX. -
Page 42: Limpieza Y Mantenimiento
Distancia mínima a objetos iluminados: 0,1 m 0,1 m Peso: 1,5 kg 1,5 kg Accesorio: EUROLITE TH-90 gancho p.tubo diá. 50mm Referencia 58000720 Referencia 58000720 EUROLITE TH-50H gancho, plateado Referencia 58000653 EUROLITE TH-200 gancho, plateado Referencia 58000740 Safety bond AG-5 3x600mm up to 5kg...