Panasonic SV-PT1PP Manuel D'utilisation
Table des Matières
Les langues disponibles
Les langues disponibles
Liens rapides
All manuals and user guides at all-guides.com
Before attempting to connect, operate or adjust this product, please read
these instructions thoroughly.
For USA assistance, please call: 1-800-272-7033 or send e-mail to: digitalstillcam@panasonic.com
For Canadian assistance, please call: 1-800-561-5505 or visit us at www.panasonic.ca
PT1.p1-5.p65
SD Media Storage
Operating Instructions
SV-PT1PP
Model No.
1
2003/01/14, 12:36
LSQT0622A
Table des Matières

Manuels Connexes pour Panasonic SV-PT1PP


Sommaire des Matières pour Panasonic SV-PT1PP
- Page 63 All manuals and user guides at all-guides.com Mémoire à support SD Manuel d’utilisation SV-PT1PP Modèle Il est recommandé de lire attentivement ce manuel avant d’utiliser l’appareil. Conserver ce manuel. Pour de l’aide, composez le 1-800-561-5505 ou visitez notre site Internet à www.panasonic.ca LSQT0622A PT1.f1-5.p65 2003/01/14, 12:38...
-
Page 64: Précautions À Prendre
Nous tenons à vous remercier d’avoir appellations de produits cités dans ce choisi cette mémoire à support SD manuel sont des marques de Panasonic. commerce ou des marques déposées Veuillez lire attentivement le présent de leur détenteur respectif. manuel et le conserver pour référence ultérieure. - Page 65 All manuals and user guides at all-guides.com Précautions à prendre Cet appareil numérique de la classe [B] est conforme à la norme NMB-003 du Canada. PT1.f1-5.p65 2003/01/14, 12:38...
-
Page 66: Contrat De Licence Avec L'utilisateur Final
All manuals and user guides at all-guides.com Contrat de licence avec l’utilisateur final Avant d’ouvrir la boîte du CD-ROM, lisez attentivement ce qui suit. À l’utilisateur une licence est accordée pour le logiciel défini dans ce contrat appelé licence avec l’utilisateur final (“contrat”), à condition que l’utilisateur même accepte les termes et les conditions de ce contrat. - Page 67 All manuals and user guides at all-guides.com Table des matières Préparatifs Précautions à prendre ................2 Contrat de licence avec l’utilisateur final ..........4 Renseignements ..................7 Précautions d’utilisation ................. 8 • Appareil principal et batterie ..............8 • Protection des données et disque dur de carte PC ......9 •...
- Page 68 All manuals and user guides at all-guides.com Table des matières Réglages de diaporama • Sélection des images ................30 • Réglage des effets/vitesse de transition d’écran ........ 31 Présentation • Exécution d’une présentation .............. 32 • Sélection du contenu d’une présentation ..........33 Édition •...
-
Page 69: Caractéristiques Principales
All manuals and user guides at all-guides.com Renseignements Caractéristiques principales G G G G G Cet appareil est une mémoire à support portable légère et compacte. G G G G G Le disque dur à grande capacité de 5 Go permet de mémoriser une grande quantité... -
Page 70: Précautions D'utilisation
All manuals and user guides at all-guides.com Précautions d’utilisation Veuillez lire attentivement les présentes instructions avant d’utiliser l’appareil, et les respecter rigoureusement pendant que l’appareil fonctionne. Sinon, l’appareil risquera de tomber en panne ou d’être abîmé. En outre, si vous ne respectez pas les précautions indiquées ici, les données mémorisées dans le support risqueront d’être endommagées ou perdues. -
Page 71: Protection Des Données De La Carte
All manuals and user guides at all-guides.com Précautions d’utilisation Protection des données de la carte (Pour plus de détails concernant les cartes compatibles, référez-vous à la page 10.) • Ne débranchez pas l’adaptateur secteur, ne débranchez pas le câble USB raccordant l’appareil à un ordinateur personnel pendant que cet appareil fonctionne. -
Page 72: Avant L'utilisation
All manuals and user guides at all-guides.com Avant l’utilisation • Les photographies et les documents imprimés ne doivent pas être utilisés sans autorisation du propriétaire des droits d’auteur, sauf pour des applications personnelles et privées. • : Le logo SD est une marque commerciale. ®... -
Page 73: Copie Et Sauvegarde
All manuals and user guides at all-guides.com Avant l’utilisation Copie et sauvegarde Copie: Carte mémoire -> Disque dur de carte PC Pour copier d’une carte mémoire sur le disque dur de carte PC, créez un dossier intitulé “CARD****” pour chaque copie et sauvegardez les données de carte mémoire dans ce dossier. -
Page 74: Copie Et Sauvegarde (Suite)
All manuals and user guides at all-guides.com Avant l’utilisation Copie et sauvegarde (suite) Copie: Disque dur de carte PC -> Carte mémoire Le dossier intitulé “CARD****” disparaît et les données sont copiées conformément aux règles des structures des fichiers. Disque dur de carte PC Carte mémoire ROOT CARDA001... -
Page 75: Sélection Des Modes
All manuals and user guides at all-guides.com Sélection des modes Mode Copie (p. 19 à 23) Le mode Copie est utilisé pour copier les données de la carte insérée sur une autre carte. En outre, vous pouvez appuyer sur MENU pour effectuer certaines opérations, par exemple pour vérifier la capacité... -
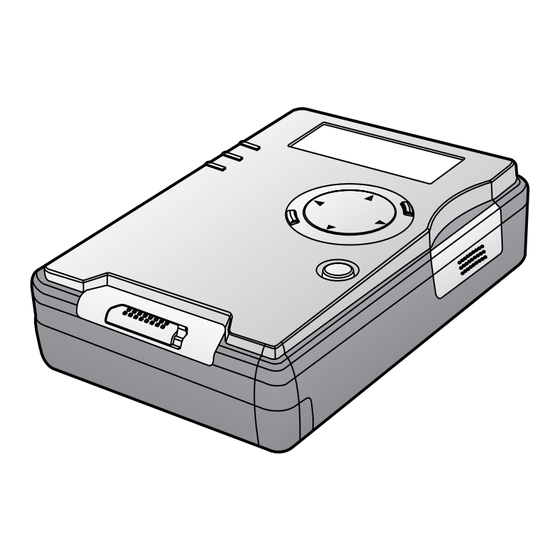
Page 76: Vue Avant
All manuals and user guides at all-guides.com Index des commandes Affichage à cristaux liquides Vue avant L’affichage à cristaux liquides indique le mode de fonctionnement actuel (TV, Copie). • En mode Copie, le niveau de la batterie, la progression du Broche de fixation transfert de données et différents menus sont affichés. -
Page 77: Transport De L'appareil
All manuals and user guides at all-guides.com Transport de l’appareil Fixation de la dragonne Insérez la boucle de l’extrémité de la dragonne dans la broche de fixation. Faites passer l’extrémité opposée par la boucle, et tirez la dragonne bien fermement dans le sens de la flèche. -
Page 78: Recharge De La Batterie
All manuals and user guides at all-guides.com Recharge de la batterie Vous pouvez recharger la batterie en laissant celle-ci à l’intérieur de l’appareil, en utilisant l’adaptateur secteur fourni. Avant de charger la batterie, il faut éteindre l’appareil. Si l’appareil est allumé, la charge sera arrêtée. Faites glisser le Pour retirer la batterie : couvercle de la... -
Page 79: Insertion De La Carte
All manuals and user guides at all-guides.com Insertion de la carte Mettez le mode d’attente hors circuit lorsque vous insérez ou que vous retirez une carte. Fente de carte mémoire SD Pour retirer la carte: Ouvrez la porte de la Poussez la porte de la carte. -
Page 80: Mise Sous Tension
All manuals and user guides at all-guides.com Mise sous tension En cas de panne de courant, l’appareil utilise la batterie fournie comme alimentation de secours pour protéger l’appareil et les données de la carte. Si vous utilisez l’adaptateur secteur, insérez une batterie suffisamment chargée avant d’allumer l’appareil. L’appareil ne peut pas être utilisé... -
Page 81: Mode Copie (Indicateur D'affichage)
All manuals and user guides at all-guides.com Mode Copie (Indicateur d’affichage) En mode Copie, les données peuvent être copiées d’une carte sur une autre. Vous pouvez aussi vérifier la capacité de stockage de la carte, effectuer des sauvegardes, régler Témoin les formats TV et formater les cartes. - Page 82 All manuals and user guides at all-guides.com Mode Copie (Menus) COPY/TV MODE Affichage à cristaux liquides MENU CANCEL /SET STANDBY/SET (Touche Fente de disque d’attente/ dur de carte PC d’exécution) (carte PC) Fente de carte mémoire • Vérification de la capacité de stockage de la carte (MEDIA CAPACITY) Ceci vous permet de vérifier la capacité...
- Page 83 All manuals and user guides at all-guides.com Mode Copie (Copie) Toutes les données peuvent être copiées d’une carte mémoire sur le disque dur de carte PC (carte PC) en une seule opération. En outre, il est possible de copier les données contenues dans des dossiers particuliers du disque dur de carte PC (carte PC) sur une carte mémoire en sélectionnant les dossiers que vous voulez copier.
-
Page 84: Formatage Des Cartes
All manuals and user guides at all-guides.com Formatage des cartes Normalement, il est inutile de formater (initialiser) la carte mémoire SD et le disque dur de carte PC. Une carte mémoire SD qui a été formatée aux spécifications FAT32* ne peut pas être utilisée; vous devez donc transférer les données importantes sur un ordinateur personnel puis formater la carte de cet appareil. -
Page 85: Précautions Concernant Le Formatage
All manuals and user guides at all-guides.com Formatage des cartes Formatage du disque dur de carte PC Les numéros de produit des cartes pouvant être formatées en utilisant l’appareil sont indiqués ci-dessous. Les cartes dont les numéros de produit ne sont pas indiqués dans la liste ne peuvent pas être formatées (en date du 1er oct. -
Page 86: Configuration (Connexions)
All manuals and user guides at all-guides.com Mode TV (Configuration) Vous pouvez visualiser les photos DSC et les fichiers de présentation PC sur un téléviseur lorsque celui-ci est connecté à cet appareil. Pour plus de détails concernant les fonctions disponibles en mode TV, référez-vous à la page suivante. Configuration (connexions) Connectez le câble vidéo. -
Page 87: É Cran Initial
All manuals and user guides at all-guides.com Mode TV (Fonctions du mode TV) É cran initial L’écran ci-dessous apparaît lorsqu’une carte est insérée. Si le message “NO CARD” apparaît, vérifiez si la carte est correctement insérée. Zone de menu Indicateur de hiérarchie des dossiers •... -
Page 88: Formats D'images Affichables
All manuals and user guides at all-guides.com Mode TV (Informations de l’affichage) Formats d’images affichables Il est possible d’afficher les images des formats suivants. • Formats compatibles avec le format DCF 1.1 • Format JPEG de base Y Cb Cr (format compressé) (Taux d’échantillonnage 4:4:4, 4:2:0, 4:2:2, 4:1:1) (80 x 60 ~ 5120 x 3840 pixels) •... -
Page 89: Visualisation D'images Dans L'index
All manuals and user guides at all-guides.com Mode TV (Affichage d’images) Visualisation d’images dans l’index Appuyez sur pour sélectionner la carte utilisée, puis appuyez sur SET. Sélectionnez “IMAGE DISPLAY”, puis appuyez sur SET. • La zone d’index est affichée avec le curseur placé... -
Page 90: Sélection De La Luminosité Du Fond
All manuals and user guides at all-guides.com Mode TV (Album) Les images de l’index peuvent être affichées sur un écran de téléviseur par groupes de 6 ou 9 simultanément, comme dans un album photo. Appuyez sur pour sélectionner “ALBUM”, puis appuyez sur SET. •... -
Page 91: Exécution De Diaporama
All manuals and user guides at all-guides.com Mode TV (Diaporama) Vous pouvez afficher les images sélectionnées comme diaporama avec plusieurs vitesses et effets de transition. MENU CANCEL /SET Exécution de diaporama Appuyez sur pour sélectionner “SLIDE SHOW”, puis appuyez sur SET. -
Page 92: Sélection Des Images
All manuals and user guides at all-guides.com Mode TV (Réglages de diaporama) Le réglage SLIDE SETUP vous permet de spécifier quelles images afficher dans un diaporama. (p. 29) MENU /SET Sélection des images Spécifiez les images de l’index que vous voulez inclure dans le diaporama. Si vous voulez inclure toutes les images de l’index, il est inutile d’effectuer cette procédure. -
Page 93: Réglage Des Effets De Transition D'écran
All manuals and user guides at all-guides.com Mode TV (Réglages de diaporama) Réglage des effets de transition d’écran Effectuez les étapes 1~3 à la page 29. À l’étape 3, appuyez sur pour sélectionner “SELECT”. Appuyez sur pour sélectionner “EFFECT”, puis appuyez sur SET. Appuyez sur pour choisir l’effet de transition désiré, puis appuyez sur... -
Page 94: Exécution D'une Présentation
All manuals and user guides at all-guides.com Mode TV (Présentation) Les données Microsoft PowerPoint créées sur un ordinateur personnel peuvent être converties en fichiers JPEG à l’aide du logiciel d’ajout JPEG fourni, puis présentées sur le téléviseur. Pour plus de détails concernant la création de fichiers de présentation, référez-vous aux pages 46 et 47. -
Page 95: Sélection Du Contenu D'une Présentation
All manuals and user guides at all-guides.com Mode TV (Présentation) Sélection du contenu d’une présentation Vous pouvez sélectionner des diapositives particulières que vous voulez afficher à partir de l’index. Si vous voulez inclure toutes les images de l’index, il est inutile d’effectuer cette procédure. -
Page 96: Suppression D'images (Delete)
All manuals and user guides at all-guides.com Mode TV (Édition) Vous pouvez supprimer des images d’une carte, copier des données d’une carte sur une autre, et protéger des données contre l’effacement accidentel. MENU /SET Suppression d’images (DELETE) Appuyez sur pour sélectionner “EDIT”, puis appuyez sur SET. -
Page 97: Copie D'images (Copy)
All manuals and user guides at all-guides.com Mode TV (Édition) Copie d’images (COPY) Copie les données d’une carte sur une autre. Une carte recevant les données copiées doit être insérée. Appuyez sur pour sélectionner “EDIT”, puis appuyez sur SET. Appuyez sur MENU. •... -
Page 98: Protection D'images (Protect)
All manuals and user guides at all-guides.com Mode TV (Édition) Protection d’images (PROTECT) Les données des fichiers importants peuvent être protégés contre un effacement accidentel. Appuyez sur pour sélectionner “EDIT”, puis appuyez sur SET. Appuyez sur MENU. • L’écran menu apparaît alors. Appuyez sur pour sélectionner “PROTECT”, puis appuyez sur... - Page 99 All manuals and user guides at all-guides.com Mode TV (Édition) MENU /SET Sélection d’images Sélectionnez les fichiers d’images pour les fonctions DELETE, COPY, et PROTECT. Les écrans donnés en exemples ci-dessous montrent comment supprimer une image. Appuyez sur pour sélectionner une image, puis appuyez sur SET.
-
Page 100: Sélection D'images
All manuals and user guides at all-guides.com Mode TV (Lecture plein écran) Pendant que l’index ou qu’un album est affiché, si vous sélectionnez une image, celle-ci sera affichée en plein écran. Vous pouvez aussi utiliser le zoom, tourner l’image, ajouter des effets de couleurs, afficher des informations d’images, et supprimer l’image. -
Page 101: Agrandissement D'une Image (Zoom)
All manuals and user guides at all-guides.com Mode TV (Lecture plein écran) Affichage du sous-menu Lorsqu’une image d’album ou qu’un index est affiché en plein écran, vous pouvez utiliser le zoom, tourner l’image, ajouter des effets de couleurs et afficher des informations d’image. -
Page 102: Rotation D'une Image (Rotate)
All manuals and user guides at all-guides.com Mode TV (Lecture plein écran) MENU /SET Rotation d’une image (ROTATE) Appuyez sur pour sélectionner “ROTATE” dans le sous-menu, puis appuyez sur SET. (p. 39) Appuyez sur pour sélectionner “LEFT” (gauche) ou “RIGHT” (droite), puis appuyez sur SET. -
Page 103: Traitement Des Couleurs De L'image (Color Effect)
All manuals and user guides at all-guides.com Mode TV (Lecture plein écran) Traitement des couleurs de l’image (COLOR EFFECT) Vous pouvez changer les couleurs de l’image. Appuyez sur pour sélectionner “COLOR EFFECT” dans le sous- menu, puis appuyez sur SET. (p. -
Page 104: Environnement D'exploitation
All manuals and user guides at all-guides.com Mode PC (Configuration) En connectant cet appareil à un ordinateur personnel à l’aide d’un câble USB, vous pouvez utiliser l’appareil comme lecteur extérieur. Environnement d’exploitation La configuration minimale du système est indiquée ci-dessous. Modèles d’ordinateurs •... -
Page 105: Installation Du Pilote Usb
All manuals and user guides at all-guides.com Mode PC (Pilote USB) Installation du pilote USB (Pour Windows 98SE seulement) Effectuez les connexions en vous référant à la section “Configuration (connexions)” à la page 42. • L’écran “Add New Hardware Wizard” est affiché. Placez le CD-ROM fourni dans le lecteur de CD-ROM de l’ordinateur personnel. -
Page 106: Opérations Des Fichiers
All manuals and user guides at all-guides.com Mode PC (Utilisation avec l’ordinateur personnel) Lorsque cet appareil est connecté à un ordinateur personnel à l’aide du câble USB fourni (p. 42), il sera reconnu comme disque amovible. Vous pourrez alors copier, déplacer, supprimer et afficher les fichiers de cet appareil de la même façon qu’avec un lecteur de disque normal. -
Page 107: Déconnexion De L'appareil De L'ordinateur Personnel
All manuals and user guides at all-guides.com Mode PC (Utilisation avec l’ordinateur personnel) Déconnexion de l’appareil de l’ordinateur personnel Assurez-vous que les témoins de SD et de disque dur sont éteints, et que la carte n’est pas en cours d’accès. Cliquez sur l’icône [Safety Remove Hardware] dans le plateau des tâches du bureau. - Page 108 All manuals and user guides at all-guides.com Mode PC (Utilisation des applications) Le CD-ROM inclus contient une application “JPEG Addin Software” qui convertit les données Microsoft PowerPoint créées sur un ordinateur personnel en fichiers JPEG et qui crée un dossier de présentation (p. 47) pour la présentation sur écran de téléviseur (p.
-
Page 109: Création De Fichiers De Présentation
All manuals and user guides at all-guides.com Mode PC (Utilisation des applications) Création de fichiers de présentation Installez le logiciel JPEG Addin Software (p. 46), puis démarrez PowerPoint sur l’ordinateur personnel. Sélectionnez [Open] dans le menu [File] pour ouvrir un fichier PowerPoint pour la conversion au format JPEG. -
Page 110: Désinstallation Du Logiciel Jpeg Addin Software
My Computer, puis sélectionnez “Properties”. • L’écran “System Properties” apparaît alors. Cliquez sur l’onglet “Device Manager”. Sélectionnez “Panasonic SD Media Storage USB”, puis cliquez sur [Remove]. Cliquez sur [OK]. Cliquez sur [Refresh]. • L’assistant Add New Hardware démarre alors. -
Page 111: Fonctionnement De L'interrupteur Hdd Safety
All manuals and user guides at all-guides.com Mode PC (Autres) Fonctionnement de l’interrupteur HDD SAFETY Lorsque vous utilisez une connexion USB, placez l’appareil sur une surface plane et horizontale. Si l’interrupteur HDD SAFETY est activé, procédez comme suit. G G G G G Pour Windows 98SE/Me Si l’interrupteur de détection de sécurité... -
Page 112: Affichages D'avertissement Et D'instruction
All manuals and user guides at all-guides.com Affichages d’avertissement et d’instruction Mode Copie (affichage à cristaux liquides) Indications État PLEASE Insérez la batterie. Il est impossible d’allumer INSERT BATT. l’appareil si la batterie n’est pas insérée. Insérez la carte. NO CARD NO DATA Aucune donnée n’est mémorisée sur la carte. - Page 113 All manuals and user guides at all-guides.com Affichages d’avertissement et d’instruction Mode PC (affichage à cristaux liquides) Indications État CONNECT AC Connectez l’adaptateur secteur. Il est possible de faire changer la sélection entre un disque dur de carte PC/carte PC et une carte CANNOT mémoire SD pendant le transfert des données entre CHANGE SLOT...
- Page 114 All manuals and user guides at all-guides.com Affichages d’avertissement et d’instruction Mode TV (affichage sur écran de téléviseur) Indications État L’opération spécifiée n’a pas été exécutée COPY ERROR correctement. Réinitialisez l’appareil (voyez ci- DELETE ERROR dessous), ou éteignez l’appareil, puis rallumez-le et PROTECT ERROR répétez l’opération.
-
Page 115: Guide De Dépannage
All manuals and user guides at all-guides.com Guide de dépannage En cas de problème, veuillez d’abord essayer de le corriger vous-même en utilisant les mesures mentionnées ci-dessous. Symptôme Correction • Vérifiez si la batterie et l’adaptateur secteur sont L’appareil ne s’allume pas... bien connectés. - Page 116 All manuals and user guides at all-guides.com Guide de dépannage Symptôme Correction • Mettez le mode COPIE/TV à “TV”. Les images n’apparaissent pas, • Connectez correctement le câble vidéo. bien que cet appareil soit • Mettez l’entrée TV à Vidéo. Référez-vous au connecté...
-
Page 117: Spécifications
All manuals and user guides at all-guides.com Spécifications Alimentation électrique: 4,8 V CC (adaptateur secteur)/3,7 V CC (Batterie) Consommation: 2,2 W (adaptateur secteur) (crête 3,4 W) 2,2 W (Batterie) (crête 2,9 W) Cartes mémoire compatibles Fente de carte SD: Carte mémoire SD, MultiMediaCard Fente de carte PC: Disque dur de carte PC (2 Go, 5 Go) Carte mémoire SD*... - Page 118 All manuals and user guides at all-guides.com Spécifications Sortie vidéo: Sortie composite: Format NTSC/Format PAL, 1 V c-c, 75 ohms Sortie S: Signaux Y et C, format NTSC / format PAL, 1 V c-c, 75 ohms Dimensions: 73 (L) x 25,8 (H) x 107,5 (P) mm Poids: 160 g (sans le disque dur de carte PC et la batterie) Poids d’utilisation:...
- Page 119 All manuals and user guides at all-guides.com Memo PT1.f55-58.p65 2003/01/14, 12:39...
- Page 120 Montréal: 3075 Louis A. Amos, Lachine, Québec H8T 1C4 (514) 633-8684 Toronto: 5770 Ambler Drive, Mississauga, Ontario L4W 2T3 (905) 238-2181 Calgary: 6835 8th Street N.E., Calgary, Alberta T2E 7H7 (403) 295-3922 Panasonic Canada Inc. Vancouver: 12111 Riverside Way, Richmond, BC V6W 1K8 (604) 278-4211 5770 Ambler Drive,...