Uline OHAUS DEFENDER 3000 Mode D'emploi
Balance numérique
Table des Matières
Les langues disponibles
Les langues disponibles
Liens rapides
H-2587, H-4594
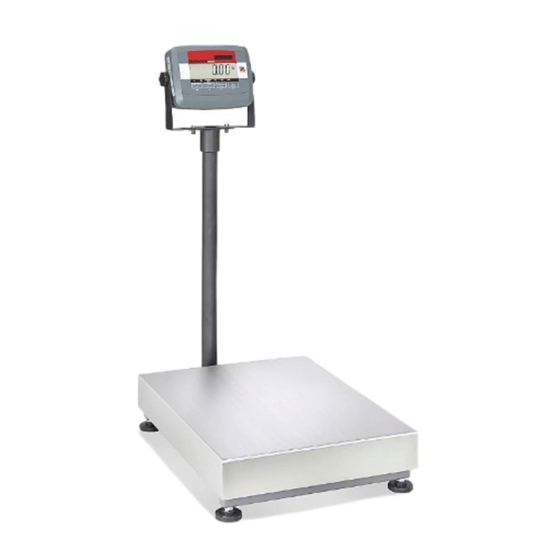
OHAUS DEFENDER™
3000 DIGITAL SCALE
CONTROL PANEL
11
CONTROL FUNCTIONS
BUTTON
PRIMARY FUNCTION
(Short Press)
SECONDARY FUNCTION
(Long Press)
MENU FUNCTION
(Short Press)
PAGE 1 OF 24
1-800-295-5510
uline.com
OVERVIEW OF CONTROLS
0 0 0
3
SE RI ES
TAR E
NET
CALIB RATIO N
PCS
0
MOD E
Fun ctio n
Prin t
On /Ze ro
Mo de
Uni ts
Off
Bac k
No
Yes
10
7
9
8
On/Zero
Off
Yes
ON/ZERO
If indicator is ON, sets
Sends the current value
zero.
to the COM port if
AUTOPRINT is set to Off.
OFF
Turns the indicator on
Changes the weighing
or off.
unit.
YES
Accepts the current
Advances to the next
setting on the display.
menu or menu item.
Rejects the current
setting on the display
and advances to the
next available setting.
Increments the value.
CONTROL PANEL PARTS
1
3
Tar e
Me nu
2
Exit
5
4
6
10
11
Print
Units
No
PRINT
Initiates an application
mode.
UNITS
Allows changing the
application mode.
Press and hold allows
scrolling through
modes.
NO
Moves back to previous
menu item.
Decrements the value.
Para Español, vea páginas 9-16.
Pour le français, consulter les pages 17-24.
#
DESCRIPTION
1
Capacity Label Window
2
TARE Menu Button
3
TARE Symbol
4
FUNCTION Mode Button
5
NET Symbol
6
PCS Symbol
7
PRINT Units Button
8
Calibration Mode Symbol
9
Battery Symbol
ON/ZERO Off Button
Center of Zero Symbol
Function
Mode
Menu
Back
FUNCTION
Performs a tare
operation.
MODE
MENU
Enter the user menu.
View the audit trial
event counters
(extended press).
BACK
Exits the user menu.
Aborts the calibration
in progress.
Tare
Exit
TARE
EXIT
0521 IH-2587
Table des Matières

Manuels Connexes pour Uline OHAUS DEFENDER 3000


Sommaire des Matières pour Uline OHAUS DEFENDER 3000
-
Page 17: Ohaus Defender Balance Numérique
H-2587, H-4594 1-800-295-5510 uline.ca OHAUS DEFENDER 3000 – BALANCE NUMÉRIQUE APERÇU DES COMMANDES ÉLÉMENTS DU PANNEAU DE COMMANDE PANNEAU DE COMMANDE DESCRIPTION Fenêtre affichant la capacité Touche du menu TARE 0 0 0 SE RI ES Symbole TARE Touche du mode FUNCTION... -
Page 18: Fonctionnement
INSTALLATION Retirez les quatre entretoises d'expédition rouges Figure 1 situées en-dessous de la plateforme métallique. (Voir Figure 1) FONCTIONNEMENT ALLUMER OU ÉTEINDRE L'INDICATEUR CHANGER L'UNITÉ DE MESURE RÉGLER L'UNITÉ DE MESURE DU DÉMARRAGE Pour allumer l'indicateur, maintenez la touche Régler l'unité de mesure affichée au démarrage à g, kg, lb, ON/ZERO OFF enfoncée oz, lb/oz ou Auto (la dernière unité... -
Page 19: Fonctionnement Suite
FONCTIONNEMENT SUITE RÉINITIALISATION L'UNITÉ DE LIVRE/ONCE rESEt UNIt Rétablir les paramètres d'usine par Définir le statut : défaut dans le menu d'unités de OFF = Désactivé mesure : ON = Activé NO = Non réinitialisé YES = Réinitialisé REMARQUE: Si l'option Autoriser à... -
Page 20: Étalonnage Linaire
FONCTIONNEMENT SUITE SPAN Le point d'étalonnage complet 2. Lorsque est affiché, appuyez clignote à l'écran. sur la touche YES pour accéder au menu de l'étalonnage de l'intervalle 8. Placez le poids spécifié sur la de mesure. Le chiffre 0 clignote à l'écran. balance et appuyez sur la touche --C-- YES. -
Page 21: Modes D'application
FONCTIONNEMENT SUITE MODES D'APPLICATION DÉTERMINER LE POIDS MOYEN D'UN ÉLÉMENT (APW) Seuls les modes activés dans le menu mode sont affichés. L'écran affiche PUt 10 pièces. PESAGE Placez les objets à peser DÉTERMINER UN sur la balance. L'illustration NOUVEL APW indique un échantillon ayant un poids brut de 1,5 kg. -
Page 22: Scellage Par Piste De Vérification
FONCTIONNEMENT SUITE SCELLAGE PAR PISTE DE VÉRIFICATION REMARQUE : Pour les installations qui utilisent un procédé de scellage par piste de vérification, les étapes 5 à 8 ne sont pas Pour les juridictions qui utilisent un procédé de scellage par nécessaires. Cependant, le commutateur piste de vérification, le responsable local de vérification de sécurité... -
Page 23: Dépannage
ENTRETIEN NETTOYAGE MISE EN GARDE! Débranchez l'appareil de l'alimentation électrique avant toute opération • Le boîtier peut être nettoyé à l'aide d'un chiffon de nettoyage. légèrement imbibé de détergent doux au besoin. • Évitez d'utiliser des solv0ants, des produits chimiques, de l'alcool, de l'ammoniac ou des nettoyants abrasifs pour nettoyer le boîtier ou le panneau de commande. -
Page 24: Dépannage Suite
égal à une division de 0,1. Si la section Dépannage ne résout pas votre problème, communiquez avec le service à la clientèle ULINE au 1 800 295-5510. REMARQUE : Avant d'utiliser l'indicateur pour la première fois, la pile rechargeable interne doit être complètement chargée pendant 12 heures.