Table des Matières

Publicité

Les langues disponibles
  • FR

Les langues disponibles

Liens rapides

Banknote Detector V75
User manual
Manual de usuario
Manuale di istruzioni
Bedienungsanleitung
Manuel d'utilisation

Publicité

Table des Matières
loading

Sommaire des Matières pour Detectalia V75

  • Page 1 Banknote Detector V75 User manual Manual de usuario Manuale di istruzioni Bedienungsanleitung Manuel d’utilisation...
  • Page 3 Language Idioma Linguaggio Sprache Langue English Español Italiano Deutsch Français...
  • Page 4 Preface Thank you for supporting and choosing our products! In order to make the best use of the machine, please read this manual carefully before using. For the products safety performance, please use our products correctly. Our company will continue to improve and optimize the product, so the actual product maybe slightly different f rom this manual.
  • Page 5: Table Des Matières

    Banknote Counter Detectalia V75 CONTENT 1. Safety usage instructions 2. The introduction of the main parts 3. Specifications 4. The introduction of the panel 5. The introduction of the main display 6. Operation 7. Detection function setting 8. Fault code and solution 9.
  • Page 7: Safety Usage Instructions

    1. Safety usage instructions To avoid machine damage and personal injury, please read all the warnings and caution carefully before first use, thank you. 1. It is strictly prohibited for unprofessional personnel to disassemble the machine. 2. Keep the unit away from heavy humidity and strong sunlight, otherwise will do harm to the machine. 3.
  • Page 8: The Introduction Of The Main Parts

    2. The introduction of the main parts Front cover Rear cover Feeding wheel Adjusting screw Banknote twiddling wheel Resistance wheel Hopper guide Banknote transporting wheel Start sensor Panel LCD display Banknote receiving wheel Transporting platform External Display Banknote receiving sensor...
  • Page 9: Specifications

    3. Specifications Voltage/Frequency 100—240V~/50—60Hz/600mA Power Consumption 60W(Max) Counting range 4 digit Counting speed 900 banknotes/min Batch range 1-999 banknotes Countable banknote size MIN: 50*90 mm MAX: 100*190 mm Banknote thickness 0.075~0.15 mm Hopper capacity 300 banknotes Stacker capacity 200 banknotes Net weight 4.02 kg Machine size...
  • Page 10: The Introduction Of The Panel

    4. The introduction of the panel START: In the manual counting mode, press this key to start counting. MENU: Press this key to enter into the MENU Interface. ENTER: In the MENU interface, press this key can save the change and back to the previous interface. Press this key to confirm or enter into the sub-menu.
  • Page 11: The Introduction Of The Main Display

    5. The introduction of the main display UV function mode MG function mode IR function mode DD function mode Last count number Current count number MNL (manual) mode AUTO (automatic) mode Batching number Batch function ADD function...
  • Page 12: Operation

    6. Operation Press the power switch to turn on/off the unit. 6.1 Turn on/off Note: When turn on , it will start self-check and all the function words on the LCD are lit up. If there is some problem with the sensors, then it will show the error code in the display.
  • Page 13: Detection Function Setting

    7. Detection function setting The users can choose the detection function according to their needs. 7.1 UV detection • Press MODE choose to turn on the UV function, when the display show “UV”, it means the UV function is on; otherwise, the UV function is off.
  • Page 14 7. Detection function setting 7.4 DD detection • Press DD choose to turn on the DD function, When the display show “DD”, it means the DD function is on; otherwise, the DD function is off. • Check the banknote with DD(size) feature. •...
  • Page 15 7. Detection function setting 7.7 Machine sensitivity • Press MENU open menu setting, then press IR or DD again to switch the setting. parameters setting • Press +1/+10 increase or ADD to decrease the sensitivity parameter setting, and press ENTER to save the change and back to the previous interface.
  • Page 16 7. Detection function setting 7.7 Machine sensitivity parameters setting 8. P10/H-*** Note hole filling function Settings: H-OFF is off, H--ON is open; the default is H--ON(open); (ref. Picture 6-11~12). 9. P11/***** Speed setting: 1000, 1200, 1500, the default is 1000; (ref. Picture 6-13~15). 10.
  • Page 17: Fault Code And Solution

    8. Fault code and solution Fault code Reason Solution 1. Poor contact of the emitter tube, re-plugging. 4. Check the circuit connection. Problem with the left count sensor error or the 2. Poor contact of the receiving tube, re-plugging. 5. Replace the main board. relative circuit.
  • Page 18: Error Code And Solution

    9. Error code and solution Fault code Reason Solution Suspicious notes checked by UV detection. Take away the suspicious banknote, and press ”ENTER” to continue. Problem with the UV detection. Lower the UV sensitivity level. Suspicious notes checked by MG detection. Take away the suspicious banknote, and press ”...
  • Page 19: Precaution For Handing The Machine

    10. Precaution for handing the machine Warning: When putting notes • Forbidden use banknote mixed with other things, wet notes, damaged notes and so on. • Please take care fingers, hair, clothes and other things into the machine when the machine counting. •...
  • Page 20: Maintenance

    12. Maintenance • The counting sensor and feeding sensor belong to the optical equipment. If there is some dust and dirty things covering the sensor, it will lead to the fault when the machine is working. • The user should clean the machine after using. 13.
  • Page 22 Prefacio ¡Gracias por elegir nuestros productos! Para hacer el mejor uso de la máquina, lea atentamente este manual antes de usarla. Lea detenidamente este manual para el correcto uso del contador de billetes. Nuestra empresa continuará mejorando y optimizando el producto, por lo que el producto real puede ser ligeramente diferente de este manual.
  • Page 23 Contador de billetes Detectalia V75 CONTENIDO 1. Instrucciones de uso de seguridad 2. Introducción de las partes principales 3. Especificaciones 4. Introducción del panel 5. Pantalla 6. Operación 7. Configuración de la función de detección 8. Código de fallo y solución 9.
  • Page 25: Instrucciones De Uso De Seguridad

    1. Instrucciones de uso de seguridad ara evitar daños en la máquina y lesiones personales, por favor, lea todas las advertencias detenidamente antes del primer uso, gracias. 1. Está estrictamente prohibido que personal no profesional desmonte la máquina. 2. Mantenga la unidad alejada de la humedad pesada y la luz solar fuerte, de lo contrario le hará daño a la máquina. 3.
  • Page 26: Introducción De Las Partes Principales

    2. Introducción de las partes principales Cubierta frontal Cubierta posterior Rueda de alimentación Tornillo de ajuste Rueda de giro de billetes Rueda de resistencia Guía de Tolva Rueda de transporte de billetes Sensor de inicio Panel Pantalla LCD Rueda receptora de billetes Plataforma de transporte Pantalla externa Sensor de recepción de billetes...
  • Page 27: Especificaciones

    3. Especificaciones 100-240V~/50-60Hz/600mA Voltaje/frecuencia 60W(Max) Consumo de Energía 4 dígitos Rango de dígitos 900 billetes/min Velocidad de conteo 1-999 billetes Rango de lotes Tamaño de billetes admitidos MIN: 50*90 mm - MAX: 100*190 mm 0.075~0.15 mm Grosores de billete admitidos 300 billetes Capacidad de la tolva 200 billetes...
  • Page 28: Introducción Del Panel

    4. Introducción del panel START: En el modo de conteo manual, presione esta tecla para comenzar a contar. MENU: Presione esta tecla para entrar a la interfaz de MENÚ. ENTER: En la interfaz de MENU, presione esta tecla para guardar el cambio y volver a la interfaz anterior.
  • Page 29: Pantalla

    5. Pantalla Modo de función UV Modo de función MG Modo de función IR Modo de función DD Número de último conteo Número de conteo actual Modo MNL (manual) Modo AUTO (automático) Número de Lote Función de Lote Función ADD (ACUMULAR)
  • Page 30: Operación

    6. Operación 6.1 Encender/Apagar Pulse el interruptor de alimentación para encender/apagar la unidad. Nota: Cuando se enciende, un test de comproba- ción incial y se iluminarán todas las palabras de función en la pantalla LCD. Si hay algún problema con los sensores, enton- ces se mostrará...
  • Page 31: Configuración De La Función De Detección

    7. Configuración de la función de detección Los usuarios pueden elegir la función de detección según sus necesidades. • Pulse el botón MODE para activar la función UV, Cuando la pantalla muestre “UV”, significa que la función UV está activada; 7.1 Detección UV de lo contrario, la función UV está...
  • Page 32 7. Configuración de la función de detección • Pulse el botón DD para activar la función DD, Cuando la pantalla muestra “DD”, significa que la función DD está activada; de lo 7.4 Detección de DD contrario, la función DD está apagada. •...
  • Page 33 7. Configuración de la función de detección 7.7 Configuración de • Pulse el botón MENU para entrar en el menú y, a continuación, pulse IR o DD de nuevo para cambiar la configuración. parámetros de • Presione +1/+10 para aumentar o ADD para disminuir la configuración del parámetro de sensibilidad y presione sensibilidad de ENTER para guardar el cambio y volver a la interfaz anterior.
  • Page 34 7. Configuración de la función de detección 7.7 Configuración de parámetros de sensibilidad de máquina 8. P10/H-*** función de llenado de agujero de billete Configuración: H-OFF está desactivado, H--ON está activado; el valor predeterminado es H—ON (activado) (ref. Imagen 6-11~12). 9.
  • Page 35: Código De Fallo Y Solución

    8. Código de fallo y solución Razón Solucion Código de fallo 1. Contacto deficiente del tubo emisor, volver a 4. Verifique la conexión del Problema con el error del sensor de recuento conectar. circuito. izquierdo o el circuito relativo. 2. Contacto deficiente del tubo receptor, 5.
  • Page 36: Código De Error Y Solución

    9. Código de error y solución Código de fallo Razón Solucion Billetes sospechosos controlados por detección UV. Quite el billete sospechoso y pulse “ENTER” para continuar. Problema con la detección UV. Disminuya el nivel de sensibilidad a los rayos UV. Billetes sospechosos controlados por detección MG.
  • Page 37: Advertencias De Uso

    10. Advertencias de uso Advertencia: Al poner billetes • Billete de uso prohibido mezclado con otras cosas, billetes húmedos, billetes dañados y así sucesivamente. • Por favor, tenga cuidado con los dedos, el pelo, la ropa y otras cosas en la máquina cuando la máquina cuente. •...
  • Page 38: Mantenimiento

    12. Mantenimiento • El sensor de conteo y el sensor de alimentación pertenecen al equipo óptico. Si hay algo de polvo y cosas sucias que cubren el sensor, conducirá al fallo cuando la máquina está trabajando. • El usuario debe limpiar la máquina después de usarla. 13.
  • Page 40 Prefazione Grazie per la f iducia e la scelta nei nostri prodotti! Per un uso ottimale dell’apparecchio, leggere attentamente questo manuale prima di utilizzarlo. Per la vostra sicurezza, si prega di utilizzare correttamente i nostri prodotti. La nostra azienda è in continua evoluzione e miglioramento dei prodotti per off rire ai propri clienti apparecchi di sempre migliore qualità, pertanto il vostro apparecchio potrebbe differire leggermente da questo manuale.
  • Page 41 Contabanconote Detectalia V75 INDICE 1. Istruzioni per l’uso in sicurezza 2. Introduzione alle parti principali 3. Specifiche 4. L’introduzione al pannello 5. L’introduzione al display principale 6. Utilizzo 7. Impostazione della funzione di rilevamento 8. Impostazione della funzione di selezione 9.
  • Page 43: Istruzioni Per L'uso In Sicurezza

    1. Istruzioni per l’uso in sicurezza Per evitare danni alla macchina e lesioni alle persone, leggere attentamente tutte le avvertenze prima del primo utilizzo. 1. È severamente vietato smontare la macchina a personale non professionale. 2. Per evitare danni alla macchina, tenere l’apparecchio lontano dall’umidità elevata e dalla forte luce solare. 3.
  • Page 44: Introduzione Alle Parti Principali

    2. Introduzione alle parti principali Coperchio frontale Coperchio posteriore Ruota di alimentazione Vite di regolazione Ruota di selezione delle banconote Ruota di resistenza Guida alla tramoggia Ruota per il trasporto banconote Sensore di avvio Pannello Schermo LCD Ruota di ricezione banconote Piattaforma di trasporto Display esterno Sensore di ricezione banconote...
  • Page 45: Specifiche

    3. Specifiche 100-240V~/50-60Hz/600mA Tensione/Frequenza 60W(Max) Consumo di energia 4 cifre Possibilità di conteggio 900 Banconote/min Velocità di conteggio 1-999 Banconote Range unità mazzette Dimensioni possibili delle banconote MIN: 50*90mm / MAX: 100*190mm 0.075~0.15mm Spessore delle banconote 300 Banconote Capacità della tramoggia 200 Banconote Capacità...
  • Page 46: L'introduzione Al Pannello

    4. L’introduzione al pannello START: Nella modialità di conteggio manaule, premere start per iniziare. MENU: Premere per entrare nell’interfaccia MENU. ENTER: Nell’interfaccia MENU, premendo questo tasto si salva la modifica e si ritorna all’interfaccia precedente. Premere per confermare o entrare nel sottomenu. Premere questo pulsante per cambiare la modalità...
  • Page 47: L'introduzione Al Display Principale

    5. L’introduzione al display principale Modo funzione UV Modo funzione MG Modo funzione IR Modo funzione DD Ultimo conteggio Conteggio corrente Modo MNL (manuale) Modo AUTO (automatico) Numero composizione mazzetta Funzione batch Funzione ADD...
  • Page 48: Utilizzo

    6. Utilizzo per accendere/spegnere l’unità. Nota: Quando l’unità è accesa, l’apparecchio effettua un Premere l’interruttore 6.1 Accensione controllo automatico e tutte le funzioni compaiono sul display LCD. In caso di un problema con i sensori, il codice e spegnimento di errore verrà visualizzato sullo schermo (per maggiori dettagli, fare riferimento al punto 7: Codice di errore e risoluzione).
  • Page 49: Impostazione Della Funzione Di Rilevamento

    7. Impostazione della funzione di rilevamento Gli utenti possono scegliere la funzione di rilevamento in base alle loro esigenze. • Premere MODE per scegliere di attivare la funzione UV. Quando il display mostra “UV”, significa che la funzione UV è abilitata, 7.1 Rilevamento altrimenti la funzione UV è...
  • Page 50 7. Impostazione della funzione di rilevamento • Premere DD per scegliere di attivare la funzione DD. Quando il display mostra “DD”, significa che la funzione DD è abilitata, 7.4 Rilevamento altrimenti la funzione DD è disabilitata. • Il controllo delle banconote avviene tramite DD (dimensione). •...
  • Page 51 7. Impostazione della funzione di selezione 7.7 Regolazione dei • Premere MENU per aprire il menu di impostazione, quindi premere nuovamente IR o HD per modificare l’impostazione. parametri di sensibilità • Premere +1/+10 per aumentare o ADD per diminuire l’impostazione della sensibilità, e premere ENTER per salvare la mo- difica e tornare all’interfaccia precedente.
  • Page 52: Impostazione Della Funzione Di Selezione

    7. Impostazione della funzione di selezione 7.7 Regolazione dei parametri di sensibilità della macchina 8. P10/H-*** Impostazioni del t: la funzione di riempimento H-OFF è disabilitata, H--ON è abilitata, il valore di default è H--ON (abilitato)(ref. Picture 6-11~12). 9. P11/***** Impostazione della velocità: 1000, 1200, 1500, il valore predefinito è 1000 (ref. foto 6-13~15). 10.
  • Page 53 8. Codici di errore e soluzioni errore Motivo Soluzione Codice di 1. Ricollegare il sensore emettitore. 4. Controllare la connessione del Problema col sensore di conteggio di sinistra o 2. Ricollegare il sensore ricevitore. circuito. del relativo circuito. 3. Sostituire il sensore di conteggio sinistro. 5.
  • Page 54: Codici Di Errore E Soluzioni

    9. Codici di errore e soluzioni Codice di errore Motivo Soluzione Banconote sospette controllate tramite rilevamento UV. Rimuovere la banconota sospetta e preme-re “ENTER” per continuare. Problema di rilevamento tramite raggi UV. Abbassare il livello di sensibilità di UV. Banconote sospette controllate tramite rilevamento MG. Rimuovere la nota sospetta e premere “ENTER”...
  • Page 55: Precauzioni Per La Consegna Della Macchina

    10. Precauzioni per la consegna della macchina Attenzione : Quando si impostano i biglietti • È vietato l’uso di banconote mischiate ad altre cose, banconote bagnate, banconote danneggiate, ecc.. • Prestare attenzione alle dita, ai capelli, ai vestiti e agli altri oggetti presenti nella macchina durante il conteggio. •...
  • Page 56: Manutenzione

    12. Manutenzione • Il sensore di conteggio e il sensore di alimentazione fanno parte dell’equipaggiamento ottico. Se il sensore è coper- to da polvere e sporcizia, causerà un malfunzionamento quando la macchina è in funzione. • L’operatore deve pulire la macchina dopo averla utilizzata. 13.
  • Page 58 Vorwort Vielen Dank für Ihre Unterstützung und Ihre Wahl unserer Produkte! Um das Gerät optimal nutzen zu können, lesen Sie bitte dieses Handbuch sorgfältig durch, bevor Sie es benutzen. Bitte verwenden Sie unsere Produkte aus Gründen der Produktsicherheit korrekt. Unser Unternehmen wird das Produkt weiterhin verbessern und optimieren, so dass das tatsächliche Produkt leicht von diesem Handbuch abweichen kann.
  • Page 59 Banknotenzähler Detectalia V75 INHALT 1. Anweisungen zur sicheren Verwendung 2. Einführung der Hauptteile 3. Spezifikationen 4. Einführung des Panels 5. Einführung der Hauptanzeige 6. Betrieb 7. Einstellung der Erkennungsfunktion 8. Fehlercode und Lösung 9. Fehlercode und Lösung 10. Vorsichtsmaßnahmen bei der Handhabung der Maschine 11.
  • Page 61: Anweisungen Zur Sicheren Verwendung

    1. Anweisungen zur sicheren Verwendung Um Schäden am Gerät und Verletzungen von Personen zu vermeiden, lesen Sie bitte vor dem ersten Gebrauch alle Warn- und Vorsichtshinweise sorgfältig durch. 1. Es ist Laien strengstens untersagt, die Maschine zu demontieren. 2. Halten Sie das Gerät von elektrischer Hitze, flüchtigen Gasen, entflammbaren Materialien usw. fern. 3.
  • Page 62: Einführung Der Hauptteile

    2. Einführung der Hauptteile Vorderseite Rückseite Zuführrad Stellschraube Sortierrad für Banknoten Widerstands-Rad Trichter-Führung Ticket-Transport-Rad Sensor starten Gremium LCD-Bildschirm Ticket-Aufnahmerad Transport-Plattform Externe Anzeige Banknoten-Empfangssensor...
  • Page 63: Spezifikationen

    3. Spezifikationen 100-240V~/50-60Hz/600mA Spannung/Frequenz 60W(Max) Energieverbrauch 4 cifre Zählbereich 900 banknoten/min Zählgeschwindigkeit 1-999 banknoten Batch-Bereich Größe der auszuhängenden Notizen MIN: 50*90 mm / MAX: 100*190 mm 0.075~0.15mm Dicke der Banknoten 300 banknoten Fassungsvermögen des Trichters 200 banknoten Kapazität der Stapelung 4.02 kg Nettogewicht Größe der Maschine...
  • Page 64: Einführung Des Panels

    4. Einführung des Panels START: Drücken Sie im manuellen Zählmodus auf , um mit dem Zählen zu beginnen. MENU: Drücken Sie auf , um die MENÜ-Oberfläche aufzurufen. ENTER: Wenn Sie in der MENÜ-Oberfläche diese Taste drücken, wird die Änderung gespeichert und Sie kehren zur vorherigen Oberfläche zurück.
  • Page 65: Einführung Der Hauptanzeige

    5. Einführung der Hauptanzeige UV-Funktionsmodus MG-Funktionsmodus IR-Funktionsmodus DD-Funktionsmodus Nummer der letzten Zählung Aktuelle Zählnummer MNL-Modus (manuell) AUTO-Modus (Automatisch) Los-Nummer Fonction de lot Funktion ADD...
  • Page 66: Betrieb

    6. Betrieb 6.1 Ein-/Ausschalten : Drücken Sie den Schalter, um das Gerät ein-/auszuschalten. Hinweis: Wenn das Gerät eingeschaltet wird, beginnt das Gerät mit der Selbstprüfung und alle Funktionswörter auf dem LCD-Display leuchten auf. Wenn es ein Problem mit den Sensoren gibt, wird der Fehlercode auf dem Bildschirm angezeigt (weitere Einzelheiten finden Sie unter Punkt 7: Fehlercode und Auflösung).
  • Page 67 7.1 UV- Erkennung • Drücken Sie MODE, um die Aktivierung der UV-Funktion zu wählen. Wenn das Display “UV” anzeigt, bedeutet das, dass die UV-Funktion aktiviert ist; andernfalls ist die UV-Funktion deaktiviert. • Prüfen Sie die Banknote mit dem UV-Merkmal. • Wenn das Gerät während des Zählens eine verdächtige Banknote erkennt, stoppt es die Zählung und piept, während auf dem Display die Meldung erscheint.
  • Page 68 7. Einstellung der Erkennungsfunktion 7.4 DD-Erkennung • Drücken Sie DD, um die DD-Funktion zu aktivieren. Wenn das Display “DD” anzeigt, bedeutet dies, dass die DD-Funktion aktiviert ist; andernfalls ist die DD-Funktion deaktiviert. • Prüfen Sie die Banknote mit dem Merkmal DD (Größe). •...
  • Page 69 7. Einstellung der Erkennungsfunktion 7.7 Einstellung der Maschinenempfindlichkeitsparameter • Drücken Sie MENU, um das Setup-Menü zu öffnen, und drücken Sie dann erneut IR oder HD, um die Einstellung zu ändern. • Drücken Sie +1/+10, um die Empfindlichkeitseinstellung zu erhöhen oder ADD, um sie zu verringern, und drücken Sie ENTER, um die Änderung zu speichern und zur vorherigen Schnittstelle zurückzukehren.
  • Page 70 7. Einstellung der Maschinenempfindlichkeitsparameter 7.7 Einstellung der Maschinenempfindlichkeitsparameter 8. P10/H-*** Beachten Sie die Parameter der Lochfüllfunktion: H-OFF ist ausgeschaltet, H--ON ist eingeschaltet; die Voreinstellung ist H--ON (eingeschaltet) (ref. Foto 6-11~12). 9. P11/***** Einstellen der Geschwindigkeit: 1000, 1200, 1500, der Standardwert ist 1000 (ref. Foto 6-13~15). 10.
  • Page 71: Fehlercode Und Lösung

    8. Fehlercode und Lösung Fehlercode Grund Lösung 1. Schlechter Kontakt der Emitterröhre, Wiederanschluss. 4. Schaltungsanschluss prüfen. Problem mit dem Fehler des linken. 2. Schlechter Kontakt des Empfängerrohrs, Wiederanschluss. 5. Ersetzen der Hauptplatine. Zählsensors oder der entsprechenden Schaltung. 3. Den rechten Zählsensor ersetzen. 1.
  • Page 72: Fehlercode Und Lösung

    9. Fehlercode und Lösung Fehlercode Grund Lösung Verdächtige Banknoten durch UV-Detektion überprüft. Entfernen Sie die verdächtige Notiz, und drücken Sie “ENTER”, um fortzufahren. UV-Detektionsproblem. Senken Sie die UV-Empfindlichkeitsstufe. Verdächtige Notizen durch MG-Erkennung überprüft. Entfernen Sie die verdächtige Notiz und drücken Sie “ENTER”, um fortzufahren. MG-Erkennungsproblem.
  • Page 73: Vorsichtsmaßnahmen Bei Der Handhabung Der Maschine

    10. Vorsichtsmaßnahmen bei der Handhabung der Maschine Haftungsausschluss Beim Einrichten der Tickets • Es ist verboten, mit anderen Dingen vermischte Notizen, nasse Notizen, beschädigte Notizen usw. zu verwenden. • Bitte achten Sie beim Zählen auf Ihre Finger, Haare, Kleidung und andere Gegenstände in der Maschine.
  • Page 74: Wartung

    12. Wartung • Der Zählsensor und der Einzugssensor sind Teil der optischen Ausrüstung. Wenn der Sensor mit Staub und Schmutz bedeckt ist, verursacht er eine Fehlfunktion, wenn die Maschine in Betrieb ist. • Der Benutzer muss das Gerät nach der Benutzung reinigen. 13.
  • Page 76 Préface Merci de soutenir et de choisir nos produits! Pour une utilisation optimale de l’appareil, veuillez lire attentivement ce manuel avant de l’utiliser. Pour la sécurité des produits, veuillez utiliser nos produits correctement. Notre société continuera à améliorer et à optimiser le produit, de sorte que le produit réel peut être légèrement différent de ce manuel.
  • Page 77 Compteur de billets Detectalia V75 CONTENU 1. Instructions pour une utilisation en sécurité 2. L’introduction des parties principales 3. Spécifications 4. L’introduction du panel 5. L’introduction de l’affichage principal 6. Opération 7. Réglage de la fonction de détection 8. Code d’erreur et solution 9.
  • Page 79: Instructions Pour Une Utilisation En Sécurité

    1. Instructions pour une utilisation en sécurité Pour éviter d’endommager la machine et de blesser des personnes, veuillez lire attentivement tous les avertissements et mises en garde avant la première utilisation, merci. 1. Il est strictement interdit au personnel non professionnel de démonter la machine. 2.
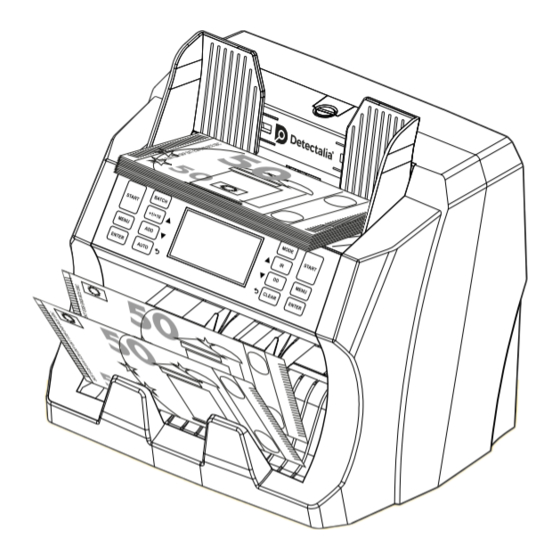
  • Page 80: L'introduction Des Parties Principales

    2. L’introduction des parties principales Couverture avant Couverture arrière Roue d’alimentation Vis de réglage Roue de triage des billets de banque Roue de la résistance Guide des trémies Roue de transport de billets Capteur de démarrage Panel Écran LCD Roue de réception des billets Plate-forme de transport Affichage externe.
  • Page 81: Spécifications

    3. Spécifications Tension/fréquence 100-240V /50-60Hz/600mA Consommation d’énergie 60W(Max) Plage de comptage 4 chiffres Vitesse de comptage 900 billets/min Gamme de lots 1-999 billets Taille des billets à comptabiliser MIN: 50*90 mm MAX: 100*190 mm Épaisseur des billets de banque 0.075 0.15 mm Capacité...
  • Page 82: L'introduction Du Panel

    4. L’introduction du panel START: En mode de comptage manuel, appuyez sur cette touche pour commencer à compter. MENU: Appuyez sur cette touche pour entrer dans l’interface MENU. ENTER: Dans l’interface MENU, une pression sur cette touche permet de sauvegarder la modification et de revenir à l’interface précédente.
  • Page 83: L'introduction De L'affichage Principal

    5. L’introduction de l’affichage principal Mode de fonction UV Mode de fonction MG Mode de fonction IR Mode de fonction DD Numéro du dernier comptage Numéro du comptage actuel Mode MNL (manuel) Mode AUTO (Automatique) Numéro de lot Fonction de lot Fonction ADD...
  • Page 84: Opération

    6. Opération 6.1 Allumer/éteindre: Appuyez sur l’interrupteur pour allumer/éteindre l’appareil. Remarque : lors de la mise en marche, l’appareil commence à s’auto-vérifier et tous les mots de fonction sur l’écran LCD s’allument. En cas de problème avec les capteurs, le code d’erreur s’affiche à l’écran. (Pour plus de détails, veuillez vous reporter au point 7 : Code d’erreur et résolution).
  • Page 85: Réglage De La Fonction De Détection

    7. Réglage de la fonction de détection Les utilisateurs peuvent choisir la fonction de détection en fonction de leurs besoins. 7.1 Détection UV • Appuyez sur MODE pour choisir d’activer la fonction UV. Lorsque l’écran affiche “UV”, cela signifie que la fonction UV est activée ; sinon, la fonction UV est désactivée. •...
  • Page 86 7. Réglage de la fonction de détection 7.4 Détection DD • Appuyez sur DD pour choisir d’activer la fonction DD. Lorsque l’écran affiche “DD”, cela signifie que la fonction DD est activée ; sinon, la fonction DD est désactivée. • Vérifiez le billet avec la caractéristique DD (taille).
  • Page 87 7. Réglage de la fonction de détection 7.7 Fonction d’auto-calibrage • Appuyez sur MENU pour ouvrir le menu de réglage, puis appuyez à nouveau sur IR ou DD pour changer le réglage. • Appuyez sur +1/+10 pour augmenter ou ADD pour diminuer le réglage du paramètre de sensibilité, et appuyez sur ENTER pour enregistrer la modification et revenir à...
  • Page 88 7. Réglage de la fonction de détection 7.7 Réglage des paramètres de sensibilité des machines 8. P10/H-*** Notez les paramètres de la fonction de remplissage des trous: H-OFF est désactivée, H--ON est activée; la valeur par défaut est H--ON (activée) (ref. Picture 6-11~12). 9.
  • Page 89: Code D'erreur Et Solution

    8. Code d’erreur et solution Code d’erreur Motif Solution 1. Mauvais contact du tube émetteur, rebranchement. 4. Vérifier la connexion du circuit. Problème avec l’erreur du capteur de comptage 2.Mauvais contact du tube récepteur, rebranchement. 5. Remplacer la carte mère. gauche ou le circuit relatif.
  • Page 90: Code D'erreur Et Solution

    9. Code d’erreur et solution Code d’erreur Motif Solution Des billets suspects contrôlés par détection UV. Retirez le billet suspect, et appuyez sur “ENTER” pour continuer. Problème de détection des UV. Baissez le niveau de sensibilité aux UV. Des billets suspects contrôlés par la détection MG. Retirez le billet suspect et appuyez sur “ENTER”...
  • Page 91: Précautions À Prendre Pour La Manipulation De La Machine

    10. Précautions à prendre pour la manipulation de la machine Avertissement: Lors de la mise en place des billets • Il est interdit d’utiliser des billets mélangés à d’autres choses, des billets mouillés, des billets endommagés, etc. • Veuillez faire attention à vos doigts, cheveux, vêtements et autres objets dans la machine lorsque celle-ci compte.
  • Page 92: Maintenance

    12. Maintenance • Le capteur de comptage et le capteur d’alimentation font partie de l’équipement optique. Si le capteur est recou- vert de poussière et de saletés, cela entraînera une panne lorsque la machine fonctionnera. • L’utilisateur doit nettoyer la machine après l’avoir utilisée. 13.
  • Page 94 Thank you Gracias Grazie Danke Mercy...
  • Page 96 Detectalia ® is a registered trademark of Detectalia Europe, S.L.U. No part of this manual may be reproduced in any form, by print, copy or in any other way without prior written permission of Detectalia Europe, S.L.U. Detectalia Europe,S.L.U. is not liable and/or responsible in any way for the information provided in this manual.

Table des Matières