
Manuels Connexes pour FujiFilm Instax Square SQ10


Sommaire des Matières pour FujiFilm Instax Square SQ10
- Page 1 User’s Guide/Trouble shooting/Safety precautions Guide d’utilisation/Guide de dépannage/Précautions de sécurité BODSQ708-201...
- Page 2 ENGLISH: See pages 3 to 38. FRANÇAIS: Voir pages 39 à 74.
-
Page 3: Table Des Matières
ENGLISH Contents Before Use ..........4 Image Eff ects ..........17 Filter ...............17 Part Names ..........5 Adjusting the Brightness .......18 Display on the LCD Monitor ....6 Vignette ..............18 Using the selector buttons ......6 More on Photography ......19 Using the command dial ........6 Using AF/AE Lock ..........19 Attaching the Strap ........ -
Page 4: Before Use
Before Use Before using the camera, check the following. Supplied Accessories • NP-50 rechargeable battery (1) Make sure supplied accessories are included in the package. • USB cable for charging (1) Ÿ Read "IMPORTANT SAFETY NOTICE" (Page 32) and "Handling the Battery"... -
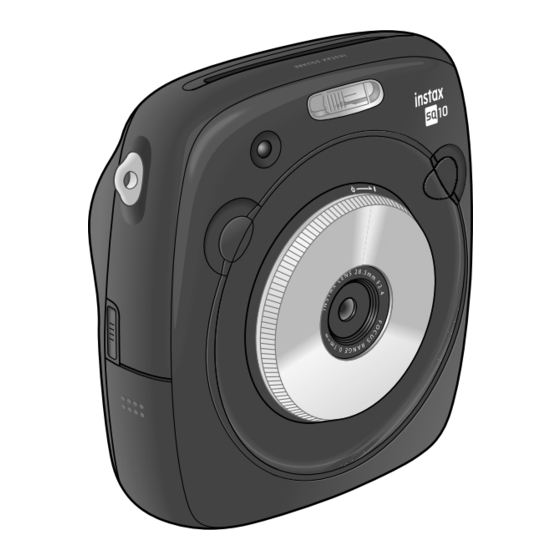
Page 5: Part Names
Part Names Front Rear 11 12 Selector button/ Film door lock Command dial Flash USB port for charging Strap eyelet (s) (Playback) button Film ejection slot Micro SD card slot Print mode selector (Back) button AF-assist illuminator/ Tripod socket (Tripod Battery-chamber cover (Print) button Self timer lamp... -
Page 6: Display On The Lcd Monitor
Display on the LCD Monitor Pressing the (Back) button displays information below. Playback Shooting Frame number Shooting date/time Flash mode Print mode (Page 20) (Page 13) Using the selector buttons Brightness adjustment Current date/time (Page 18) (Page 26) Move cursor up Filter Battery level Move cursor left... -
Page 7: Attaching The Strap
Attaching the Strap Ÿ Place the shoulder strap clip on each Attaching the Hand Strap strap eyelet. Attach the strap as illustrated below. Hook the strap eyelet in the clip opening. Remove the • When you carry or use the camera, put the strap around tool using the other hand to keep the clip in place. -
Page 8: Inserting/Charging The Battery
Inserting/Charging the Battery Inserting the Battery • Use an AC adapter to meet the rated output below: DC 5.0 V/1000 mA • You can take a picture or print an image while charging is in progress. • Charging time is approximately three to four hours. Charging status indication Slide the battery cover to open. -
Page 9: Turning The Camera On/Off
Turning the Camera on/off To turn the camera on, turn the lens ring (power switch) clockwise. To turn it off, turn the switch counterclockwise. The camera turns on and shooting screen Checking Remaining Battery Life appears. Pressing the (Back) button on the shooting/playback screen displays remaining battery life on the LCD monitor. -
Page 10: Performing Initial Settings
Performing Initial Settings The language, date, and time are not specified when the camera is turned on for the first time. Follow the procedure below to specify them. You can specify these settings at any time. See page 26 if you perform these settings later or change them. -
Page 11: Function Setting For The Shutter Button
Performing Initial Settings Function Setting for the Shutter Button Assign a function to each of the shutter buttons from the combinations on the table below. Shutter button (Right) Shutter button (Left) Shutter button Shutter button Shutter button Shooting mode switching button Function Shutter button Shooting mode switching button... -
Page 12: Loading/Removing The Instax Square Film Pack
The film cover (black) is Notes on the film pack ejected automatically when • Each FUJIFILM Instant Film “instax SQUARE” pack contains the back cover is closed. 1 black film protective cover and 10 film sheets. Remove the film cover from •... -
Page 13: Print Mode
Print Mode Two print modes are available. • Auto print mode • Manual print mode (initial setting) When the auto print mode is selected, printing starts immediately after the image is saved in the memory. When the manual print mode is selected, the image is saved in the memory. You can select and print images later. ■... -
Page 14: Basic Photography And Playback
Basic Photography and Playback Taking a Picture This section describes basic operation for photography. Turn the lens ring (power switch) clockwise to turn Lightly press the shutter button the rest of the way the camera on. down to take the picture. The picture is taken and it is saved in the camera’s memory. -
Page 15: Viewing Images
Basic Photography and Playback Viewing Images Changing the Playback Display Images can be viewed on the monitor. Take a test shot and You can zoom in on the image on the monitor or change check the results before printing a picture. the number of images displayed at a time. -
Page 16: Printing
(Page 15) • For details on taking out the film, refer to the instructions and warnings on the FUJIFILM Instant Film “instax SQUARE” pack. • The development time is approximately 90 seconds. (The time varies depending on the ambient temperature.) -
Page 17: Image Eff Ects
Image Eff ects You can select an effect menu directly by pressing a button on the rear to adjust the image effect while the shooting/ playback screen is displayed. ■ Filter eff ects you can use Filter Type Details Follow the steps below to select a filter. Cornelius Intensifies shadows and brightens Press the... -
Page 18: Adjusting The Brightness
Image Eff ects Adjusting the Brightness Vignette Follow the steps below to adjust the brightness. Adjust the brightness of four corners on the image. Follow the steps below to adjust the brightness. Press the (Brightness) button while shooting/ Press the (Vignette) button while shooting/ playback screen is displayed. -
Page 19: More On Photography
More on Photography Using AF/AE Lock Using the Self Timer Use "AF/AE lock" to lock focus/exposure by pressing the Use the self timer to include a photographer in a group shutter button halfway. AF/AE lock is useful when you take photo or to reduce blur when the shutter button is pressed. -
Page 20: Using The Flash
More on Photography Using the Flash Use the flash when shooting at night or indoors under low light. ■ Flash settings Press the MENU/OK button on the shooting Select one of the settings below. screen. • AUTO FLASH The flash fires automatically when the camera recognizes it is dark. -
Page 21: Changing The Shooting Mode
Changing the Shooting Mode Select a shooting mode according to the subject or purpose. Selecting a Shooting Mode Shooting Mode Follow the steps below to select a shooting mode. STANDARD Press the MENU/OK button on the shooting screen. Select for normal photography. The flash fires automatically when the camera recognizes it is dark. -
Page 22: Printing From Print History (Reprint)
Printing from Print History (Reprint) Print an image with the same settings (e.g. image effect) as those specified when you printed the image in the past. Follow the steps below for operation. Press the (Print) button. Press the (Playback) button. ¤... -
Page 23: Using A Memory Card
Using a Memory Card This camera can save approximately 50 images in the memory. However, using a memory card enables you to save more images. Inserting the Memory Card Caution on the memory card • Micro SD/micro SDHC cards have been approved Slide the card slot cover to open. -
Page 24: Menus
Menus Shooting Menu ■ Items on the shooting menu Follow the steps below to specify/change the shooting menu. SHOOTING MODE Press the MENU/OK button on the shooting screen. Select a shooting mode according to the purpose or situation. (Page 21) •... -
Page 25: Playback Menu
Menus Playback Menu Follow the steps below to specify/change the playback ERASE menu. Delete an image one by one or delete all at one time. Press the MENU/OK button on the playback screen. Option: FRAME/ALL FRAMES IMAGE ROTATE Rotate an image by 90 degrees. Use the command dial for operation. -
Page 26: Setup Menu
Menus Setup Menu Follow the steps below to specify/change the setup OPERATION VOL. menu. Adjust the volume of the operation, shutter, or startup Press the MENU/OK button on the shooting/ sound. playback screen. Option: OFF/1/2/3 Select OFF to disable sounds. SHUTTER BUTTON SETTINGS Assign the function for the left/right shutter button. -
Page 27: Specifications
SPECIFICATIONS Camera Image sensor 1/4-in., CMOS with primary color fi lter Eff ective pixels 1920 x 1920 Storage media Built-in memory, microSD/microSDHC memory card Recording capacity Built-in memory: Approx. 50 fi les microSD/microSDHC memory card: Approx. 1000 fi les per 1 gigabyte File system Compliant with Design Rule for Camera File System (DCF), Exif Ver.2.3, Com- pliant with JPEG and PIM... - Page 28 SPECIFICATIONS Printer Film FUJIFILM Instant Film “instax SQUARE” (Purchased separately) Photo capacity 10 prints/pack Film size 86 mm x 72 mm Image size 62 mm x 62 mm Supported image size 800 x 800 dots Printing solution 12.5 dots/mm (318 dpi, 80 μm dot pitch)
-
Page 29: Trouble Shooting
TROUBLE SHOOTING Review below if you think the camera has some trouble. If you cannot find the solution, contact a FUJIFILM authorized distributor. Or visit our website below. FUJIFILM website : http://fujifilm.com/ During operation Problem Possible Causes Solution The camera cannot be ①... - Page 30 The camera is ① Malfunction occurs temporarily. ① Remove the battery and reinsert it. ② The battery is running out. If this does not solve the problem, contact a unresponsive. FUJIFILM authorized distributor. ② Replace with a fully-charged battery.
- Page 31 Solution The film pack cannot ① The fi lm pack is not for your camera. ① Use FUJIFILM Instant Film “instax SQUARE” only. ② The fi lm pack is not being loaded (No other fi lms can be used.) be loaded, or cannot be ②...
-
Page 32: Important Safety Notice
IMPORTANT SAFETY NOTICE This product has been designed with safety in mind, and to provide safe service when handled correctly and in accordance with the User’s Guide and instructions. It is important that both the product and the INSTAX fi lm are handled properly and used only to print pictures as instructed in this User’s Guide and in the INSTAX mini fi lm instructions. - Page 33 If anything is wrong with the camera, never attempt to repair it by yourself. You may be injured. If this product is dropped or damaged so that the inside is showing, do not touch it. Contact your FUJIFILM dealer. Do not touch any parts or projecting parts inside the back cover. You may be injured.
- Page 34 For customers in Canada : CAUTION: This Class B digital apparatus complies with Canadian ICES-003. Disposal of Electric and Electronic Equipment in Private Households Disposal of used Electrical & Electronic Equipment (Applicable in the European Union and other European countries with separate collection systems) This symbol on the product, or in the manual and in the warranty, and/or on its packaging indicates that this product shall not be treated as household waste.
- Page 35 INSTAX SQUARE FILM AND PRINT CARE See FUJIFILM Instant Film “instax SQUARE” for film use instructions. Follow all instructions for safe and proper use. 1 Keep the film in a cool and dry place. Do not leave the film in a place where the temperature is extremely high (e.g., in a closed car) for many hours.
-
Page 36: Handling The Battery
Required shock. Contact your FUJIFILM dealer. The Battery The following describes the proper use of batteries and how to prolong their life. Incorrect use can shorten battery life or cause leakage, overheating, fire, or explosion. -
Page 37: Charging The Battery
■ Notes on the Battery The battery gradually loses its charge when not in use. Charge the battery one or two days before use. Battery life can be extended by turning the camera off when not in use. Battery capacity decreases at low temperatures; a depleted battery may not function when cold. Keep a fully charged spare battery in a warm place and exchange as necessary, or keep the battery in warm place and insert it in the camera only when shooting. - Page 38 Information for traceability in Europe Information for FUJIFILM in the United Manufacturer: FUJIFILM Corporation States Address, City: 7-3, Akasaka 9-Chome, FUJIFILM North America Corp. Minato-ku, Tokyo 200 Summit Lake Drive Country: JAPAN Valhalla, New York 10595, USA Authorized representative in Europe:...
- Page 39 FRANÇAIS Table des matières Avant l'utilisation ........40 Eff et sur l'image ........53 Nom des pièces ........41 Filtre ...............53 Ajustement de la luminosité......54 Affi chage sur le moniteur ACL ..42 Vignette ..............54 Utilisation des boutons de sélection ..42 Plus d'informations sur la Utilisation de la molette de commande ...42 photographie .........55 Fixation de la courroie ......43...
-
Page 40: Avant L'utilisation
Avant l'utilisation Avant d'utiliser l'appareil photo, vérifiez ce qui suit. Accessoires fournis • Batterie rechargeable NP-50 (1) Assurez-vous que les accessoires fournis se trouvent bien dans l'emballage. • Câble USB pour la charge (1) Ÿ Pour votre sécurité, lisez les sections "AVERTISSEMENTS ET •... -
Page 41: Nom Des Pièces
Nom des pièces Avant Arrière 11 12 Verrou de la porte Bouton de sélection/ du film Molette de commande Flash Port USB pour la charge Œilleton(s) de courroie Touche (lecture) Fente d'éjection du Fente de la carte Sélecteur du mode film Micro SD Touche... -
Page 42: Affi Chage Sur Le Moniteur Acl
Affi chage sur le moniteur ACL Appuyer sur la touche (retour) affiche les informations ci-dessous. Lecture Prise de vue Numéro d'image Date/heure de prise de vue Mode Flash Mode d'impression Utilisation des boutons de sélection (Page 56) (Page 49) Ajustement de la Date/heure actuelle Déplace le curseur vers luminosité... -
Page 43: Fixation De La Courroie
Fixation de la courroie Ÿ Placez une attache sur chaque Fixation de la dragonne œilleton de courroie. Fixez la dragonne comme montré sur l'illustration ci-dessous. Accrochez l'œilleton dans l'ouverture de l'attache. • Quand vous transportez ou utilisez l'appareil photo, Retirez l'outil avec l'autre main pour maintenir passez la dragonne autour de votre poignet de façon l'attache en place. -
Page 44: Insertion/Charge De La Batterie
Insertion/charge de la batterie Insertion de la batterie • Utilisez un adaptateur secteur conforme à la sortie nominale ci-dessous : CC 5,0 V/1000 mA • Vous pouvez prendre une photo ou imprimer une image pendant que la charge est en cours. •... -
Page 45: Mise Sous/Hors Tension De L'appareil Photo
Mise sous/hors tension de l'appareil photo Pour mettre sous tension l'appareil photo, tournez la bague de l'objectif (interrupteur d'alimentation) dans le sens des aiguilles d'une montre. Pour le mettre hors tension, tournez l'interrupteur dans le sens contraire des aiguilles d'une montre. L'appareil photo se met sous tension et Vérification de la durée de vie l'écran de prise de vue apparaît. -
Page 46: Réalisation Des Réglages Initiaux
Réalisation des réglages initiaux La langue, la date et l'heure ne sont pas réglées quand l'appareil photo est mis sous tension pour la première fois. Suivez la procédure ci-dessous pour les régler. Vous pouvez faire ces réglages à n'importe quel moment. Reportez-vous à la page 62 si vous souhaitez faire ces réglages plus tard ou les modifier. -
Page 47: Réglage De La Fonction Du Déclencheur
Réalisation des réglages initiaux Réglage de la fonction du déclencheur Attribuez une fonction à chaque déclencheur à partir des combinaisons du tableau ci-dessous. Déclencheur (droit) Déclencheur (gauche) Déclencheur Déclencheur Déclencheur Touche de commutation du mode de prise de vue Fonction Déclencheur Touche de commutation du mode Déclencheur... -
Page 48: Mise En Place/Retrait De La Cassette Fi Lm Instax Square
être utilisé. quand le couvercle arrière Remarques sur la cassette film est fermé. Retirez le • Chaque cassette Film instantané FUJIFILM “instax SQUARE” couvercle du film de la fente contient 1 couvercle de protection du film et 10 feuilles d'éjection du film. -
Page 49: Mode D'impression
Mode d'impression Deux modes d'impression sont disponibles. • Mode d'impression automatique • Mode d'impression manuel (réglage initial) Quand le mode d'impression automatique est sélectionné, l'impression démarre immédiatement après que l'image a été sauvegardée en mémoire. Quand le mode d'impression manuel est sélectionné, l'image est sauvegardée en mémoire. Vous pouvez sélectionner et imprimer les images plus tard. -
Page 50: Photographie De Base Et Lecture
Photographie de base et lecture Prise d’une photo Cette section décrit les opérations de base pour la photographie. Tournez la bague de l’objectif (interrupteur Appuyez doucement sur le déclencheur le reste de d’alimentation) dans le sens des aiguilles d’une la course pour prendre la photo. montre pour mettre l’appareil photo sous tension. -
Page 51: Affichage Des Images
Photographie de base et lecture Affichage des images Changement de l'affichage de lecture Les images peuvent être vues sur le moniteur. Faites Vous pouvez faire un zoom sur l’image sur le moniteur ou une prise de vue d’essai et vérifiez les résultats avant changer le nombre d’images affichées en une fois. -
Page 52: Impression
• Pour en savoir plus sur le retrait du film, reportez- vous aux instructions et aux avertissements du Film instantané FUJIFILM “instax SQUARE”. • La durée du développement est d’environ 90 secondes. (La durée varie en fonction de la température ambiante.) -
Page 53: Eff Et Sur L'image
Eff et sur l'image Vous pouvez sélectionner le menu des effets directement en appuyant sur une touche à l’arrière afin d’ajuster l’effet pendant que l’écran de prise de vue/lecture est affiché. ■ Filtres d'eff et que vous pouvez utiliser Filtre Type Détails Suivez la procédure ci-dessous pour sélectionner un filtre. -
Page 54: Ajustement De La Luminosité
Eff et sur l'image Ajustement de la luminosité Vignette Suivez la procédure ci-dessous pour ajuster la luminosité. Ajustez la luminosité des quatre coins de l'image. Suivez la procédure ci-dessous pour ajuster la luminosité. Appuyez sur la touche (luminosité) pendant que Appuyez sur la touche (vignette) pendant que l'écran de prise de vue/lecture est affiché. -
Page 55: Plus D'informations Sur La Photographie
Plus d'informations sur la photographie Utilisation du verrouillage AF/AE Utilisation du retardateur Utilisez le «verrouillage AF/AE» pour verrouiller la mise au Utilisez le retardateur pour que le photographe puisse point/l’exposition en appuyant sur le déclencheur jusqu’à être aussi sur la photo ou pour réduire le risque de flou au mi-course. -
Page 56: Utilisation Du Flash
Plus d'informations sur la photographie Utilisation du flash Utilisez le flash lors d'une prise de vue la nuit ou dans le cas d'un intérieur mal éclairé. ■ Réglages du fl ash Appuyez sur la touche MENU/OK sur l'écran de Sélectionnez un des réglages ci-dessous. prise de vue. -
Page 57: Changement Du Mode De Prise De Vue
Changement du mode de prise de vue Sélectionnez un mode de prise de vue en fonction du sujet ou du but recherché. Sélection d'un mode de prise de vue Mode de prise de vue Suivez la procédure ci-dessous pour sélectionner un mode STANDARD de prise de vue. -
Page 58: Impression À Partir De L'historique D'impression (Réimpression)
Impression à partir de l'historique d'impression (réimpression) Imprimez une image avec les mêmes réglages (par ex. effet d’image) que ceux spécifiés quand vous avez imprimé une image dans le passé. Suivez la procédure ci-dessous pour l’opération. Appuyez sur la touche (imprimer). -
Page 59: Utilisation D'une Carte Mémoire
Utilisation d'une carte mémoire Cet appareil photo peut sauvegarder environ XX images dans sa mémoire. Cependant, vous pouvez sauvegarder plus d'images si vous utilisez une carte mémoire. Précautions relatives à la carte mémoire Insertion de la carte mémoire • L'utilisation des cartes Micro SD/micro SDHC a été approuvée pour cet appareil photo. -
Page 60: Menus
Menus Menu de prise de vue ■ Options sur le menu de prise de vue Suivez la procédure ci-dessous pour spécifier/changer le menu de prise de vue. CLICHÉ SELÉCTIONNÉ Appuyez sur la touche MENU/OK sur l'écran de prise Sélectionnez un mode de prise de vue en fonction du de vue. -
Page 61: Menu De Lecture
Menus Menu de lecture Suivez la procédure ci-dessous pour spécifier/changer le EFFACE menu de lecture. Supprime les images une par une ou toutes à la fois. Appuyez sur la touche MENU/OK sur l'écran de Option : IMAGE/TOUTES IMAGES lecture. ROTATION IMAGE Pivote une image de 90 degrés. -
Page 62: Menu De Configuration
Menus Menu de configuration Suivez la procédure ci-dessous pour spécifier/changer le VOL. APPAREIL menu de configuration. Ajuste le volume d'opération, du déclencheur ou du son Appuyez sur la touche MENU/OK sur l’écran de prise de démarrage. de vue/lecture. Option : NON/1/2/3 Sélectionnez NON pour désactiver tous les sons. -
Page 63: Spécifications
SPÉCIFICATIONS Appareil photo Capteur d'image 1/4 pouce, CMOS avec fi ltre de couleurs primaires Pixels eff ectifs 1920 x 1920 Support de stockage Mémoire intégrée, carte mémoire microSD/microSDHC Capacité d'enregistrement Mémoire intégrée : Environ 50 fi chiers Carte mémoire microSD/microSDHC : Environ 1000 fi chiers pour 1 gigaoctet Système de fi chiers Compatible avec le système de fi... - Page 64 SPÉCIFICATIONS Imprimante Film Film instantané FUJIFILM “instax SQUARE” (vendu séparément) Capacité photo 10 tirages/paquet Taille du fi lm 86 mm x 72 mm Taille des images 62 mm x 62 mm Taille d'image acceptée 800 x 800 points Résolution d'impression 12,5 points/mm (318 ppp, pas de masque 80 μm)
-
Page 65: Guide De Dépannage
GUIDE DE DÉPANNAGE Recherchez les causes du problème avant de conclure que l’appareil photo a des problèmes. Si vous ne pouvez pas trouver de solution, contactez un distributeur FUJIFILM autorisé. Ou consultez notre site web ci-dessous. Site web FUJIFILM : http://fujifilm.com/ Pendant l'utilisation Problèmes... - Page 66 ① Un mauvais fonctionnement se ① Retirez la batterie puis remettez-la en place. répond pas. produit temporairement. Si cela ne résout pas le problème, contactez un ② La batterie est déchargée. distributeur FUJIFILM autorisé. ② Remplacez-la par une batterie complètement chargée.
- Page 67 Origine du problème Solutions La cassette film ne peut ① La cassette fi lm ne convient pas à ① Utilisez uniquement un Film instantané FUJIFILM l’appareil photo. “instax SQUARE”. (Aucun autre fi lm ne peut être pas être chargée ou ne ②...
-
Page 68: Avertissements Et Recommandations
AVERTISSEMENTS ET RECOMMANDATIONS Ce produit a été conçu avec la sécurité à l’esprit, afi n de fournir un service sûr lorsqu’il est manipulé correctement et conformément au mode d’emploi et aux instructions. Il est important que le produit et le fi lm INSTAX soient manipulés correctement et utilisés seulement pour imprimer des images comme indiqué... -
Page 69: Remarque : Déclaration De La Fcc/Industrie Canada Sur L'exposition Aux Radiations
En cas de problème avec l’appareil photo, n’essayez jamais de le réparer vous-même. Vous pourriez vous blesser. Si ce produit tombe ou est endommagé et que les pièces internes deviennent apparentes, n’y touchez pas. Contactez votre revendeur FUJIFILM. Ne touchez aucune pièce ni partie saillante du couvercle arrière. Vous pourriez vous blesser. -
Page 70: Traitement Des Appareils Électriques Et Électroniques Chez Les Particuliers
Traitement des appareils électriques et électroniques chez les particuliers Traitement des appareils électriques et électroniques (Applicable dans l’Union européenne et les autres pays européens pratiquant le tri sélectif ) Cette icône sur le produit ou sur l’emballage, dans le manuel ou sur la garantie, indique que l’appareil ne sera pas traité comme déchet ménager. - Page 71 Précautions pendant l’impression FILM INSTAX SQUARE ET PRÉCAUTION D’IMPRESSION Reportez-vous au Film instantané FUJIFILM “instax SQUARE” pour les instructions d’utilisation du film. Suivez toutes les instructions de sécurité et d’utilisation. 1 Gardez le film dans un endroit frais et sec. Ne laissez pas le film dans un endroit où la température est extrêmement chaude (par exemple dans une voiture fermée)
-
Page 72: À Propos De La Manipulation De La Batterie
émet de la fumée, a une odeur inhabituelle ou se trouve dans un autre état Requis anormal peut entraîner un incendie ou un choc électrique. Contactez votre revendeur FUJIFILM. Batterie Les paragraphes suivants décrivent comment utiliser correctement les batteries et prolonger leur autonomie. Une utilisation incorrecte peut réduire l’autonomie de la batterie ou provoquer sa fuite, sa surchauffe, un incendie ou une explosion. - Page 73 ■ Remarques relatives à la batterie La batterie perd progressivement sa charge lorsqu’elle n’est pas utilisée. Chargez la batterie un ou deux jours avant utilisation. La vie de la batterie peut être prolongée en mettant l’appareil photo hors tension quand il n’est pas utilisé. La capacité...
-
Page 74: Informations De Traçabilité En Europe
Informations de traçabilité en Europe Informations sur FUJIFILM au Canada Fabricant : FUJIFILM Corporation FUJIFILM Canada Inc. Adresse, Ville : 7-3, Akasaka 9-Chome, 600 Suffolk Court, Mississauga, Ontario L5R Minato-ku, Tokyo Pays : JAPON Représentant autorisé en Europe : FUJIFILM EUROPE GMBH... - Page 75 MEMO...
- Page 76 If you have any inquiries about this product, please Si vous avez des questions sur ce produit, veuillez vous adresser à un distributeru Fujifilm autorisé, ou contact a FUJIFILM authorized distributor, or access the website below. consultez le site web ci-dessous.