Télécharger Imprimer la page

Publicité

Les langues disponibles

Les langues disponibles

Liens rapides

U.S.A./CANADA
EN Instructions for use
ES Instrucciones de uso
FR Notice d'emploi

Publicité

loading

Sommaire des Matières pour Peg-Perego Switch four

  • Page 1 U.S.A./CANADA EN Instructions for use ES Instrucciones de uso FR Notice d’emploi...
  • Page 5 Only USA...
  • Page 7 ONLY CA...
  • Page 9 Only USA...
  • Page 11 Switch Four Only USA Only Modular System 1 SAPI7087N 8 SAPI6812DNGR SPST7002WSGRS 19 SPST6975DB 2 SPST6813N SAPI6812SNGR 13 SAPI6994JL31NGR SPST6975SB 3 ERSBSW00-RE01M 9 IRSHPE00-NY01RE53M 14 SPST6991GR 20 ASPI0145NF 4 BSAPSS• 10 SAPI6811JGRN 15 ITSWFONANL65 21 ITSW4DNANF 5 SOFF0302L31 11 SPST7071DNF 16 SAPI6980NFGRPEG 22 ASPI0136NFGL 6 BCOPSS•...
  • Page 12 EN_English _ ALL OPERATING AND ASSEMBLY PROCEDURES SHOULD BE PERFORMED BY AN ADULT. Thank you for choosing a Peg-Pérego product. _ DO NOT LIFT THE STROLLER BY GRIPPING THE FRONT BAR. THE WARNING FRONT BAR IS NOT DESIGNED TO _ CAREFULLY READ INSTRUCTIONS WITH STAND LOADS. AND KEEP FOR FUTURE USE. _ ENSURE THAT THE STROLLER IS _ THE CHILD’S SAFETY COULD BE PUT OPENED CORRECTLY AND LOCKED IN AT RISK IF THE INSTRUCTIONS ARE POSITION OF USE. NOT FOLLOWED. _ CHECK TO MAKE SURE THAT THE _ THIS PRODUCT IS DESIGNED FOR CAR SEAT OR THE BABY CARRIAGE CHILDREN WHOSE MAXIMUM IS CORRECTLY FASTENED TO THE...
  • Page 13 INSTRUCTIONS downwards (fig_a); to raise the footrest lift it upwards (fig_b). 1 OPENING: Raise the levers on the two handles 1 2 BABY SAFE: pull the Baby Safe system out together (fig_a) and pull upwards until the from under the leg rest (fig_a), attach it to the chassis is completely open (fig_b). Check that seat (fig_b), fit the front bar (fig_c), unbutton the chassis is correctly opened: the side tubes the fabric covering at the side and then must be locked together (fig_c). attach the Baby Safe system to the sides of If the front clips do not fasten properly, push the armrests (fig_d). A fitted Baby Safe system down on the seat until they click into place. is shown in Figure E. 2 FITTING THE BASKET: Slip the loops onto the 1 3 FIVE POINT SAFETY HARNESS: To fasten it, hooks at the front (fig_a) and the rear (fig_b). push the two waist strap buckles (with the 3 FITTING THE CUP HOLDER: insert the cup shoulder straps attached – arrow_a) into holder on the corresponding peg and press the leg divider until they click into place down until it clicks into place (fig_a). The cup (arrow_b). To unfasten it, press the round holder can be attached to either side of the button in the centre of the buckle (arrow_c) chassis. and pull the waist straps out (arrow_d). 4 ADJUSTABLE HANDLES: Switch Four: To raise 1 4 To tighten the waist strap, pull on both sides or lower the handles, hold the button down in the direction of the arrow (arrow_a). To (fig_a) and adjust them (fig_b).
  • Page 14 2 1 REAR LEDGE: the rear ledge makes it easier to of manufacture of the product. negotiate kerbs or level differences with the _ Product name, date of manufacture and serial stroller (fig_a) and can also be used to transport number of the seat (fig_a) and of the carriage a second child (fig_b). To use the stroller with (fig_b). two children, apply the brakes, position the This information is required for any complaints. smaller child in the seat and attach the safety CLEANING AND harness (1). Grip the handles (2) and help the second child to climb onto the ledge (3). MAINTENANCE 2 2 FOLDING UP: The stroller can be folded PRODUCT MAINTENANCE: protect from the without the seat, with the seat facing the weather: water, rain, or snow; prolonged and person pushing, or with the seat facing continuous exposure to bright sunlight may forwards. If the seat is facing the person give rise to colour changes of various different pushing: before folding it, lower the backrest materials; store this product in a dry place. completely. If the seat is facing forwards: CLEANING THE CHASSIS: periodically clean all before folding the stroller raise the backrest, plastic parts with a damp cloth. Do not use then lower it once the stroller is folded. To solvent or similar cleaning products; keep fold the stroller, set the front wheels to their all metal parts dry to prevent rusting; keep fixed position and close the hood (if fitted). moving parts clean (adjustment mechanisms, Lift the two levers on the handles one at a locking mechanisms, wheels, ...) and free of time until they click, push downwards to dust and sand and, if necessary, lubricate with release the side tubes (fig_a-b) and pull the...
  • Page 15 ES_Español _ PARA EVITAR LESIONES GRAVES, ASEGURARSE DE QUE EL NIÑO NO PUEDA MOVERSE PELIGROSAMENTE Le agradecemos haber elegido un producto MIENTRAS SE REGULA EL PRODUCTO. Peg-Pérego. ADVERTENCIA _ TODAS LAS OPERACIONES DE ENSAMBLAJE DEBE REALIZARLAS SOLO UN ADULTO. _ IMPORTANTE: LEER ATENTAMENTE _ NO LEVANTAR LA SILLA DE PASEO ESTAS INSTRUCCIONES Y COGIÉNDOLA POR LA BARRA CONSERVARLAS PARA UNA FUTURA FRONTAL. LA BARRA FRONTAL NO HA UTILIZACIÓN. SI NO SE SIGUEN SIDO CONCEBIDA PARA SOPORTAR ESTAS INSTRUCCIONES, SE PODRÍA PESOS. ARRIESGAR LA SEGURIDAD DEL _ ASEGURARSE DE QUE LA NIÑO.
  • Page 16 _ Switch Four se compone de dos elementos: 9 BARRA FRONTAL: antes de introducirla, CHASIS-Switch Four y SILLITA-Switch Four. presionar sobre los botones laterales de los brazos y quitar los tapones (fig_a). Para COMPONENTES DEL enganchar la barra frontal, introducir los enganches en los brazos y empujar hacia la ARTÍCULO silla hasta oír el clic de enganche (fig_b). Para Comprobar el contenido presente en el quitar la barra frontal, presionar sobre los embalaje y contactar al Servicio de Asistencia dos botones y quitarla (fig_c). Abrir la barra en caso de reclamación. frontal sólo por un lado para facilitarle al _ Chasis-Switch Four: Cesta, 2 ruedas delanteras bebé la entrada y la salida. Cuando se desee pivotantes o con bloqueo, 2 ruedas utilizar la silla de paseo sin barra frontal, traseras con freno de barra centralizado y volver a poner los tapones en los brazos. portabebidas. 1 0 RESPALDO: para regularlo, alzar el asa (fig. _ Sillita-Switch Four: barra frontal; capota; a) y colocarlo como desee en una de las 4 cubrepiés; protector de luvia. posiciones (fig. b). 1 1 REPOSAPIÉS: para bajarlo, empujar hacia INSTRUCCIONES DE USO abajo las dos palancas (fig. a). Para alzarlo, 1 APERTURA: Levantar a la vez las palancas empujar el reposapiés hacia arriba (fig. b). de las dos asas (fig_a) y tirar hacia arriba 1 2 Sacar el dispositivo de protección de debajo hasta abrir el chasis (fig_b). Comprobar que...
  • Page 17 capota está dotada de un ojal para colgar su gesto el capazo Navetta, la silla de auto juguete favorito (fig_d). Primo Viaggio y la silla Switch Four al chasis: 1 7 CUBREPIÉS: Colocar el cubrepiés y abotonarlo colocarlos y presionar sobre el producto con por debajo y en el lateral del reposapiés ambas manos hasta oír el clic. (fig_a). En el modo cochecito, levantar el Accionar siempre el freno del chasis o del reposapiés y colocar el cubrepiés por encima carrito antes de enganchar y desenganchar de la barra frontal (fig_b), fijándolo a los los productos (consultar los respectivos botones de la capota (fig_c). manuales de instrucciones). 1 8 Para la versión de silla de paseo baje el Comprobar que el elemento de transporte apoyapiernas, pase la cubierta debajo del del bebé esté correctamente enganchado. frontal (fig_a) y fíjela según el modelo ACCESORIOS comprado A, B. 1 9 PARA-LLUVIA: coloque el para-lluvia en la 2 6 BORSA (Bolso cambiador). Bolso con silla de paseo (fig_a) y pase las dos ranuras colchoncito para cambiar al bebé se laterales del mismo por los botones de la engancha a la silla de paseo (fig_a). capota (fig_b). BARRA FRONTAL. Barra frontal con bandeja y 2 0 Fije el para-lluvia enganchando el elástico portabebidas. a los montantes posteriores (fig_a) o a los anteriores (fig_b) dependiendo de la posición NÚMEROS DE SERIE del asiento.
  • Page 18 FR_Français razones técnicas o comerciales. SERVICIO DE ASISTENCIA Merci d’avoir choisi un produit Peg-Pérego. PEG-PÉREGO AVERTISSEMENT En caso de que se pierdan o se dañen partes del producto, utilizar sólo repuestos _ LIRE CES INSTRUCTIONS AVEC originales Peg-Pérego. Para eventuales ATTENTION ET LES CONSERVER reparaciones, sustituciones, informaciones POUR TOUTE RÉFÉRENCE FUTURE. sobre los productos, venta de recambios originales y accesorios, póngase en contacto _ LA SÉCURITÉ DE VOTRE ENFANT con el Servicio de Asistencia Peg Perego POURRAIT ÊTRE MENACÉE SI CES indicando, si está presente, el número de INSTRUCTIONS NE SONT PAS serie del producto. RESPECTÉES. _ CE PRODUIT A ETE CONÇU POUR DES USA ENFANTS DONT LE POIDS N’EXCEDE tel. 800.671.1701 fax 260.471.6332 PAS 20 KG (45 LIVRES) ET LA TAILLE call us toll free 1.800.671.1701 website www.pegperego.com NE DEPASSE PAS 110 CM (43 POUCES). LE PANIER A ETE CONÇU POUR SUPPORTER DES CHARGES MAXIMALES DE 5 KG (11 LIVRES). LES POCHETTES OU SACS FOURNIS AVEC CE PRODUIT ONT ETE CONÇUS POUR SUPPORTER DES CHARGES MAXIMALES DE 0,2 KG (0,44 LIVRES). _ IL EST DÉCONSEILLÉ DE METTRE UN BIBERON OU UNE BOUTEILLE CONTENANT UNE BOISSON CHAUDE ET PESANT PLUS D' 0,5 KG DANS LE PORTE-BIBERON.
  • Page 19 
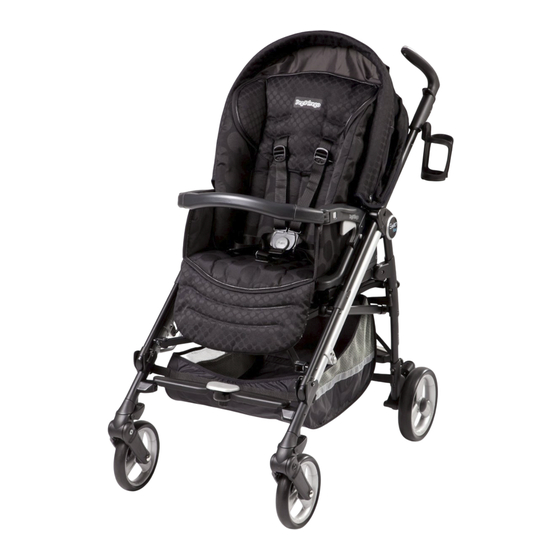
COMPOSANTS DE L’ARTICLE MONTAGE ET D’UTILISATION DOIT ÊTRE EFFECTUÉ PAR UN ADULTE Vérifier le contenu de l’emballage. Pour toute réclamation, veuillez contacter le Service _ NE PAS SOULEVER LA POUSSETTE d’assistance. PAR LA BARRE FRONTALE. ELLE N’A _ Châssis-Switch Four : panier ; 2 roues avant PAS ÉTÉ CONÇUE POUR SUPPORTER pivotantes ou fixes ; 2 roues arrière avec frein DES CHARGES. à barre centralisé ; porte-boissons. _ S’ASSURER QUE LA POUSSETTE _ Siège Switch Four: Main courante; capote; tablier; habillage pluie. EST CORRECTEMENT OUVERTE EST BLOQUÉE DANS LA POSITION INSTRUCTIONS CONVENANT À SON UTILISATION. D’UTILISATION _ CONTRÔLER QUE LE SIÈGE ENFANT 1 OUVERTURE : relever simultanément les OU LE LANDAU EST CORRECTEMENT leviers des deux poignées (fig_a) et tirer vers ACCROCHÉ À LA POUSSETTE. le haut jusqu’à l’ouverture du châssis (fig_b). _ NE PAS UTILISER CE PRODUIT Contrôler la bonne ouverture du châssis : les À PROXIMITÉ DE MARCHES OU montants latéraux doivent être accrochés les uns aux autres (fig_c). D’ESCALIERS; PRÊTER ATTENTION Si les crochets avant ne sont pas À LA MANIPULATION DU PRODUIT correctement montés, faire pression sur le DANS DES ESCALIERS OU DES siège jusqu’au déclic d’enclenchement.
  • Page 20 barre frontale, appuyer sur les boutons boucle pour accrocher le jouet préféré de latéraux des accoudoirs et extraire les l’enfant (fig_d). bouchons (fig_a). Pour accrocher la barre 1 7 TABLIER : mettre le tablier en place et le frontale, accompagner les attaches dans les boutonner sous le repose-pieds (fig_a) et sur accoudoirs et pousser vers le siège jusqu’au les côtés. Pour la version landau, relever le click d’accrochage (fig_b). Pour ôter la barre repose-pieds et mettre le tablier en place sur frontale, appuyer sur les deux boutons et la barre frontale (fig_b) en l’accrochant aux enlevez-la (fig_c). Ouvrir la barre frontale boutons de la capote (fig_c). d’un coté seulement pour faciliter l’entrée 1 8 Pour la version poussette, baisser le repose- et la sortie de l’enfant. Si vous voulez utiliser pieds, enfiler la capote sous la main courante la poussette sans barre frontale, mettre à (fig_a) et la fixer selon le modèle acheté A, B. nouveau les bouchons dans les accoudoirs. 1 9 HABILLAGE PLUIE : Placer l’habillage pluie 1 0 DOSSIER: pour régler l’inclinaison, relever la sur la poussette (fig_a) et enfiler ses deux poignée (fig. a) et placer le dossier dans l’une boutonnières latérales aux boutons de la des 4 positions au choix (fig. b). capote (fig_b). 1 1 REPOSE-PIEDS: pour abaisser le repose-pieds, 2 0 Fixer l’habillage pluie en fixant l’élastique déplacer vers le bas les deux petits leviers aux montants arrière (fig_a) ou aux montants et baisser le repose-pieds. vers le bas (fig. a);...
  • Page 21 positionner sur le châssis et appuyer des deux modèles décrits dans cet ouvrage, pour des mains jusqu’au déclic. raisons de nature technique ou commerciale. Toujours actionner le frein du châssis ou SERVICE D’ASSISTANCE de la poussette avant d’accrocher ou de décrocher les produits (consulter le manuel PEG-PÉREGO d’instructions de chaque produit). En cas de perte de pièces ou de rupture de Vérifier que le produit est bien positionné sur l'une d'elles, utiliser exclusivement des pièces le châssis. de rechange originales Peg-Pérego. Pour toute réparation, remplacement, informations ACCESSOIRES EN OPTION sur les produits, vente de pièces détachées 2 6 BORSA (Sac à langer). Ce sac muni d’un petit d’origine et accessoires, contactez le service matelas pour changer bébé peut se fixer sur après-vente Peg Pérego en indiquant, si la poussette (fig_a). présent, le numéro de série du produit. BARRE FRONTALE. Barre frontale avec plateau et porte-boissons. CANADA tél. 905.839.3371 fax 905.839.9542 NUMÉROS DE SÉRIE call us toll free 1.800.661.5050 site Internet 2 7 Switch Four reporte les informations relatives www.pegperego.com à sa date de production. _ Nom du produit, date de production et numéro de série du siège (fig_a) et du châssis (fig_b). Ces informations sont indispensables en cas de réclamation.
  • Page 22 - 22 -...
  • Page 23 - 23 -...
  • Page 24 PEG PEREGO S.p.A. VIA DE GASPERI 50 20862 ARCORE MB ITALIA tel. 0039 039 60881 fax 0039 039 615869/616454 Servizio Post Vendita - After Sale: tel. 0039 039 6088213 fax: 0039 039 3309992 Conforms to ASTM F833 PEG PEREGO U.S.A. Inc. Safety Standards 3625 INDEPENDENCE DRIVE FORT WAYNE INDIANA 46808 phone 260 482 8191 fax 260 484 2940 Call us toll free: 1 800 671 1701 PEG PEREGO CANADA Inc. 585 GRANITE COURT PICKERING ONTARIO CANADA L1W3K1 phone 905 839 3371 fax 905 839 9542 Call us toll free: 1 800 661 5050 www.pegperego.com WARNING AVOID SERIOUS INJURY FROM FALLING OR SLIDING OUT. ALWAYS USE COMPLETE 5 POINT SEAT BELT. ADVERTENCIA EVITE LESIÓNES DE CAIDAS O DESLIZAMIENTOS HACIA FUERA. SIEMPRE UTILIZE EL CINTURON COMPLETO DE 5 PUNTOS. AVERTISSEMENT EVITER UNE BLESSURE SÉRIEUSE DUE À UNE CHUTE OU À UN GLISSEMENT. TOUJOURS UTILISER LA CEINTURE DE SÉCURITÉ À 5 POINTS COMPLÈTE. Tutti i diritti di proprietà intellettuale relativi ai contenuti di questo manuale d’istruzione appartengono a PEG PEREGO S.p.A.