Table des Matières
Publicité
Les langues disponibles
Les langues disponibles
Publicité
Chapitres
Table des Matières

Manuels Connexes pour COOL WORKS MPPH-08CRN1-BI0


Sommaire des Matières pour COOL WORKS MPPH-08CRN1-BI0
-
Page 2: Table Des Matières
TABLE OF CONTENTS Preparation.............................2 Safety Precautions..........................4 Cautions..............................5 Installation..............................6 Operation..............................10 Maintenance............................12 Faults Diagnosis..........................13 Design and Compliance Notes......................14 Sociable Remark..........................15 REMOTE CONTROL INSTRUCTIONS....................16 Air Conditioner Limited Warranty......................27... -
Page 3: Preparation
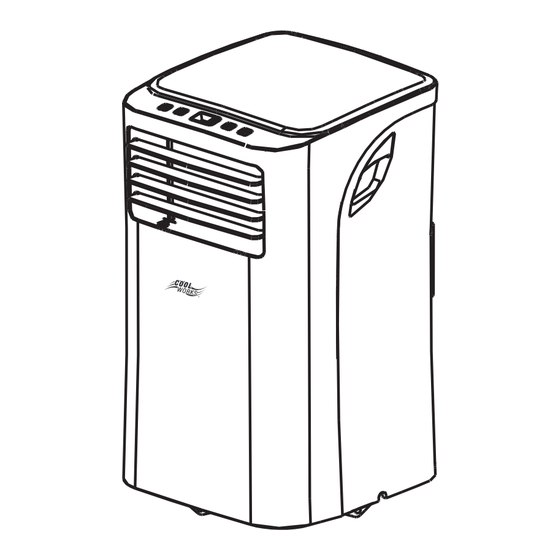
Preparation control panel remote signal receptor horizontal louver control lever(adjust manually) NOTE: PHA can not be adjusted. vertical louver control lever(adjust manually) NOTE: PHA can not be adjusted. panel Caster front handle (both sides) air filter (behind the grille) upper air intake drain outlet air outlet lower air intake... -
Page 4: Safety Precautions
Safety Precautions Please read through these instructions before you start the installation process. Improper installation can cause damage to the unit, your personal property, and also poses a personal safety hazard. -Installation must be performed according to the installation instructions. Improper installation can cause water leakage, electrical shock, or fire. -
Page 5: Cautions
Cautions -This appliance can be used by children aged from 8 years and above and person with reduced physical, sensory or mental capabilities or lack of experience and knowledge if they have been given supervision or instruction concerning use of the appliance in a safe way and understand the hazards involved. -
Page 6: Installation
Installation Choosing The Right Location Your installation location should meet the following requirements: -Make sure that you install your unit on an even surface to minimize noise and vibration. -The unit must be installed near a grounded plug, and the Collection Tray Drain (found on the back of the unit) must be accessible. - Page 7 Installation Tools Needed -Medium Philips screwdriver; -Tape measure or ruler; -Knife or scissors; -Saw (optional, to shorten window adaptor for narrow windows) Accessories Your Window Installation Kit fits windows 67.5-123cm(26.5-48”) and can be shortened for smaller windows. Part Description Quantity 1 pc Unit Adaptor 1 pc...
- Page 8 Installation Note: Once the Exhaust Hose assembly and Adjustable Window Sliderare prepared, choose from one of the following two installation methods. Type 1: Hung Window Installation Foam seal B Foam seal C (Adhesive type-shorter) (Non-adhesive type) Window slider B Window slider A (if required) Foam seal A (Adhesive type)
- Page 9 Installation Security Bracket 2 Screws Insert the window slider adaptor If desired, install the security into the hole of the window slider. bracket with 2 screws as shown. Note: To ensure proper function, DO NOT overextend or bend the hose. Make sure that there is no obstacle around the air outlet of the exhaust hose (in the range of 500mm) in order to the exhaust system works properly.
- Page 10 PH Mode PHA Model...
-
Page 11: Operation
Operation Operation Instructions COOL operation -Press the "MODE" button until the "COOL" indicator light comes on. -Press the ADJUST buttons "+" or "-" to select your desired room temperature. The temperature can be set within a range of 17°C~30°C/62°F~86°F. -Press the "FAN SPEED" button to choose the fanspeed. DRY operation -Press the "MODE"... - Page 12 Operation AUTO-RESTART If the unit breaks off unexpectedly due to the power cut,it will restart with the previous function setting automatically when the power resumes. WAIT 3 MINUTES BEFORE RESUMING OPERATION After the unit has stopped, it can not be restarted operation in the first 3 minutes. This is to protect the unit.
-
Page 13: Maintenance
Maintenance Safety Precautions -Always unplug the unit before cleaning or servicing. -DO NOT use flammable liquids or chemicals to clean the unit. -DO NOT wash the unit under running water. Doing so causes electrical danger. -DO NOT operate the machine if the power supply was damaged during cleaning. A damaged power cord must be replaced with a new cord from the manufacturer. -
Page 14: Faults Diagnosis
Faults Diagnosis Please check the machine according to the following form before asking for maintenance: Problem Troubleshooting Possible Cause The Water Collection Tray is full.Turn off the unit, drain the water from the P1 Error Code Water Collection Tray and restart the Unit does not turnon unit. -
Page 15: Design And Compliance Notes
Design and Compliance Notes Design Notice In order to ensure the optimal performance of our products, the design specifications of the unit and remote control are subject to change without prior notice. Energy Rating Information The Energy Rating for this unit is based on an installation using an un-extended exhaust duct without adapters A or B (as shown in the Installation section of this manual). -
Page 16: Sociable Remark
Sociable Remark When using this dehumidifier in the European countries, the following information must be followed: DISPOSAL: Do not dispose this product as unsorted municipal waste. Collection of such waste separatelyfor special treatment is necessary.It is prohibited to dispose of this appliance in domestic household waste.For disposal, there are several possibilities:A) The municipality has established collection systems, where electronic waste can be disposed of at least free of charge to the user.B) -
Page 17: Remote Control Instructions
REMOTE CONTROL INSTRUCTIONS Specification Model RG09E/BGCE 3.0V(Dry batteries R03/LR03×2) Rated Voltage Lowest Voltage of 2.0V CPU Emitting Signal Transmission Distance 。 。 Environment -5 C 60 C( 23 F~140 F) - Page 18 REMOTE CONTROL INSTRUCTIO Features of remote control ON/OFF Button: Push this button to start operation, push the button again to stop operation. MODE Select Button: Each time you push the button, a mode is selected in a sequence that goes from AUTO, COOL, DR Y and FAN, as the following figure indicates: AUTO COOL...
- Page 19 REMOTE CONTROL INSTRUCTIO Features of remote control(continued) temperature setting or to adjust the TIMER in a counter-clockwise direction. NOTE: Press and hold buttons together for 3 seconds will alternate the temperature display between the C & F scale. SLEEP Button: In SLEEP mode, Active/Disable sleep function.
- Page 20 REMOTE CONTROL INSTRUC Indicators on remote controller Transmission Indicator This transmission indicator lights when remote controller transmits signals to the indoor unit. Mode display Displays the current operation mode. Including ) , F AN AUTO( ), COOL( ), DRY( AUTO ONLY ( )and back to AUTO( AUTO...
- Page 21 REMOTE CONTROL INSTRUCTIO Handling the remote controller Location of the remote controller. Keep the remote controller where its signals can reach the receiver of the unit (a distance of 8m is allowed). When you select the timer operation, the remote controller automatically transmits a signal to the indoor unit at the specified time.
- Page 22 REMOTE CONTROL INSTRUCTIO Setting the clock Before you start operating the air conditioner, set the clock of the remote controller using the procedures given in this section. The clock panel on the remote controller will display the time regardless of whether the air conditioner is in use or not.
- Page 23 REMOTE CONTROL INSTRUCTIO Automatic operation When you set the air conditioner in AUTO mode, it will automatically select cooling, or fan only operation depending on what temperature you have selected and the room temperature. Once you select the operating mode, the operating conditions are saved in the AUTO unit's microcomputer memory...
- Page 24 REMOTE CONTROL INSTRUCTIO Cooling /Fan only operation Start Ensure unit is plugged and power is available. The OPERATION lamp on the display panel of the indoor unit starts flashing. 1. Mode select button (MODE) CLOCK SET TEMP. Press to select COOL, FAN ONLY FAN SPEED 2.
- Page 25 REMOTE CONTROL INSTRUCTIO Timer operation 1. TIMER button Press the TIMER button, the remote displays 0.0 alongside either the TIMER ON or TIMER OFF indicator, and will flash. SET TEMP. 2. TEMP/TIME button Press to set the desired time. FAN SPEED Forward Backward Press or hold the forward or backward...
- Page 26 REMOTE CONTROL INSTRUCTIO Example of timer setting TIMER ON (Timer Start Operation) The TIMER ON feature is useful when you want the unit to turn on automatically before say when you return home. The air conditioner will automatically start operating at the set time. IMPORTANT: The time will be registered Start within a 3 second period(after pressing...
- Page 27 REMOTE CONTROL INSTRUCTIO COMBINED TIMER etting both ON and OFF timers simultaneously) TIMER OFF → TIMER ON (On → Stop → Start operation) This feature is useful when you want to stop the air conditioner after you go to bed, and start it again in the morning when you wake up or when you return home.
- Page 32 Sommaire Préparation..............................2 Consignes de sécurité..........................4 Mises en gardes.............................5 Installation...............................6 Utilisation...............................10 Entretien.............................. .12 Diagnostic des pannes.........................13 Notes sur la conception et la conformité....................14 Remarque..............................15 MANUELD’UTILISATION DE LATÉLÉCOMMANDE................16 GARANTIE LIMITÉE POUR CLIMATISEUR..................27...
-
Page 33: Préparation
Préparation Panneau de commande Capteur de signal à distance Levier de commande de l'aérateur à lames horizontales (réglage manuel) REMARQUE : Il n'est pas possible de modifier le PHA. Levier de commande de l'aérateur à lames verticales (réglage manuel) REMARQUE : il n'est pas possible de modifier le PHA. -
Page 34: Consignes De Sécurité
Consignes de sécurité Veuillez lire attentivement ces instructions avant de commencer le processus d'installation. Une installation incorrecte peut causer des dommages à l'appareil et à vos biens personnels. Elle représente également un risque pour la sécurité des personnes. -L'installation doit être effectuée conformément aux instructions d'installation. Une installation incorrecte peut provoquer des fuites d'eau, des décharges électriques ou un incendie. -
Page 35: Mises En Gardes
Mises en gardes -Cet appareil peut être utilisé par des enfants de 8 ans ou plus, par des personnes aux capacités physiques, sensorielles ou mentales réduites ou par des personnes manquant d'expérience et de connaissances, si elles sont surveillées. Des instructions doivent leur être fournies afin qu'elles sachent comment faire fonctionner le système de manière sécurisée et appropriée et pour qu'elles comprennent les risques encourus. -
Page 36: Installation
Installation Choix du bon emplacement Le lieu d'installation doit répondre aux exigences suivantes : -Veillez à ce que l'appareil soit installé sur une surface plane pour minimiser le bruit et les vibrations. -L'appareil doit être installé près d'une prise de terre et le bac à... - Page 37 Installation Outillage nécessaire - tournevis Phillips moyen ; ruban à mesurer ou règle ; couteau ou ciseaux ; - Scie (facultative, pour réduire l'adaptateur de fenêtre en cas de fenêtres étroites) Accessoires L'ensemble d'installation pour fenêtre est adapté aux fenêtres de 67,5 à 123 cm (26,5-48 po) et peut être raccourci pour les petites fenêtres.
- Page 38 Installation Remarque : une fois l'assemblage du tuyau d'évacuation et du battant coulissant ajustable de fenêtre terminé, choisissez l'une des deux méthodes d'installation Type 1 : Installation de fenêtre à guillotine Joint en mousse B Joint en mousse C (Type adhésif plus court) (Type non adhésif) Battant coulissant Battant coulissant...
- Page 39 Installation Support de sécurité 2 vis Insérez l'adaptateur pour Si vous le désirez, installez battant coulissant de fenêtre les supports de sécurité avec dans l'emplacement du battant 2 vis comme indiqué. coulissant de fenêtre. Remarque : pour garantir un bon fonctionnement, ÉVITEZ de trop étirer ou plier le tuyau.
- Page 40 PH modèles PHA modèles...
-
Page 41: Utilisation
Utilisation Consignes d'utilisation Utilisation en mode COOL (CLIMATISATION) - Appuyez sur le bouton « MODE » jusqu'à ce que le voyant « COOL » s'allume. - Appuyez sur les boutons ADJUST + ou - pour sélectionner la température ambiante souhaitée. La température peut avoir une valeur comprise entre 17 °C et 30 °C/62 °Fet 86 °F. - Page 42 Utilisation REDÉMARRAGE AUTOMATIQUE Si l'appareil arrête de fonctionner de façon inattendue en raison d'une coupure de courant, il redémarrera automatiquement avec la fonction précédente lorsque le courant sera rétabli. ATTENDEZ 3 MINUTES AVANT D'UTILISER À NOUVEAU L'APPAREILL'appareil ne peut pas être utilisé...
-
Page 43: Entretien
Entretien Consignes de sécurité - Débranchez toujours l'appareil avant le nettoyage ou l'entretien. - N'UTILISEZ PAS de liquides inflammables ou des produits chimiques pour nettoyer l'appareil. - NE lavez PAS l'appareil à l'eau courante. Le faire représente un risque électrique. - Vous NE DEVEZ PAS faire fonctionner l'appareil si le cordon d'alimentation électrique a été... -
Page 44: Diagnostic Des Pannes
Diagnostic des pannes Veuillez vérifier la machine selon le formulaire suivant avant de faire une demande d'entretien : Problèmes Dépannage Causes possibles Le bac de vidange d'eau est plein. L'appareil ne Éteignez l'appareil, évacuez l'eau du bac Code d'erreur P1 s'allume pas de vidange et redémarrez l'appareil. -
Page 45: Notes Sur La Conception Et La Conformité
Notes sur la conception et la conformité Avis de conception Afin de garantir des performances optimales à nos produits, les spécifications de conception de l'appareil et de la télécommande sont sujettes à des modifications sans préavis. Informations sur le rendement énergétique Le rendement énergétique de cet appareil est basé... -
Page 46: Remarque
Remarque Lorsque vous utilisez ce déshumidificateur dans un pays européen, les consignes suivantes doivent être respectées : ÉLIMINATION : Ne jetez pas ce produit avec les ordures ménagères non triées. Ce produit doit être éliminé séparément car il nécessite un traitement spécial. Il est interdit de jeter cet appareil avec les ordures ménagères. -
Page 47: Manueld'utilisation De Latélécommande
MANUELD’UTILISATION DE LATÉLÉCOMMANDE Caractéristiques techniques RG09E/BGCE Modèle Tension nominale AAA) 3,0 V (2 piles Tension minimale du 2.0 V signal de l’unité centrale Distance de transmission 8 m (26 pi) Environnement -5 C 60 ºC( 23 ºF~14 ºF) - Page 48 MANUEL D’UTILISATION DE LA TÉLÉCOMMANDE Caractéristiques de télécommande Touche MARCHE/ARRÊT L ’appareil se met en marche lorsque vous appuyez sur ce cette touche puis, il s’arrête lorsque vous le pressez de nouveau. Touche de sélection du MODE Chaque fois que vous appuyez sur cette touche, vous sélectionnez un mode de fonctionnement dans l’ordre suivant : AUTO COOL...
- Page 49 MANUEL D’UTILISATION DE LA TÉLÉCOMMANDE Caractéristiques de la télécommande (suite) AVIS: Appuyez et maintenez les touches pendant 3 secondes pour alterner l'affichage de température entre les degrés C et F. Touche SOMMEIL: Sélectionnez cette fonction durant les heures de sommeil. Elle peut maintenir la température la plus confortable et économiser l’énergie.
- Page 50 MANUEL D’UTILISATION DE LA TÉLÉCOMMANDE Indicateurs de la télécommande Indicateur de transmission Cet indicateur de transmission s’allume lorsque la télécommande transmet des signaux au climatiseur. Affichage du MODE Indique le mode actuellement sélectionné : automatique (AUTO) , refroidissement AUTO (COOL) ,déshumidification (DRY) et ventilation (FAN) Affichage marche/arrêt...
- Page 51 MANUEL D’UTILISATION DE LA TÉLÉCOMMANDE Utilisation de la télécommande Positionnement de la télécommande Utilisez la télécommande à moins de 8 m (26 pi) de l’appareil, en la pointant directement sur le récepteur. Un signal sonore confirme la réception du signal. AVERTISSEMENTS Le climatiseur ne fonctionnera pas si des rideaux, des portes ou d’autres matériaux empêchent le signal émis par la télécommande d'atteindre le...
- Page 52 MANUEL D’UTILISATION DE LA TÉLÉCOMMANDE Réglage de l'horloge Avant de commencer à utiliser le climatiseur, régler l'horloge de la télécommande à l'aide les procédures indiquées dans cette section. Le panneau d'horloge de la télécommande affiche le temps indépendamment du fait que le climatiseur est en fonctionnement ou non.
- Page 53 MANUEL D’UTILISATION DE LA TÉLÉCOMMANDE Fonctionnement Automatique Lorsque vous réglez le climatiseur en mode automatique, il sélectionnera automatiquement le refroidissement, ou ventilateur uniquement en fonction de la température que vous avez sélectionnée et de la température ambiante. Une fois que vous sélectionnez le mode de fonctionnement, les conditions d'exploitation AUTO sont enregistrées dans la mémoire du micro-...
- Page 54 MANUEL D’UTILISATION DE LA TÉLÉCOMMANDE COOL (refroidissement) / FAN (ventilation) Début Assurez-vous que l’appareil est bien branché une prise de courant sous tension. 1. Appuyez sur la touche MODE pour sélectionner COOL (refroidissement), CLOCK SET TEMP. ou FAN (ventilation). 2. Touche de température/minuterie FAN SPEED Réglez la température souhaitée.
- Page 55 MANUEL D’UTILISATION DE LA TÉLÉCOMMANDE MISE EN MARCHE ET ARRÊT DE LA MINUTERIE 1. Touche de minuterie Appuyez sur la touche TIMER, la télécommande affiche aux côtés de 0.0, soit la minuterie ou indicateur TIMER OFF, et se met à clignoter. SET TEMP.
- Page 56 MANUEL D’UTILISATION DE LA TÉLÉCOMMANDE Exemple de réglage de la minuterie TIMER ON (minuterie de mise en marche) (Mise en marche automatique) La fonction de mise en marche automatique est pratique lorsque vous voulez que l’appareil s’allume automatiquement avant votre retour à...
- Page 57 MANUEL D’UTILISATION DE LA TÉLÉCOMMANDE MINUTERIE COMBINÉE (Réglage simultané de la minuterie de mise en marche et de la minuterie d’arrêt) TIMER OFF (minuterie d’arrêt) →TIMER ON (minuterie de mise en marche) (En fonction → Arrêt automatique → Mise en marche automatique) Cette fonction est pratique lorsque vous voulez que le climatiseur s’arrête durant...
- Page 58 APPELER AU...