EGO AH1501 Mode D'emploi
Les langues disponibles
Les langues disponibles
Liens rapides
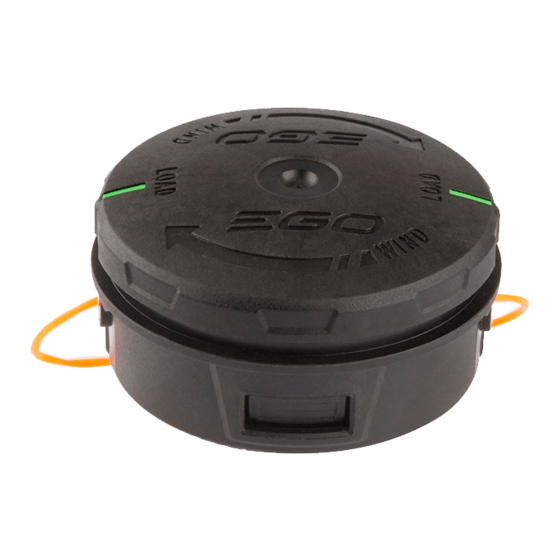
REPLACING THE STRING TRIMMER HEAD
This Replacement String Trimmer Head is exclusively compatible with
EGO POWER+ String Trimmer
.
STA1500
DANGER:
If the head loosens after it is fixed in position, replace it immediately. Never use a trimmer with
a loose cutting attachment. Replace a cracked, damaged or worn-out cutting head immediately, even if
damaged is limited to superficial cracks. Such attachments may shatter at high speed and cause serious
injury.
WARNING:
Always remove the battery pack from the product when you are assembling parts,
making adjustments, cleaning, or when the product is not in use.
1
Flange
Flange Cover
Slot in the Flange
Spool Base
Spring
Remove the trimmer head
1. Remove the battery from the Power Head.
2. Press the 2 release tab on the spool retainer to remove it (Fig. 2 & 3).
2
3
Release tab
Spool Retainer
3. Pull the spring out of the spool base (Fig. 4).
4. Rotate the spool base to align the slot in the flange with the hole in the gear case (Fig. 5)
4
5
Nut
Spool Base
Gear Case
Spring
5. Insert the hex wrench provided into the aligned holes to act as a stabilizer (Fig.6). Use the
multifunction wrench provided to loosen the nut in the direction of the arrow marked on the spool
base inside housing, and then remove it (Fig. 7 ).
6
OPERATING MANUAL
MODEL NUMBER AH1501
6. Remove the plain washer from the motor shaft and save it for reassembly (Fig. 8).
7. Hold the spool base and pull it straight out from the motor shaft (Fig. 9).
8
Plain Washer
Plain Washer
8. Remove the flange cover and then remove
Nut
the flange from the motor shaft (Fig. 10).
Cutting Line
Check and replace them if they are worn.
Install the new trimmer head
1. Position the flange removed in step 8 of the
"Remove the trimmer head" section onto the
motor shaft with the bulge facing away from
the base (Fig. 11).
2. Position the flange cover onto the flange with
Spool Retainer Assembly
its flat surface facing outwards (Fig. 12).
11
Spool Base
3. Align the mounting hole in the new spool base with the motor shaft, and then mount the new spool
base onto the shaft.
4. Position the plain washer onto the motor shaft (Fig. 8).
5. Mount the nut onto the shaft, and pre-tighten it COUNTERCLOCKWISE by hand.
6. Rotate the spool base to align the slot in the flange with the hole in the gear case (Fig. 5).
7. Insert the hex wrench provided into the
Aligned Shaft-locking Holes
aligned holes to act as a stabilizer (Fig.6).
Use the multifunction wrench provided to
tighten the nut securely onto the shaft (Fig.
13).
8. Position the spring into the spool base and
press it in place (Fig. 4).
Spool Base
7
Arrow
Stabilizer
9
Motor Shaft
Motor shaft
10
12
Bulge facing away from the base
Flat surface facing outwards
13
9. With one hand holding the spool base, use the other hand to grasp the new spool retainer and align
the tabs on the new spool retainer with the holes in the spool base. Use your palm to press and
rotate the new spool retainer left and right until the tabs lock with the spool base (Fig. 14 & 15).
10. If any parts of the spool retainer assembly are damaged or worn, replace the damaged part and
Multi-function
reassemble them as following showing (Fig. 16).
Wrench Provided
14
Wind the spool with new line
NOTICE:
Always use the recommended nylon
cutting line with a diameter that does not exceed
0.095 in. (2.4 mm). Using line other than that
specified may cause the string trimmer to overheat
or become damaged.
WARNING:
Never use metal-reinforced line,
wire, or rope, etc. These can break off and become
dangerous projectiles.
Spool Base
WARNING:
To prevent serious personal
injury, remove the battery pack from the power head before servicing, cleaning, changing attachments or
removing material from the unit.
1. Remove the battery pack.
2. Remove the remaining cutting line, if necessary. Simply pull it out by hand.
3. Rotate the spool retainer in the direction indicated by the arrow, as necessary, to align the LOAD line
on the spool retainer with the eyelets in the spool base (Fig. 17).
Flange
4. Cut one piece of cutting line 16 ft. (5m) long. Insert the line into the mounting hole located inside the
Flange Cover
eyelet. Push the line until the end of the line comes out of the other side of the spool base. Pull the
line from the other side until equal amounts of line appear on both sides of the spool (Fig. 18).
5. Press while rotating the spool retainer in the direction indicated by the arrow in order to wind the
cutting line onto the spool until approximately 5.5 in. (14cm) of line is showing on each side (Fig.
19).
17
Eyelet
6. Push the spool retainer down while pulling
on the lines to manually advance the line and
to check for proper assembly of the trimmer
head.
15
Alignment
16
Spool Retainer Assembly
Wire Holder
Slot Cover
Screws
Location Housing
Head Housing
18
Arrow Direction
LOAD Line
Mounting Hole
inside the Eyelet
19
5.5" (14 cm)

Manuels Connexes pour EGO AH1501


Sommaire des Matières pour EGO AH1501
- Page 2 REMPLACEMENT DE LA TÊTE DU TAILLE-BORDURE Alignement NUMÉRO DE MODÈLE AH1501 La tête du taille-bordure est compatible exclusivement avec Utilisez la clé multifonction fournie pour desserrer l’écrou dans le sens indiqué par la flèche qui se trouve sur la paroi intérieure de la base de la bobine et retirez l’écrou(Fig. 7).