
Sommaire des Matières pour Di4 Aspirojet Duo
- Page 1 Aspirojet LIMPIACRISTALES 2 EN 1 Maquina de limpar vidros 2 em 1 2 in 1 window cleaner 2 en 1 lava vitres 2 in 1 aspiragocce.
- Page 3 E S PA Ñ O L AGRADECEMOS QUE HAYA DEPOSITADO SU CONFIANZA EN DI4 Y DESEAMOS QUE EL FUNCIONAMIENTO DEL PRODUCTO LE SATISFAGA PLENAMENTE. ATENCIÓN LEA ATENTAMENTE LAS INSTRUCCIONES DE USO ANTES DE UTILIZAR EL PRODUCTO. GUÁRDE- LAS EN UN LUGAR SEGURO POR SI NECESITA CONSULTARLAS EN EL FUTURO.
- Page 4 adaptador suministrado con el dispositivo y alimentado con el voltaje de seguridad indicado en la placa de carac- terísticas del aparato. Siga las instrucciones de CARGAR EL DISPOSITIVO para cargarlo. Siga las instrucciones de EXTRACCIÓN DE BATERÍA para retirar la batería del dispositivo. No se puede reemplazar el cable del adaptador.
- Page 5 INSTRUCCIONES DE USO CÓMO MONTAR LA UNIDAD 1. Montar el filtro Coloque el filtro en el soporte del filtro, a continuación, gire el filtro en la dirección de las agujas del reloj hasta la posición de parada. Gire a la izquierda para sacar el filtro. 2.
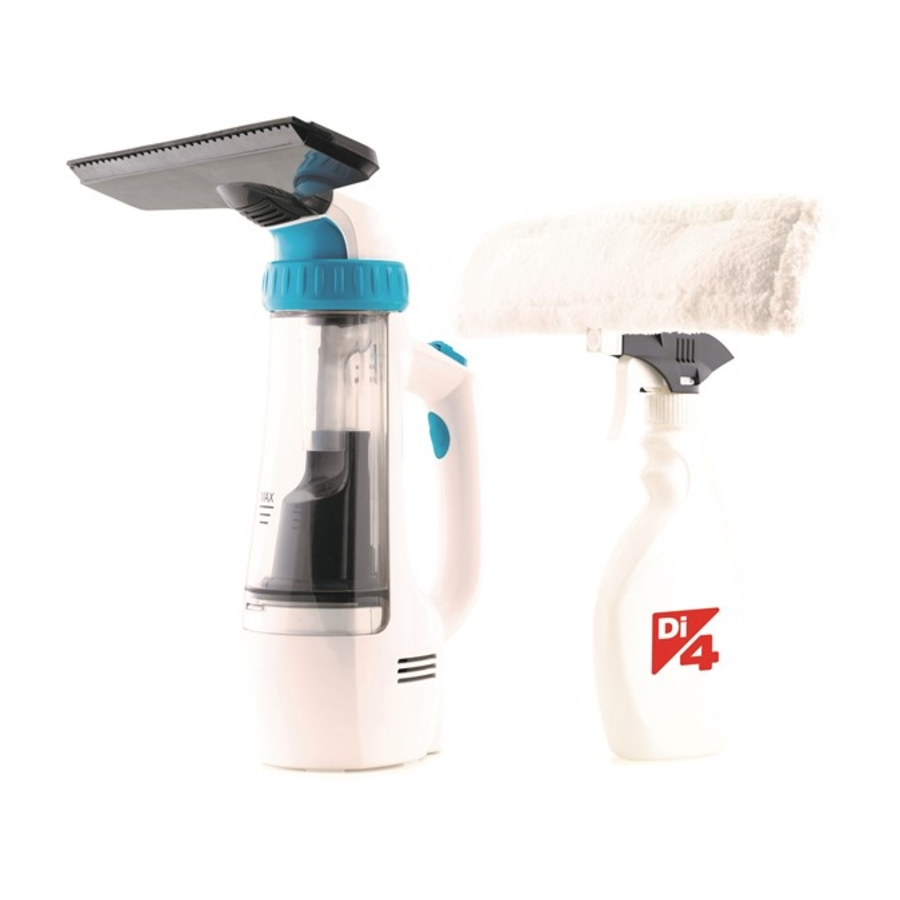
- Page 6 7. Montar la unidad de pulverización Monte el cabezal del rociador con la botella de agua con la cubierta de tornillo. Alinee la ranura del cabezal del rociador y el soporte del trapeador y empuje el soporte a lo largo de la ranura.
- Page 7 VACÍE EL DEPÓSITO: ATENCIÓN: SOSTENGA EL DEPÓSITO ANTES DE RETIRARLO DE LA UNIDAD. Si presiona el botón de liberación directamente, el depósito se desprenderá. Retire el accesorio del conector. Sostenga el depósito y presione hacia abajo el botón de liberación del depósito.
- Page 8 P O R T U G U Ê S OBRIGADA POR TEREM COLOCADO A SUA CONFIANÇA EM DI4 E ESPERAMOS QUE O PRODUTO SEJA DO SEU AGRADO E DA SUA SATISFAÇÃO. AVISO LER AS INSTRUÇÕES DE UTILIZAÇÃO CUIDADOSAMENTE ANTES DE UTILIZAR O PRODUTO.
- Page 9 Este dispositivo apenas pode ser utilizado com o modelo de transformador incluído de origem e alimentado com a tensão de segurança indicada na placa de especificações do eletrodoméstico. Seguir as instruções de CARREGAMENTO DO DISPOSITIVO para o carregar. Seguir as instruções de REMOÇÃO DA BATERIA para a re- moção das baterias do dispositivo.
- Page 10 INSTRUÇÕES DE UTILIZAÇÃO MONTAGEM DA UNIDADE 1. Montar o filtro Colocar o filtro no suporte do filtro, depois rodar o filtro para a direita para a posição de paragem. Rodar para a esquerda para remover o filtro. 2. Montar a unidade do filtro no depósito Alinhar a saliência com a ranhura, colocar a unidade do filtro no depósito, alinhar a unidade do filtro com o depósito.
- Page 11 7. Montar a unidade de vaporização Montar a cabeça de vaporização com a garrafa de água apertando a tampa. Alinhar a ranhura da cabeça de vaporização e o suporte da mopa, pressionar o suporte ao longo da ran- hura; quando os clipes bloquearem, o suporte está fixado. Introduzir a extremidade do suporte da mopa na derivação elástica, apertar a outra extremidade na de- rivação de nylon.
- Page 12 ESVAZIAR O DEPÓSITO: ATENÇÃO: SEGURAR O DEPÓSITO ANTES DE O DESBLOQUEAR DA UNIDADE. Se premir direta- mente o botão de desbloqueio, o depósito irá cair. Remover o acessório do conector. Segurar o depósito, premir o botão de desbloqueio do depósito. Rodar ligeiramente o depósito e retirá-lo.
- Page 13 E N G L I S H WE WOULD LIKE TO THANKS YOUR FOR CHOOSING DI4, WE WISH THE PRODUCT PERFORMS TO YOUR SATISFACTION AND PLEASURE. WARNING PLEASE READ THE INSTRUCTIONS FOR USE CAREFULLY PRIOR TO USING THE PRODUCT. STORE THESE IN A SAFE PLACE FOR FUTURE REFERENCE.
- Page 14 This device can only be used with the adapter model supplied with the device and powered at very safety voltage indicated on the appliance specifications plate. Follow the DEVICE CHARGE instructions in order to charge it. Follow the BATTERY REMOVAL instructions for removal of the batteries from the device.
- Page 15 2.Assemble the filter unit into tank Align the rib and slot, put the filter Unit into the tank, align the filter Unit plane to the step of the tank. ATTENTION: If the filter unit is not in the right position, there is risk of leakage. Don’t use the cleaner without the filter in tank.
- Page 16 HOW TO USE ATTENTION: Full charge before using. Keep the rubber clean before cleaning. there is track on the window, if the some dust on the rubber. If the battery is not enough, it cut off by itself. All the dust and water is not excel the max line on the tank. USE AS A SCRAPER: Remove the spray head, fill full the bottle by cleaning water, make sure the spray nozzle is on “spray”...
- Page 17 TROUBLE SHOOTING TROUBLE REASON MAINTENANCE DESCRIBE SPRAY BOTTLE 1.spray head closed Make the head at spray or stream DOESN’T SPRAY position 2.spray system is defective 2.contact dealer to replace WATER GO OUT 1.Leakage of the seal Check the rubber seal of the filter unit, if it is damaged, contact the dealer to change 2.Filter is not in right position...
- Page 18 F R A N Ç A I S MERCI D’AVOIR PLACÉ LEUR CONFIANCE EN DI4 ET NOUS ESPÉRONS QUE CE PRO- DUIT VOUS DONNERA ENTIÈRE SATISFACTION ET PLAISIR. ATTENTION VEUILLEZ LIRE ATTENTIVEMENT LE MANUEL D’UTILISATION AVANT D’UTILISER LE PRODUIT. CONSERVEZ CE MANUEL D’UTILISATION DANS UN ENDROIT SÛR EN VUE DE CONSULTATION FUTURE.
- Page 19 cordé à l’alimentation secteur. Ce dispositif ne peut être utilisé qu’avec le modèle d’adapta- teur fourni et branché à la tension de sécurité indiquée sur la plaque signalétique. Suivez les instructions relatives au CHARGEMENT DU DIS- POSITIF pour le charger. Suivez les instructions relatives au RETRAIT DE LA BATTERIE pour retirer les batteries du dispositif.
- Page 20 MODE D’EMPLOI ASSEMBLAGE DE L’UNITÉ 1. Assemblage du filtre Placez le filtre dans le support du filtre, puis tournez le filtre vers la droite dans le sens des aiguilles d’une montre vers la position arrêt. Tournez-le vers la gauche pour retirer le filtre. 2.Assemblage du filtre dans le réservoir Alignez la monture et l’encoche, placez le filtre dans le réservoir, alignez la partie...
- Page 21 7.Assemblage du vaporisateur Fixez la tête du vaporisateur sur la bouteille d’eau à l’aide du cache-vis. Alignez la fente de la tête du vaporisateur et du support balai, poussez le support tout le long de la fente. Le support est fixé lorsque le clips est bloqué. Insérez l’embout du support du balai-éponge dans le filetage en plastique, attachez l’autre embout à...
- Page 22 ATTENTION : RETENEZ LE RÉSERVOIR AVANT DE LE RETIRER DE L’UNITÉ. Si vous appuyez di- rectement sur le bouton de retrait, le réservoir tombera. Retirez l’accessoire du raccord. Retenez le réservoir, appuyez sur le bouton de retrait du réservoir. Tournez légèrement le réservoir et retirez-le. Retirez le filtre, videz le réservoir.
- Page 23 I TA L I A N O GRAZIE PER AVER RIPOSTO LA LORO FIDUCIA IN DI4 E LA SPERANZA CHE IL PRODOT- TO SODDISFI APPIENO LE VOSTRE ASPETTATIVE. AVVERTENZE PRIMA DI UTILIZZARE IL PRODOTTO, LEGGERE ATTENTAMENTE LE ISTRUZIONI D’USO. CON- SERVARE LE ISTRUZIONI IN LUOGO SICURO PER CONSULTAZIONI FUTURE.
- Page 24 adattatore fornito con il dispositivo e alimentato al voltaggio di sicurezza indicato sulle caratteristiche dell’apparecchio. Seguire le istruzioni di CARICA DELL’APARECCHIO per cari- carlo. Seguire le istruzioni per la RIMOZIONE DELLA BATTERIA per rimuovere le batterie dall’apparecchio. Il cavo del trasformatore non può essere sostituito; se il cavo è...
- Page 25 ISTRUZIONI PER L’USO COME MONTARE L’APPARECCHIO 1. Montaggio del filtro Mettere il filtro nell’apposito sostegno, Poi girarlo in senso orario Fino alla posizione di stop. Girare in senso antiorario per togliere il filtro. 2.Montare l’unità filtro nel serbatoio Allineare il bordo e la cavità e inserire l’unità filtro nel serbatoio, allineare l’unità...
- Page 26 7. Montare l’unità spray Montare la punta spray con la bottiglia d’acqua con il coperchio a vite. Allineare la fessura della punta spray e il sostegno per il mocio, spingere il supporto lungo la fessura, quan- do i gancetti sono bloccati, il sostegno è fisso. Inserire l’estremità...
- Page 27 Rimuovere l’accessorio dall’attacco. Sostenere il serbatoio, premere il bottone di rilascio del serba- toio. Inclinare un po’ il serbatoio ed estrarlo. Estrarre l’unità filtro e svuotare il serbatoio. Rimuovere il filtro e l’attacco per pulirli. Pulire il serbatoio e il filtro. ATTENZIONE: ASCIUGARE BENE IL FILTRO PRIMA DI RIMONTARE L’UNITÀ...
- Page 28 BOLETÍN DE GARANTÍA B&B TRENDS, SL. garantiza la conformidad de este producto al uso para el que se destina, durante un periodo de dos años y para todo el territorio nacional. Durante la vigencia de esta garantía y en caso de avería, el usuario tiene derecho a la reparación y en su defecto, a la substitución del producto, sin cargo alguno, salvo que una de estas opciones resultase imposible o desproporcionada, y enton- ces podrá...
- Page 29 USE OF WARRANTY Consumers should contact a technical service centre authorised by B&B TRENDS, SL. for repair of the product as any tampering thereof by persons not authorised by B&B TRENDS, SL., as well as misuse or inappropriate use, will lead to the cancellation of this warranty. The warranty must be fully completed and delivered along with the receipt or delivery docket for the effective exercise of rights under this warranty.
- Page 30 BULLETIN DE GARANTIE B&B TRENDS, SL. garantie la conformité de ce produit utilisé aux fins auxquelles il est destiné, durant une période de deux ans et pour tout le territoire national. Pendant la durée de la garantie et en cas de panne, l’utilisateur aura droit à...
- Page 31 SERVICIOS DE ATENCIÓN TECNICA (SAT) TECHNICAL ASSITANCE SERVICE (TAS), SERVIÇO DE ATENÇAO TÉCNICA (SAT) SERVICE TECHNIQUE (ST), SERVIZIO DI ASSISTENZA TECNICA (SDAT) (+34) 937 010 753. sat@di4.eu B&B TRENDS, S.L. C. Cataluña, 24 P.I. Ca N’Oller 08130 Santa Perpètua de Mogoda (Barcelona) España C.I.F.
- Page 32 ALAVA 33900 SAMA DE LANGREO 08950 ESPLUGUES DE LLOBREGAT 01012 VITORIA ALGA NALON, S.L. SAT J. BAUTISTA REPARACIONES BERNA TORRE DE ABAJO, 8 SANTIAGO RUSIÑOL, 27-29 LOCAL 5 DOMINGO BELTRAN, 54 985692242 933722157 945 248 198 alganalon@yahoo.es satdireccion@satjbautista.com bernaabetxuko@yahoo.es AVILA 08015 BARCELONA 01001 VITORIA 05005 AVILA...
- Page 33 8720 VILAFRANCA DEL PENEDES CADIZ CUENCA FRED VILAFRANCA, S.L 11402 JEREZ DE LA FR 16400 TARANCON POL.INDR.”DOMENYS I” NAVE 9 ELECTRO LARA DOMINGO SANTAOLALLA MEJIA 938904852 C. DIVINA PASTORA EDIF. 2 LOCAL 6 P.I. TARANCON SUR C/ SANCHO fred@fredvilafranca.com 956 336 254 PANZA 9 electrolara@eresmas.com 969322036/667607788...
- Page 34 GUIPUZCOA LA CORUÑA 24004 LEON 20014 SAN SEBASTIAN (no oficial) 15688 SIGÜERO (OROSO) ELECTRO - CASH SANTIAGO ESTALAYO SERVITECGA S.L. TORRIANO, 3 - 5 BJ Pº URRALBURU, 30 pab. C pol. 27 RUA TRAVESA 2 BAJO 987206409 943475013 981572579 electrocash@ono.com santiagoestalayo@hotmail.com servitecga@gmail.com LLEIDA...
- Page 35 28038 MADRID MALLORCA PONTEVEDRA 07008 PALMA DE MALLORCA 36003 PONTEVEDRA FERSAY VALLECAS -Tienda Fersay Madrid Vallecas SAT BALEAR MARDEL RIAS BAIXAS C/PEÑA PRIETA, 17 LOCAL REIS CATOLICS, 72 FERNANDEZ LADREDA, 67 911394704 971247695 986843760 scmrivas@gmail.com satbalear@ono.com mardelrias@mundo-r.com 28020 MADRID MURCIA 36004 PONTEVEDRA ENRIQUE ARRIBAS GARCIA (jaen 18) 30700 TORRE PACHECO...
- Page 36 P.I. Ca N’Oller 08130 962872810 48011 BILBAO relgangandia@gmail.com R.E. ABAD MANUEL GONZALEZ Santa Perpètua de Mogoda HERVERA (Barcelona) España 46005 VALENCIA GREGORIO DE LA REVILLA, 34 C.I.F. B-86880473 RELEVAN,S.L. 944215271 C/ MATIAS PERELLO ,49 mghervera@yahoo.es www.di4.eu 963 222 529 merce@relevansl.com...
- Page 38 ESPAÑOL El producto puede disponer de pilas o baterías. Retirarlas antes de desechar el producto y deposítelas en los contenedores especiales autorizados para tal fin. RETIRADA DE LA BATERÍA El aparato debe desconectarse de la corriente para extraer la batería. Asegúrese de que el producto está...
- Page 39 FRANCÉS: Le produit peut disposer de piles ou de batteries. Retirez-les avant de jeter le produit et déposez-les dans le container spécial prévu à cet effet. EXTRACTION DE LA BATTERIE Veillez à débrancher l produit avant d’extraire la batterie. Veillez à ce que la tondeuse à cheveux soit complètement déchargée. Dévisser les vis du boîtier du produit.
- Page 40 Aspirojet B&B TRENDS, S.L. C. Cataluña, 24 P.I. Ca N’Oller 08130 Santa Perpètua de Mogoda (Barcelona) España C.I.F. B-86880473 www.di4.eu...