
Manuels Connexes pour LD Systems AM 8 Série


Sommaire des Matières pour LD Systems AM 8 Série
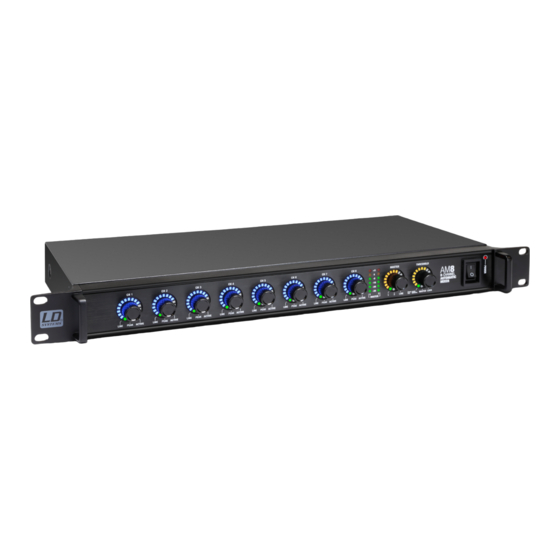
- Page 1 USER´S MANUAL BEDIENUNGSANLEITUNG MANUEL D`UTILISATION MANUAL DE USUARIO INSTRUKCJA OBSŁUGI MANUALE D‘ USO AM 8 8-CHANNEL AUTOMATIC MIXER LDAM8...
-
Page 2: Table Des Matières
CONTENTS / INHALTSVERZEICHNIS / CONTENU / CONTENIDO / TREŚĆ / CONTENUTO ENGLISH ESPAÑOL PREVENTIVE MEASURES MEDIDAS DE SEGURIDAD 66-67 INTRODUCTION INTRODUCCIÓN CONNECTIONS, CONTROLS, AND INDICATORS CONEXIONES, CONTROLES E INDICADORES 67-69 MANUAL OPERATION OPERACIÓN MANUAL 70-73 STARTUP 10-11 PUESTA EN MARCHA 73-74 DAISY-CHAINING CONEXIÓN EN CASCADA... -
Page 3: Preventive Measures
YOU‘VE MADE THE RIGHT CHOICE! We have designed this product to operate reliably over many years. LD Systems stands for this with its name and many years of experience as a manufacturer of high-quality audio products. Please read this User‘s Manual carefully, so that you can begin making optimum use of your LD Systems product quickly. -
Page 4: Introduction
INTRODUCTION The LD Systems AM 8 is an automatic 8 x 2 matrix mixer with balanced mic line inputs, 96 kHz/24 bit signal processing and a frequency response of 20 Hz - 30 kHz. The Priority function of the AM8 automatic mixer can be switched on individually for each input; the total threshold for channel activation is selected automatically or manually using the threshold controller. -
Page 5: Connections, Controls, And Indicators
CONNECTIONS, CONTROLS, AND INDICATORS 110-240 AC / 50-60Hz RS-232 CAUTION! DO NOT OPEN RISK OF ELECTRICAL SHOCK ! AVIS! NE PAS OUVRIR RISQUE DE CHOC ELECTRIQUE ! EXTERNAL CONTROL ACHTUNG! NICHT ÖFFNEN, STROMSCHLAGGEFAHR ! + I - I G + I - I G + I - I G + I - I G + I - I G... -
Page 6: External Control
Example: %V,01,2020202020202020,3030,0A,AF79# NETWORK The RS485 interface allows the remote control of the AM8 automatic mixer through a Windows PC (control software AUTOMIX8 included). Connect the AM8 automatic mixer with the Ethernet interface of the computer using a CAT-5 LAN cable. AES/EBU OUTPUT Terminal block connector for the output of the sum signal in the digital AES/EBU format (terminal block included, configuration as shown). -
Page 7: Manual Operation
MANUAL OPERATION INPUT GAIN CH 1 - CH 8 Rotary encoder for setting the input gain. Turning it to the right increases and turning it to the left reduces the input gain (please observe LED indicator N°18) LED DISPLAY CH 1 - CH 8 15-segment LED display for the visualisation of the gain input setting. - Page 8 SUM VOLUME MASTER 1 + 2 Encoder for setting the total volume of the line outputs Master 1 and Master 2 (dual function). If the display LED 1 lights up green (N°26), the sum volume of the line output Master 1 can be adjusted as desired using the MASTER rotary encoder. If the display LED 2 lights up green (N°27), the same applies to the line output Master 2.
- Page 9 STATUS-LED LINE Displays the level status of the Master 1 and Master 2 line outputs. If the green status LED lights up, the output signal of the corresponding line output Master 1 or Master 2 is output at line level (e.g. for the line input of a power amplifier). If the green status LED does not light up, the output signal of the corresponding line output Master 1 or Master 2 is output with a 20 dB attenuation (e.g.
-
Page 10: Startup
STATUS-LED THRESHOLD AUTO / MANUAL The status LED shows the operating mode of the threshold value setting (green = automatic setting of the threshold value, red = manual setting of the threshold value, see also point 29). To change the operating mode, press and hold the push-button on the THRESHOLD rotary encoder for approximately 2 seconds (one of the 3 LEDs AUTO / MANUAL, MASTER or LOCK will now flash red. -
Page 11: Daisy-Chaining
DAISY-CHAINING Up to 16 LD Systems AM8 automatic mixers can be daisy-chained to an audio system. When daisy-chaining the AM8 automatic mixers using the LINK IN / LINK OUT interface on the rear panel of the unit, the device that must serve as the master unit needs to be configured as the master unit. - Page 12 Install the AUTOMIX8 software on a Windows PC (Windows Vista, WIN 7, WIN 8, screen resolution min. 1366 X 768) and connect the AM8 automatic mixer to the Ethernet interface of the computer using a LAN cable (CAT-5). Since the IP address of the AM8 automatic mixer is factory set to 192.168.1.88, the interface of the computer must be assigned a different IP address (see figure “Properties of Internet Protocol Version 4”).
-
Page 13: Software Main Window
Only one automatic mixer can be connected to the software at any time. To connect a different automatic mixer with the software, remove the connection of the currently connected mixer by clicking on “MENU” and “DISCONNECT” (see figure). Now click on “MENU” and “CONNECT” to establish a connection with an automatic mixer with a different IP address. - Page 14 CHANNELS Overview of the input channels (CHANNEL 1 - 8) and the line outputs (MASTER 1 & 2). Equalizer setting for the input channels and channel groups (GROUP 1-5). MATRIX Individual routing for the input channels (CHANNEL 1 - 8) and the line outputs (MASTER 1 & 2). SYSTEM Set threshold for activation of a channel (THRESHOLD), hold time (HOLD TIME) and gain limits, panel lock (PANEL LOCK), configuration as a master or slave unit (DEVICE MODE), maximum number of open channels (MAX.
-
Page 15: Equalizer Channel 1 - 8 (Edit Eq)
MASTER EQ MASTER 1 & 2 Button to access the 15-band parametric equalizer of the output channels Master 1 and 2 (single click with the left mouse button). PHANTOM CHANNEL 1 - 8 Button for the 48 V phantom power of the input channels. By clicking on the “PHANTOM” button, the phantom power of the corresponding channel is enabled or disabled. -
Page 16: Frequency (Hz)
CHANNELS 1 - 8 Button to access the 5-band parametric equalizer of the input channels 1 to 8. Click on the button of the selected channel to adjust the equalizer settings. The colour of the button changes to yellow. COPY EQ Copying the equalizer settings of one input channel to another. -
Page 17: Equalizer Master 1 & 2
EQUALIZER MASTER 1 & 2 15-BAND FULLY PARAMETRIC EQUALIZER WITH BELL FILTER AND VARIABLE QUALITY OF FILTER BYPASS Click on “BYPASS” to disable the equalizer and high-pass filter and once more to re-enable both (sound comparison before - after). If the equalizer is disabled, the “BYPASS”... -
Page 18: Master Limiter 1 & 2
MASTER LIMITER 1 & 2 The limiter (peak limiter) is used to limit peaks in the audio signal of the line outputs. For this purpose, the following parameter settings are available. THRESHOLD Setting the threshold value from -80 dB to 19.9 dB, and to OFF (off). Use the arrow buttons in the threshold field to enter the desired value, or use the point in the graph using the mouse (click, hold and drag). -
Page 19: Audio Matrix
AUDIO MATRIX Each of the 8 input channels (INPUTS 1-8) can be individually routed to the two line outputs Master 1 and 2 using the audio matrix of the AM8 automatic mixer (M1 and M2). To select which input channel should be routed to which of the two line outputs, and which one should not, simply click on the appropriate button. - Page 20 MAX. OPEN CH To set the maximum number of simultaneously active input channels on the drop-down menu, select the desired number and click “OK”. In the opening window, click again on “OK”. DEVICE IP The IP address of the device is factory set to 192.168.1.88. To change the IP address (e.g., for daisy-chaining multiple AM8 automatic mixer), click on the address field, change the number of the last digit (e.g.
-
Page 21: Menu
MENU OPEN FILE / SAVE FILE Save and load user settings (SAVE FILE / OPEN FILE). Custom settings can be saved directly to the computer as data files and can be reloaded. These data files contain all of the settings, such as equalizer, limiter, routing, channel groups etc. CONNECT / DISCONNECT Connecting and disconnecting a connection between the AM8 automatic mixer and the computer (for information about this procedure, see “CONNECTING TO A WINDOWS PC”). -
Page 22: Specifications
Click on the button of the channels (CHANNEL 1-8 / MASTER 1 + 2) to be grouped in this channel group.. The buttons of the selected channels are highlighted in yellow. To remove a channel from a group, click on the button of the corresponding channel, the button will appear greyed out. Input and output channels can not be grouped in a channel group. -
Page 23: Manufacturer´s Declarations
Power Socket: IEC power socket Operating Voltage: 110 - 240 V AC / 50 - 60 Hz Power Consumption: 60 W Operating Temperature: 0°C - 50°C Relative Humidity: 10% to 70%, non-condensing Weight: 2.58 kg Dimensions (W x H x D): 481 x 44 x 232 mm Other Features: power cable and terminal blocks included, free AUTOMIX8 software... -
Page 24: Deutsch
Dieses Gerät wurde unter hohen Qualitätsanforderungen entwickelt und gefertigt, um viele Jahre einen reibungslosen Betrieb zu gewährleisten. Dafür steht LD Systems mit seinem Namen und der langjährigen Erfahrung als Hersteller hochwertiger Audioprodukte. Bitte lesen Sie diese Bedienungsanleitung sorgfältig, damit Sie Ihr neues Produkt von LD Systems schnell optimal einsetzen können. -
Page 25: Einführung
Vermeiden Sie länger anhaltende Belastung durch hohe Lautstärken über 90 dB. EINFÜHRUNG Der LD Systems AM 8 ist ein automatischer 8x2 Matrixmixer mit symmetrischen Mic-Line-Eingängen, 96kHz/24-Bit Signalbearbeitung und einem Frequenzgang von 20 Hz – 30 kHz. Die Priority-Funktion des AM8 Automatik-Mixers kann für jeden Eingang individuell eingeschaltet werden, der gesamte Schwellenwert zur Kanalaktivierung wird automatisch oder mit dem Threshold-Regler manuell gewählt. - Page 26 EINSTELL- UND ANZEIGEELEMENT CH 1 - CH 8 Drehgeber, Drucktaster und LED-Anzeige mit Mehrfachfunktionen. LED DISPLAYS MASTER 1 & 2 6-Segment Pegel-Anzeigen für die Summensignale Master 1 und Master 2. EINSTELL- UND ANZEIGEELEMENT MASTER Drehgeber, Drucktaster und LED-Anzeige mit Mehrfachfunktionen. EINSTELL- UND ANZEIGEELEMENT THRESHOLD Drehgeber, Drucktaster und LED-Anzeige mit Mehrfachfunktionen.
-
Page 27: External Control
AES/EBU OUTPUT Klemmblock-Anschluss für die Ausgabe des Summen-Signals im digitalen AES/EBU Format (Klemmblock im Lieferumfang, Belegung wie abgebildet). EXTERNAL CONTROL Die D-SUB 25-Pin Schnittstelle bietet die Möglichkeit der externen Kontrolle über die Eingangs-Kanäle (CH Input). An den Ausgängen 1 bis 8 (CH Output) liegt eine 3,3V Gleichspannung für die Kontrolle externer Geräte an, sobald ein Kanal aktiviert wird. -
Page 28: Manuelle Bedienung
MANUELLE BEDIENUNG EINGANGSVORVERSTÄRKUNG CH 1 - CH 8 Drehgeber für die Einstellung der Eingangsvorverstärkung. Drehung nach rechts erhöht die Eingangsvorverstärkung, Drehung nach links verringert sie (LED-Anzeige Nr. 18 beachten). LED-ANZEIGE CH 1 - CH 8 15-Segment LED-Anzeige für die Visualisierung der Einstellung der Eingangsvorverstärkung. DRUCKTASTER CH 1 - CH 8 Eingangsempfindlichkeit Um einen Eingang von Mikrofon- auf Line-Empfindlichkeit umzuschalten und umgekehrt, drücken und halten Sie den Drucktaster des Drehgebers... - Page 29 SUMMENLAUTSTÄRKE MASTER 1 + 2 Drehgeber für die Einstellung der Summenlautstärke der Line-Ausgänge Master 1 und Master 2 (Doppelfunktion). Leuchtet die Anzeige-LED 1 grün (Nr. 26), kann die Summenlautstärke des Line-Ausgangs Master 1 wunschgemäß mit Hilfe des Drehgebers MASTER eingestellt werden, leuchtet die Anzeige-LED 2 grün (Nr.
- Page 30 STATUS LED MASTER 1 & 2 LED rot blinkend Umschaltbereitschaft LED MASTER 1 grün Lautstärkeneinstellung Master 1 LED MASTER 2 grün Lautstärkeneinstellung Master 2 STATUS LED LINE LED rot blinkend Umschaltbereitschaft LED MASTER 1 grün & LINE LED grün Master 1 Line-Pegel LED MASTER 2 grün &...
-
Page 31: Inbetriebnahme
STATUS LED THRESHOLD AUTO / MANUAL LED rot blinkend Umschaltbereitschaft LED AUTO / MANUAL grün automatische Einstellung des Schwellenwerts LED AUTO / MANUAL rot manuelle Einstellung des Schwellenwerts STATUS-LED MASTER Beim Einsatz eines einzelnen AM8 Automatik-Mixers, muss dieser als Master-Einheit konfiguriert sein. Beim Kaskadieren von bis zu 16 AM8 Automatik-Mixern mit Hilfe der LINK IN / LINK OUT Schnittstelle auf der Rückseite des Geräts (siehe Punkt 14), muss das Gerät, welches als Master-Einheit dienen soll, als Master-Einheit konfiguriert sein. -
Page 32: Kaskadierung
KASKADIERUNG Bis zu 16 der LD Systems AM8 Automatik-Mixer können zu einem Audio-System kaskadiert werden. Beim Kaskadieren der AM8 Automa- tik-Mixer mit Hilfe der LINK IN / LINK OUT Schnittstelle auf der Rückseite des Geräts, muss der AM8 Automatik-Mixer, welcher als Mas- ter-Einheit eingesetzt werden soll, als Master-Einheit konfiguriert werden. - Page 33 Installieren Sie die AUTOMIX8 Software auf einem Windows-PC (Windows Vista, WIN 7, WIN 8, Bildschirmauflösung min. 1366 x 768) und schließen Sie den AM8 Automatik-Mixer mit Hilfe eines LAN-Kabels (CAT-5) an der Ethernet-Schnittstelle des Rechners an. Da die IP-Adresse des AM8 Automatik-Mixers ab Werk auf 192.168.1.88 gesetzt ist, muss der verwendeten Schnittstelle des Rechners eine andere IP-Adresse zugewiesen werden (siehe Abbildung „Eigenschaften von Internetprotokoll Version 4“).
-
Page 34: Software Hauptfenster
Es kann immer nur ein Automatik-Mixer aktuell mit der Software verbunden sein. Um einen anderen Automatik-Mixer mit der Software zu verbinden, lösen Sie die Verbindung des aktuell verbundenen Mixers, indem Sie auf „MENU“ und „DISCONNECT“ klicken (siehe Abbildung). Klicken Sie nun auf „MENU“ und „CONNECT“, um eine Verbindung mit einem Automatik-Mixer mit einer anderen IP-Adresse herzustellen. Wurden alle Einstellungen und Verbindungen korrekt durchgeführt, werden nach wenigen Sekunden die Geräte, die mit dem Rechner verbunden sind, mit der entsprechenden IP-Adresse angezeigt und ein INFO-Fenster mit mit dem Hinweis „Search finished“... - Page 35 CHANNELS Übersicht der Eingangs-Kanäle (CHANNEL 1 - 8) und der Line-Ausgänge (MASTER 1 & 2). Equalizer-Einstellung der Eingangs-Kanäle und der Kanal-Gruppen (GROUP 1 - 5). MATRIX Individuelles Routen der Eingangs-Kanäle (CHANNEL 1 - 8) auf die Line-Ausgänge (MASTER 1 & 2). SYSTEM Einstellung des Schwellenwerts für die Aktivierung eines Kanals (THRESHOLD), der Haltezeit (HOLD TIME) und Gain Limits, der Sperrung der Bedienelemente (PANEL LOCK), der Konfigurierung als Master- oder Slave-Einheit (DEVICE MODE), der maximalen Anzahl der offenen...
-
Page 36: Equalizer Kanal 1 - 8 (Edit Eq)
die Prioritäts-Funktion deaktiviert. MASTER EQ MASTER 1 & 2 Schaltfläche zum Aufrufen der 15-Band Parametrik-Equalizer der Ausgangs-Kanäle Master 1 und 2 (einfacher Klick mit der linken Maustaste). PHANTOM CHANNEL 1 - 8 Schalt- und Anzeigefläche für die 48V Phantomspeisung der Eingangs-Kanäle. Durch Klicken auf die Schalfläche „PHANTOM“ wird die Phantomspeisung des entsprechenden Kanals aktiviert bzw. -
Page 37: Frequency (Hz)
CHANNELS 1 - 8 Schalt- und Anzeigefläche zum Aufrufen der 5-Band Parametrik-Equalizer der Eingangs-Kanäle 1 bis 8. Klicken Sie auf die Schaltfläche des gewünschten Kanals, um Equalizer-Einstellungen vorzunehmen. Die Farbe der Schaltfläche wechselt dabei auf gelb. COPY EQ Kopieren von Equalizer-Einstellungen von einem auf den anderen Kanal. Klicken Sie auf die Schaltfläche (Nr. 1) des Kanals, dessen Equalizer überschrieben werden soll (Schaltfläche des angewählten Kanals wechsel auf Gelb). -
Page 38: Equalizer Master 1 & 2
GRAPHICAL EQUALIZER DISPLAY Die grafische Darstellung der Equalizer-Kurve dient der schnellen und klaren Übersicht der Equalizer-Einstellungen. Frequenz und Verstärkung können gleichzeitig mit Hilfe der 5 Punkte in der Frequenzkurve verändert werden (Klicken, Halten und Ziehen). Jeder Punkt steht für ein Frequenzband. EQUALIZER MASTER 1 &... -
Page 39: Master Limiter 1 & 2
MASTER LIMITER 1 & 2 Der Limiter (Spitzenwert-Begrenzer) dient dazu, Pegelspitzen im Audio-Signal der Line-Ausgänge zu begrenzen. Hierfür sind Einstellungen der folgenden Parameter verfügbar. THRESHOLD Einstellung des Schwellenwerts von -80dB bis 19,9dB und OFF (aus). Verwenden Sie für die Eingabe des gewünschten Werts die Pfeiltasten im Threshold-Feld, oder benutzen dafür den Punkt in der grafischen Darstellung mit Hilfe der Computermaus (Klicken, Halten und Ziehen). -
Page 40: Audio Matrix
AUDIO MATRIX Jeder der 8 Eingangs-Kanäle (INPUTS 1 - 8) kann mit Hilfe der Audio Matrix des AM8 Automatik-Mixers individuell auf die beiden Line-Ausgänge Master 1 und 2 geroutet werden (M1 und M2). Die Auswahl, welcher Eingangs-Kanal auf welchen der beiden Line-Ausgänge geroutet wird und welcher nicht, erfolgt durch einfaches Klicken auf die entsprechende Schaltfläche. - Page 41 MAX. OPEN CH Stellen Sie die maximale Anzahl der gleichzeitig aktivierbaren Eingangs-Kanäle ein, indem Sie auf das Ziffern-Aufklappmenü klicken, die gewünschte Anzahl auswählen und auf „OK“ klicken. Im nun geöffneten Fenster klicken Sie wiederum auf „OK“. DEVICE IP Die IP-Adresse des Geräts ist ab Werk auf 192.168.1.88 eingestellt. Zum Ändern der IP-Adresse (z.B. Kaskadierung mehrerer AM8 Automatik-Mixer) klicken Sie auf das Adress-Feld, ändern die Zahl der letzten Stelle (z.B.
-
Page 42: Menü
MENÜ OPEN FILE / SAVE FILE Sichern und Laden von Benutzer-Einstellungen (SAVE FILE / OPEN FILE). Benutzer-Einstellungen können als Daten-File direkt auf dem Rechner gespeichert und wieder geladen werden. Diese Daten-Files enthalten alle Einstellungen, wie Equalizer, Limiter, Routing, Kanal-Gruppen etc.. CONNECT / DISCONNECT Herstellen und Trennen einer Verbindung des AM8 Automatik-Mixers zum Rechner (Vorgehensweise siehe “VERBINDUNG MIT EINEM WINDOWS PC HERSTELLEN”). -
Page 43: Technische Daten
Klicken Sie auf die Schaltflächen der Kanäle (CHANNEL 1 - 8 / MASTER 1 + 2), die in dieser Kanal-Gruppe zusammengefasst werden sollen. Die Schaltflächen der so ausgewählten Kanäle erscheinen nun gelb hervorgehoben. Um einen Kanal aus einer Gruppe herauszunehmen, klicken Sie wiederum auf die Schaltfläche des entsprechenden Kanals, die Schaltfläche erscheint nun grau hinterlegt. -
Page 44: Herstellererklärungen
Maximale Anzahl Einheiten bei Kaskadierung: Netzanschluss: IEC-Netzbuchse Betriebsspannung: 110 - 240 V AC, 50 - 60 Hz Leistungsaufnahme: 60 W Betriebstemperatur: 0°C - 50°C Relative Luftfeuchtigkeit: 10% - 70%, nicht kondensierend Gewicht: 2,58 kg Abmessungen (B x H x T) 481 x 44 x 232 mm Weitere Eigenschaften: Netzkabel und Klemmblöcke inklusive, kostenlose Software AUTOMIX8... -
Page 45: Francais
Cet appareil a été développé et fabriqué en appliquant des exigences de qualité très élevées : il garantit des années de fonctionnement sans problème. Grâce à de nombreuses années d‘expérience, LD Systems est un nom connu dans le domaine des produits audio haut de gamme. -
Page 46: Introduction
INTRODUCTION Le LD Systems AM 8 est un mixeur-matrice automatique 8 x 2 doté d'entrées symétriques micro/ligne ; il travaille en 24 bits/96 kHz, et sa réponse en fréquence s'étend de 20 Hz à 30 kHz. La fonction Priority de l'AM8 est commutable séparément sur chaque entrée. La valeur globale de seuil d'activation de canal se règle automatiquement ou manuellement, via le potentiomètre Threshold. - Page 47 LED DISPLAYS MASTER 1 & 2 Indicateur de niveau sur 6 LED, pour les signaux mixés Master 1 et Master 2. RÉGLAGES ET INDICATEURS CANAUX MASTER Encodeur/sélecteur et couronne LED multifonctions. RÉGLAGE ET INDICATEUR THRESHOLD Encodeur/sélecteur et couronne LED multifonctions. POWER Interrupteur d’alimentation de l’appareil.
-
Page 48: External Control
EXTERNAL CONTROL Le port Sub-D 25 points offre la possibilité d’un contrôle externe sur les canaux d’entrée (CH Input). Sur les sorties 1 à 8 (CH Output) se trouve une tension continue de 3,3 V pour le contrôle d’appareils externes, dès qu’un canal est activé. 25-Pin D-SUB connector pin assignment Pin 1: Ground... -
Page 49: Indicateur Led Line / Mic
COURONNE LED CH 1 - CH 8 Couronne de 15 LED pour visualisation du niveau du signal d’entrée ENCODEUR/TOUCHE CH 1 - CH 8 Sensibilité d’entrée Pour commuter une entrée de sensibilité micro sur sensibilité ligne et inversement, appuyez sur le bouton-poussoir du codeur rotatif du canal correspondant et maintenez-le enfoncé... -
Page 50: Encodeur/Touche Master
bouton-poussoir du codeur rotatif MASTER. L’indicateur LED correspondant à la sortie ligne actuellement choisie s’allume, Master 1 (n°26) ou Master 2 (n°27). Tournez alors l’encodeur pour passer au réglage de l’autre sortie ligne. Validez ensuite votre choix en appuyant sur l’encodeur MASTER. - Page 51 THRESHOLD Les canaux d’entrée dont le niveau de signal ne dépasse pas une valeur seuil donnée sont mis en sourdine à l’aide de cette fonction. Ainsi, lors de la transmission d’un canal, les crépitements, les effets larsen et les effets de peigne indésirables provenant d’autres canaux ouverts sont efficacement éliminés et la clarté...
-
Page 52: Mise En Service
MISE EN SERVICE - Pour le câblage du mixeur automatique AM8, utilisez exclusivement des câbles symétriques. - Pour éviter d’éviter le système audio suite à un Larsen, etc., réglez au minimum le volume sonore du système audio lorsque vous procédez à... -
Page 53: Cascade
CASCADE Vous pouvez relier en cascade jusqu’à 16 mixeurs automatiques LD Systems AM8 dans un système audio. Dans ce cas de figure, il faut interconnecter les appareils via leurs connecteurs LINK IN / LINK OUT, situés sur le panneau arrière, et régler en mode Master l’AM8 consi- déré... - Page 54 Si tous les réglages et branchements ont été effectués correctement, l’AM8 connecté apparaît à l’écran au bout de quelques secondes, avec son adresse IP et une fenêtre INFO mentionnant «Search finished» (recherche terminée). Cliquez sur «OK». Pour pouvoir accéder aux champs USER NAME (nom utilisateur) et USER PSW (mot de passe utilisateur), cliquez sur le champ bleu «OK».
-
Page 55: Fenêtre Principale Du Logiciel
Le logiciel ne peut communiquer qu’avec un seul mixeur automatique à un moment donné. Dès que vous reliez un autre mixeur automatique au logiciel, vous perdez la liaison avec le mixeur déjà relié, puisqu’il vous faut cliquer sur «MENU» et «DISCONNECT» (voir illustration). Cliquez ensuite sur «MENU»... - Page 56 CHANNELS Vue globale des canaux d’entrée (CHANNEL 1 - 8) et des sorties (MASTER 1 & 2). Paramètres des égaliseurs des canaux d’entrée et des groupes de canaux (GROUP 1 - 5). MATRIX Assignation individuelle des canaux d’entrée (CHANNEL 1 - 8) aux sorties (MASTER 1 & 2). SYSTEM Réglage du seuil d’activation d’un canal donné...
-
Page 57: Égaliseur Canaux 1 - 8 (Edit Eq)
MASTER EQ MASTER 1 & 2 Indicateur/sélecteur de l’égaliseur paramétrique 15 bandes sur les sorties Master 1 et 2. PHANTOM CHANNEL 1 - 8 Indicateur/sélecteur de la tension d’alimentation fantôme 48 V sur les canaux d’entrée. Il suffit de cliquer sur le bouton «PHANTOM» pour activer/désactiver la tension d’alimentation fantôme sur le canal correspondant. -
Page 58: Frequency (Hz)
CHANNELS 1 - 8 Indicateur/sélecteur de l’égaliseur 5 bandes paramétriques sur les canaux d’entrée 1 à 8. Cliquez sur le sélecteur du canal désiré pour faire apparaître ses paramètres d’égaliseur. Le sélecteur passe alors au jaune. COPY EQ Copie des paramètres d’égaliseur d’un canal d’entrée sur l’autre. Cliquez sur l’onglet (n°1) du canal destination de l’opération de copie des paramètres d’égalisation. -
Page 59: Equalizer Master 1 & 2
EQUALIZER MASTER 1 & 2 ÉGALISEUR 15 BANDES PARAMÉTRIQUES DE TYPE BELL, AVEC LARGEUR DE BANDE VARIABLE BYPASS Cliquez sur «BYPASS» pour désactiver l’égaliseur ; cliquez de nouveau sur BYPASS pour le réactiver (pour comparaison sonore avec/sans égalisation). Lorsque l’égaliseur est désactivé, le bouton BYPASS passe en bleu. RESET Cliquez sur «RESET»... -
Page 60: Master Limiter 1 & 2
MASTER LIMITER 1 & 2 Le limiteur sert à atténuer les crêtes du signal audio de la sortie ligne. Voici les paramètres de réglage disponibles. THRESHOLD Réglage de la valeur de seuil, de -80 dB à +19,9 dB et OFF (désactivé). Pour régler la valeur de Threshold désirée, vous pouvez taper directement la valeur dans le champ, ou agir directement avec la souris sur le point de la représentation graphique (maintenez enfoncé... -
Page 61: Matriz De Audio
MATRIZ DE AUDIO La matrice audio intégrée du mixeur automatique AM8 permet d’assigner individuellement les 8 canaux d’entrée (INPUTS 1 - 8) aux sorties Master 1 et Master 2 (M1 et M2). Pour sélectionner la ou les sorties auxquelles assigner chaque canal d’entrée, il suffit de cliquer sur le bouton correspondant. - Page 62 MAX. OPEN CH Pour définir le nombre maximal de canaux d’entrée pouvant être activés simultanément, choisissez-le dans le menu local, puis cliquez sur «OK». Dans la fenêtre alors ouverte, cliquez de nouveau sur «OK». DEVICE IP L’adresse IP de l’appareil est réglée en usine sur 192.168.1.88. Pour modifier cette adresse IP (par exemple, afin de cascader plusieurs mixeurs automatiques AM8), cliquez sur le champ DEVICE IP,modifiez le dernier nombre (par exemple, 192.168.1.89) puis cliquez sur «OK».
-
Page 63: Menu
MENU OPEN FILE / SAVE FILE Ouverture/enregistrement de fichiers de paramètres utilisateur (SAVE FILE / OPEN FILE). Les valeurs de paramètres peuvent être exportées/ importées sous forme de fichier de données sur/depuis l’ordinateur. Ces fichiers incluent tous les réglages de l’AM8 : égaliseur, limiteur, assignation, groupes de canaux, etc. -
Page 64: Caractéristiques Techniques
Cliquez sur le bouton correspondant à la fonction que vous désirez pouvoir appliquer simultanément à l’ensemble du Groupe de canaux. Les indicateurs des fonctions correspondantes passent alors en jaune. Exemple : La fonction Mute est ici applicable aux canaux d’entrée 1 à... -
Page 65: Declarations
Branchement Secteur : Embase secteur au format IEC Tension Secteur : 110 - 240 V, 50/60 Hz Consommation Électrique : 60 W Température d'utilisation : 0°C - 50°C Taux d'hygrométrie relative : 10% - 70%, sans condensation Masse : 2,58 kg Dimensions (LxHxP) : 481 x 44 x 232 mm Divers :... -
Page 66: Español
Los productos de LD-Systems se caracterizan por su gran calidad, avalada por el prestigio de la marca y una dilatada expe- riencia como fabricante. Lea atentamente este manual de usuario para poder aprovechar rápidamente toda la funcionalidad de su nuevo producto de LD Systems. Si desea obtener información sobre LD-SYSTEMS, visite nuestro sitio web WWW.LD-SYSTEMS.COM MEDIDAS DE SEGURIDAD 1. -
Page 67: Introducción
INTRODUCCIÓN El AM8 de LD Systems es un mezclador matricial automático de 8x2 canales con entradas de micrófono/línea balanceadas, procesador de señales de 96 kHz y 24 bits, y una respuesta en frecuencia de 20 Hz a 30 kHz. La función Prioridad de los mezcladores automáticos AM8 se puede activar para cada canal de entrada;... - Page 68 CONTROLES E INDICADORES CH 1 - CH 8 Control giratorio, pulsador e indicadores LED multifunción. LED DISPLAYS MASTER 1 & 2 Columnas de 6 LED que indican los niveles de las señales de mezcla Master 1 y Master 2. CONTROL INDICADOR MASTER Control giratorio, pulsador e indicadores LED multifunción.
-
Page 69: External Control
AES/EBU OUTPUT Bloque de terminales para la salida de la señal de mezcla en formato digital AES/EBU (se suministra la regleta de terminales; se indica la disposición de pines). EXTERNAL CONTROL Conector D-Sub de 25 pines para controlar externamente los canales de entrada CH. En las salidas CH 1 a 8 hay una tensión continua de 3,3 voltios para poder controlar equipos externos en cuanto se activa un canal. -
Page 70: Operación Manual
OPERACIÓN MANUAL ANANCIA DE ENTRADA CH 1 - CH 8 Control giratorio para ajustar la ganancia de entrada. Gírelo a la derecha para aumentar la ganancia de entrada, o a la izquierda para disminuirla (corona de LED 18). CORONA DE LED CH 1 - CH 8 Corona LED de 15 segmentos para indicar el ajuste de ganancia de entrada. - Page 71 NIVEL DE MEZCLA MASTER 1 + 2 Control giratorio para ajustar el nivel de mezcla de las salidas de línea Master 1 y Master 2 (doble función). Si el LED 1 (26) se ilumina de color verde, el control giratorio MASTER regulará el nivel de mezcla de la salida de línea Master 1; si el LED 2 (27) se ilumina de color verde, se regulará...
- Page 72 STATUS-LED LINE Indicador de nivel de línea en las salidas de línea Master 1 y Master 2. El LED de estado se ilumina de color verde si la señal de la salida de línea Master 1 o Master 2 tiene un nivel de línea (por ejemplo, para la entrada de línea de un amplificador de potencia). El LED de estado no se enciende si la señal de la salida de línea Master 1 o Master 2 tiene un nivel atenuado 20 dB (por ejemplo, para la entrada de micro de una mesa de mezclas).En primer lugar, seleccione la salida de línea cuyo volumen de salida desea cambiar.
-
Page 73: Puesta En Marcha
STATUS-LED THRESHOLD AUTO / MANUAL El LED de estado indica el modo de funcionamiento del ajuste del umbral (verde = ajuste automático del umbral, rojo = ajuste manual del umbral, véase también el punto 29). Para cambiar el modo de funcionamiento, mantenga presionado el pulsador del control giratorio THRESHOLD durante unos 2 segundos (uno de los 3 LED AUTO/MANUAL, MASTER o LOCK parpadeará... -
Page 74: Conexión En Cascada
Conexión en cascada A un sistema de audio se pueden conectar en cascada hasta 16 mezcladores automáticos AM8 de LD Systems. Al conectar en cascada los mezcladores automáticos AM8 mediante el puerto LINK IN / LINK OUT del panel posterior, debe configurar como master el AM8 que va a fun- cionar como maestro. - Page 75 mezclador automático AM8 es 192.168.1.88, deberá asignar otra dirección IP al puerto del ordenador (ver la figura «Propiedades: Protocolo de Internet versión 4»). Ejecute el programa AUTOMIX8, haga clic en «MENU», y haga clic en «CONNECT» (conectar). En la ventana que se abre, haga clic en «SEARCH»...
-
Page 76: Ventana Principal Del Programa
Es posible tener conectado un único mezclador automático al software. Para conectar otro mezclador automático al software, haga clic en «MENU» «DISCONNECT» para desconectar el mezclador actualmente conectado (ver figura). A continuación, haga clic en «MENU» y «CON- NECT» para conectar un mezclador automático con otra dirección IP. Si la configuración y el cableado está correcto, al cabo de unos segundos se mostrarán los equipos conectados al PC, su dirección IP y una ventana INFO con el texto «Search finished»... - Page 77 CHANNELS Vista general de los canales de entrada (CHANNEL 1 - 8) y salidas de línea (MASTER 1 y 2). Ecualizador de los canales de entrada y grupos de canales (GROUP 1 - 5). MATRIX Asignación de los canales de entrada (CHANNEL 1 - 8) a las salidas de línea (MASTER 1 y 2). SYSTEM Ajuste del umbral para la activación de un canal (THRESHOLD), del tiempo de permanencia (HOLD TIME) y de los límites de ganancia (Gain Limits), del bloqueo de los mandos (PANEL LOCK), de la configuración como unidad maestra o esclava (DEVICE MODE), del número máximo...
-
Page 78: Égaliseur Canaux 1 - 8 (Edit Eq)
MASTER EQ MASTER 1 & 2 Botón para mostrar el ecualizador paramétrico de 15 bandas de los canales de salida Master 1 y 2 (con un clic de ratón). PHANTOM CHANNEL 1 - 8 Botones de la alimentación fantasma de 48 V de los canales de entrada. Haga clic en «PHANTOM» para activar o desactivar la alimentación fantasma del canal. -
Page 79: Frequency (Hz)
CHANNELS 1 - 8 Botón para mostrar el ecualizador paramétrico de 5 bandas de los canales de entrada 1 a 8. Haga clic en el botón de un canal para configurar el ecualizador. El color de fondo cambiará a amarillo. COPY EQ Permite copiar la configuración del ecualizador de uno a otro canal. -
Page 80: Equalizer Master 1 & 2
EQUALIZER MASTER 1 & 2 ECUALIZADOR PARAMÉTRICO DE 15 BANDAS CON FILTRO PASABANDA Y FACTOR Q VARIABLE BYPASS Haga clic en «BYPASS» para desactivar el ecualizador (haga clic de nuevo para activarlos. Es útil para comparar el sonido con y sin ecualiza- ción. -
Page 81: Master Limiter 1 & 2
MASTER LIMITER 1 & 2 El limitador sirve para limitar los picos de la señal de las salidas de línea. Para ello, puede cambiar los siguientes parámetros. THRESHOLD Ajuste del nivel umbral de -80 dB a 19,9 dB y OFF (desactivado). Puede introducirse el valor con los botones de flecha o bien seleccionando y arrastrando el punto de la gráfica con el ratón. -
Page 82: Funkcja Audio Matrix
FUNKCJA AUDIO MATRIX Con la matriz de audio del mezclador automático AM8 puede enviarse cada uno de los 8 canales de entrada (INPUTS 1 - 8) a las salidas de línea Master 1 y 2 (M1 y M2). Para seleccionar qué canal de entrada se envía a qué salida, simplemente haga clic en los botones. Si se está enviando un canal a una determinada salida, el botón correspondiente aparecerá... - Page 83 MAX. OPEN CH Establezca el máximo número de canales de entrada activados simultáneamente. Para ello, haga clic en la lista de números, seleccione uno de ellos y haga clic en «OK». En la ventana que se abre, haga clic en «OK». DEVICE IP La dirección IP por defecto del equipo es 192.168.1.88.
-
Page 84: Menú
MENÚ OPEN FILE / SAVE FILE Permite guardar y recuperar la configuración del usuario (SAVE FILE / OPEN FILE). La configuración del usuario se guarda en un archivo de datos en el ordenador que posteriormente se puede recuperar. Este archivo de datos incluye toda la configuración, como la del ecualizador, el limitador, la matriz de envíos, los grupos de canales, etc. -
Page 85: Características Técnicas
Haga clic en los botones de canal (CHANNEL 1 - 8 / MASTER 1 + 2) para asignarlos a este grupo de canales. El canal activo estará de color amarillo. Para eliminar un canal del grupo, haga clic de nuevo en el botón de canal (el fondo del botón pasará a gris). En un mismo grupo de canales no puede haber canales de entrada y de salida. -
Page 86: Declaración Del Fabricante
N.º máximo de equipos en cascada: 16 Toma eléctrica: Conector IEC Alimentación eléctrica: 110 - 240 VAC, 50/60 Hz Consumo: 60 W Rango operativo de temperaturas: 0 a 50°C Humedad relativa: 10% a 70%, sin condensación Peso: 2,58 kg Dimensiones (An x Al x F): 481 x 44 x 232 mm Otras características: Se suministran el cable eléctrico y bloques de terminales. -
Page 87: Polski
To urządzenie zostało zaprojektowane i wyprodukowane przy zastosowaniu najwyższych kryteriów jakościowych w celu zapewnienia wie- loletniej bezawaryjnej eksploatacji. Firma LD Systems gwarantuje to swoją marką i wieloletnim doświadczeniem w wytwarzaniu wysokiej jakości produktów audio. Proszę starannie przeczytać niniejszą instrukcję obsługi, aby móc jak najszybciej zacząć użytkować ten produkt marki LD Systems. -
Page 88: Wprowadzenie
Należy unikać długotrwałego narażenia na wysoki poziom głośności powyżej 90 dB. WPROWADZENIE AM 8 firmy LD Systems jest automatycznym mikserem 8x2 typu Matrix z symetrycznymi wejściami liniowymi/mikrofonowymi, próbkowaniem sygnału 96 kHz/24 bity oraz charakterystyką częstotliwościową od 20 Hz do 30 kHz. Funkcja priorytetowa automatycznego miksera AM8 może zostać... - Page 89 REGULATOR I WSKAŹNIK KANAŁÓW 1–8 Pokrętło enkodera przyrostowego, przyciski i wielofunkcyjny wskaźnik diodowy. LED DISPLAYS MASTER 1 & 2 Wskaźniki poziomu sumy sygnałów Master 1 i sumy sygnałów Master 2. Każdy z nich składa się z 6 pojedynczych wskaźników diodowych. REGULATOR I WSKAŹNIK MASTER Pokrętło enkodera przyrostowego, przyciski i wielofunkcyjny wskaźnik diodowy.
-
Page 90: External Control
NETWORK Interfejs RS485 umożliwia zdalne sterowanie automatycznym mikserem typu Matrix za pomocą komputera z systemem operacyjnym Win- dows (oprogramowanie sterujące AUTOMIX8 znajduje się w zestawie). Podłączyć automatyczny mikser AM8 do złącza Ethernet komputera za pomocą kabla LAN CAT-5. AES/EBU OUTPUT Złącze na kostkę... -
Page 91: Obsługa Ręczna
OBSŁUGA RĘCZNA WSTĘPNE WZMOCNIENIE WEJŚCIA KANAŁÓW 1–8 Pokrętło enkodera przyrostowego do ustawiania wstępnego wzmocnienia wejścia. Obrót w prawo zwiększa, a obrót w lewo zmniejsza wstępne wzmocnienie wejścia (zwrócić uwagę na wskaźnik diodowy nr 18). LED-ANZEIGE CH 1 - CH 8 Składający się... - Page 92 SUMA GŁOŚNOŚCI MASTER 1 + 2 Pokrętło enkodera przyrostowego do ustawiania sumy głośności wyjść liniowych Master 1 i Master 2 (funkcja podwójna). Kiedy wskaźnik diodowy 1 świeci się na zielono (nr 26), możliwe jest ustawienie według własnego uznania sumy głośności wyjścia liniowego Master 1 za pomocą...
- Page 93 STATUS-LED LINE Wskaźnik stanu poziomu wyjść liniowych Master 1 i Master 2. Kiedy dioda stanu świeci się na zielono, z odpowiedniego wyjścia liniowego Master 1 lub Master 2 zostaje wyprowadzony sygnał wyjściowy (np. dla wejścia liniowego końcówki mocy) o poziomie odpowiadającym sygnałowi liniowemu.
-
Page 94: Uruchomienie
PRZYCISK PROGU Przycisk do wybierania automatycznego lub ręcznego ustawienia wartości progowej i trybu Master lub Slave. STATUS-LED THRESHOLD AUTO / MANUAL Dioda LED stanu wskazuje tryb pracy ustawienia wartości progowej (zielona = automatyczne ustawienie wartości progowej, czerwona = ręczne ustawienie wartości progowej, patrz również punkt 29). Aby zmienić tryb pracy, nacisnąć i przytrzymać przycisk enkodera THRE- SHOLD przez ok. -
Page 95: Kaskadowanie
OUTPUT 1 KASKADOWANIE Istnieje możliwość kaskadowania maksymalnie 16 automatycznych mikserów AM8 firmy LD Systems do jednego systemu audio. W przypadku kaskadowania automatycznego miksera AM8 za pomocą interfejsu LINK IN/LINK OUT znajdującego się na tylnym panelu urządzenia auto- matyczny mikser AM8 mający pełnić funkcję urządzenia głównego musi zostać skonfigurowany jako jednostka główna. Wszystkie pozostałe automatyczne miksery AM8 systemu audio zostaną... -
Page 96: Nawiązywanie Połączenia Z Komputerem Z
NAWIĄZYWANIE POŁĄCZENIA Z KOMPUTEREM Z SYSTEMEM OPERACYJNYM WINDOWS Zainstalować oprogramowanie AUTOMIX8 na komputerze z systemem Windows (Vista, 7, 8) o minimalnej rozdzielczości ekranu 1366 × 768 i podłączyć automatyczny mikser AM8 za pomocą kabla LAN (CAT-5) do złącza Ethernet komputera. Ponieważ fabrycznym adresem IP auto- matycznego miksera AM8 jest adres 192.168.1.88, do użytego złącza komputera należy przypisać... - Page 97 W przypadku kaskadowania kilku automatycznych mikserów AM8, wprowadzania ustawień i sterowania za pomocą oprogramowania AU- TOMIX8 każdemu automatycznemu mikserowi należy przypisać indywidualny adres IP. W tym celu każdy z mikserów należy połączyć z oprogramowaniem z osobna, tj. jeden po drugim. Podczas zmiany adresu IP następuje ponowne uruchomienie automatycznego miksera. Po zmianie adresu IP należy ponownie uruchomić...
-
Page 98: Główne Okno Programu
GŁÓWNE OKNO PROGRAMU CHANNELS Przegląd kanałów wejściowych (KANAŁY 1–8) i wyjść liniowych (MASTER 1 I 2). Ustawienie korektora dźwięku kanałów wejściowych i grup kanałów (GRUPY 1–5). MATRIX Indywidualne przetrasowywanie kanałów wejściowych (KANAŁY 1–8) na wyjścia liniowe (MASTER 1 I 2). SYSTEM Ustawienie wartości progowej aktywacji kanału (THRESHOLD), czasu zatrzymania (HOLD TIME) i limitu wzmocnienia, blokady panelu obsługi (PANEL LOCK), konfiguracji jednostki w trybie master lub slave (DEVICE MODE), maksymalnej liczby otwartych kanałów (MAX. - Page 99 EQUALIZER Graficzne przedstawienie ustawień korektora dźwięku i przycisk otwierający pięciopasmowy parametryczny korektor dźwięku kanałów wejściowych od 1 do 8 oraz piętnastopasmowy parametryczny korektor dźwięku kanałów wyjściowych Master 1 i 2 (wystarczy kliknąć lewym przyciskiem myszy). LINE / MIC CHANNEL 1 - 8 Przełączanie czułości kanałów wejściowych z odpowiedniej dla sygnału liniowego na właściwą...
-
Page 100: Edit Eq (Zmiana Ustawień Korektora Dźwięku Dla Kanałów 1-8)
GAIN ANZEIGE MASTER 1 & 2 Wskaźnik wzmocnienia wyjścia wyjść liniowych Master 1 i 2 w dB. EDIT EQ (ZMIANA USTAWIEŃ KOREKTORA DŹWIĘKU DLA KANAŁÓW 1–8) W PEŁNI PARAMETRYCZNY, PIĘCIOPASMOWY KOREKTOR DŹWIĘKU Z ODDZIELNYM FILTREM GÓRNOPRZEPUSTOWYM ORAZ ZMIENNĄ JAKOŚCIĄ I CHARAKTERYSTYKĄ FILTRA. CHANNELS 1 - 8 Przycisk i wyświetlany obszar otwierający pięciopasmowy parametryczny korektor dźwięku kanałów wejściowych od 1 do 8. -
Page 101: Equalizer Master 1 & 2
GAIN (DB) Wzmocnienie (+/–15) danego pasma częstotliwości następuje przez bezpośrednie wprowadzenie wartości w polu wzmocnienia, użycie przycisków-strzałek znajdujących się na prawo obok pola wzmocnienia lub przez wykorzystanie wirtualnego tłumika nastawnego (nr 8). Częstotliwość i wzmocnienie można zmieniać jednocześnie za pomocą jednego z pięciu punktów znajdujących się na graficznym odwzoro- waniu krzywej częstotliwości (kliknąć, przytrzymać... -
Page 102: Master Limiter 1 & 2
jednego z piętnastu punktów znajdujących się na graficznym odwzorowaniu krzywej częstotliwości (kliknąć, przytrzymać i przeciągnąć). GAIN (DB) Wzmocnienie (+/–15) danego pasma częstotliwości następuje przez bezpośrednie wprowadzenie wartości w polu wzmocnienia, użycie przycisków-strzałek znajdujących się na prawo obok pola wzmocnienia lub przez wykorzystanie wirtualnego tłumika nastawnego (nr 5). Częstotliwość... -
Page 103: Funkcja Audio Matrix
RATIO W celu ustawienia proporcji należy przesunąć kursor myszy na pole proporcji, kliknąć lewym przyciskiem myszy, wybrać żądaną wartość i ponownie kliknąć lewym przyciskiem myszy. Normalną wartością funkcji limitera jest INF:1 (∞:1). FUNKCJA AUDIO MATRIX Za pomocą funkcji Audio Matrix automatycznego miksera AM8 każdy z 8 kanałów wejściowych (INPUTS 1–8) może zostać z osobna przetrasowany zarówno na wyjście liniowe Master 1, jaki i Master 2 (M1 i M2). - Page 104 Kliknąć „MAN” (przycisk „MAN” wyróżniony na żółto), a następnie wybrać rozwijane menu żądanego kanału i wybrać wartość progową, przy której odgłosy z otoczenia nie aktywują automatycznie kanału wejściowego, lecz aktywacja kanału jest możliwa przez osobę mówiącą itd. Ustawić czas zatrzymania aktywowanego kanału, klikając na rozwijane menu dla „HOLD TIME” i wybierając wartość zgodnie z życzeniem (0 - 2000 ms).
-
Page 105: Menü
do dołu, jak i do góry. Wprowadzić żądaną wartość jako liczbę całkowitą w polu UPPER (górny limit) i LOWER (dolny limit) i kliknąć „OK”. Ustawienie można przyjąć dla każdego kanału indywidualnie. GLOBAL PRESETS Ustawienia na wszystkich poziomach mogą być zapisane jako preset w 5 miejscach pamięci i ponownie wywołane. Wprowadzić ustawienia jak zwykle i zapisać... -
Page 106: Grupy Kanałów
GRUPY KANAŁÓW W celu przypisania kanałów wejściowych/wyjściowych do jednej grupy kanałów należy kliknąć jedną z pięciu grup kanałów, co umożliwi jej edytowanie (GROUP 1–5 – GRUPY 1–5). Przycisk wybranej grupy zostanie wtedy wyróżniony kolorem żółtym. Kliknąć przyciski kanałów (CHANNEL 1–8/MASTER 1 + 2 – KANAŁY 1–8/MASTER 1 + 2), które mają zostać przypisane do wybranej wcześniej grupy kanałów. - Page 107 Elementy obsługi: 8 × wielofunkcyjny enkoder kanałów 1–8 (CH1–CH8), 1 × wielofunkcyjny enkoder Master, 1 × wielofunkcyjny enkoder Threshold, przycisk Reset Wskaźniki: 8 × wielofunkcyjnych wskaźników diodowych kanałów 1–8 (CH1–CH8), 1 × wielofunkcyjny wskaź- nik diodowy Master, 1 x wielofunkcyjny wskaźnik diodowy Threshold, 2 ×...
-
Page 108: Deklaracje Producenta
Funkcje EQ wyjść (modyfikacja piętnastopasmowy parametryczny (+/–15dB), Variable Q (zmienna funkcja Q) (0,3–20), zakres sygnału wyjściowego korektorem częstotliwości 20 Hz–20 kHz, konfigurowalny w krokach co 1 Hz. Copy EQ (kopiowanie ustawień dźwięku): korektora dźwięku), bypass (obejście), reset. Konfiguracja dynamiki wyjść: Threshold (próg) (–80 dB do +20 dB), Attack (atak) (1 ms–2 s), Release (powrót) (10 ms–2s), Ratio (proporcja) (kompresor 1:1–10:1, limiter), reset Maksymalna liczba aktywnych... -
Page 109: Italiano
Quest‘apparecchio è stato sviluppato e prodotto secondo elevati standard qualitativi che garantiscono un funzionamento regolare per molti anni. Per questo motivo LD Systems, con il suo nome e la pluriennale esperienza, rappresenta un‘azienda produttrice di prodotti audio di qualità. Leggete attentamente questo manuale d‘uso per utilizzare al meglio il vostro nuovo prodotto LD Systems. -
Page 110: Introduzione
INTRODUZIONE L’AM8 di LD Systems è un mixer a matrice automatico da 8x2 canali con ingressi bilanciati per microfono/linea, elaborazione del segnale da 96 kHz/24 bit e una risposta in frequenza di 20 Hz - 30 kHz. La funzione Priorità del mixer automatico AM8 può essere attivata per ogni ingresso separatamente;... - Page 111 CONTROLLI E INDICATORI CH 1 - CH 8 Manopole, pulsanti e indicatori LED con funzioni multiple. LED DISPLAYS MASTER 1 & 2 Indicatori di livello a 6 segmenti per i segnali di missaggio Master 1 e Master 2. CONTROLLI E INDICATORI MASTER Manopole, pulsanti e indicatori LED con funzioni multiple.
- Page 112 AES/EBU OUTPUT Collegamento della morsettiera per l’uscita del segnale di missaggio nel formato digitale AES/EBU (morsettiera fornita in dotazione, configu- razione dei pin come illustrato in figura). EXTERNAL CONTROL Il connettore D-Sub a 25 pin consente il controllo esterno tramite i canali di ingresso (CH). Sulle uscite da 1 8 è presente una corrente continua da 3,3 V per il controllo delle apparecchiature esterne non appena si attiva un canale.
-
Page 113: Funzionamento Manuale
FUNZIONAMENTO MANUALE PREAMPLIFICAZIONE INGRESSO CH 1 - CH 8 Manopola per l’impostazione della preamplificazione d’ingresso. Ruotando verso destra si aumenta la preamplificazione, verso sinistra si riduce (osservare l’indicatore LED n. 18). INDICATORE LED CH 1 - CH 8 Indicatore LED a 15 segmenti per la visualizzazione dell’impostazione della preamplificazione d’ingresso. PULSANTE CH 1 - CH 8 Sensibilità... - Page 114 VOLUME DI MISSAGGIO MASTER 1 + 2 Manopola per l’impostazione del volume di missaggio delle uscite di linea Master 1 e Master 2 (doppia funzione). Se l’indicatore LED 1 (n. 26) si accende in verde, con la manopola MASTER è possibile impostare il volume di missaggio dell’uscita di linea Master 1; se l’indica- tore LED 2 (n. 27) si accende in verde, si può...
- Page 115 LED DI STATO MASTER 1 e 2 LED rosso lampeggia Modo cambio disponibile LED MASTER 1 verde Impostazione volume Master 1 LED MASTER 2 verde Impostazione volume Master 2 LED DI STATO LINEA LED rosso lampeggia Modo cambio disponibile LED MASTER 1 verde e LED LINE verde Livello di linea Master 1 LED MASTER 2 verde e LED LINE verde Livello di linea Master 2...
-
Page 116: Messa In Funzione
LED DI STATO THRESHOLD AUTO / MANUALE LED rosso lampeggia Modo cambio disponibile LED AUTO / MANUAL verde impostazione automatica del valore soglia LED AUTO / MANUAL rosso impostazione manuale del valore soglia LED DI STATO MASTER Se si utilizza un solo mixer automatico AM8, deve essere configurato come unità master. Se si collegano a cascata fino a 16 mixer automa- tici AM8 tramite la porta LINK IN / LINK OUT che si trova sul lato posteriore dell’apparecchio (v. punto 14), l’apparecchio che deve fungere da master deve essere configurato come master. -
Page 117: Collegamento A Cascata
Collegamento a cascata A un sistema audio si possono collegare a cascata fino a 16 mixer automatici AM8 di LD Systems. Se si collegano a cascata i mixer automatici AM8 tramite la porta LINK IN / LINK OUT che si trova sul lato posteriore dell’apparecchio, l’AM8 che dovrà essere utilizzato come master deve essere configurato come unità... - Page 118 Installare il software AUTOMIX8 su un PC con sistema operativo Windows (Windows Vista, WIN 7, WIN 8, risoluzione dello schermo min.1.366 x 768) e collegare il mixer automatico AM8 alla porta Ethernet del computer utilizzando un cavo LAN (CAT-5). Poiché l’indirizzo IP del mixer automatico AM8 è...
-
Page 119: Finestra Principale Del Software
Al software è possibile collegare un solo mixer automatico. Per collegare al software un altro mixer automatico, fare clic su “MENU” e “DI- SCONNECT” (v. immagine) per disattivare il mixer attualmente connesso. Ora fare clic su “MENU” e “CONNECT” per stabilire una connessione tra il mixer automatico con un indirizzo IP diverso. - Page 120 CHANNELS Panoramica dei canali d’ingresso (CHANNEL 1 - 8) e delle uscite di linea (MASTER 1 e 2). Impostazioni dell’equalizzatore dei canali di ingresso e dei gruppi di canali (GROUP 1 - 5). MATRIX Instradamento dei canali d’ingresso (CHANNEL 1 - 8) nelle uscite di linea (MASTER 1 e 2). SYSTEM Impostazione del valore soglia per l’attivazione di un canale (THRESHOLD), del tempo di sospensione (HOLD TIME) e Gain Limits, del blocco degli elementi di comando (PANEL LOCK), della configurazione dell’apparecchio in modalità...
-
Page 121: Equalizzatore Canale 1 - 8 (Modifica Equalizzatore)
MASTER EQ MASTER 1 & 2 Pulsante per la visualizzazione degli equalizzatori parametrici a 15 bande dei canali di uscita Master 1 e 2 (un clic con il mouse). PHANTOM CHANNEL 1 - 8 Pulsanti di attivazione e visualizzazione dell’alimentazione phantom 48 V dei canali d’ingresso. Facendo clic sul pulsante “PHANTOM” si attiva e disattiva l’alimentazione phantom del canale corrispondente. - Page 122 CHANNELS 1 - 8 Pulsanti per la visualizzazione dell’equalizzatore parametrico a 5 bande dei canali di ingresso da 1 a 8. Fare clic sul pulsante del canale che interessa per eseguire le impostazioni dell’equalizzatore. Il pulsante cambia colore e diventa giallo. COPY EQ Copia le impostazioni equalizzatore da un canale all’altro.
-
Page 123: Equalizer Master 1 & 2
EQUALIZER MASTER 1 & 2 EQUALIZZATORE PARAMETRICO A 15 BANDE CON FILTRO PASSA BANDA E FATTORE Q VARIABILE BYPASS Fare clic su “BYPASS” per disattivare l’equalizzatore; fare clic di nuovo per riattivarlo (confronto del suono prima-dopo). Se l’equalizzatore è disattivato, il pulsante “BYPASS” diventa azzurro. RESET Per ripristinare i valori dell’equalizzatore, fare clic su “RESET”. -
Page 124: Master Limiter 1 & 2
MASTER LIMITER 1 & 2 Il limitatore consente di limitare i picchi di livello del segnale audio delle uscite di linea utilizzando le impostazioni dei seguenti parametri. THRESHOLD Impostazione del valore soglia da -80 dB a 19,9 dB e OFF (disattivato). Per inserire il valore desiderato è possibile utilizzare i tasti freccia o il punto raffigurato nel grafico, trascinandolo con il tasto del mouse. -
Page 125: Matrice Audio
MATRICE AUDIO Con la matrice audio del mixer automatico AM8, ciascuno degli 8 canali di ingresso (INPUTS 1 - 8) può essere instradato nelle due uscite di linea Master 1 e 2 (M1 e M2). Per selezionare quale canale di ingresso debba essere instradato in quale uscita di linea, basta un semplice clic sul pulsante corrispondente. - Page 126 MAX. OPEN CH Per impostare il numero massimo di canali d’ingresso attivabili contemporaneamente, fare clic sul menu dei numeri, selezionare il numero desiderato e fare clic su “OK”. Fare clic di nuovo su “OK” nella finestra che si apre. DEVICE IP L’indirizzo IP dell’apparecchio è...
-
Page 127: Menu
MENU OPEN FILE / SAVE FILE Salvataggio e caricamento delle impostazioni utente (SAVE FILE / OPEN FILE). Le impostazioni utente possono essere salvate direttamente sul computer e recuperate successivamente. Questi file di dati contengono tutte le impostazioni, relative ad esempio all’equalizzatore, al limitatore, all’instradamento, ai gruppi di canali ecc. -
Page 128: Dati Tecnici
Fare clic sui pulsanti delle funzioni condivise tra tutti i canali di un gruppo. I pulsanti delle rispettive funzioni sono gialli. Esempio: la funzione Mute è attivata per i canali d’ingresso da 1 a 3, riuniti nel gruppo 1 (GROUP 1). Se si silenzia il canale 1 del gruppo (MUTE), anche i canali 2 e 3 vengono silenziati automaticamente. -
Page 129: Dichiarazioni Del Produttore
Umidità dell'aria relativa: 10% - 70%, senza condensazione Peso: 2,58 kg Ingombro (L x H x P) 481 x 44 x 232 mm Altre caratteristiche: Cavo di rete e morsettiere inclusi, software gratuito AUTOMIX8 Software AUTOMIX8 per LDAM8 Compatibilità: Windows Vista, 7, 8 Porta necessaria: RS-485 / Ethernet Ingressi parametri:... - Page 132 WWW.LD-SYSTEMS.COM Adam Hall GmbH | Daimlerstrasse 9 | 61267 Neu-Anspach | Germany Tel. +49(0)6081/9419-0 | Fax +49(0)6081/9419-1000 web : www.adamhall.com | e-mail : mail@adamhall.com REV: 02...