Publicité

Les langues disponibles
  • FR

Les langues disponibles

Liens rapides

User Guide
English ( 3 – 14 )
Guía del usuario
Español ( 15 – 26 )
Guide d'utilisation
Français ( 27 – 38 )
Guida per l'uso
Italiano ( 39 – 50 )
Benutzerhandbuch
Deutsch ( 51 – 62 )
Appendix
English ( 63 )

Publicité

Table des Matières
loading

Sommaire des Matières pour Numark NS7II

  • Page 1 User Guide English ( 3 – 14 ) Guía del usuario Español ( 15 – 26 ) Guide d'utilisation Français ( 27 – 38 ) Guida per l'uso Italiano ( 39 – 50 ) Benutzerhandbuch Deutsch ( 51 – 62 ) Appendix English ( 63 )
  • Page 3: Quick Start

    Ensure unit has adequate air flow to all ventilation ports (especially if installed in a case). 2. Place the platter onto the NS7II by aligning the pins in the bottom of the platter with the holes in the NS7II's motor.
  • Page 4 • When ending a session, turn off (1) output devices, (2) NS7II, (3) input sources. 5. Connect the NS7II to your computer with the USB cable (included) and to your headphones. 6. Open Serato DJ and go! For more information on how to use Serato DJ with NS7II, visit serato.com/dj/support and select Numark NS7II.
  • Page 5: Top Panel

    Touch Mode: Press and hold this button to activate Touch Mode, which lets you access the touch-capacitive functions of NS7II's FX 1 Knob, FX 2 Knob, and FX 3 Knob. Press and hold Shift and then press this button to access the touch-capacitive functions of the same knobs as above plus the EQ Knobs (Channel Treble, Channel Mid, and Channel Bass).
  • Page 6 Mic 2 or Line (a device connected to the Mic 2 Input or Line Input on NS7II's rear panel). Please note that the Line/Phono selector switches on NS7II's rear panel must also be set properly. Also, a channel's controls will only send MIDI information when its Input Selector is set to PC.
  • Page 7 If the Deck is paused, you can press and hold the Cue Button to play the track from the Temporary Cue Point. Releasing the Cue Button will return the track to the Temporary Cue Point and pause it. To continue playback without returning to the Temporary Cue Point, press and hold the Cue Button, then press and hold the Play Button, and then release both buttons.
  • Page 8 26. Cues: This Pad Mode button switches the pads between two modes: Hot Cue Mode (red) and Hot Cue Auto-Loop Mode (orange). When the button is unlit, the first press will always select Hot Cue Mode. • Hot Cue Mode: Each pad assigns a Hot Cue Point or returns the track to that Hot Hot Cue 1 Hot Cue 2...
  • Page 9 28. Loop: This Pad Mode button switches the pads between two banks in Manual Loop Mode. When the button is unlit, the first press will always select the first bank. • Manual Loop Mode: Pads 1-4 (the top Manual Manual Manual Manual row) return the track to one of your...
  • Page 10 30. Slicer: This Pad Mode button switches the pads between two modes: Slicer Mode and Slicer Loop Mode. When the button is unlit, the first press will always select Slicer Mode. Important: Your track must have a set Beat Grid for Slicer Mode or Slicer Loop Mode to work.
  • Page 11 37. Takeover LEDs: When you select the other Deck with the Deck Select switch, the position of the NS7II's Pitch Fader may not match the Pitch setting for that Deck in the software. Slowly move the Pitch Fader in the direction indicated by the Takeover LED arrow until it turns off. At this point, the Pitch Fader matches the Pitch setting in the software and can control it again.
  • Page 12 Effects Controls 49. FX 1, FX 2, FX 3: These buttons have different functions on each Deck depending on the current FX Mode. • Single-FX Mode: FX 1 activates or deactivates the effect; FX 2 activates or deactivates the first effect parameter; FX 3 activates or deactivates the second effect parameter. Press and hold Shift and press FX 1 to select the desired effect.
  • Page 13: Front Panel

    Front Panel 9 10 11 Headphones (1/4" or 1/8"): Connect your 1/4" or 1/8" headphones to this output for cueing and mix monitoring. Headphone Volume: Adjusts the volume level of the headphone output. Split Cue: When this switch is in the On position, the headphone audio will be "split" such that all channels sent to Cue are mixed to mono and applied to the left headphone channel and the Program mix is mixed to mono and applied to the right channel.
  • Page 14: Rear Panel

    Rear Panel 4 5 6 Power In: Use the included power cable to connect NS7II to a power outlet. While the power is switched off, plug the cable into NS7II first, then plug the cable into a power outlet. Power Switch: Turns NS7II on and off. Turn on NS7II after all input devices have been connected and before you turn on amplifiers.
  • Page 15: Contenido De La Caja

    Para soporte adicional del producto, visite numark.com/support. Inicio rápido ANTES DE EMPEZAR: • Lea el Manual sobre la seguridad y garantía antes de usar el NS7II. • Asegúrese de que estén presentes todos los elementos enumerados en Contenido de la caja.
  • Page 16 4. Enchufe todos los dispositivos a las fuentes de alimentación y enciéndalos en el orden correcto: • Para iniciar la sesión, encienda (1) las fuentes de entrada, (2) el NS7II, (3) los dispositivos de salida. • Al terminar la sesión, invierta esta operación apagando (1) los dispositivos de salida, (2) el NS7II y (3) las fuentes de entrada.
  • Page 17: Características

    La bandeja A puede controlar las bandejas virtuales 1 ó 3. La bandeja B puede controlar las bandejas virtuales 2 ó 4. Indicador USB: Este LED se enciende cuando el NS7II se conecta exitosamente y se comunica con su computadora.
  • Page 18 Mic 2 (Micrófono 2) o Line (Línea) del panel trasero del NS7II). Tenga en cuenta que los interruptores selectores Line/Phono del panel trasero también se deben colocar correctamente. Asimismo, los controles de un canal solo envían información MIDI cuando su selector de entrada se coloca en PC.
  • Page 19 Durante la reproducción, puede pulsar el botón Cue para que la pista vuelva a este punto de cue temporal. (Si no estableció un punto de cue temporal, volverá al principio de la pista.) Si la bandeja está en pausa, puede mantener pulsado el botón Cue para reproducir la pista desde el punto de cue temporal.
  • Page 20 26. Cues: Este botón de modo de pad cambia los pads entre dos modos: Modo de Hot Cue (Cue rápido) (rojo) y loop automático con cue rápido (naranja). Cuando el botón está apagado, la primera pulsación selecciona siempre el modo de cue rápido. •...
  • Page 21 28. Fijación: Este botón de modo de pad cambia los pads entre dos bancos en modo de loop manual. Cuando el botón está apagado, la primera pulsación selecciona siempre el primer banco. • Modo de loop manual: Los pads 1-4 Loop Loop Loop...
  • Page 22 30. Cortador: Este botón de modo de pad cambia los pads entre dos modos: Cortador y loop del cortador. Cuando el botón está apagado, la primera pulsación selecciona siempre el modo cortador. Importante: Su pista debe tener configurada una grilla de bits para que los modos cortador o loop del cortador funcionen.
  • Page 23 38. LED de toma de control: Cuando usted selecciona la otra bandeja con el conmutador bandeja virtual, la posición del fader de pitch del NS7II puede no coincidir con el ajuste de pitch correspondiente a esa bandeja en el software. Mueva lentamente el fader de pitch en el sentido indicado con la flecha de los LED de toma de control hasta que se apague.
  • Page 24 Panel / Vista: Pulse este control para cambiar entre los paneles de grabación (Rec), Efectos (FX), y Muestreador (SP-6). Mantenga pulsado Shift y pulse este botón para cambiar entre los modos de visualización de software disponibles (es decir, Vertical, Horizontal, Extended (Extendido), Library (Biblioteca)).
  • Page 25: Panel Frontal

    Panel frontal 9 10 11 Auriculares (1/4" o 1/8"): Conecte sus auriculares de 1/4" o 1/8" a esta salida para búsqueda de punto inicial (cue) y monitoreo de la mezcla. Volumen de auriculares: Ajusta el nivel de volumen de la salida para auriculares. Split Cue: Cuando este interruptor está...
  • Page 26: Panel Trasero

    —la sensación de un giradiscos “clásico”. 13. Ventilador de enfriamiento: Mantenga el área frente a esta ventilación libre de obstáculos. El ventilador que está detrás de la ventilación enfría el NS7II, evitando el recalentamiento.
  • Page 27: Présentation

    2. Placez le plateau sur le NS7II en alignant les broches du fond du plateau avec les trous sur le moteur du NS7II. 3. Placez le tapis sur le plateau, puis placez le vinyle sur le tapis.
  • Page 28: Installez Les Pilotes Et Le Logiciel

    (2) le NS7II, puis (3) les sources d'entrée. 5. Branchez le NS7II à votre ordinateur à l'aide du câble USB fourni puis à votre casque d'écoute. 6. Il ne vous reste plus qu'à lancer l'application Serato DJ! Pour plus d'informations sur l'utilisation de Serato DJ avec le NS7II, visitez serato.com/dj/support et sélectionnez Numark NS7II.
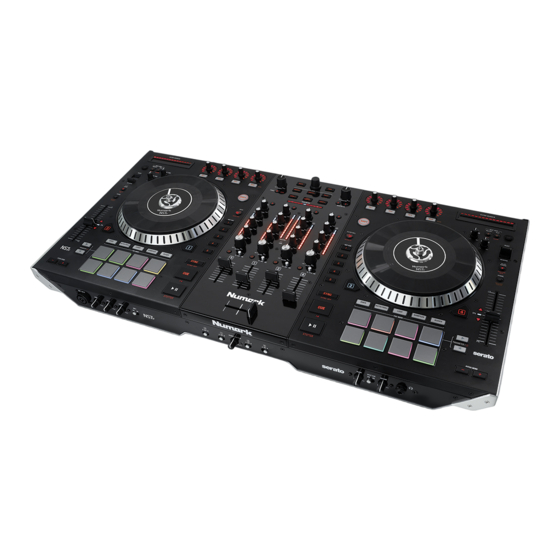
  • Page 29: Caractéristiques

    Mode Touch : Maintenez cette touche enfoncée pour activer le mode Touch, qui vous permet d’accéder aux fonctions tactiles capacitives des boutons FX 1, FX 2 et FX 3 du NS7II. Maintenez la touche Shift enfoncée puis appuyez sur cette touche pour accéder aux fonctions tactiles capacitives des touches mentionnées ci-dessus et des touches...
  • Page 30 Mic 2 ou Line (un appareil branché à l'entrée Mic 2 ou Line sur le panneau arrière du NS7II). Veuillez noter que les sélecteurs d’entrée Line/Phono sur le panneau arrière du NS7II doivent également être réglés correctement. Les commandes de canal envoient seulement de l’information MIDI lorsque son sélecteur...
  • Page 31 Pendant la lecture, vous pouvez appuyer sur la touche Cue afin de revenir à ce point de repère temporaire. (Si vous n'avez pas réglé de point de repère temporaire, la lecture reprendra au début de la piste.) Si le module est pausé, vous pouvez maintenir la touche Cue enfoncée afin de reprendre la lecture à...
  • Page 32 26. Cues : Cette touche permet de basculer les pads entre deux modes : Mode Hot Cue (rouge) et mode Hot Cue Auto-Loop (orange). Lorsque la touche est éteinte, appuyer une fois permet de sélectionner le mode Hot Cue. • Mode repérage rapide (Hot...
  • Page 33 28. Loop : Cette touche permet de basculer les pads entre les deux banques dans le mode de bouclage manuel. Lorsque la touche est éteinte, appuyer une fois permet de sélectionner la première banque. • Mode de bouclage manuel (Manual Loop Loop Loop...
  • Page 34 30. Slicer : Cette touche permet de basculer les pads entre deux modes : mode Slicer et le mode Loop Slicer. Lorsque la touche est éteinte, appuyer une fois permet de sélectionner le mode Slicer. Important : Une grille des battements (Beat Grid) pour la piste doit avoir été configurée pour que le mode Slicer ou le mode Loop Slicer fonctionne.
  • Page 35 38. LED Takeover : Lorsque vous sélectionnez l'autre module à l’aide du sélecteur Layer, il se peut que la position du pitch fader du NS7II ne corresponde plus au réglage pour ce module dans le logiciel. Déplacez lentement le pitch fader dans la direction indiquée par la flèche de la DEL Takeover jusqu’à...
  • Page 36 Panel/View : Appuyez sur cette touche pour faire défiler l'enregistrement (Rec), effets (FX) ou des panneaux de l'échantillonneur (SP-6). Appuyez sur cette touche pour parcourir les différents modes d’affichage du logiciel (p. ex., Vertical, Horizontal, Extended, Library). Commandes des effets FX 1, FX 2, FX 3 : Ces pads ont différentes fonctions selon le mode FX et le module sélectionné.
  • Page 37: Panneau Avant

    Panneau avant 9 10 11 Casque audio (6,35 mm ou 3,5 mm / ¼ ou 1/8 po) : Permet de brancher un casque d’écoute 6,35 mm (¼ po) ou 3,5 mm (1/8 po) pour la pré écoute. Volume casque audio : Ce bouton ajuste les niveaux de la sortie du casque d'écoute. Cue Mix / Split : En position On ceci permet de diviser le signal audio du casque d'écoute de façon à...
  • Page 38: Panneau Arrière

    Panneau arrière 4 5 6 Entrée courant : Utilisez le câble d’alimentation inclus pour brancher le NS7II dans une prise d’alimentation murale. Lorsque le NS7II est hors tension, branchez le câble d'alimentation dans le NS7II, puis dans la prise de courant.
  • Page 39: Contenuti Della Confezione

    Assicurarsi che l'apparecchio presenti un flusso d'aria adeguato a tutte le porte di ventilazione (soprattutto se installato in una valigia). 2. Collocare il piatto sull'NS7II allineando i perni a livello della parte inferiore del piatto con i fori nel motore dell'NS7II.
  • Page 40 • Al momento di concludere una sessione, invertire questa operazione spegnendo (1) dispositivi di uscita, (2) NS7II, (3) sorgenti d'ingresso. 5. Collegare l'NS7II al computer servendosi del cavo USB (incluso) e alle cuffie. 6. Aprire il software Serato DJ e partire! Per maggiori informazioni su come utilizzare il Serato DJ con l'NS7II, recarsi alla pagina serato.com/dj/support e selezionare Numark NS7II.
  • Page 41: Pannello Superiore

    Modalità Touch: tenere premuto questo tasto per attivare la modalità Touch, che consente di avere accesso alle funzioni tattili capacitive delle manopole FX 1, FX 2 e FX 3 dell'NS7II. Tenere premuto Shift e premere questo tasto per accedere alle funzioni tattili capacitive delle stesse manopole di cui sopra più...
  • Page 42 PC (una traccia che suona su quel livello nel software), Mic 2 o Linea (un dispositivo collegato all'ingresso Mic 2 o all'ingresso di linea a livello del pannello posteriore dell'NS7II). Nota bene: gli interruttori Line/Phono sul pannello posteriore dell'NS7II devono a loro volta essere configurati adeguatamente.
  • Page 43 Se il deck è in pausa, si può premere il tasto cue per riprodurre la traccia dal punto cue temporaneo. Lasciando la pressione, la traccia tornerà al punto cue temporaneo e la riproduzione verrà interrotta. Per continuare la riproduzione senza tornare al punto cue temporaneo, tenere premuto il tasto cue, quindi premere e tenere premuto il tasto play e rilasciare entrambi i tasti.
  • Page 44 26. Cue: questo tasto di modalità pad fa commutare i pad tra due modalità: modalità Hot Cue (rosso) e modalità Hot Cue Auto-Loop (arancione). Quando il tasto è spento, la prima pressione selezionerà sempre la modalità Hot Cue. • Modalità Cue: ciascun assegna un punto Hot Cue o fa tornare...
  • Page 45 28. Loop: questo tasto di modalità pad fa commutare i pad tra due banchi in modalità Loop Manuale. Quando il tasto è spento, la prima pressione selezionerà sempre il primo banco. • Modalità loop manuale: i pad 1-4 (riga Loop Loop Loop Loop...
  • Page 46 30. Slicer: questo tasto di modalità pad fa commutare i pad tra due modalità: modalità Slicer e modalità Slicer Loop. Quando il tasto è spento, la prima pressione selezionerà sempre la modalità Slicer. Importante: la traccia deve avere una Beat Grid affinché la modalità Slicer o la modalità Slicer Loop funzioni.
  • Page 47 38. LED di Takeover: Quando si seleziona il deck opposto servendosi del pulsante Layer, la posizione del fader del pitch del NS7II potrebbe non corrispondere all’impostazione del Pitch per quel Deck nel software. Muovere lentamente il fader del pitch nella direzione indicata dalla freccia del LED di Takeover fino a quando non si spegne.
  • Page 48 Panel / View: premere questo tasto per commutare tra i pannelli registrazione (Rec), Effetti (FX) e campionatore (SP-6). Tenere premuto Shift, quindi premere questo tasto per commutare tra le modalità di visualizzazione disponibili nel software (ad es., Verticale, Orizzontale, Estesa, Libreria). Comandi effeti FX 1, FX 2, FX 3: questi tasti hanno funzioni diverse su ciascun deck a seconda della modalità...
  • Page 49: Pannello Anteriore

    Pannello anteriore 9 10 11 Cuffie (1/4" o 1/8"): Collegare le cuffie da 1/4" o 1/8" a questa uscita per il monitoraggio del mix e il cueing. Volume cuffie: Regola il livello del volume dell’uscita cuffie. Split Cue: Quando questo interruttore è impostato su On, l'audio delle cuffie sarà "suddiviso" in modo che tutti i canali inviati a Cue vengano mixati a mono e applicati al canale cuffie di sinistra, e che il mix Program venga mixato a mono e applicato al canale destro.
  • Page 50: Pannello Posteriore

    NS7II ad una presa di alimentazione. Ad alimentazione spenta, collegare l’alimentazione elettrica innanzitutto nel NS7II, quindi ad una presa elettrica. Interruttore di alimentazione: Accende e spegne il NS7II. Accendere il mixer dopo aver collegato tutti i dispositivi d’ingresso e prima di accendere gli amplificatori. Spegnere gli amplificatori prima di spegnere il NS7II.
  • Page 51: Lieferumfang

    Gerät über Ventilationsschlitze gut belüftet wird (vor allem, falls dies in ein Gehäuse eingebaut wird). 2. Legen Sie die Plattenteller auf den NS7II auf, indem die Stifte unterhalb des Tellers auf die Löcher des Motors ausgerichtet werden. Schritt 4 3. Legen Sie zuerst die Vinylschutzmatte (Slipmat) auf den Plattenteller und danach darauf das Vinyl.
  • Page 52 • Bei Spielende diese Reihenfolge umkehren und (1) Ausgabegeräte, (2) NS7II und (3) Eingabequellen ausschalten. 5. Schließen Sie den NS7II an den Computer mit einem USB-Kabel (beigelegt) und an die Kopfhörer an. 6. Öffnen Sie die Serato DJ-Software und los geht's! Für weitere Informationen über die Verwendung on Serato DJ mit NS7II besuchen Sie serato.com/dj/support und wählen...
  • Page 53 Ebene: Wählt aus, welche Ebene in der Software vom Hardware-Deck gesteuert wird. Deck A kann Ebene 1 oder 3 steuern; Deck B kann Ebene 2 oder 4 steuern. USB-Anzeige: Diese LED gibt an, dass Ihr NS7II erfolgreich mit einem Computer verbunden wurde und mit ihm kommuniziert.
  • Page 54 Kanals ein: PC (ein Track, der auf diesem Deck in der Software abgespielt wird), Mic 2 oder Line (ein Gerät, das an den Line-Eingang oder Mic-Eingang auf der Rückseite des NS7II angeschlossen ist). Bitte beachten Sie, dass die Line/Phono-Wahlschalter auf der Rückseite des NS7II ebenfalls richtig eingestellt sein müssen. Außerdem senden die Kanal- Controller nur dann MIDI-Daten, wenn ihre Eingangswahlschalter auf PC eingestellt sind.
  • Page 55 Wenn das Deck pausiert wurde, können Sie die Cue-Taste gedrückt halten, um den Track ab dem temporären Cue-Punkt wiederzugeben. Wenn Sie die Cue-Taste loslassen, wird der Track am temporären Cue-Punkt pausiert. Um die Wiedergabe fortzusetzen ohne zum temporären Cue-Punkt zurückzuspringen, halten Sie erst die Cue-Taste und dann die Wiedergabe-Taste gedrückt und lassen Sie anschließend beide Tasten los.
  • Page 56 26. Cues: Mit dieser Pad-Modus-Taste kann zwischen zwei Pad-Modi gewechselt werden: Hot Cue-Modus (rot) und Hot Cue Autoloop-Modus (orange). Wenn die Taste nicht leuchtet, wird beim erstmaligen Drücken der Taste immer der Hot Cue-Modus ausgewählt. • Hot Cue-Modus: Jedes Pad weist einen Hot Cue-Punkt zu oder lässt den Hot Cue 1 Hot Cue 2...
  • Page 57 28. Loop: Mit dieser Pad-Modus-Taste können die Pads zwischen zwei Banken im manuellen Loop-Modus wechseln. Wenn die Taste nicht leuchtet, wird beim erstmaligen Drücken der Taste immer die erste Bank ausgewählt. • Manueller Loop-Modus: Mit den Pads Manueller Manueller Manueller Manueller 1-4 (obere Reihe) können Sie im Track Loop 1...
  • Page 58 Slicer: Mit dieser Pad-Modus-Taste kann zwischen zwei Pad-Modi gewechselt werden: Slicer-Modus und Slicer Loop-Modus. Wenn die Taste nicht leuchtet, wird beim erstmaligen Drücken der Taste immer der Slicer-Modus ausgewählt. Wichtig: Damit der Slicer-Modus und der Slicer Loop-Modus funktioniert, muss Ihr Track ein Beat- Grid eingestellt haben.
  • Page 59 Takeover LEDs: Wird das andere Deck mit dem Layer-Schalter gewählt, stimmt unter Umständen die Position des Pitch Faders des NS7II nicht mit der Tonhöheneinstellung des anderen Decks im Programm überein. Schieben Sie den Pitch Fader langsam in die vom Takeover LED angegebene Richtung, bis diese erlischt.
  • Page 60 Panel / Ansicht: Drücken Sie diese Taste, um zwischen den Feldern Aufnahme (Rec), Effekte (FX) und Sampler (SP-6) zu wechseln. Halten Sie die Umschalttaste gedrückt und drücken Sie diese Taste, um zwischen den verfügbaren Software-Anzeigemodi zu wechseln (z.B. Vertikal, Horizontal, Erweitert, Bibliothek).
  • Page 61 Vorderseite 9 10 11 Kopfhörer (6,35 mm oder 3,5 mm): Schließen Sie hier Ihren Kopfhörer mit 6,35 mm oder 3,5 mm Klinkenstecker an, um Signale vorzuhören und Cue Funktionen zu verwenden. Kopfhörervolume: Stellt die Lautstärke des Kopfhörerausgangs ein. Cue Mix / Split: Falls dieser Schalter auf On gesetzt ist, wird das Kopfhörersignal geteilt, so dass alle Kanäle, die zum Cue-Kanal senden, als Monosignal auf der linken Seite und das Mono Master Signal auf der rechten Seite gehört werden.
  • Page 62 Rückseite 4 5 6 Power Eingang: Verwenden Sie das beiliegende Netzteil, um den NS7 II mit einer Steckdose zu verbinden. Verbinden Sie, während das Gerät ausgeschaltet ist, das Netzteil zuerst mit dem NS7 II und stellen Sie anschließend die Verbindung zur Steckdose her. Power Schalter: Mit diesem Schalter können Sie den NS7 II einschalten, nachdem alle Kabelverbindungen vorgenommen wurden.
  • Page 63: Appendix (English)

    Trademarks and Licenses Numark, Akai Professional, MPC, and Strip Search are trademarks of inMusic Brands, Inc., registered in the U.S. and other countries. Serato, Serato DJ, and the Serato logo are registered trademarks of Serato Audio Research. Mac and OS X are trademarks of Apple Inc., registered in the U.S.
  • Page 64 Manual Version 1.3...

Table des Matières