Publicité

Les langues disponibles
  • FR

Les langues disponibles

Liens rapides

GÄRKELLER
GÄRKELLER PRO
Fermentierkessel
Conical Fermenter
Cuve de fermentation
Caldera de fermentación
Caldaia di fermentazione
10033674 10033675
www.klarstein.com

Publicité

Table des Matières
loading

Sommaire des Matières pour Klarstein Cuve de fermentation

  • Page 1 GÄRKELLER GÄRKELLER PRO Fermentierkessel Conical Fermenter Cuve de fermentation Caldera de fermentación Caldaia di fermentazione 10033674 10033675 www.klarstein.com...
  • Page 3: Hersteller & Importeur (Uk)

    Sehr geehrter Kunde, wir gratulieren Ihnen zum Erwerb Ihres Produkts. Lesen Sie die folgenden Hinweise sorgfältig durch und befolgen Sie diese, um möglichen Schäden vorzubeugen. Für Schäden, die durch Missachtung der Hinweise und unsachgemäßen Gebrauch entstehen, übernehmen wir keine Haftung. Scannen Sie den QR-Code, um Zugriff auf die aktuellste Bedienungsanleitung und weitere Informationen rund um das Produkt zu erhalten.
  • Page 4 MONTAGETEILE Bezeichnung Bild Anzahl Gärspund Gärspunddichtung Thermometer Thermometer- Dichtring Thermometer- Mutter M10 Ablaufventil Ventilmutter M12 Ablaufarm 1/2 " Ablassventil (nur 10033675) Standfüße (nur 10033675) Schraube M6 (nur 10033675) Mutter M6 (10033675)
  • Page 5 MONTAGEANLEITUNG Bitte stecken Sie das Thermometer in die Thermometerbohrung und ziehen Sie es mit einer Mutterschraube (M10) an. Die Bohrung befindet sich auf der Vorderseite des Fermenters (siehe Abbildung). Stecken Sie zuerst den Dichtring auf den Temperaturfühler. Stecken Sie das Ablaufventil in die entsprechende Bohrung. Ziehen Sie es mit einer Mutter (M12) an.
  • Page 6 FERMENTIERUNG Vorbereitung 1. Vor der Fermentation ist es unerlässlich, den Fermenter und das Zubehör zu sterilisieren. Sie können den Fermenter mit einem Desinfektionsmittel in Lebensmittelqualität reinigen oder den Fermenter für 20-30 Minuten in Wasser mit Sterilisationstabletten einweichen. 2. Bitte befüllen Sie den Kessel mit Wasser und vergewissern Sie sich, dass kein Leck vorhanden ist, bevor Sie die Würze hineingeben.
  • Page 7: Manufacturer & Importer (Uk)

    Dear Customer, Congratulations on purchasing this device. Please read the following instructions carefully and follow them to prevent possible damages. We assume no liability for damage caused by disregard of the instructions and improper use. Scan the QR code to get access to the latest user manual and more product information.
  • Page 8 ASSEMBLY PIECES Parts Picture Quantity Fermentation lock Fermentation lock seal Thermometer O ring (white) Thermometer M10 Drain valve + O ring (black) Valve nut M12 Racking arm 1/2 " dump valve (only 10033675) Detachable stand (only10033675) M6 screw (only 10033675) M6 nut (only10033675)
  • Page 9 ASSEMBLY Please insert the thermometer into the thermometer bore and tighten it with a nut screw (M10). This is located in front of the boiler, as shown. First, insert the sealing ring into the temperature sensor. Insert the drain valve into the corresponding hole. Tighten it with a nut (M12). This is located on the fermenting kettle on the arched part.
  • Page 10: Preparation

    FERMENTATION Preparation 1. Before fermentation, it is essential to sterilize the fermenter as well as its accessories. You can clean the fermenter with a food-grade disinfectant or soak the fermenter in water with sterilization tablets for 20-30 minutes. 2. Please fill the boiler up to the top with water and make sure that there are no leaks before adding the wort.
  • Page 11: Fabricant Et Importateur (Uk)

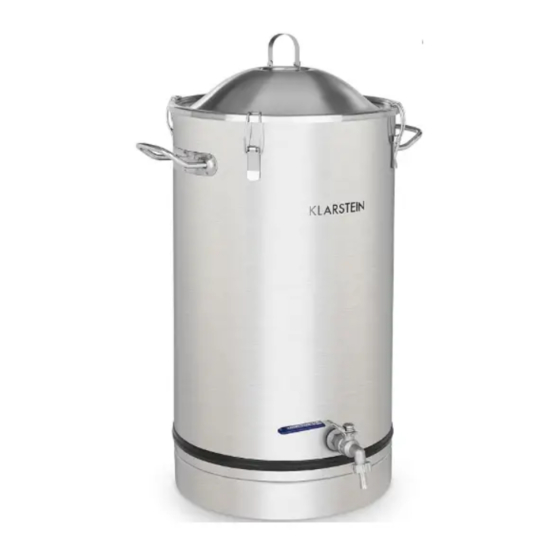
    Cuve de fermentation 10033675 Cuve de fermentation Pro Remarques • Suivez précisément les instructions pour l'assemblage de la cuve de fermentation. • Lisez attentivement toutes les instructions d’utilisation et conservez le mode d'emploi pour vous y référer ultérieurement. FABRICANT ET IMPORTATEUR (UK) Fabricant : Chal-Tec GmbH, Wallstraße 16, 10179 Berlin, Allemagne.
  • Page 12: Pièces D'assemblage

    PIÈCES D'ASSEMBLAGE N° Description Schéma Nombre Bonde de fermentation Joint de la bonde de fermentation Thermomètre Bague d'étanchéité du thermomètre Ecrou M10 du thermomètre Robinet de vidange Ecrou de robinet M12 Bras de vidange Robinet de vidange 1/2 " (10033675 uniquement) Pieds de support (10033675...
  • Page 13: Guide De Montage

    GUIDE DE MONTAGE Insérez le thermomètre dans son logement et serrez-le à l'aide d'un écrou (M10). Le trou est situé à l'avant de la cuve de fermentation (voir photo). Placez d'abord la bague d'étanchéité sur le capteur de température. Insérez le robinet de vidange dans le trou correspondant. Fixez-le avec un écrou (M12).
  • Page 14 6. Placez la cuve de fermentation sur une surface plane et stable. Après la fermentation 1. Nettoyez et stérilisez la cuve de fermentation et les accessoires (y compris les vannes) après utilisation. 2. N'utilisez pas d'outils métalliques tranchants pour retirer les débris. Utilisez un chiffon doux ou un tampon à...
  • Page 15: Fabricante E Importador (Reino Unido)

    Estimado cliente, Estimado cliente, le felicitamos por la compra de su producto. Lea atentamente las siguientes instrucciones y sígalas para evitar posibles daños. No asumimos ninguna responsabilidad por los daños que resulten del incumplimiento de las instrucciones y del uso inadecuado. Escanee el código QR para acceder a las instrucciones de uso más recientes y a más información sobre el producto.
  • Page 16: Piezas De Montaje

    PIEZAS DE MONTAJE Núm. Descripción Imagen Cantidad Tapón de fermentación Sello del tapón de fermentación Termómetro Anillo de sellado del termómetro Tuerca del termómetro M10 Válvula de vaciado Tuerca de válvula M12 Brazo de extracción 1/2 " Válvula de drenaje (sólo 10033675) Pies (sólo 10033675) Tornillo M6 (sólo...
  • Page 17: Instrucción De Montaje

    INSTRUCCIÓN DE MONTAJE Introduzca el termómetro en el orificio del termómetro y apriételo con un tornillo de tuerca (M10). El orificio se encuentra en la parte delantera del fermentador (ver ilustración). En primer lugar, coloque el anillo de sellado en el sensor de temperatura. Inserte la válvula de drenaje en el orificio correspondiente.
  • Page 18 FERMENTACIÓN Preparación 1. Antes de la fermentación, es esencial esterilizar el fermentador y los accesorios. Puede limpiar el fermentador con un desinfectante de grado alimenticio o remojar el fermentador en agua con pastillas de esterilización durante 20-30 minutos. 2. Por favor, llene el hervidor con agua y asegúrese de que no haya fugas antes de añadir el mosto.
  • Page 19: Produttore E Importatore (Uk)

    Gentile cliente, congratulazioni per l'acquisto di questo prodotto. Leggere attentamente le seguenti istruzioni e seguirle per evitare possibili danni. Non ci assumiamo alcuna responsabilità per danni causati dall'inosservanza delle istruzioni e da un uso improprio. Scansionare il codice QR per accedere alla guida utente più...
  • Page 20 PEZZI DI MONTAGGIO Num. Denominazione Immagine Quantità Tappo di fermentazione Guarnizione del tappo di fermentazione Termometro Anello di tenuta del termometro Dado M10 per la tenuta del termometro Valvola di drenaggio Dado M12 per la valvola Braccio di drenaggio Valvola di scarico da 1/2'' (solo 10033675) Basi di supporto...
  • Page 21: Istruzioni Di Montaggio

    ISTRUZIONI DI MONTAGGIO Inserire il termometro nel foro del termometro e serrarlo con un bullone con dado (M10). Il foro si trova sul lato anteriore del fermentatore (vedi immagine). Posizionare per primo l'anello di tenuta sul sensore di temperatura. Inserire la valvola di drenaggio nel foro corrispondente. Serrare con un dado (M12). La posizione del braccio di drenaggio può...
  • Page 22 FERMENTAZIONE Preparazione 1. Prima della fermentazione, è essenziale sterilizzare il fermentatore e i suoi accessori. È possibile pulire il fermentatore con un disinfettante alimentare o immergere il fermentatore in acqua con compresse sterilizzanti per 20-30 minuti. 2. Riempire d'acqua la caldaia e assicurarsi che non ci siano perdite prima di aggiungere il mosto di malto.

Ce manuel est également adapté pour:

Cuve de fermentation pro1003367410033675

Table des Matières