Intermatic DDT40 Manuel D'installation Et D'utilisation
Table des Matières
Les langues disponibles
Les langues disponibles
Liens rapides
Spring Grove, Illinois 60081
www.intermatic.com
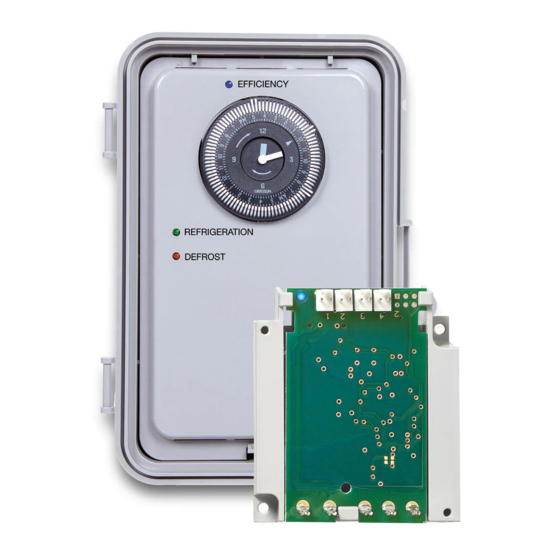
DDT40 Adaptive Defrost Control
Installation and Operation Manual
SAFETY SECTION
Risk of Fire or Electrical Shock
• Disconnect the power at the circuit breaker(s) or disconnect switch(es) before
installing or servicing.
• More than one circuit breaker or disconnect switch may be required to
de-energize the equipment before servicing.
• Installation and/or wiring must be in accordance with the national and local
electrical code requirements.
• For 40 A loads, use #8 AWG wire, for 30 A loads, use #10 AWG rated at least
90º C min. - Use COPPER conductors ONLY.
• Do not exceed maximum current carrying capacity.
• Bonding between conduit connections is not automatic and must be provided as
part of the installation.
• For outdoor locations or wet locations (rain-tight), conduit hubs that comply with
requirements of the UL514B (standard for fitting for conduit and outlet boxes) are
to be used.
• KEEP DOOR CLOSED AT ALL TIMES when not servicing.
• Replace the dead front after servicing or installation, if applicable.
PRODUCT DESCRIPTION
The DDT40 Commercial Refrigeration Control is integrated with ICUBE™ Adaptive Defrost sensing technology. This Adaptive
Defrost Control with ICUBE™ technology transforms a typical Grässlin™ DTAV40 Timer into an Adaptive Defrost Control
which has the ability to skip scheduled defrost events when they are not needed in order to save energy. There is absolutely
no change to the Grässlin™ Defrost Timer load wiring. For more details, see the wiring diagrams on page 7.
The thermistor probes can be installed up to 400 ft (122 m) away from the DDT40. Additionally, it can connect up to four
thermistor probes to a single DDT40 control in order to monitor multiple evaporator coils. To order additional thermistor probe
kits, use part number 178GR10K-1.
Used in electric or hot gas defrost applications where the defrost is terminated when the coil is frost free, as sensed by a
temperature or pressure switch, even though the defrost programmed termination time has not been reached. The time
termination functions as a fail-safe and will terminate the defrost if the temperature or pressure switch fails to do so. The
temperature or pressure switch on the refrigeration coil has contacts which close on a temperature or pressure rise above
freezing, indicating that frost and ice have melted from the coil. Typically a wide differential SPDT temperature switch is used
with it's normally closed contacts wired to the fans thereby delaying the fans from coming on until the coil temperature has
dropped back to below freezing.
WARNING
AVERTISSEMENT
Risque d'incendie ou de choc électrique
• Pour les charges de 40 A, utiliser du fil n° 8 AWG, pour les charges de 30 A,
utiliser n° 10 AWG classés 90° C minimum – Utiliser EXCLUSIVEMENT des
conducteurs en CUIVRE.
• La liaison entre les raccordements de conduits n'est pas automatique et doit être
prévue dans le cadre de l'installation.
• Rotate the timer dial clockwise only, rotating counter-clockwise will damage the
timer.
• Do not move the clock hands on the timer. Moving the clock hands manually may
damage the timer.
• The thermistor wire may be extended up to 400 ft (122 m) using field-supplied
wiring between the DDT40 control and the thermistor probe location.
• Use Intermatic model number DT-B for bracket mounting of the defrost controller
board.
NOTICE
Table des Matières

Manuels Connexes pour Intermatic DDT40


Sommaire des Matières pour Intermatic DDT40
-
Page 11: Panneau De Commande De Dégivrage Adaptatif Ddt40
Les sondes à thermistance peuvent être installées jusqu’à 122 m (400 pi) du panneau de commande DDT40. Par ailleurs, vous pouvez connecter jusqu’à quatre sondes à thermistance à un seul panneau de commande DDT40 afin de surveiller plusieurs serpentins d’évaporateur. Pour commander des trousses supplémentaires de sonde à thermistance, utiliser la référence 178GR10K-1. -
Page 12: Caractéristiques
• Un petit tournevis plat ou de type TORX nº 4-40 • Du ruban isolant, un collier de serrage ou des serre- • Une pince coupante câbles (éventuellement nécessaires) • Une pince à dénuder • Du câble de traction (éventuellement nécessaire) Panneau de commande de dégivrage adaptatif DDT40... -
Page 13: Montage Du Boîtier
7. Utiliser des raccords de calibre approprié pour FIG. 5 Boîtier l’installation. 8. Réinstaller la minuterie dans le boîtier. 9. L’écran isolant est remis en place par encliquetage une fois le câblage terminé. Pastille défonçable FIG. 6 Pastilles défonçables Panneau de commande de dégivrage adaptatif DDT40... -
Page 14: Installation De La Sonde À Thermistance
2. Raccorder le câble d’entrée au panneau de commande DDT40, comme illustré à la FIG. 7. Il est possible d’insérer le câble d’entrée dans l’un des quatre connecteurs du panneau de commande DDT40. -
Page 15: Sélection De Mode
Se reporter aux schémas de câblage 1 à 10 pour plus de détails. Remarque : Lorsque le mode « B » est sélectionné, le DDT40 fonctionne de la manière suivante : – Mode réfrigération : DEL rouge et verte éteintes (bornes 1 et 3, 2 et 4 ouvertes, bornes 1 et F fermées). - Page 16 Remarque : Il est nécessaire d’appliquer une tension entre les bornes 1 et N pour effectuer le test électrique. Remarque : Bien que le câblage soit équivalent, le panneau de commande DDT40 ne rentre pas dans un boîtier Paragon. Ce dernier doit être remplacé par le boîtier Grasslin fourni.
- Page 17 Mode A avec étiquette de bornier 8245 apposée ENTRÉE ALIMENTATION DE COMMANDE D’INTERRUPTION 8245 ÉTIQUETTE THERMOSTAT PRESSOSTAT MOTEUR DE DISPOSITIF DE COMPRESSEUR VENTILATEUR LIGNE CHAUFFAGE DE ÉLECTROVANNE DÉGIVRAGE OU BOBINE- CONTACTEUR Toutes les marques de commerce appartiennent à leurs propriétaires respectifs. Panneau de commande de dégivrage adaptatif DDT40...
-
Page 18: Remplacement De Minuteries De Dégivrage Existantes
Panneau de commande de dégivrage adaptatif DDT40... -
Page 19: Démarrage Du Système
Erreur au niveau du capteur à 10 secondes thermistance DEL rouge 1 à 4 clignotements/ Se produit uniquement au 10 secondes démarrage pour indiquer le nombre de capteurs connectés au panneau de commande TABLEAU 2 Tableau d’indication d’état des DEL FIG. 13 Panneau de commande de dégivrage adaptatif DDT40... -
Page 20: Fonctionnalité Du Panneau De Commande Ddt40
Cela correspond à la DEL bleue allumée en permanence. Si aucune sonde à thermistance n’a été fixée ou en cas de panne de la sonde, le module de commande DDT40 fonctionne uniquement à partir de la minuterie de dégivrage et ne passe pas en mode économique.