Dyna-Glo EG5000DGP Manuel De L'utilisateur Et Instructions D'utilisation
Table des Matières
Les langues disponibles
Les langues disponibles
Liens rapides
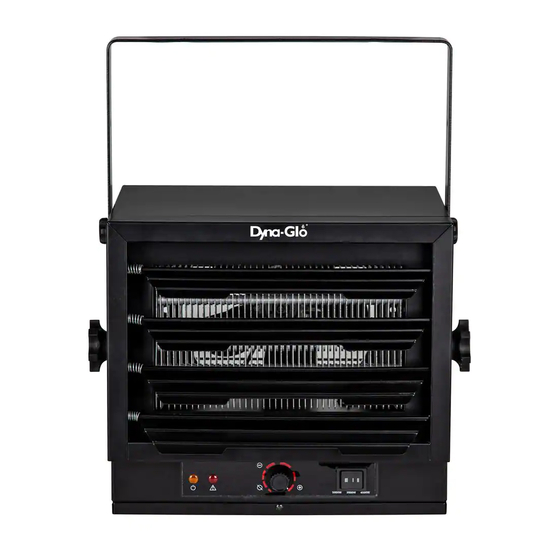
Heavy Electric Utility Heater
Model: EG5000DGP
"USER'S MANUAL AND
OPERATING INSTRUCTIONS"
MODEL: EG5000DGP
Before the first use of this heater, please read this USER'S MANUAL
very carefully. This USER'S MANUAL has been designed to instruct
you as to the proper manner in which to assemble, maintain, store,
and most importantly, how to operate the heater in a safe and efficient
manner. Please keep this manual for future reference.
CONSUMER : Retain this manual for future reference.
Questions, problems, missing parts? Before returning to your retailer, call our customer
service department at 877-447-4768 8:30 a.m. - 4:30 pm CST, Monday - Friday.
or email us at customerservice@ghpgroupinc.com
1
06/29/2018
Chapitres
Table des Matières

Manuels Connexes pour Dyna-Glo EG5000DGP


Sommaire des Matières pour Dyna-Glo EG5000DGP
-
Page 28: Radiateur Électrique Robuste À Usage Général Modèle: Eg5000Dgp
Radiateur électrique robuste à usage général Modèle: EG5000DGP GUIDE D’INSTRUCTION MODÈLE: EG5000DGP Avant d’utiliser cet appareil de chauffage pour la première fois, veuillez lire très attentivement ce GUIDE D’UTILISATION. Ce GUIDE D’UTILISATION vise à vous fournir la méthode appropriée pour as-sembler, entretenir, entreposer et, plus importante encore, pour utiliser l’appareil de chauffage de façon sûre et... -
Page 29: Instructions Importantes
INSTRUCTIONS IMPORTANTES Lors de l’utilisation d’un appareil électrique, les mesures de sécurité de base devraient toujours être respectées afin de réduire les risques d’incendie, de décharge électrique et de blessure. Les mesures suivantes en font partie: 1. Lisez toutes les instructions avant d’installer ou d’utiliser le radiateur. 2. -
Page 30: Description
TABLE DES MATIÈRES ARTICLE PAGE # PRÉCAUTIONS - GUIDE DE SÉCURITÉ ........1. DESCRIPTION ................2. CARACTÉRISTIQUES TECHNIQUES ........3. INFORMATIONS GÉNÉRALES RELATIVES À LA SÉCURITÉ 4. EMPLACEMENT DU RADIATEUR ........... 5. INSTALLATION ................. 6. INSTRUCTIONS DE FONCTIONNEMENT ......7. INSTRUCTIONS D’ENTRETIEN..........DESCRIPTION Ce chauffe-garage électrique est la solution de chauffage idéale pour votre garage, entrepôt ou atelier avec ses 3 réglages de chaleur, son montage au plafond pratique et peu... -
Page 31: Informations Générales Relatives À La Sécurité
INFORMATIONS GÉNÉRALES RELATIVES À LA SÉCURITÉ 6. Toute l’alimentation électrique doit être coupée et le panneau électrique principal doit être verrouillé avant d’exécuter une inspection, un nettoyage ou un entretien du radiateur. Cette précaution permet d’éviter des décharges électriques graves. 7. -
Page 32: Installation
EMPLACEMENT DU RADIATEUR Figure 3 INSTALLATION INSTALLATION DU SUPPORT Consultez les figures 4a et 4b. 1. Repérez une poutre en bois dans la solive de plafond. Si vous ne trouvez aucune poutre en bois, vous devez installer un morceau de bois au plafond afin de fixer solidement le radiateur. -
Page 33: Ajustement De La Direction De L'air
AJUSTEMENT DE LA DIRECTION DE L’AIR Figure 5 1. Si le radiateur a été fixé avec un seul tire-fond, comme illustré à la figure 4a, il est possible de le tourner horizontalement au besoin. Par contre, s’il a été installé avec deux tire-fonds, il ne peut être tourné... -
Page 34: Branchement De L'alimentation
BRANCHEMENT DE L’ALIMENTATION Thermostat du Thermostat radiateur externe Interrupteur de sélection (thermostat du radiateur, thermostat externe) Thermostat du radiateur 240AC or 208AC 60HZ 1000W 1000W Interrupteur de sélection Thermostat externe Interrupteur Station terminale 1000Wx3 LINE LOAD BLACK Relais de protection contre la surchauffe Si vous désirez utiliser un thermostat externe pour commander le Thermostat externe fonctionnement du radiateur, veuillez porter attention aux points suivants :... -
Page 35: Protection De L'élément Chauffant
BRANCHEMENT DE L’ALIMENTATION 3. Le thermostat externe doit respecter les normes UL ou CSA. 4. Les fils de connexion du thermostat externe doivent avoir un calibre d’au moins 14 AWG. PROTECTION DE L’ÉLÉMENT CHAUFFANT Pour démarrer le radiateur, tournez lentement le bouton de réglage de température en sens horaire : le ventilateur s’allumera d’abord, suivi de l’élément chauffant. - Page 36 BRANCHEMENT DE L’ALIMENTATION...
-
Page 37: Instructions De Fonctionnement
INSTRUCTIONS DE FONCTIONNEMENT AVERTISSEMENT Le radiateur doit être correctement installé avant d’être mis en fonction. Panneau de commande 5000W 3000W 4000W Indicateur d’alimentation Indicateur d’avertissement Thermostat Interrupteur (3000W (jaune) (rouge) 4000W 5000W) RÉGLAGE DU THERMOSTAT 1) Tournez le bouton du thermostat en sens horaire : le VOYANT DE FONCTIONNEMENT jaune s’allume. -
Page 38: Instructions D'entretien
INSTRUCTIONS D’ENTRETIEN ENTRETIEN ET NETTOYAGE 1. Avant de nettoyer le radiateur, veillez à couper l’alimentation sur le panneau à disjoncteurs et à laisser refroidir les éléments chauffants. 2. Pour maintenir l’apparence externe du radiateur, il suffit de l’épousseter à sec à l’occasion. - Page 39 GARANTIE GARANTIE LIMITÉE : Cette garantie limitée n’est offerte qu’à l’acheteur initial de cet appareil à air pulsé/appareil à convection/radiateur et assure qu’il sera exempt de défauts de matériaux et de fabrication pour une période d’un (1) an à partir de la date d’achat (seule la buse en cuivre du brûleur bénéficie d’une garantie à vie). À sa discrétion, GHP Group, Inc.
-
Page 40: Enregistrement De La Garantie
ENREGISTREMENT DE LA GARANTIE IMPORTANT : Nous vous invitons à remplir votre carte d’enregistrement de garantie dans les quatorze (14) jours suivant la date de votre achat. Vous pouvez également enregistrer votre garantie par Internet au www.ghpgroupinc.com. Veuillez entrer le numéro de série complet.