Table des Matières
Publicité
Les langues disponibles
Les langues disponibles
Liens rapides
Publicité
Chapitres
Table des Matières

Manuels Connexes pour AEG MSC2544S


Sommaire des Matières pour AEG MSC2544S
- Page 1 Gebruiksaanwijzing MSC2544S Magnetron User Manual Microwave Oven Notice d'utilisation Four à micro-ondes Benutzerinformation Mikrowellenofen Manual de instruções Forno microondas Manual de instrucciones Horno de microondas...
-
Page 2: Table Des Matières
12. MONTAGE ......................18 VOOR PERFECTE RESULTATEN Bedankt dat u voor dit AEG-product heeft gekozen. Dit apparaat is ontworpen om vele jaren uitstekend te presteren, met innovatieve technologieën die het leven gemakkelijker helpen maken met functies die gewone apparaten wellicht niet hebben. -
Page 3: Veiligheidsinformatie
NEDERLANDS VEILIGHEIDSINFORMATIE Lees zorgvuldig de meegeleverde instructies voor installatie en gebruik van het apparaat. De fabrikant is niet verantwoordelijk voor letsel en schade veroorzaakt door een foutieve installatie. Bewaar de instructies van het apparaat voor toekomstig gebruik. 1.1 Veiligheid van kinderen en kwetsbare mensen WAARSCHUWING! Gevaar voor verstikking, letsel of permanente invaliditeit. - Page 4 – kantoren of andere werkomgevingen Door gasten in hotels, motels, bed&breakfasts en – andere woonomgevingen Van binnen wordt het apparaat heet als het in werking • is. Raak de verwarmingselementen in het apparaat niet aan. Gebruik altijd ovenhandschoenen om accessoires of kookgerei te plaatsen of verwijderen.
- Page 5 NEDERLANDS slippers, sponzen, vochtige doekjes en dergelijke kan leiden tot letsel, zelfontbranding of brand. Als rook wordt waargenomen, zet dan het apparaat uit • of trek de stekker uit het stopcontact en houd de deur gesloten om vlammen te doven. Het in de magnetron opwarmen van dranken kan •...
-
Page 6: Veiligheidsvoorschriften
2. VEILIGHEIDSVOORSCHRIFTEN 2.1 Montage • Trek niet aan het netsnoer om het apparaat los te koppelen. Trek altijd WAARSCHUWING! aan de stekker. Alleen een erkende 2.3 Gebruik installatietechnicus mag het apparaat installeren. WAARSCHUWING! • Verwijder alle verpakkingsmaterialen. Gevaar op letsel, •... -
Page 7: Beschrijving Van Het Product
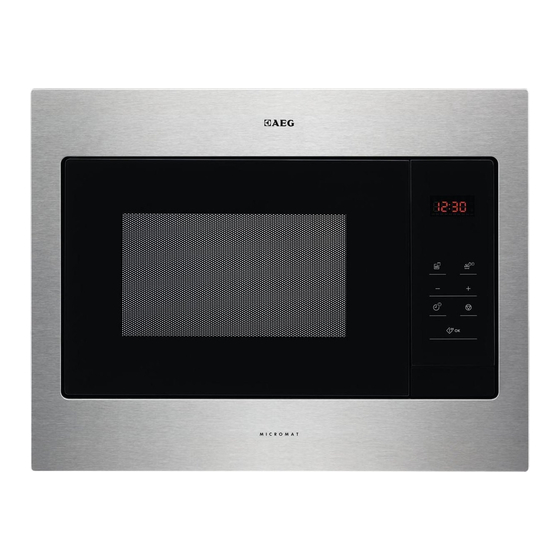
NEDERLANDS 2.5 Verwijdering • Haal de stekker uit het stopcontact. • Snij het netsnoer van het apparaat af WAARSCHUWING! en gooi dit weg. Gevaar voor letsel of verstikking. 3. BESCHRIJVING VAN HET PRODUCT 3.1 Algemeen overzicht Lampje Veiligheidvergrendelingssysteem Weergave Bedieningspaneel Deuropener Afdekking voor microgolfgeleider Grillen... -
Page 8: Accessoires
Symbool Functie Beschrijving Ontdooien Voedsel ontdooien op gewicht of tijd. Stop / Wissen Om het apparaat uit te schake- len of kookinstellingen te ver- wijderen. Klok Om de klok en de keukenwek- ker in te stellen. Start / +30 sec... -
Page 9: Dagelijks Gebruik
NEDERLANDS 2. Druk op de Instellingstoetsen om de Druk op om de uren in te stellen. instellingen te 3. Druk op om te bevestigen. annuleren. 4. Druk op de Instellingstoetsen om de minuten in te stellen. 5. Druk op om te bevestigen. 5. - Page 10 • U moet de op de verpakking verwijderen en plastic folie afgedrukte instructies van de fabrikant doorprikken). opvolgen (bijv. metalen afdekking Geschikt kookgerei en materialen Materiaal van de pannen Magnetron Grillen / Hete Ontdooien Verwar- Meer lucht mings- Ovenbestendig glas en porselein (zon- der metalen onderdelen, bijv.
- Page 11 NEDERLANDS 5.2 De magnetron aan- en Om de instelling van het uitzetten vermogen te controleren terwijl de magnetron in LET OP! werking in, drukt u op Stel de magnetron nooit in Gedurende 3 seconden werking als er geen voedsel wordt de tijd weergegeven. is geplaatst.
-
Page 12: Snelle Start
Druk op de Vermogeninstelling Functiemodus Functietoets 10 keer C – 4 Magnetron, grill, hete lucht Koken met hete lucht 11 – 20 keer 130 °C – 220 °C Koken met hete lucht bij vaste temperatuur 5.4 Snelle start 2. Druk op de Instellingstoetsen om de tijd of het gewicht in te stellen. -
Page 13: Automatische Programma's
NEDERLANDS 2. Druk op om te bevestigen. 6. Druk op om te bevestigen en de magnetron in te schakelen. 3. Druk weer in om de magnetron in te schakelen. 5.8 Grillen en U hoort een geluidssignaal als de combinatiekoken temperatuur is ingesteld en knippert op het display. -
Page 14: Gebruik Van De Accessoires
Menu Gewicht Menu Gewicht A - 9 150 g A - 10 50 g (voeg 450 ml water toe) 250 g Pastascho- 100 g (voeg 800 ml water 350 g toe) 450 g 150 g (voeg 1200 ml water... -
Page 15: Aanwijzingen En Tips
NEDERLANDS 8.2 Kookwekker 3. Druk op om te bevestigen. De Kookwekker stopt als u de deur U kunt maximaal 95 minuten instellen. opent of het apparaat pauzeert. Als u het koken voortzet gaat de Als de kookwekkerfunctie kookwekker terug naar de vorige actief is, kan er geen ander ingestelde tijd. -
Page 16: Onderhoud En Reiniging
Snijd de verse groente in stukken van Draai het voedsel halverwege de gelijke grootte. Alle groenten afgedekt ingestelde tijd om en ga verder. in de container koken. Er bestaan 4 modi voor Combikoken. Elke modus combineert de functies van 9.4 Opwarmen... - Page 17 NEDERLANDS 11.1 Wat moet u doen als… Probleem Mogelijke oorzaak Oplossing Het apparaat werkt Het apparaat is uitgeschakeld. Schakel het apparaat in. niet. Het apparaat werkt De stekker zit niet in het stop- Sluit het apparaat aan op het niet. contact.
-
Page 18: Montage
12. MONTAGE WAARSCHUWING! De fabrikant is niet Raadpleeg de hoofdstukken verantwoordelijk indien u Veiligheid. deze veiligheidsmaatregelen uit hoofdstuk 'Veiligheidsinformatie' niet 12.1 Algemene informatie opvolgt. LET OP! Deze magnetron wordt geleverd met Blokkeer de luchtopeningen een netsnoer en stekker. niet. Als u dat wel doet, kan... - Page 19 NEDERLANDS sjabloon en bevestig de beugel 4. Open de deur en bevestig de d.m.v. de schroeven op de magnetron aan de kast met een gemarkeerde plaats. schroef. Sla deze stap over als de kastdiepte 300 mm is. 3. De magnetron installeren. Als u de beugel bevestigd hebt, zorg er dan voor dat hij aan de achterkant van het apparaat vastzit.
-
Page 20: Customer Care And Service
12. INSTALLATION..................... 35 FOR PERFECT RESULTS Thank you for choosing this AEG product. We have created it to give you impeccable performance for many years, with innovative technologies that help make life simpler features you might not find on ordinary appliances. Please spend a few minutes reading to get the very best from it. -
Page 21: Safety Information
ENGLISH SAFETY INFORMATION Before the installation and use of the appliance, carefully read the supplied instructions. The manufacturer is not responsible if an incorrect installation and use causes injuries and damages. Always keep the instructions with the appliance for future reference. - Page 22 By clients in hotels, motels, bed and breakfast and – other residential type environments Internally the appliance becomes hot when in • operation. Do not touch the heating elements that are in the appliance. Always use oven gloves to remove or put in accessories or ovenware.
-
Page 23: Safety Instructions
ENGLISH The contents of feeding bottles and baby food jars • shall be stirred or shaken and the temperature checked before consumption, in order to avoid burns. Eggs in their shell and whole hard-boiled eggs should • not be heated in the appliance since they may explode, even after microwave heating has ended. -
Page 24: Electrical Connection
2.2 Electrical Connection • Do not use the appliance as a work surface and do not use the cavity for WARNING! storage purposes. Risk of fire and electrical 2.4 Care and Cleaning shock. • All electrical connections should be WARNING! made by a qualified electrician. -
Page 25: Product Description
ENGLISH 3. PRODUCT DESCRIPTION 3.1 General overview Lamp Safety interlock system Display Control panel Door opener Waveguide cover Grill Turntable shaft 3.2 Control Panel Symbol Function Description Display Shows the settings and current — time. Function pad To set the microwave / grill / convection / combi cooking. -
Page 26: Accessories
Symbol Function Description Clock To set the clock and Kitchen timer. Start / +30 sec To start the appliance or in- crease the cooking time for 30 seconds at full power. Setting pads To set the time, weight, tem- perature or Auto cooking func- tion. -
Page 27: Daily Use
ENGLISH 5. DAILY USE with small holes, e. g. on handles or WARNING! unglazed bottoms. Moisture going Refer to Safety chapters. into the holes can cause the cookware to crack when it is heated. 5.1 General information about • The glass cooking tray is a work space using the appliance for heating food or liquids. - Page 28 Cookware / Material Microwave Grilling / Convec- Defrosting Heating Cooking tion Non-ovenproof glass and porcelain Glass and glass ceramic made of oven- proof/frost-proof material (e. g. Arco- flam), grill shelf Ceramic , earthenware Heat-resistant plastic up to 200 °C...
-
Page 29: Quick Start
ENGLISH To deactivate the microwave: • press • wait until the microwave deactivates When the microwave automatically, when the time comes deactivates automatically, an to an end. acoustic signal sounds. • open the door. The microwave stops automatically. Close the door and press to continue to cook. -
Page 30: Multistage Cooking
6. Press Setting pads to set the cooking to activate the microwave at time. full power. 7. Press to confirm and activate 5.5 Defrosting the microwave. After each step an acoustic signal You can choose between 2 defrosting sounds. -
Page 31: Automatic Programmes
ENGLISH 6. AUTOMATIC PROGRAMMES WARNING! Menu Weight Refer to Safety chapters. A - 4 50 g 6.1 Auto cooking Popcorn 100 g Use this function to easily cook favourite A - 5 500 g food. The microwave automatically sets Chicken 750 g the optimum settings. -
Page 32: Additional Functions
8. ADDITIONAL FUNCTIONS 8.1 Child Safety Lock 1. Press 2. Press the Setting pads to set the The Child Safety Lock prevents an time. accidental operation of the microwave. 3. Press to confirm. Press and hold for 3 second. -
Page 33: Care And Cleaning
ENGLISH 9.4 Reheating To get better results for rice use a flat, wide dish. When you reheat packed ready meals always follow the instruction written on 9.2 Defrosting the packaging. Always defrost roast with the fat side 9.5 Grilling down. Do not defrost covered meat because Grill flat food items in the middle of the this may cause cooking instead of... -
Page 34: Service Data
11.1 What to do if... Problem Possible cause Remedy The appliance does The appliance is deactivated. Activate the appliance. not operate. The appliance does The appliance is not plugged in. Plug in the appliance. not operate. The appliance does The fuse in the fuse box is Check the fuse. -
Page 35: Installation
ENGLISH 12. INSTALLATION The cable has an earth wire with an WARNING! earthing plug. The plug must be Refer to Safety chapters. plugged into an outlet that is properly installed and earthed. In the event of an 12.1 General Information electrical short circuit, earthing reduces the risk of electric shock. -
Page 36: Environmental Concerns
4. Open the door and fix the microwave to the cabinet with screw. 3. Install the microwave. If you fixed the bracket, make sure it locks the back of the appliance. 13. ENVIRONMENTAL CONCERNS marked with the symbol with the Recycle the materials with the symbol household waste. -
Page 37: Service Après-Vente
12. INSTALLATION..................... 53 POUR DES RÉSULTATS PARFAITS Merci d'avoir choisi ce produit AEG. Nous l'avons conçu pour qu'il vous offre des performances irréprochables pour longtemps, en intégrant des technologies innovantes qui vous simplifient la vie grâce à des caractéristiques que vous ne trouverez pas forcément sur des appareils ordinaires. -
Page 38: Informations De Sécurité
INFORMATIONS DE SÉCURITÉ Avant d'installer et d'utiliser cet appareil, lisez soigneusement les instructions fournies. Le fabricant ne peut être tenu pour responsable des dommages et blessures liés à une mauvaise installation ou utilisation. Conservez toujours cette notice avec votre appareil pour vous y référer ultérieurement. -
Page 39: Consignes Générales De Sécurité
FRANÇAIS 1.2 Consignes générales de sécurité Cet appareil est conçu uniquement pour un usage • domestique et des utilisations telles que : bâtiments de ferme, cuisines réservées aux – employés dans les magasins, bureaux et autres lieux de travail ; pour une utilisation privée, par les clients, dans des –... - Page 40 Cet appareil est uniquement destiné à chauffer des • aliments et des boissons. L'utiliser pour sécher des aliments ou des vêtements, ou pour faire chauffer des compresses chauffantes, des chaussons, des éponges, des tissus humides ou autres pourrait provoquer des blessures ou un incendie.
-
Page 41: Consignes De Sécurité
FRANÇAIS Faites attention aux dimensions minimales du meuble • (le cas échéant). Reportez-vous au chapitre « Installation ». L'appareil doit être mis en marche avec la porte • décorative du meuble ouverte (si présente). 2. CONSIGNES DE SÉCURITÉ 2.1 Instructions d’installation électrique, assurez-vous qu'elle est reliée à... -
Page 42: Mise Au Rebut
• Nettoyez régulièrement l'appareil afin • Si vous utilisez un spray pour four, de maintenir le revêtement en bon suivez les consignes de sécurité état. figurant sur l'emballage. • Ne laissez pas les résidus alimentaires 2.5 Mise au rebut ou de produits nettoyants s'accumuler sur les joints de la porte. -
Page 43: Avant La Première Utilisation
FRANÇAIS Symbole Fonction Description — Affichage Affiche les réglages et l'heure. Touche de fonc- Pour régler la fonction micro- tion ondes / grill / convection / cuis- son combinée. Décongélation Pour décongeler des aliments selon le poids ou la durée. Arrêt / Annuler Pour éteindre l'appareil ou supprimer les réglages de cuis-... -
Page 44: Réglage De L'heure
• Retirez toutes les pièces et 1. Appuyez deux fois sur l'emballage supplémentaire du micro- 2. Pour régler les heures, appuyez sur ondes. les touches de réglage. • Nettoyez l'appareil avant de l'utiliser 3. Appuyez sur pour confirmer. pour la première fois. - Page 45 FRANÇAIS séparez puis retirez les morceaux • Vous pouvez utiliser une puissance de ayant commencé à décongeler. micro-ondes plus élevée pour cuire Décongélation de beurre, de les fruits et légumes sans les morceaux de gâteau, de fromage décongeler. • Ne décongelez pas ces aliments Plats préparés entièrement dans l'appareil mais •...
-
Page 46: Activation Et Désactivation Du Micro-Ondes
Ustensile de cuisine/matériaux Micro-ondes Gril / con- vection Dégivrer Résistan- Faites cuire Ustensiles de cuisine pour dorer, par exemple plat « Crisp » ou plateau « Crunch » Plats préparés et emballés 1) Sans couches/ornements en argent, or, platine ou métal 2) Sans composants en quartz ou en métal ou avec un revêtement contenant du métal... -
Page 47: Démarrage Rapide
FRANÇAIS Appuyez sur Réglage de la puissance Pourcentage de puissance approximatif la touche de fonction 5 fois P 10 10 % Autres fonctions Appuyez sur Réglage de la puissance Mode de fonctionnement la touche de fonction Gril 6 fois G – 1 Gril complet Cuisson combinée 7 fois... -
Page 48: Cuisson En Plusieurs Étapes
2. Pour régler la durée ou le poids, 1. Appuyez à plusieurs reprises sur appuyez sur les touches de réglage. pour sélectionner la Convection Pour la décongélation selon le poids, naturelle. la durée est automatiquement 2. Appuyez sur pour confirmer. -
Page 49: Utilisation Des Accessoires
FRANÇAIS 1. Appuyez à plusieurs reprises sur Menu Poids pour sélectionner le menu souhaité. 2. Appuyez sur pour confirmer. A - 6 150 g 3. Pour régler le poids, appuyez sur les Viande 300 g touches de réglage. 450 g 4. -
Page 50: Fonctions Supplémentaires
8. FONCTIONS SUPPLÉMENTAIRES 8.1 Sécurité enfants Lorsque la fonction Minuteur est activée, vous ne pouvez La fonction Sécurité enfants permet activer aucun autre d'éviter une utilisation involontaire du programme. micro-ondes. Maintenez la touche enfoncée 1. Appuyez sur pendant 3 secondes. -
Page 51: Entretien Et Nettoyage
FRANÇAIS Problème Solution Une fois la durée de cuisson écoulée, La prochaine fois, diminuez la puissance et allon- les aliments sont trop cuits sur les gez le temps. Remuez les liquides à la moitié du bords mais ne sont pas prêts au cen- temps, par exemple la soupe. -
Page 52: En Cas D'anomalie De Fonctionnement
• Utilisez un produit courant destiné au • Pour ramollir les résidus alimentaires nettoyage des surfaces en métal. secs, faites bouillir un verre d'eau à • Nettoyez l'intérieur de l'appareil pleine puissance de micro-ondes après chaque utilisation. Les salissures pendant 2 ou 3 minutes. -
Page 53: Données De Maintenance
FRANÇAIS Problème Cause probable Solution L'ensemble du pla- Il y a un objet ou de la salissure Nettoyez le dessous du plateau teau tournant émet sous le plateau de cuisson en de cuisson en verre. un grincement. verre. L'appareil s'arrête de Une anomalie de fonctionne- Si cette situation se reproduit, fonctionner sans rai-... -
Page 54: Installation Du Microondes
Le fabricant ne pourra être marques. tenu pour responsable si vous ne respectez pas les Ignorez cette étape si la précautions de sécurité du profondeur du meuble chapitre « Consignes de est inférieure à 300 mm. -
Page 55: En Matière De Protection De L'environnement
FRANÇAIS 13. EN MATIÈRE DE PROTECTION DE L'ENVIRONNEMENT Recyclez les matériaux portant le électroniques. Ne jetez pas les appareils portant le symbole avec les ordures symbole . Déposez les emballages ménagères. Emmenez un tel produit dans les conteneurs prévus à cet effet. dans votre centre local de recyclage ou Contribuez à... -
Page 56: Reparatur- Und Kundendienst
11. FEHLERSUCHE......................71 12. MONTAGE......................72 FÜR PERFEKTE ERGEBNISSE Danke, dass Sie sich für dieses AEG-Produkt entschieden haben. Wir haben es geschaffen, damit Sie viele Jahre von seiner ausgezeichneten Leistung und den innovativen Technologien, die Ihnen das Leben erleichtern, profitieren können. -
Page 57: Sicherheitshinweise
DEUTSCH SICHERHEITSHINWEISE Lesen Sie vor der Montage und dem Gebrauch des Geräts zuerst die Gebrauchsanleitung. Der Hersteller übernimmt keine Verantwortung für Verletzungen und Beschädigungen durch unsachgemäße Montage. Bewahren Sie die Gebrauchsanleitung griffbereit auf. 1.1 Sicherheit von Kindern und schutzbedürftigen Personen WARNUNG! Erstickungs- und Verletzungsgefahr sowie Gefahr einer dauerhaften Behinderung. -
Page 58: Allgemeine Sicherheit
1.2 Allgemeine Sicherheit Dieses Gerät ist für die Verwendung im Haushalt und • ähnliche Zwecke vorgesehen, wie z. B.: Bauernhöfe, Personalküchenbereiche in – Geschäften, Büros und anderen Arbeitsumfeldern Für Gäste in Hotels, Motels, Pensionen und – anderen wohnungsähnlichen Räumlichkeiten Der Geräteinnenraum wird während des Betriebs... - Page 59 DEUTSCH Wenn Sie Lebensmittel in Behältern aus Kunststoff • oder Papier erwärmen, beobachten Sie das Gerät aufmerksam, da die Möglichkeit einer Entflammung besteht. Das Gerät ist zum Erwärmen von Speisen und • Getränken vorgesehen. Das Trocknen von Kleidungsstücken und das Erwärmen von Wärmekissen, Hausschuhen, Schwämmen, feuchten Tüchern o.
-
Page 60: Sicherheitsanweisungen
Die Geräterückseite muss gegen die Wand gestellt • werden. Benutzen Sie keine scharfen Scheuermittel oder • Metallschwämmchen zum Reinigen der Glastür; sie könnten die Glasfläche verkratzen und zum Zersplittern der Scheibe führen. Achten Sie auf die Mindestabmessungen des •... -
Page 61: Entsorgung
DEUTSCH • Üben Sie keinen Druck auf die • Fett- oder Speisereste im Gerät geöffnete Gerätetür aus. können einen Brand verursachen. • Die Lüftungsöffnungen dürfen nicht • Reinigen Sie das Gerät mit einem abgedeckt werden. weichen, feuchten Tuch. Verwenden • Verwenden Sie das Gerät nicht als Sie ausschließlich Neutralreiniger Arbeitsfläche und den Garraum nicht Benutzen Sie keine Scheuermittel,... - Page 62 3.2 Bedienfeld Symbol Funktion Beschreibung Display Anzeige der Einstellungen und — der aktuellen Uhrzeit. Touchpad Funktio- Einstellen eines der Betriebs- modi Mikrowelle/Grill/Umluft/ Kombi-Garen. Auftauen Auftauen von Lebensmitteln nach Gewicht oder Zeit. Stopp/Löschen Ausschalten des Geräts oder Löschen der Gareinstellungen.
-
Page 63: Vor Der Ersten Inbetriebnahme
DEUTSCH Grillrost Verwendung: • Grillen • Kombi-Garen • Umluftgaren 4. VOR DER ERSTEN INBETRIEBNAHME zeigt das Display 0:00 an und es ertönt WARNUNG! ein akustisches Signal. Siehe Kapitel Sicherheitshinweise. Sie können die Uhrzeit im 24-Stunden-Format 4.1 Erste Reinigung einstellen. VORSICHT! 1. - Page 64 Garen mit einer Gabel mehrfach an, • Drehen Sie das Lebensmittel nach der damit sie nicht platzen. halben Auftauzeit um. Bereits • Verlängern Sie die Garzeit bei kalten angetaute Stücke nach Möglichkeit oder tiefgekühlten Lebensmitteln. teilen und herausnehmen. • Gerichte mit einer Soße müssen von Auftauen von Butter, Tortenstücken,...
- Page 65 DEUTSCH Kochgeschirr/Material Mikrowelle Grillen/ Umluft Auftauen Aufwär- Garen Frischhaltefolie Bratfolie mit mikrowellen-geeignetem Verschluss Bratgeschirr aus Metall, z. B. Emaille, Gusseisen Backformen, schwarz lackiert oder sili- konbeschichtet Backblech Bräunungsgeschirr, z. B. Crisp- oder Crunchplatte Fertiggerichte in Verpackungen 1) Ohne Beschichtung/Verzierung aus Silber, Gold, Platin oder Metall 2) Ohne Quarz- oder Metallteile oder metallhaltiger Glasur 3) Beachten Sie die Herstellerhinweise zu den Höchsttemperaturen.
- Page 66 Wenn die Mikrowelle automatisch ausgeschaltet wird, ertönt ein akustisches Signal. 5.3 Tabelle der Leistungsstufen Drücken Sie Leistungsstufe Ungefährer Prozentwert der Leistung die Funkti- onstaste 1 Mal P100 100 % 2 Mal P 80 80 % 3 Mal P 50...
- Page 67 DEUTSCH wiederholt, um eine Funktion oder Auftauen nach Gewicht Leistungsstufe einzustellen. sollte nicht für tiefgekühlte 5. Mit bestätigen. Fertiggerichte oder für 6. Drücken Sie die Touchpads Lebensmittel verwendet Einstellungen, um die Gardauer werden, die vor mehr als 20 einzustellen. Minuten aus dem Gefrierfach genommen 7.
-
Page 68: Automatikprogramme
2. Mit bestätigen. Nach Ablauf der Hälfte der 3. Drücken Sie die Touchpads Garzeit ertönt ein Signal. Sie Einstellungen, um die Zeit können die Speise dann einzustellen. wenden. 4. Drücken Sie , um Ihre Auswahl zu bestätigen und die Mikrowelle einzuschalten. -
Page 69: Zusatzfunktionen
DEUTSCH 7.1 Einsetzen des Drehteller- 7.2 Einsetzen des Grillrostes Sets Legen Sie den Grillrost auf das Drehteller-Set. VORSICHT! Lebensmittel nicht ohne das Drehteller-Set garen. Verwenden Sie ausschließlich das mit der Mikrowelle gelieferte Drehteller-Set. Lebensmittel niemals direkt auf dem Glasteller garen. 1. -
Page 70: Tipps Und Hinweise
9. TIPPS UND HINWEISE WARNUNG! Siehe Kapitel Sicherheitshinweise. 9.1 Tipps für die Mikrowelle Problem Abhilfe Sie finden keine Angaben für die vor- Orientieren Sie sich an einem ähnlichen Lebens- bereitete Speisemenge. mittel. Verlängern oder verkürzen Sie die Garzei- ten nach folgender Regel: Doppelte Menge = fast doppelte Zeit, Halbe Menge = halbe Zeit Die Speise wurde zu trocken. -
Page 71: Reinigung Und Pflege
DEUTSCH Für das Kombi-Garen stehen Ihnen 4 Die Mikrowellenfunktion bleibt Modi zur Verfügung. Jeder Modus ausgeschaltet. kombiniert die Mikrowellen-, Grill- und Umluftfunktion bei variierenden Garzeiten und Leistungsstufen. 9.7 Umluftgaren Die Zubereitung von Speisen kann wie in einem herkömmlichen Backofen erfolgen. 10. -
Page 72: Montage
Störung Mögliche Ursache Abhilfe Das Gerät funktio- Die Tür ist nicht richtig ge- Vergewissern Sie sich, dass die niert nicht. schlossen. Tür nicht blockiert ist. Die Beleuchtung Die Lampe ist defekt. Die Lampe muss ausgewechselt funktioniert nicht. werden. Im Display erscheint... -
Page 73: Allgemeine Informationen
DEUTSCH 12.1 Allgemeine Informationen Das Kabel besitzt einen Erdungsleiter mit einem Erdungsstecker. Der Stecker muss VORSICHT! in eine ordnungsgemäß montierte und Lüftungsöffnungen nicht geerdete Steckdose gesteckt werden. Im blockieren. Wenn Falle eines elektrischen Kurzschlusses Lüftungsöffnungen blockiert reduziert die Erdung die sind, kann sich das Gerät Stromschlaggefahr. - Page 74 4. Öffnen Sie die Tür und befestigen Sie die Mikrowelle mit einer Schraube am Schrank. 3. Setzen Sie die Mikrowelle ein. Wenn Sie den Winkel angebracht haben, achten Sie darauf, dass er die Geräterückseite festklemmt. 13. UMWELTTIPPS Recyceln Sie Materialien mit dem Symbol Geräte mit diesem Symbol...
- Page 75 11. RESOLUÇÃO DE PROBLEMAS................90 12. INSTALAÇÃO......................91 PARA RESULTADOS PERFEITOS Obrigado por escolher este produto AEG. Criámo-lo para lhe oferecer um desempenho impecável durante muitos anos, com tecnologias inovadoras que tornam a sua vida mais fácil – funcionalidades que poderá não encontrar em aparelhos comuns.
-
Page 76: Informação De Segurança
INFORMAÇÃO DE SEGURANÇA Leia atentamente as instruções fornecidas antes de instalar e utilizar o aparelho. O fabricante não é responsável por lesões ou danos resultantes de instalação e utilização incorrectas. Guarde sempre as instruções junto do aparelho para futura referência. - Page 77 PORTUGUÊS turismo rural; áreas de cozinha destinadas ao – pessoal em lojas, escritórios e outros ambientes de trabalho; utilização por clientes de hotéis, motéis e outros – ambientes do tipo residencial. O interior do aparelho fica quente durante o • funcionamento.
- Page 78 Se observar saída de fumo, desligue o aparelho ou • retire a ficha da tomada e mantenha a porta fechada para abafar possíveis chamas. O aquecimento de bebidas no microondas pode •...
-
Page 79: Instruções De Segurança
PORTUGUÊS 2. INSTRUÇÕES DE SEGURANÇA 2.1 Instalação substituir o cabo de alimentação se estiver danificado. AVISO! • Não puxe o cabo de alimentação A instalação deste aparelho para desligar o aparelho. Puxe só deve ser efectuada por sempre a ficha. uma pessoa qualificada. -
Page 80: Descrição Do Produto
2.5 Eliminação • Desligue o aparelho da alimentação eléctrica. AVISO! • Corte o cabo de alimentação eléctrica Risco de ferimentos ou e elimine-o. asfixia. 3. DESCRIÇÃO DO PRODUTO 3.1 Descrição geral Lâmpada Sistema de bloqueio de segurança Visor Painel de comandos... -
Page 81: Antes Da Primeira Utilização
PORTUGUÊS Símbolo Função Descrição Descongelar Para descongelar alimentos por peso ou tempo. Parar / Anular Para desactivar o aparelho ou cancelar as definições de coze- dura. Relógio Para acertar o relógio e o tem- porizador de cozinha. Iniciar / +30 seg. Para iniciar o aparelho ou au- mentar o tempo de cozedura em 30 segundos à... -
Page 82: Utilização Diária
1. Prima duas vezes. 5. Prima para confirmar. 2. Prima os botões de definição para Para cancelar a definir as horas. definição, prima 3. Prima para confirmar. 4. Prima os botões de definição para definir os minutos. 5. UTILIZAÇÃO DIÁRIA •... - Page 83 PORTUGUÊS Refeições pré-cozinhadas • Deve seguir as instruções do produtor • Pode preparar refeições prontas no impressas na embalagem (por aparelho apenas se as respectivas exemplo, retirar a cobertura metálica embalagens forem adequadas para e furar a película de plástico). microondas.
- Page 84 5.2 Activar e desactivar o Para verificar o nível de microondas potência com o microondas em funcionamento, prima CUIDADO! . A hora é apresentada Não permita que o durante 3 segundos. microondas funcione sem alimentos no interior. Para desactivar o microondas: •...
-
Page 85: Início Rápido
PORTUGUÊS Prima o bo- Regulação da potência Modo de função tão de função Cozedura por Convecção 11 – 20 vezes 130 °C – 220 °C Cozedura por convecção à temperatura se- leccionada 5.4 Início rápido 1. Prima uma vez para seleccionar a descongelação por peso ou duas O tempo de cozedura vezes para seleccionar a... -
Page 86: Programas Automáticos
5.7 Cozedura por Convecção não definir o tempo de cozedura dentro 5 minutos, ouvirá 5 sinais Para obter os melhores resultados, pré- sonoros e o microondas ficará em aqueça o microondas até à temperatura modo de espera. correcta antes de colocar os alimentos. -
Page 87: Utilizar Os Acessórios
PORTUGUÊS Menu Peso Menu Peso A - 8 150 g A - 10 50 g (adicione 450 ml de Legumes 350 g Massa água) 500 g 100 g (adicione 800 ml de água) A - 9 150 g 150 g (adicione 1200 ml de Peixe 250 g água) -
Page 88: Funções Adicionais
8. FUNÇÕES ADICIONAIS 8.1 Bloqueio de Segurança 1. Prima para Crianças 2. Prima os botões de definição para definir o tempo. O Bloqueio de Segurança para Crianças 3. Prima para confirmar. impede a activação acidental do O temporizador pára quando abrir a microondas. -
Page 89: Manutenção E Limpeza
PORTUGUÊS 9.4 Reaquecer Para obter os melhores resultados com arroz, utilize um recipiente plano e largo. Quando reaquecer refeições prontas embaladas, siga sempre as instruções da 9.2 Descongelar embalagem. Descongele a carne sempre com a parte 9.5 Grelhador da gordura virada para baixo. Não descongele a carne tapada porque Grelhar alimentos planos no centro da isso pode fazer com que coza em vez de... -
Page 90: Resolução De Problemas
11. RESOLUÇÃO DE PROBLEMAS AVISO! Consulte os capítulos relativos à segurança. 11.1 O que fazer se… Problema Causa possível Solução O aparelho não fun- O aparelho está desactivado. Active o aparelho. ciona. O aparelho não fun- A ficha do aparelho não está li- Ligue a ficha do aparelho. -
Page 91: Instalação
PORTUGUÊS Recomendamos que anote os dados aqui: Modelo (MOD.) ........Número do produto (PNC) ........Número de série (S.N.) ........12. INSTALAÇÃO 12.2 Instalação eléctrica AVISO! Consulte os capítulos AVISO! relativos à segurança. A instalação eléctrica só deve ser efectuada por uma 12.1 Informações gerais pessoa qualificada. - Page 92 3. Instale o microondas. Se tiver fixado o suporte, certifique-se de que ele fixa a parte de trás do aparelho. Distâncias de instalação Dimensão 4. Abra a porta e fixe o microondas no 450 + 2 móvel com o parafuso.
-
Page 93: Preocupações Ambientais
PORTUGUÊS 13. PREOCUPAÇÕES AMBIENTAIS Recicle os materiais que apresentem o símbolo juntamente com os resíduos domésticos. Coloque o produto num símbolo . Coloque a embalagem nos ponto de recolha para reciclagem local contentores indicados para reciclagem. ou contacte as suas autoridades Ajude a proteger o ambiente e a saúde municipais. - Page 94 11. SOLUCIÓN DE PROBLEMAS................109 12. INSTALACIÓN.....................110 PARA OBTENER RESULTADOS PERFECTOS Gracias por escoger este producto AEG. Este artículo ha sido creado para ofrecer un rendimiento impecable durante muchos años, con innovadoras tecnologías que facilitarán su vida y prestaciones que probablemente no encuentre en electrodomésticos corrientes.
-
Page 95: Información Sobre Seguridad
ESPAÑOL INFORMACIÓN SOBRE SEGURIDAD Antes de instalar y utilizar el aparato, lea atentamente las instrucciones facilitadas. El fabricante no se hace responsable de los daños y lesiones causados por una instalación y uso incorrectos. Guarde siempre las instrucciones junto con el aparato para futuras consultas. -
Page 96: Seguridad General
1.2 Seguridad general Este aparato está concebido para utilizarse en • aplicaciones domésticas y similares, tales como: Granjas; áreas de cocina para el personal en – tiendas, oficinas y otros entornos de trabajo; Por clientes en hoteles, moteles, pensiones y otros –... - Page 97 ESPAÑOL o similares puede conllevar riesgo de lesiones o incendios. Si se genera humo, apague o desenchufe el horno y • deje la puerta cerrada para sofocar las posibles llamas. Las bebidas que se calientan en el microondas • pueden romper a hervir bruscamente en contacto con el aire;...
-
Page 98: Instrucciones De Seguridad
2. INSTRUCCIONES DE SEGURIDAD 2.1 Instalación • No desconecte el aparato tirando del cable de conexión a la red. Tire ADVERTENCIA! siempre del enchufe. Solo un electricista 2.3 Uso cualificado puede instalar este aparato. ADVERTENCIA! • Retire todo el embalaje. -
Page 99: Descripción Del Producto
ESPAÑOL 2.5 Desecho • Desconecte el aparato de la red. • Corte el cable de conexión a la red y ADVERTENCIA! deséchelo. Existe riesgo de lesiones o asfixia. 3. DESCRIPCIÓN DEL PRODUCTO 3.1 Descripción general Bombilla Sistema de bloqueo de seguridad Pantalla Panel de control Abridor de la puerta... -
Page 100: Antes Del Primer Uso
Símbolo Función Descripción Descongelar Para descongelar alimentos por peso o por tiempo. Parada / Borrar Para desactivar el aparato o eli- minar los ajustes de cocción. Reloj Para programar el reloj y el temporizador de cocina. Inicio / +30 seg Para iniciar el aparato o au- mentar el tiempo de cocción... -
Page 101: Uso Diario
ESPAÑOL 2. Pulse los teclados de ajuste para 5. Pulse para confirmar. ajustar las horas. Para cancelar los ajustes, 3. Pulse para confirmar. pulse 4. Pulse los teclados de ajuste para ajustar los minutos. 5. USO DIARIO • No utilice recipientes de porcelana, ADVERTENCIA! cerámica o barro cocido que tengan Consulte los capítulos sobre... - Page 102 Recipientes y materiales adecuados Material/recipiente Microondas Grill / Convec- Desconge- Calentar Cocción ción Vidrio y porcelana para horno (sin com- ponentes de metal, p. ej., Pyrex, vidrio térmico)
- Page 103 ESPAÑOL 5.2 Activación y desactivación Para comprobar el ajuste de del microondas. potencia mientras funciona el microondas, pulse PRECAUCIÓN! Aparece la hora durante 3 No deje funcionar el segundos. microondas sin alimentos en el interior. Para desactivar el microondas: • esperar hasta que el microondas se 1.
- Page 104 Pulse la tecla Ajuste de potencia Modo de funcionamiento de Función Cocción con convección 11 – 20 veces 130 °C – 220 °C Cocción con convección a la temperatura ajustada 5.4 Inicio rápido 1. Pulse una vez para ajustar el peso de descongelación y dos veces...
-
Page 105: Programas Automáticos
ESPAÑOL temperatura adecuada antes de suenan 5 señales acústicas y el introducir el alimento. microondas pasa al modo de espera. 6. Pulse para confirmar y activar el 1. Pulse repetidamente para ajustar microondas. la función de cocción con convección. 5.8 Cocción grill y combinada 2. -
Page 106: Uso De Los Accesorios
Menú Peso Menú Peso A - 8 150 g A - 10 50 g (añada 450 ml de agua) Verduras 350 g Pasta 100 g (añada 800 ml de 500 g agua) 150 g (añada 1.200 ml de A - 9... -
Page 107: Funciones Adicionales
ESPAÑOL 8. FUNCIONES ADICIONALES 8.1 Bloqueo de seguridad para Mientras está activo el niños temporizador de la cocina, no puede ajustarse ningún El Bloqueo de seguridad para niños otro programa. impide que el microondas se utilice accidentalmente. 1. Pulse 2. Pulse los teclados de ajuste para Mantenga pulsado durante 3 ajustar la hora. -
Page 108: Cocción Combinada
9.3 Cocinar Dé la vuelta al alimento a la mitad del tiempo establecido y continúe el asado. Saque siempre la carne y las aves frías del frigorífico al menos 30 minutos antes 9.6 Cocción combinada de cocinarlos. Utilice la Cocción combinada para... -
Page 109: Solución De Problemas
ESPAÑOL 11. SOLUCIÓN DE PROBLEMAS ADVERTENCIA! Consulte los capítulos sobre seguridad. 11.1 Qué hacer si... Problema Posible causa Solución El aparato no funcio- El horno está apagado. Encienda el horno. El aparato no funcio- El aparato no está enchufado. Enchufe el aparato. El aparato no funcio- Se ha fundido un fusible de la Revise el fusible. -
Page 110: Instalación
Es conveniente que anote los datos aquí: Modelo (MOD.) ........Número de producto (PNC) ........Número de serie (S.N.) ........12. INSTALACIÓN 12.2 Instalación eléctrica ADVERTENCIA! Consulte los capítulos sobre ADVERTENCIA! seguridad. Deje la instalación eléctrica en manos de un profesional 12.1 Información general... - Page 111 ESPAÑOL 3. Coloque el microondas. Si ha fijado la abrazadera, asegúrese de que bloquea la parte posterior del aparato. Distancias de instalación Medidas 450 + 2 4. Abra la puerta y sujete el microondas al armario con un tornillo. 560 + 8 2.
-
Page 112: Aspectos Medioambientales
13. ASPECTOS MEDIOAMBIENTALES electrónicos. No deseche los aparatos Recicle los materiales con el símbolo marcados con el símbolo junto con los Coloque el material de embalaje en los residuos domésticos. Lleve el producto a contenedores adecuados para su su centro de reciclaje local o póngase en reciclaje. - Page 113 ESPAÑOL...
- Page 114 www.aeg.com...
- Page 115 ESPAÑOL...
- Page 116 www.aeg.com/shop...