Publicité

Les langues disponibles
  • FR

Les langues disponibles

Liens rapides

WELL AIR FRY
Heißluftfritteuse
Hot Air Fryer
Freidora de aire caliente
Friteuse à air chaud
Friggitrice ad aria calda
10031968 10031969
www.klarstein.com

Publicité

Chapitres

Table des Matières
loading

Sommaire des Matières pour Klarstein WELL AIR FRY

  • Page 1 WELL AIR FRY Heißluftfritteuse Hot Air Fryer Freidora de aire caliente Friteuse à air chaud Friggitrice ad aria calda 10031968 10031969 www.klarstein.com...
  • Page 3: Table Des Matières

    Sehr geehrter Kunde, wir gratulieren Ihnen zum Erwerb Ihres Gerätes. Lesen Sie die folgenden Hinweise sorgfältig durch und befolgen Sie diese, um möglichen Schäden vorzubeugen. Für Schäden, die durch Missachtung der Hinweise und unsachgemäßen Gebrauch entstehen, übernehmen wir keine Haftung. Scannen Sie den folgenden QR-Code, um Zugriff auf die aktuellste Bedienungsanleitung und weitere Informationen rund um das Produkt zu erhalten.
  • Page 4: Sicherheitshinweise

    SICHERHEITSHINWEISE • Tauchen Sie das Gehäuse und die Heizelemente mit den elektronischen Teilen nicht in Wasser und spülen Sie sie nicht unter einem Wasserhahn ab. • Geben Sie das Frittiergut immer in den Korb, damit es nicht mit den Heizelemenen in Kontakt kommt.
  • Page 5 Warten Sie bis die Rauchentwicklung aufhört, bevor Sie die Pfanne aus dem Gerät entfernen. • Das Gerät auf eine waagerechte, ebene und stabile Fläche stellen. • Dieses Gerät ist nur für den normalen Hausgebrauch bestimmt. Es ist nicht für den Einsatz in Umgebungen wie Personalküchen von Geschäften, Büros, Bauernhöfen oder anderen Arbeitsumgebungen gedacht.
  • Page 6: Geräteübersicht

    GERÄTEÜBERSICHT Heizlampe Ein/Aus-Lampe Timer/ Temperaturregler Leistungsstufen- regler Korb-Griff...
  • Page 7: Betrieb

    BETRIEB Vor der ersten Benutzung 1. Entfernen Sie das Verpackungsmaterial. 2. Entfernen Sie vom Gerät Aufkleber und Schilder. 3. Reinigen Sie den Korb und den Topf vollständig mit heißem Wasser und etwas Spülmittel und einem nicht scheuernden Schwamm. 4. Das Gerät innen und außen mit einem feuchten Tuch reinigen. Die Heißluftfritteuse funktioniert mit heißer Luft.
  • Page 8 drehen Sie den Zeitregler auf über 3 Minuten und warten, bis die Heizlampe ausgeht (nach ca. 3 Minuten). Befüllen Sie dann den Korb und drehen die den Zeitregler in die gewünschte Stellung. a. Die Betriebslampe und die Heizlampe gehen an. b.
  • Page 9 Tipp: Um große oder zerbrechliche Zutaten herauszunehmen, benutzen Sie Zangen. 13. Wenn eine Portion fertig ist, ist die Heißluftfritteuse für eine weitere Fuhre fertig. Einstellungen Die Tabelle weiter unten ist eine Hilfe für die wesentlichen Einstellungen. Hinweis: Beachten Sie, dass diese Einstellungen Richtwerte sind. Zutaten unterscheiden sich in Herkunft, Größe, Form und Erzeuger.
  • Page 10 Gargut Min Max Zeit Temp Sonstige Infos (Gramm) (Min) (°C) Kartoffeln&Frites Dünne Tiefkühlfritten 300-700 9-16 schütteln Dicke Tiefekühlfritten 300-700 1 1-20 schütteln Selbstgem. Fritten 300-800 16-10 + 1/2 Teel. Öl; schütteln Kartoffelecken 300-800 18-22 + 1/2 Teel. Öl; shake Kartoffelwürfel 300-750 12-18 + 1/2 Teel.
  • Page 11: Wartung

    Selbstgemachte Pommes frites Zum Herstellen selbstgemachter Pommes frites nachfolgende Schritte befolgen 1. Kartoffeln schälen und in Stifte schneiden. 2. Die Kartoffelstifte gründlich waschen und mit einem Küchentuch trocknen. 3. Einen halben Teelöffel Olivenöl und die Kartoffelstifte in eine Schüssel geben. Mischen, bis die Kartoffelstifte mit Öl benetzt sind.
  • Page 12: Fehlerbehebung

    FEHLERBEHEBUNG Problem Ursache Lösung Das Gerät Der Netzstecker ist nicht Schließen Sie den Netzstecker funktioniert nicht. eingesteckt. an eine Steckdose an. Der Timer ist nicht Drehen Sie den Zeitregler auf eingestellt. die benötigte Garzeit. Der Topf wurde nicht Setzen Sie den Topf richtig in korrekt in das Gerät das Gerät ein.
  • Page 13 Problem Ursache Lösung Wenn Sie fettreiche Zutaten zubereiten, gelangt eine große Menge Öl in den Topf. Das Öl verursacht weißen Rauch Das Gargut ist fettig. und der Topf kann heißer werden als gewöhnlich. Dies beeinträchtigt nicht das Gerät Weißer Rauch tritt oder das Frittierergebnis.
  • Page 14: Hinweise Zur Entsorgung

    Rost Topf HINWEISE ZUR ENTSORGUNG Wenn es in Ihrem Land eine gesetzliche Regelung zur Entsorgung von elektrischen und elektronischen Geräten gibt, weist dieses Symbol auf dem Produkt oder auf der Verpackung darauf hin, dass dieses Produkt nicht im Hausmüll entsorgt werden darf. Stattdessen muss es zu einer Sammelstelle für das Recycling von elektrischen und elektronischen Geräten gebracht werden.
  • Page 15: Technical Data

    Dear Customer, Congratulations on purchasing this device. Please read the following instructions carefully and follow them to prevent possible damages. We assume no liability for damage caused by disregard of the instructions and improper use. Scan the QR code to get access to the latest user manual and more product information.
  • Page 16 • Never immerse the housing, which contains electrical components and the heating elements, in water nor rinse under the tap. • Do not let any water or other liquid enter the appliance to prevent electric shock. • lways put the ingredients to be fried in the basket, to prevent it from coming into contact with the heating elements.
  • Page 17: Overheating Protection

    • This appliance is intended for normal household use only. It is not intended for use in environments such as staff kitchens of shops, offices, farms or other work environments. Nor is it intended to be used by clients in hotels, motels, bed and breakfasts and other residential environments.
  • Page 18: Product Overview

    PRODUCT OVERVIEW Heat up light Power on light Timer/ Temperature Power knob control knob Basket handle...
  • Page 19 OPERATION Before first use 1. Remove all packaging material. 2. Remove any stickers or labels from the appliance. 3. Thoroughly clean the basket and pan with hot water, some washing-up liquid and a non-abrasive sponge. 4. Wipe the inside and outside of the appliance with a moist cloth. This is an air fryer that works on hot air.
  • Page 20 In that case, tum the timer knob to more than 3 minutes and wait until the heating-up light goes out (after approx. 3 minutes). Then fill the basket and turn the timer knob to the required preparation time. a. The power-on light and the heating-up light go on. b.
  • Page 21 Tip: To remove large or fragile ingredients, use a pair of tongs to lift the ingredients out of the basket 13. When a batch of ingredients is ready, the air fryer is instantly ready for preparing another batch. Settings This table below helps you to select the basic settings for the ingredients you want to prepare.
  • Page 22: Extra Information

    Food Min-max Time ° C Extra information amount (min) Potatos & fries Thin frozen fries 300-700 9-16 shake Thick frozen fries 300-700 1 1-20 shake Home-made fries 300-800 16-10 Add 1 /2 tbsp of oil; shake Home-made potato 300-800 18-22 Add 1 12 tbsp of oil;...
  • Page 23 Making home-made fries To make home-made fries, follow the steps below. 1. Peel the potatoes and cut them into sticks. 2. Wash the potato sticks thoroughly and dry them with kitchen paper. 3. Pour 1/2 tablespoon of olive oil in a bowl, put the sticks on top and mix until the sticks are coated with oil.
  • Page 24 TROUBLESHOOTING Problem Possible Cause Solution The air fryer does The appliance is not Put the mains plug in an not work. plugged in. earthed wall socket. Turn the timer knob to the You have not set the timer. required preparation time to switch on the appliance.
  • Page 25 Problem Possible Cause Solution There are too much Do not fill the basket beyond in ingredients in the full, refer to the "Setting" table I cannot slide the basket. above. pan into the appliance property. The basket is not placed in Push the basket down into the the pan correctly.
  • Page 26: Disposal Considerations

    DISPOSAL CONSIDERATIONS If there is a legal regulation for the disposal of electrical and electronic devices in your country, this symbol on the product or on the packaging indicates that this product must not be disposed of with household waste. Instead, it must be taken to a collection point for the recycling of electrical and electronic equipment.
  • Page 27 Estimado cliente: Le felicitamos por la adquisición de este producto. Lea atentamente el siguiente manual y siga cuidadosamente las instrucciones de uso con el fin de evitar posibles daños. La empresa no se responsabiliza de los daños ocasionados por un uso indebido del producto o por haber desatendido las indicaciones de seguridad.
  • Page 28: Instrucciones De Seguridad

    INSTRUCCIONES DE SEGURIDAD • No sumerja la carcasa o los elementos calefactores con las partes electrónicas en agua y no los enjuague bajo el grifo. • Coloque siempre la comida a freír en la cesta para que no entre en contacto con los elementos ca-lefactores.
  • Page 29 • Coloque el aparato en una superficie horizontal, nivelada y estable. • Este aparato está destinado únicamente al uso doméstico normal. No está destinado a uso en ambientes como las cocinas del personal de tiendas, oficinas, granjas u otros ambientes de trabajo. Tampoco está destinado a ser utilizado por los clientes en hoteles, moteles, bed &...
  • Page 30: Descripción Del Aparato

    DESCRIPCIÓN DEL APARATO Lámpara de encendido y apagado Lámpara de calentamiento Controlador de Control del temperatura nivel de potencia y del temporizador Mango de la cesta...
  • Page 31 FUNCIONAMIENTO Antes del primer uso 1. Retire el material de embalaje. 2. Retire las pegatinas y etiquetas del aparato. 3. Limpie la cesta y la olla completamente con agua caliente, un poco de detergente y una esponja no abrasiva. 4. Limpie el interior y el exterior del aparato con un paño húmedo. La freidora funciona con aire caliente.
  • Page 32 perilla de tiempo a más de 3 minutos y espere a que la lámpara de calor se apague (después de unos 3 minu-tos). Entonces llene la cesta y gire el control de tiempo a la posición deseada. a. La lámpara de operación y la lámpara de calentamiento se encenderán. b.
  • Page 33 Ajustes La tabla siguiente es una ayuda para los ajustes esenciales. Nota: Tenga en cuenta que estos ajustes son pautas. Los ingredientes varían en origen, tamaño, forma y productor. No garantizamos los ajustes óptimos para su comida. Como la tecnología de aire caliente rápido calienta constantemente el aire dentro del aparato, sacar la olla por un corto tiempo durante la operación de aire caliente interrumpirá...
  • Page 34: Información Adicional

    Alimento Mín. Máx. Tiempo Temp. Información adicional (Gramos) (Min) (ºC) Patatas y fritos Fritos congelados finos 300-700 9-16 remover Fritos congelados gruesos 300-700 1 1-20 remover Fritos caseros 300-800 16-10 + 1/2 cucharada de aceite, remover Gajos de patata 300-800 18-22 + 1/2 cucharada de aceite, remover...
  • Page 35: Almacenamiento

    Patatas fritas caseras Para hacer patatas fritas caseras, siga estos pasos 1. Pele las patatas y córtelas en bastones. 2. Lave bien los bastones de patata y séquelos con un trapo de cocina. 3. Ponga media cucharadita de aceite de oliva y los bastones de patata en un bol. Mezcle hasta que los palitos de patata estén cubiertos de aceite.
  • Page 36: Solución De Problemas

    SOLUCIÓN DE PROBLEMAS Problema Posible causa Solución El aparato no El enchufe no está Conecte el enchufe a una toma funciona conectado. de corriente. Gire la perilla de control de El temporizador no está tiempo al tiempo de cocción programado. requerido.
  • Page 37 Problema Posible causa Solución Cuando preparas ingredientes con alto contenido de grasa, una gran cantidad de aceite va a la olla. El aceite causa La comida está grasienta. humo blanco y la olla puede calentarse más de lo normal. Sale humo blanco Esto no afecta al aparato ni al del dispositivo resultado de la fritura.
  • Page 38: Indicaciones Sobre La Retirada Del Aparato

    Parilla Olla INDICACIONES SOBRE LA RETIRADA DEL APARATO Si en su país existe una disposición legal relativa a la eliminación de aparatos eléctricos y electrónicos, este símbolo estampado en el producto o en el embalaje advierte que no debe eliminarse como residuo doméstico. En lugar de ello, debe depositarse en un punto de recogida de reciclaje de aparatos eléctricos y electrónicos.
  • Page 39 Chère cliente, cher client, Toutes nos félicitations pour l’acquisition de ce nouvel appareil. Veuillez lire attentivement et respecter les instructions de ce mode d’emploi afin d’éviter d’éventuels dommages. Le fabricant ne saurait être tenu pour responsable des dommages dus au non- respect des consignes de sécurité...
  • Page 40: Consignes De Sécurité

    CONSIGNES DE SÉCURITÉ • Ne plongez pas le corps de l’appareil ou les éléments chauffants contenant les composants électroniques dans l’eau et ne les rincez pas sous un robinet. • Placez toujours les aliments dans le panier afin qu’ils n’entrent pas en contact avec les éléments chauffants.
  • Page 41: Arrêt Automatique

    • Placez l’appareil sur une surface plane, horizontale et stable. • Cet appareil est destiné à un usage domestique normal seulement. Il n’est pas destiné à être utilisé dans des environnements tels que les cuisines du personnel dans les magasins, les bureaux, les fermes ou d’autres environnements de travail. Il n’est pas non plus destiné...
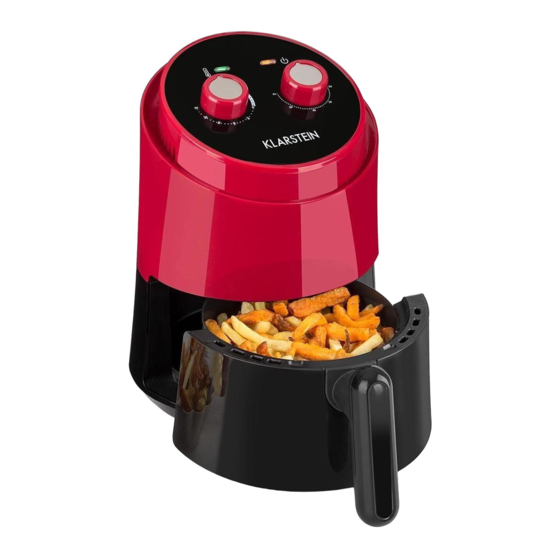
  • Page 42: Vue D'ensemble Du Produit

    VUE D'ENSEMBLE DU PRODUIT Témoin de chauffage Témoin de marche/arrêt Minuterie/ Contrôleur Réglage de la de niveau de température puissance Poignée du panier...
  • Page 43: Fonctionnement

    FONCTIONNEMENT Avant la première utilisation 1. Retirez le matériau d’emballage. 2. Retirez les étiquettes et les signes de l’appareil. 3. Nettoyez complètement le panier et la cuve avec de l’eau chaude et un peu de détergent et une éponge non abrasive. 4.
  • Page 44 témoin de chauffe s’éteigne (au bout de 3 minutes environ). Puis remplissez le panier et réglez la minuterie. a. Le témoin de marche et le témoin de chauffage s'allument. b. La minuterie compte à rebours la durée prédéfinie. Pendant la cuisson, le témoin de chauffe s’allume et s’éteint à plusieurs reprises, indiquant que l’élément chauffant est allumé...
  • Page 45 cuisson. Réglages Le tableau ci-dessous vous aidera pour les paramètres essentiels. Remarque : Notez que ces paramètres sont des valeurs standard. Les ingrédients diffèrent par l’origine, la taille, la forme et le producteur. Nous ne garantissons pas les réglages optimaux pour vos ingrédients. Étant donné que la technologie de l’air chaud est rapide et chauffe constamment l’air à...
  • Page 46 Produit Min Max Durée Temp Autres infos (grammes) (min) ° C Pommes de terre & frites Frites surgelées fines 300-700 9-16 secouer Frites surgelées épaisses 300-700 1 1-20 secouer Frites maison 300-800 16-10 + 1/2 CàC d'huile ; secouer Pommes de terre coupées 300-800 18-22 + 1/2 CàC d'huile ;...
  • Page 47: Nettoyage

    Frites maison Pour préparer des frites maison, suivez les étapes ci-dessous : 1. Épluchez les pommes de terre et coupez-les en frites. 2. Bien laver les frites et sécher avec un torchon. 3. Verser une demi-cuillère à café d'huile d'olive et les frites de pommes de terre dans un bol.
  • Page 48: Résolution Des Problèmes

    RÉSOLUTION DES PROBLÈMES Problème Cause Solution L'appareil ne La fiche n'est spas Branchez la fiche dans une fonctionne pas. branchée. prise. Tournez le bouton de réglage La minuterie n'est pas sur la durée de cuisson réglée. nécessaire. La cuve est mal placée Installez correctement la cuve dans l'appareil.
  • Page 49 Problème Cause Solution Lorsque vous préparez des ingré-dients riches en matières grasses, une grande quantité d'huile pénètre dans la cuve. L'huile provoque une fumée Les aliments sont cuits. blanche et la cuve peut de-venir plus chaude que L'appareil émet de d'habitude.
  • Page 50: Informations Sur Le Recyclage

    grille cuve INFORMATIONS SUR LE RECYCLAGE S‘il existe une réglementation pour l‘élimination ou le recyclage des appareils électriques et électroniques dans votre pays, ce symbole sur le produit ou sur l‘emballage indique que cet appareil ne doit pas être jeté avec les ordures ménagères.
  • Page 51: Dati Tecnici

    Gentile cliente, La ringraziamo per aver acquistato il dispositivo. La preghiamo di leggere attentamente le seguenti istruzioni per l’uso e di seguirle per evitare possibili danni tecnici. Non ci assumiamo alcuna responsabilità per danni scaturiti da una mancata osservazione delle avvertenze di sicurezza e da un uso improprio del dispositivo.
  • Page 52: Avvertenze Di Sicurezza

    AVVERTENZE DI SICUREZZA • Non immergere l’alloggiamento e gli elementi riscaldanti con i componenti elettrici in acqua e non sciacquarli sotto a un rubinetto. • Mettere sempre le pietanze da cuocere nell’apposito cestello, in modo che non entrino in contatto con gli elementi riscaldanti. •...
  • Page 53 • Questo dispositivo è adatto solo a normale uso casalingo. Non è adatto per uso in cucine per il personale di negozi, uffici, agriturismi o altri contesti lavorativi. Non è previsto l’uso nemmeno per clienti di hotel, motel, bed & breakfast e altri contesti abitativi.
  • Page 54: Descrizione Del Dispositivo

    DESCRIZIONE DEL DISPOSITIVO Spia on/off Spia di riscaldamento Regolazione Regolazione temperatura timer/livello di potenza Impugnatura cestello...
  • Page 55: Utilizzo

    UTILIZZO Prima di procedere al primo utilizzo 1. Rimuovere il materiale d’imballaggio 2. Rimuovere adesivi ed etichette dal dispositivo. 3. Pulire il cestello e il contenitore con acqua bollente e un po’ di detergente per piatti. Non usare spugne abrasive. 4.
  • Page 56 valore desiderato. a. Le spie di funzionamento e riscaldamento si accendono. b. Il timer inizia il conto alla rovescia impostato. La spia di riscaldamento si spegne e si accende continuamente durante l’uso, per indicare l’accensione e lo spegnimento dell’elemento riscaldante per mantenere la temperatura impostata.
  • Page 57 La tabella sottostante aiuta a gestire le impostazioni essenziali. Nota: tenere presente che queste impostazioni sono valori di riferimento. Gli ingredienti si differenziano per origine, dimensione, forma e produttore. Non garantiamo le impostazioni ottimali per i vostri ingredienti. Dato che la tecnologia ad aria calda scalda l’aria all’interno del dispositivo, una breve rimozione del contenitore durante il funzionamento interrompe il processo di cottura.
  • Page 58 Alimenti Min. Max. Durata Temp (°C) Altre informazioni (grammi) (minuti) Patate e patatine fritte Patatine surgelate sottili 300-700 9-16 Scuotere Patatine surgelate spesse 300-700 1 1-20 Scuotere Patatine fatte in casa 300-800 16-10 +1/2 cucchiaino d’olio; scuotere Spicchi di patata 300-800 18-22 +1/2 cucchiaino d’olio;...
  • Page 59: Manutenzione

    Patatine fritte fatte in casa Seguire questi passaggi per preparare patatine fritte fatte in casa. 1. Pelare le patate e tagliarle a bastoncini. 2. Lavare per bene le patate tagliate e asciugarle con un panno di carta. 3. Mescolare per bene le patate con un cucchiaino d’olio in una ciotola. 4.
  • Page 60: Correzione Degli Errori

    CORREZIONE DEGLI ERRORI Problema Causa Soluzione Il dispositivo non Collegare la spina a una presa La spina non è collegata. funziona. elettrica. Il timer non è stato Impostare il timer impostato. correttamente. Il contenitore non è stato Posizionare correttamente il posizionato correttamente.
  • Page 61 Problema Causa Soluzione Se si preparano ingredienti ricchi di grasso, una grande quantità di questo finisce nel contenitore. Il grasso provoca Le pietanze sono pronte. fumo bianco e il contenitore si scalda più del solito. Questo Esce fumo bianco non influisce negativamente dal dispositivo.
  • Page 62: Avviso Di Smaltimento

    Griglia Pentola AVVISO DI SMALTIMENTO Se nel proprio paese si applicano le regolamentazioni inerenti lo smaltimento di dispositivi elettrici ed elettronici, questo simbolo sul prodotto o sulla confezione segnala che questi prodotti non possono essere smaltiti con i rifiuti normali e devono essere portati a un punto di raccolta di dispositivi elettrici ed elettronici.

Ce manuel est également adapté pour:

1003196810031969

Table des Matières