Xylem SI Analytics TitroLine 7500 KF Mode D'emploi

Xylem SI Analytics TitroLine 7500 KF Mode D'emploi

Titrateur
Masquer les pouces Voir aussi pour SI Analytics TitroLine 7500 KF:
Table des Matières

Publicité

Les langues disponibles

Les langues disponibles

Liens rapides

GEBRAUCHSANLEITUNG
Originalversion
OPERATING MANUAL
MODE D'EMPLOI
MANUAL DE INSTRUCCIONES
TitroLine® 7500 KF
TITRATOR | TITRATOR | TITRATEUR | TITULADOR

Publicité

Table des Matières
loading

Sommaire des Matières pour Xylem SI Analytics TitroLine 7500 KF

  • Page 1 GEBRAUCHSANLEITUNG Originalversion OPERATING MANUAL MODE D’EMPLOI MANUAL DE INSTRUCCIONES TitroLine® 7500 KF TITRATOR | TITRATOR | TITRATEUR | TITULADOR...
  • Page 2 Gebrauchsanleitung Seite 3 ..72 Originalversion .................. ® Wichtige Hinweise: Die Gebrauchsanleitung vor der ersten Inbetriebnahme des Titrators TitroLine 7500 KF ® bitte sorgfältig lesen und beachten. Aus Sicherheitsgründen darf der Titrator TitroLine 7500 KF ausschließlich nur für die in dieser Gebrauchsanleitung beschriebenen Zwecke eingesetzt werden. Bitte beachten Sie auch die Gebrauchsanleitungen für die anzuschließenden Geräte.
  • Page 3: Table Des Matières

    INHALTSVERZEICHNIS SEITE ® Technische Eigenschaften des Titrators TitroLine 7500 KF ........ 5 Zusammenfassung ........................5 ® Technische Daten des Titrators TitroLine 7500 KF ..............6 Warn- und Sicherheitshinweise ....................9 Aufstellen und Inbetriebnahme ................10 Auspacken und Aufstellen des Titrationsgerätes ..............10 Anschluss und Montage der Bürette und des Magnetrührers TM 235 ........
  • Page 4 Datum und Uhrzeit ........................61 Passwort ..........................61 RESET ............................ 61 Drucker ............................ 62 Geräteinformationen........................ 62 Systemtöne ..........................62 Software Update ........................63 Datenkommunikation über die RS232- und USB-B-Schnittstelle ......65 Allgemeines ..........................65 Verkettung mehrerer Geräte — „Daisy Chain Konzept“ ............65 Befehlsliste für RS-Kommunikation ..................
  • Page 5: Technische Eigenschaften Des Titrators Titroline

    ® Technische Eigenschaften des Titrators TitroLine 7500 KF 1.1 Zusammenfassung ® Der TitroLine 7500 KF ist ein potentiometrischer Titrator und ist für folgende Anwendungen geeignet: Es können volumetrische KF und Dead-stop-Titrationen mit bis zu 50 speicherbaren Methoden durchgeführt werden. ® Beispiele für die Einsatzmöglichkeiten des Titrators TitroLine 7500 KF sind: −...
  • Page 6: Technische Daten Des Titrators Titroline ® 7500 Kf

    ® 1.2 Technische Daten des Titrators TitroLine 7500 KF Stand 21.11.2013 CE-Zeichen: EMV - Verträglichkeit nach der Richtlinie 2004/108/EG des Rates; angewandte harmonisierte Norm: EN 61326/1:2006. Niederspannungsrichtlinie nach der Richtlinie 2006/95/EG des Rates, angewandte harmonisierte Norm: EN 61 010, Teil 1. ETL Zeichen: Conforms to ANSI/ UL Std.
  • Page 7 2 x USB-Typ-A und 1 x USB-Typ-B USB-Schnittstellen USB –Typ B („Slave“) für Computeranschluss, USB –Typ A („Master“) für Anschluss von - USB-Tastatur - USB-Drucker - USB-Handtaster („Maus“), - USB-Speichermedien wie z.B. USB-Stick - USB-Hub Rührer/Pumpe TM235 KF: 12V DC out, 500 mA Spannungsversorgung für Rührer TM 235 und KF Titrationstand TM 235 KF Polypropylen Gehäuse-Werkstoff:...
  • Page 8 EigenschaftenTitrationstand TM 235 KF Stand 21. November 2013 ® In Verbindung mit dem Titrator TitroLine 7500 KF EMV - Verträglichkeit nach der Richtlinie 2004/108/EG des Rates; CE-Zeichen: angewandte harmonisierte Norm: EN 61326/1:2006. Niederspannungsrichtlinie nach der Richtlinie 2006/95/EG des Rates, angewandte harmonisierte Norm: EN 61 010, Teil 1. ETL Zeichen: Conforms to ANSI/ UL Std.
  • Page 9: Warn- Und Sicherheitshinweise

    1.3 Warn- und Sicherheitshinweise ® Das Gerät TitroLine 7500 KF entspricht der Schutzklasse III. Es ist gemäß EN 61 010 - 1, Teil 1, Sicherheitsbestimmungen für elektrische Mess-, Steuer-, Regel- und Laborgeräte, gebaut und geprüft und hat das Werk in sicherheitstechnisch einwandfreiem Zustand verlassen. Um diesen Zustand zu erhalten und einen gefahrlosen Betrieb sicherzustellen, muss der Anwender die Hinweise und Warnvermerke beachten, die in dieser Gebrauchsanleitung enthalten sind.
  • Page 10: Aufstellen Und Inbetriebnahme

    Aufstellen und Inbetriebnahme 2.1 Auspacken und Aufstellen des Titrationsgerätes Der Titrator und alle Zubehörteile sowie die Peripheriegeräte sind werkseitig sorgfältig auf Funktion und Maßhaltigkeit geprüft. Die TitroLine® 7500 KF-Module bestehen aus folgenden Einzelteilen: ® • TitroLine 7500 Grundgerät • Ein Wechselaufsatz WA 05, WA 10 oder WA 20 •...
  • Page 11: Anschluss Und Montage Der Bürette Und Des Magnetrührers Tm 235

    2.2 Anschluss und Montage der Bürette und des Magnetrührers TM 235 Das Niederspannungskabel des Netzteils TZ 1853 wird in die mittlere 12 V Buchse, Buchse „in“, (siehe auch Abb. 4 Rückwand, Kap. 2.4), auf der Rückseite der Bürette eingesteckt. Danach das Netzteil in die Netzsteckdose einstecken.
  • Page 12 Das Titrationsgefäß TZ 1770 wird an die Stativstange angeschraubt. Bitte darauf achten, dass die Metallklammer nur soweit wie abgebildet heruntergedrückt wird. Abb. 3a Montieren Sie alle drei inneren weißen Plastikadapter an die Abfall-, Solvent- und Trockenflasche. Füllen Sie die Trockenflasche mit dem Molekularsieb und verbinden Sie die flexiblen PVC- sowie die dünneren PTFE-Schläuche, wie in den folgenden Abbildungen dargestellt.
  • Page 13 Die Trockenflasche wird an die rechte Olive (Sicht von oben) des TM 235 KF angeschlossen. Die Abfallflasche (Klarglas) wird an die linke Olive angeschlossen. Abb. 4 Der PTFE-Schlauch von der Abfallflasche („Tube 1“) sollte möglichst bis zum Boden des Titrationsgefäßes justiert werden.
  • Page 14 Abb. 6 Die Titrierspitze mit dem Titrierschlauch wird in die linke NS 14-Öffnung gesteckt und an das Ventil der Wechseleinheit angeschlossen. Füllen Sie zuerst etwas Glaswolle und das Molekularsieb in das Trockenröhrchen aus Plastik. Stecken Sie das Trockenröhrchen in die andere vorhandene NS 14-Öffnung, wie auch in der nächsten Abbildung zu sehen ist. Abb.
  • Page 15: Anschlüsse Des Titrators. Kombination Mit Zubehör Und Weiteren Geräten

    2.5 Anschlüsse des Titrators. Kombination mit Zubehör und weiteren Geräten ® 2.5.1 Rückwand des Titrators TitroLine 7500 KF Fig. 8 ® 2.5.2 Messeingänge des Titrators TitroLine 7500 KF ® Der TitroLine 7500 KF verfügt über folgende Anschlüsse: 1) µA-Messeingang für Anschluss Doppelplatinelektroden (KF 1100 oder Pt 1200, Pt 1400 2) USB-B Schnittstelle für den Anschluss an einen PC 3) Netzschalter 4) Zwei USB-A („Master“) Schnittstellen für den Anschluss von USB-Geräten wie Tastatur, Drucker,...
  • Page 16: Anschluss Von Analysenwaagen

    2.5.5 Anschluss von Analysenwaagen Analysenwaagen werden mit einem entsprechenden Kabel an die RS232-2 angeschlossen. 2.6 Einstellen der Landessprache Werkseitig ist Englisch als Sprache voreingestellt. Nach dem der Titrator eingeschaltet und sein Startvorgang beendet ist, erscheint das Hauptmenü: Abb. 8 Mit <SYS/<F7> wechselt man zu den Systemeinstellungen (Englisch = System settings). Das erste Menü ist gleich die Einstellung der Landessprache: Abb.
  • Page 17: Wechselaufsatz Wa

    2.7 Wechselaufsatz WA Abb. 11 1) TZ 3871 - Ansaugschlauch 2) TZ 3872 - Verbindungsschlauch 3) TZ 3873 - Dosierschlauch ohne Dosierspitze und Halter; TZ 3874.- Dosierschlauch mit Dosierspitze und Halter 4) TZ 3801 - Ventilabdeckung 5) TZ 3000 - 3/2-Wege Ventil 6) TZ 2003 - Trockenrohr 7) TZ 3802 - Schraubkappe GL 45 mit Bohrung, inkl.
  • Page 18: Aufsetzen Und Austauschen Eines Wechselaufsatzes

    2.8 Aufsetzen und Austauschen eines Wechselaufsatzes Die Titratoreinheit enthält ein RFID-Lesegerät und die Wechselaufsätze enthalten alle eine RFID-Transponder. In diesem Transponder können folgende Informationen gespeichert werden: • Aufsatzgröße (nicht veränderbar) • Aufsatz ID (nicht veränderbar) • Reagenzname (default: Leerzeichen) • Konzentration (default: 1.000000) •...
  • Page 19: Abnahme Eines Wechselaufsatzes

    Abb. 12 c 2.8.2 Abnahme eines Wechselaufsatzes Die Abnahme des Wechselaufsatzes geschieht in der umgekehrten Reihenfolge: • Links auf die schwarze Taste drücken und den Wechselaufsatz nach vorne ziehen wie in Abb. 12.c – 12 a abgebildet. ! Wichtig: Die Abnahme des Wechselaufsatzes ist nur möglich wenn sich der Kolben in der unteren Position befindet (Nullposition).
  • Page 20 Bei der ersten Verwendung ist empfehlenswert, hier zumindest den Namen des verwendeten Reagenzes einzutragen. Dazu bestätigt man die Auswahl „Reagenz“ mit <ENTER> und tippt den Namen und eventuell die Konzentration ein (Abb. 15). Abb. 15 Mit <OK>/<ENTER> bestätigen (Abb. 15). Nach der optionalen Eingabe weiterer Parameter verlässt man das Reagenzienmenü...
  • Page 21: Erstbefüllen Bzw. Spülen Des Kompletten Wechselaufsatzes

    Abb. 18 2.9 Erstbefüllen bzw. Spülen des kompletten Wechselaufsatzes Das Erstbefüllen der Wechseleinheit erfolgt durch das Spülprogramm <Spülen>. Abb. 19 Vom Hauptmenü (Abb. 19) gelangt man mit <MODE> in das Methoden-/Systemmenü (Abb. 20) Abb. 20...
  • Page 22 Durch 2 x <↑> gelangt man sofort zur Auswahl <Spülen> (Abb. 21). Abb. 21 Die Auswahl mit <ENTER> bestätigen: Abb. 22 Nun kann man die Anzahl der Spülzyklen auswählen. Für eine Erstbefüllung muss man mindestens zweimal Spülen. Den Spülvorgang (Abb. 23) kann man jederzeit mit <STOP> abbrechen und anschließend mit <START> fortsetzen.
  • Page 23: Lösungsmittel In Das Titriergefäß Füllen

    2.10 Lösungsmittel in das Titriergefäß füllen Durch Herunterdrücken des Titrierstandes TM 235 KF (den vorderen Teil der Wippe) wird Lösunsgmittel aus der Solventflasche in das Titriergerfäß gepumpt. Bitte soviel Lösungsmittel in das Titriergefäß pumpen bis die Titrierspitze und die Elektrode vollstandig eingetaucht sind. Das sind etwa 35- 40 ml Lösunsgmittel: 35-40 ml Befüllen Abb.
  • Page 24 Kolbenstange Abb. 25 a Abb. 25 b Grundsätzlich ist darauf zu achten, dass in einen Wechselaufsatz nur die vorgesehene Zylindergröße montiert werden darf, weil sonst die im Wechselaufsatz gespeicherte Codierung nicht mehr mit der Zylindergröße übereinstimmt. Die Folge ist eine falsche Dosierung. Es wird aus Gründen der Dosier- und Analysengenauigkeit empfohlen, stets auch die PTFE-Kolben mit auszutauschen, wenn ein defekter Glaszylinder erneuert wird.
  • Page 25: Das Arbeiten Mit Dem Titrator Titroline

    ® Das Arbeiten mit dem Titrator TitroLine 7500 KF 3.1 Fronttastatur Mit Ausnahme von alphanumerischen Eingaben (a-z, A-Z, 0-9) und einigen wenigen Funktionen, können alle Funktionen auch über die Fronttastatur ausgeführt werden. Auswahl der Methoden, Spülen, Systemeinstellungen <Mode>: Ändern der aktuellen Methode, neue Methode, Methode kopieren und löschen <EDIT>: Mit <ESC>...
  • Page 26: Handtaster

    3.3 Handtaster Der Handtaster („Maus“, Abb. 26) kann für Dosierungen und zum Lösung ansetzen verwendet werden. Der Handtaster gehört nicht zum Lieferumfang des TL 7500 Grundgerätes. Abb. 26 Modus Schwarze Taste Graue Taste Dosieren über Dosiermethode Start der Dosierung Füllen Lösungen ansetzen Start der Dosierung Füllen...
  • Page 27: Menüstruktur

    3.5 Menüstruktur Es gibt 4 Hauptmenüs: • Start- oder Hauptmenü • Methodenparameter • Auswahl Methoden • Systemeinstellungen. Nach dem Einschalten erscheint immer das Hauptmenü. Es wird immer die zuletzt verwendete Methode angezeigt (Abb. 27). Abb. 27 Die angezeigte Methode kann nun mit <START> sofort ausgeführt werden. Mit <EDIT>/F3 gelangt man zu den Methodenparametern (Abb.
  • Page 28 Mit <MODE>/F6 gelangt man zu dem Methodenauswahlmenü (Abb. 26). Abb. 29 Die vorhandenen Methoden werden mit <↓> und <↑>- Tasten angewählt und mit <OK>/<ENTER> die Auswahl bestätigt. Nach der Auswahl kommt man sofort mit der neu ausgewählten Methode zurück zum Hauptmenü. Ohne Auswahl einer Methode gelangt man mit <ESC>...
  • Page 29: Hauptmenü

    3.6 Hauptmenü Nach dem Einschalten erscheint immer das Hauptmenü. Es wird immer die zuletzt verwendete Methode angezeigt (Abb. 32). Abb. 32 3.6.1 Standardmethoden KF Titration Wenn noch keine Titration durchgeführt wurde empfiehlt es sich, eine der Standardmethoden zu laden. Sie sind vorparametriert und können in der Regel sofort ohne Änderung verwendet werden.
  • Page 30: Automatische Kf Titration

    Standardmethoden KF Anwendung Titer 1-Component (liquid standard) Bestimmung der Konzentration der Titrierlösung. Verwendbar für 1-Komponentenreagenz. Standard ist flüssiger Standard in Ampullen mit einer Konzentration von ca. 10 mg/g. Titer 1-Component (solid standard) Bestimmung des Titers der Titrierlösung. Verwendbar für 1-Komponentenreagenz. Standard ist die fester Urtitersubstanz Natriumtartrat-Dihydrat mit einem Wassergehalt von 15.66 %.
  • Page 31 Abb. 35 Wenn die Endkriterien erfüllt sind, dann erfolgt ein Signalton und es erscheint ‚Konditionierung fertig‘ oben auf dem Display: Abb. 36 Die Konditionierung bleibt solange aktiv bis die eigentliche Titration mit <F1/Start> gestartet wird. Man wird sofort aufgefordert die Probe zuzugeben: Abb.
  • Page 32 Abb. 38 Abb. 39 Die Waagedaten können mit Hilfe der Fronttastatur oder der externen Tastatur eingegeben werden. Die Eingabe wird mit <OK>/<ENTER> bestätigt. Bei automatischer Waagedatenübernahme werden die Einwaagen aus einem Speicher ausgelesen. Falls keine Waagedaten im Speicher vorhanden sind, wird dies in einer Meldung angezeigt: Abb.
  • Page 33 Abb. 41 Abb. 42 Abb. 43 Die Skalierung der Grafik geschieht automatisch: Am Ende der Titration wird das Ergebnis angezeigt: Abb. 44 Mit <MODE>/<F6> kann man sich die Titrationskurve bzw. weitere Ergebnisse anzeigen lassen.
  • Page 34: Dosierung

    Abb. 45 Bei angeschlossenem Drucker werden die Ergebnisse, wie in der Methode eingestellt, ausgedruckt bzw. auf einem angeschlossenen USB-Stick als PDF-Datei und als CSV-Datei abgespeichert. Falls kein Drucker oder USB-Stick angeschlossen ist, erscheint unten links im Display die Meldung „Kein Drucker“ oder „Kein USB-Stick“. Durch <ESC>...
  • Page 35 Abb. 48 Abb. 49 Die nächste Dosierung kann dann sofort gestartet werden. Der Aufsatz wird nach jeder Dosierung automatisch gefüllt. Diese Option kann auch abgeschaltet werden. Dann wird der Aufsatz erst gefüllt, wenn das Zylindervolumen erreicht ist. Man kann natürlich jederzeit den Aufsatz mit <FILL> füllen lassen. Eine Dosierung kann auch über die <DOS>/<F10>...
  • Page 36 Abb. 51 Die nächste Dosierung kann sofort wieder mit der <ENTER>/<OK> Taste ausgeführt werden: Abb. 52 Der Aufsatz wird hier nicht automatisch nach der Dosierung gefüllt, es sei denn das Zylindervolumen ist erreicht. Mit <FILL> kann der Aufsatz jederzeit gefüllt werden. Mit <ESC> gelangt man wieder zurück in das Hauptmenü.
  • Page 37: Lösungen Ansetzen

    3.6.4 Lösungen ansetzen Eine spezielle Dosiermethode ist das so genannte „Lösungen ansetzen“. Dabei wird ein Lösungsmittel solange zu einer Einwaage eines Stoffes zu dosiert, bis die gewünschte Zielkonzentration erreicht ist: Abb. 53 Abb. 54 Abb. 55 Ist das berechnete Volumen größer als das maximal eingestellte Volumen, erscheint eine Fehlermeldung und es wird aus Sicherheitsgründen nicht dosiert: Abb.
  • Page 38: Methodenparameter

    Methodenparameter Vom Hauptmenü aus (Abb. 53) gelangt man <EDIT>/<F3> in die Methodenparameter: Abb. 57 4.1 Methode editieren und neue Methode Bei Anwahl von <Methode editieren> und <neue Methode> gelangt man zur Änderung bzw. Neuerstellung einer Methode. Bei <neue Methode> wird immer nach der Eingabe der Methodennamens gefragt (Abb. 58). Das entfällt bei der Änderung einer bereits erstellten Methode.
  • Page 39: Methoden Kopieren

    Nach der Auswahl wird man direkt nach der Eingabe des Methodennamens gefragt: Abb. 60 Man kann den Standardnamen übernehmen oder auch abändern. Danach kommt man zu <Methodenparameter ändern>. Weiter dann mit Kapitel 4.6. 4.3 Methoden kopieren Methoden können kopiert und unter einen neuen Namen abgespeichert werden. Bei Anwahl der Funktion wird die aktuelle Methode kopiert und ein neuer Name kann eingeben werden: Abb.
  • Page 40: Methode Drucken

    4.5 Methode drucken Die aktuell ausgewählte Methode kann auf einem angeschlossen Drucker ausgedruckt oder als PDF-Datei auf einem USB-Stick gespeichert werden. Abb. 63 4.6 Methodenparameter ändern Die Eingabe oder Änderung des Methodenamens wurde bereits in Kapitel 4.1 und 4.3. beschrieben. Abb.
  • Page 41: Automatischer Titrationsmodus

    4.6.2 Automatischer Titrationsmodus Bei einer automatischen Titration kann man zwischen folgenden Modi auswählen: • • Dead-Stop Titration (µA) 4.6.2.1 KF und Dead-stop Titration Die KF Titration ist eine besondere Form einer Dead-stop Titration. Bei einer normalen Dead-stop Titration wird einfach auf den vorgegebenen Wert in µA titriert, der eine definierte Zeit gehalten werden muss. Bei der KF- Titration geschieht dies zwar auch, jedoch muss zusätzlich noch ein bestimmtes Driftkriterium in µg/min erfüllt sein.
  • Page 42 Der Ergebnistext kann bis zu 21 alphanumerische Zeichen inkl. Sonderzeichen enthalten: Abb. 67 Die Eingabe wird mit <OK</<ENTER> bestätigt. 4.6.3.1 Berechnungsformeln Die passende Berechnungsformel wird im Formelauswahl-Menü gewählt. Abb. 68 Folgende Berechnungsformeln stehen dem automatischen Titrationsmodes zur Verfügung: Formel Zusätzliche Informationen Formel zur Berechnung des ml Verbrauches (EP-B)*T*M*F1/(W*F2)
  • Page 43 Wenn man eine Formel ausgewählt hat, wird die Auswahl mit <OK>/<ENTER> bestätigt: Abb. 69 Die Werte für den Blindwert, und Faktoren F1-F5 können eingegeben oder aus einem globalen Speicher eingelesen werden. Die Werte aus dem globalen Speicher wurden durch eine Titration vorab bestimmt und abgespeichert oder manuell eingegeben: Abb.
  • Page 44 Das Abspeichern von Ergebnissen in globale Speicher wird in Kapitel 4.6.3.7 beschrieben. Die Werte der einzelnen Parameter der ausgewählten Berechnungsformel können nun einzeln eingegeben werden: Abb. 73 4.6.3.2 Einwaage und Vorlage (Probenmenge) Abb. 74 Abb. 75 ä Bei der Probenmenge (W) wird ausgewählt, ob man eine Einwaage oder Vorlage bei der Titration oder dem Lösung ansetzen verwenden möchte.
  • Page 45 4.6.3.3 Formeleinheit Die Formeleinheit kann in dem Untermenü Einheit ausgewählt werden. Abb. 76 Nach der Auswahl (z.B. %) erscheint die Einheit auch als Information in der Anzeige: Abb. 77...
  • Page 46 4.6.3.4 Formeln für Lösungen ansetzen Für den Modus Lösungen ansetzen stehen besondere Berechnungsformeln zur Auswahl. In dem Untermenü Formelauswahl wählt man die passende Berechnungsformel aus: Abb. 78 Es stehen 3 verschiedene Berechnungsformeln zur Auswahl: W*(100-Fa-Fb)*Fc/Fd - W*(100-Fb)/(100*Fe) +Ff W*(100-Fa-Fb)*(Fd/Fg ) - W*(100-Fb)/(100*Fg) +Ff W*(100-Fa-Fb)*Fc/(100*Fd) Bedeutung der einzelnen Faktoren: Einwaage der Probe in g...
  • Page 47 4.6.3.5 Dezimalstellen Man kann die Anzahl der Dezimalstellen von 0 – 6 festlegen. Die Standardeinstellung ist 2. Abb. 79 4.6.3.6 Statistik Durch die Verwendung der Statistik kann der Mittelwert und die relative Standardabweichung automatisch berechnet und dokumentiert werden. Abb. 80 Die Berechnung des Mittelwertes ist schon aus 2 Einzelwerten möglich, die Berechnung der relativen Standardabweichung erst ab 3 Einzelwerten.
  • Page 48: Globale Speicher

    4.6.3.7 Globale Speicher Ergebnisse von Titrationen können in einen der 50 globalen Speicher (M01 – M50) für weitere Berechnungen geschrieben werden. Abb. 82 Bei eingeschalteter Statistik wird der Mittelwert in den globalen Speicher geschrieben. Mit <Enter/OK> gelangt man in das Untermenü. Falls noch kein globaler Speicher angelegt wurde, kann man mit der Einfügen-Taste <Ins>...
  • Page 49: Titrationsparameter

    Abb. 85 4.6.4 Titrationsparameter In dem Untermenü <Titrationsparameter> werden die eigentlichen Parameter der Methode festgelegt. Die Parameter wurden bereits im Kapitel 4.6.2.1 vorgestellt: Abb. 86 Abb. 87 Allgemein gültige Titrationsparameter Je nach Titrationsmodus (dynamische-, lineare-, Endpunkttitration und Dead-Stopp-Titration) kann man unterschiedliche Parameter eingeben.
  • Page 50 Startwartezeit/Extraktionszeit (KF): Bei der Dead-stop-Titration wird die Startwartezeit am Anfang der Titration abgewartet. Bei der KF Titration heißt die Startwartezeit = Extraktionszeit. Die Extraktionszeit läuft nach der Zugabe der Probe ab. Die Startwarte/Extraktionszeit kann zwischen 0 und 999 Sekunden eingegeben werden: Abb.
  • Page 51 Abb. 91 Die (lineare) Schrittweite wird bei dieser Titrationsart nach der kontinuierlichen Titrationsstufe verwendet. Titrationsrichtung (nur Dead-stop-Titration Die Titrationsrichtung kann auf „steigend“ oder „fallend“ eingestellt werden. Wenn man z.B. eine Titration von schwefeliger Säure mit Iodlösung durchführen möchte, muss man steigend einstellen. Bei einer iodometrischen Rücktitration mit Natriumthiosulfat muss man fallend einstellen.
  • Page 52: Titrationsende

    Fig. 94 Die Werte lassen sich zwischen 40 und 220 mV einstellen. 100 mV ist voreingestellt. Niedrige Polarisationsspannung: unempfindlich Hohe Polarisationsspannung: empfindlich 4.6.5 Titrationsende Das Ende eine Titration ist erreicht und das Ergebnis wird berechnet wenn: • Der vorgegebene Endwert in µA-Wert erreicht ist •...
  • Page 53 Minimale Titrationsdauer Die minimale Titrationsdauer kann von 0 – 9999 Sekunden eingestellt werden. Voreingestellt sind 10 Sekunden. Die minimale Titrationsdauer verhindert ein zu frühes beenden der Titration bei verzögerter Wasserextraktion aus der Probe. Die minimale Titrationsdauer wird kombiniert mit der Extraktionszeit eingesetzt. Sie läuft schon ab wenn die Extraktionszeit noch aktiv ist.
  • Page 54: Dosierparameter

    4.6.6 Dosierparameter Abb. 98 Die Dosierparameter (Dosiergeschwindigkeit, Füllgeschwindigkeit und max. Dosier-/Titriervolumen) werden für jede einzelne Methode festgelegt. Das gilt für alle Typen von Methoden wie automatische Titration, Dosieren und Lösungen ansetzen: Abb. 99 Die Dosiergeschwindigkeit in % kann von 1 bis 100 % eingestellt werden. 100 % entspricht der maximal möglichen Dosiergeschwindigkeit: Wechseleinheit maximale...
  • Page 55: Probenbezeichnung

    Abb. 100 Bei Füllen „Aus“ wird nicht automatisch nach jedem Dosierschritt gefüllt. Bei Füllen „intelligent vorher“ wird immer vor dem nächsten Dosierschritt geprüft, ob der Dosierschritt noch ohne einen Füllvorgang ausgeführt werden kann. Falls das nicht möglich ist wird erst gefüllt und dann der Dosierschritt durchgeführt.
  • Page 56: Dokumentation

    4.6.8 Dokumentation Abb. 103 Die Dokumentation auf einem Drucker oder USB-Stick kann in 3 verschiedenen Formaten eingestellt werden: „kurz“, „Standard mit Kurve“ und „GLP“: Abb. 104 Methodentyp Kurzdokumentation Standarddokumentation GLP-Dokumentation Automatische Titration Methodenname, Datum, Uhrzeit, Wie Kurzdokumentation, Wie Standard- Titrationsdauer, + Titrationskurve Dokumentation + Probenbezeichnung,...
  • Page 57: Systemeinstellungen

    Systemeinstellungen Abb. 105 Vom Hauptmenü aus (Abb. 107) gelangt man <SYS>/<F7> in die Systemeinstellungen: Abb. 106 Die Einstellung der Landessprache wurde bereits im Kapitel 2.5 beschrieben. 5.1 Reagenzien - Wechselaufsatz Jeder Wechselaufsatz enthält ein RFID Transponder. In diesem Transponder können folgende Informationen gespeichert werden: •...
  • Page 58 Abb. 107 Abb. 108 Abb. 109 Wenn man das Menü <Reagenzien WA> mit <ESC> verlässt wird man immer gefragt, ob man die Werte übernehmen möchte: Abb. 110 Bei der Antwort <Ja> werden die aktualisierten Werte in den RFID Transponder des Wechselaufsatzes geschrieben.
  • Page 59: Rs232 Einstellungen

    5.2 RS232 Einstellungen Unter dem Menü <RS232- Einstellungen> kann man die Geräteadresse des TitroLine® 7500 KF festlegen und die Parameter der beiden RS232-Schnittstellen unabhängig voneinander einstellen: Abb. 111 Die Geräteadresse kann von 0 – 15 eingestellt werden. Die Adresse 1 ist voreingestellt: Abb.
  • Page 60 Abb. 114 Die Parität kann zwischen <No> (Keine), <Even> (Gerade) und <Odd> (Ungerade) eingestellt werden. <No> ist voreingestellt: Abb. 115 Die Datenbits können zwischen 7 und 8 Bit eingestellt werden. 8 Bit sind voreingestellt: Abb. 116 Die RS232-Parameter können auf die Werkseinstellung zurückgesetzt werden.
  • Page 61: Datum Und Uhrzeit

    5.3 Datum und Uhrzeit Die Uhrzeit ist Werkseitig auf die MEZ eingestellt. Bei Bedarf kann Sie verändert werden: Abb. 117 5.4 Passwort Die Aktivierung des Passwortes ist in der aktuellen Version 12_18 noch nicht aktiviert. Bitte wenden Sie sich an die Firma SI Analytics für die Zusendung einer Updateversion.
  • Page 62: Drucker

    5.6 Drucker Für den Anschluss von Druckern lesen Sie bitte Kapitel 7.3. Abb. 119 5.7 Geräteinformationen Die <Geräteinformationen> enthalten Informationen über die • Aktuelle Softwareversion • Seriennummer des Gerätes • Druckertreiberversion • Updateversion • Eingestellte Geräteadresse • Anzahl der Messungen (Starts einer Methode) •...
  • Page 63: Software Update

    Abb. 121 Bei Bedienen der externen Tastatur werden keine Töne ausgegeben. 5.9 Software Update Abb. 122 Für ein Update der Gerätesoftware wird ein USB-Stick benötigt auf der sich eine neue Version befindet. Die 2 benötigten Dateien müssen sich dazu einfach im Root- Verzeichnis des USB-Sticks befinden: Man steckt den USB-Stick in einem freien USB-A (Master) Port, wartet ein paar Sekunden und wählt dann die Funktion Software Update aus.
  • Page 64 Abb. 123 Nachdem man das Update mit <OK/ENTER> gestartet hat, erscheint erst diese Anzeige: Abb. 124 und wechselt dann nach wenigen Sekunden zu dieser Anzeige: Abb. 125 Nach erfolgtem Update (ca. 2-3 Minuten) fährt das Gerät die Software komplett herunter und startet neu. Wichtig: Die Methoden werden bei dem Update nicht gelöscht! Sie können weiter verwendet werden.
  • Page 65: Datenkommunikation Über Die Rs232- Und Usb-B-Schnittstelle

    Datenkommunikation über die RS232- und USB-B-Schnittstelle 6.1 Allgemeines ® Der TitroLine 7500 KF verfügt über zwei serielle RS232-C- Schnittstellen zur Datenkommunikation mit anderen Geräten. Mit diesen beiden Schnittstellen lassen sich mehrere Geräte an einer PC - Schnittstelle betreiben. ® Zusätzlich verfügt der TitroLine 7500 KF alternativ zur RS232-1 noch über eine USB-B Schnittstelle, die ausschließlich für die Anbindung an einem PC genutzt werden kann.
  • Page 66 Befehl Beschreibung Antwort aaAA automatische Vergabe der Geräteadresse aaMC1...XX Auswahl einer Methode aaBF „Bürette füllen“. Aufsatz wird gefüllt. aaBV dosiertes Volumen in ml ausgeben aa0.200 aaDA dosiere Volumen ohne Füllen, mit Addition des Volumens aaDB dosiere Volumen ohne Füllen, Nullstellen des Volumens aaDO dosiere Volumen mit Füllen, ohne Addition des Volumens aaGDM...
  • Page 67: Anschluss Von Analysenwaage Und Drucker

    Anschluss von Analysenwaage und Drucker 7.1 Anschluss von Analysenwaagen Da sehr häufig die Probe auf einer Analysenwaage eingewogen wird, ist es auch sinnvoll diese Waage an den ® ® TitroLine 7500 KF anzuschließen. Um die Waage an den einen TitroLine 7500 KF anschließen zu können, muss die Waage über eine RS232-C-Schnittstelle verfügen und es muss ein entsprechend konfiguriertes Verbindungskabel vorhanden sein.
  • Page 68: Waagedateneditor

    7.2 Waagedateneditor Mit dem Druck auf die Funktionstaste <F5/Waagesymbol> ruft man den so genannten Waagedateneditor auf. Es erscheint eine Liste mit den vorhandenen Waagedaten: Abb. 127 Die Waagedaten können einzeln editiert werden. Nach einer Änderung erscheint ein Kreuz vor der Einwaage: Abb.
  • Page 69: Anschluss Von Drucker

    Abb. 130 Anschluss von Drucker Ergebnisse, Kalibrierdaten und Methoden können auf folgenden Medien ausgedruckt werden: • HP PCL kompatiblen Drucker (A4) Farbe und Monochrom (z.B. Laserdrucker) • Seiko DPU S445 (Thermopapier 112 mm Breite) • Auf dem USB-Stick im PDF- und CSV-Format Zum Anschluss der Drucker sind die USB Anschlüsse des Geräts zu verwenden.
  • Page 70: Wartung Und Pflege Des Titrators Titroline

    ® Wartung und Pflege des Titrators TitroLine 7500 KF Zur Erhaltung der Funktionsfähigkeit des Titriergerätes müssen regelmäßig Prüf- und Wartungsarbeiten durchgeführt werden. Voraussetzung für die Richtigkeit des Volumens und Funktionsfähigkeit des Titriergerätes sind regelmäßige Überprüfungen. Die Richtigkeit des Volumens wird bestimmt durch alle Chemikalien führenden Teile (Kolben, Zylinder, Ventil, Titrierspitze und Schläuche).
  • Page 71: Lagerung Und Transport

    Achtung: Alle Prüfungen und Wartungsarbeiten können applikationsabhängig auch anders festgelegt werden. Die einzelnen Intervalle können verlängert werden, wenn keine Beanstandung auftritt, Sie müssen wieder verkürzt werden, sobald eine Beanstandung aufgetreten ist. Die Prüfung der messtechnischen Zuverlässigkeit einschließlich Wartungsarbeiten wird als Serviceleistung (auf Bestellung mit Herstellerprüfzertifikat) von SI Analytics GmbH angeboten.
  • Page 72: Index

    Index Anschluss von Analysenwaagen 16, 67 max. Dosier-/Titriervolumen 54 Anschluss von Drucker 69 Maximale Titrationsdauer 52 Anzeige 25 Maximale Titrationsvolumen 53 Aufstellen 10 Methode drucken 40 Austausch des Glaszylinders 23 Methode editieren 38 Austauschen eines Wechselaufsatzes 18 Methode löschen 39 Automatischer Titrationsmodus 41 Methoden kopieren 39 Befehlsliste für RS-Kommunikation 65...
  • Page 73 TABLE OF CONTENT PAGE ® Technical Specifications of the Titrator TitroLine 7500 KF ........ 75 Summary ..........................75 ® Technical Data Titrator TitroLine 7500 KF ................76 Warning and safety information ....................79 Unpacking and First Operation ................80 Unpacking ..........................80 Connection and installation of titrator and magnetic stirrer TM 235 ........
  • Page 74 System Tone ......................... 132 Software Update ........................133 Data Communication via RS232- and USB-B interface ........135 General Information....................... 135 Chaining multiple devices —“Daisy Chain Concept“ ............135 Instruction Set for RS-Communication .................. 135 Connection of Analytical Balances and Printers ..........137 Connection of Analytical Balances ..................
  • Page 75: Technical Specifications Of The Titrator Titroline

    ® Technical Specifications of the Titrator TitroLine 7500 KF 1.1 Summary ® The TitroLine 7500 KF is suitable for the following applications: The possible range of titrations includes volumetric KF and Dead stop titrations with a maximum of 50 memorisable methods. ®...
  • Page 76: Technical Data Titrator Titroline ® 7500 Kf

    ® 1.2 Technical Data Titrator TitroLine 7500 KF Status Nov.21 2013 EMC compatibility according to the Council Directive: 2004/108/EG; CE sign: applied harmonized standards: EN 61326-1:2006 Low-voltage directive according to the Council Directive 2006/95/EG Testing basis EN 61 010, Part 1 ETL sign: Conforms to ANSI/ UL Std.
  • Page 77 USB –Typ B (“slave“) for connecting a PC USB –Typ A (“master“) for connecting: - USB keyboard - USB printer - USB “mouse“ (“mouse“), - USB data media e.g. USB stick - USB Hub Stirrer/pump TMKF: 12V DC out, 500mA power supply for stirrer TM 235 and KF titration stand TM 235 KF Polypropylene Housing material:...
  • Page 78 Status Nov 21. 2013 Specifications Titration Stand TM 235 KF In connection with the titrator TitroLine 7500 KF EMV – compatibility according to Council Directive 89/336/EWG; CE - Mark Transient emissions according to norm EN 50 081, part 1 Interference resistance according to norm EN 50 082, part 2 Low voltage directive according to Council Directive 73/23/EWG Last amended by directive 93/68/EWG;...
  • Page 79: Warning And Safety Information

    1.3 Warning and safety information The TitroLine 7500 KF corresponds to protection class III. It was manufactured and tested according to DIN ® EN 61 010, Part 1, Protective Measures for Electronic Measurement Devices and has left the factory in an impeccable condition as concerns safety technology.
  • Page 80: Unpacking And First Operation

    Unpacking and First Operation 2.1 Unpacking The titrator itself as well as all related accessory and peripheral parts have been carefully checked at the factory to ensure their correct function and size. The TitroLine ® 7500 KF modules consists of: •...
  • Page 81: Installation And Connection Of The Tm 235 Kf Titration Stand And Titration Vessel

    Fig. 2a Place the power supply easily accessable in order to be able to remove the titrator anytime easily from the power circuit. As a rule, the TM 235 magnetic stirrer is arranged to the right of the piston burette. The magnetic stirrer is connected to the 12V out-socket in the rear panel of the piston burette using the TZ 1577 connection cable (scope of delivery of the basic device) (cp.
  • Page 82 Fig. 3a Put all three white inner plastic adapters at the waste, solvent and moisture bottle. Fill the moisture bottle with molecular sieve. Connect the PVC and PTFE plastic tubes as shown in the next pictures. The PVC tubes are connected to the connectors at the back side of the TM 235 KF. The long PVC tube is used for the connection of the waste bottle.
  • Page 83 The moisture bottle is connected to the right connector (view from above) of the TM 235 KF. The waste (clear) bottle is connected to the left connector. Fig. 4 The PTFE tube from the clear waste bottle is adjusted to the ground (tube 1) of the titration vessel. The PTFE tube from the solvent bottle (tube 2) is adjusted as shown in the next two pictures: Fig.
  • Page 84 Fig. 6 The burette tip is placed into the left NS 14 opening and connected to the valve of the interchangeable unit. Put first some glass wool and then molecular sieve in the plastic moisture tube. Place it to the other NS opening as shown in the next picture.
  • Page 85: Connecting The Titrator - Combination With Accessories And Additional Devices

    2.4 Connecting the Titrator - Combination with Accessories and Additional Devices ® 2.4.1 Back panel of the titrator TitroLine 7500 KF Fig. 8 ® 2.4.2 Connection ports of the TitroLine 7500 KF The TitroLine® 7500 KF is equipped with the following connections: 1) µA measurement input for the connection of double platinum electrodes (KF 1100 or Pt 1200, Pt 1400) 2) USB-B interface for connection to a PC 3) On/Off switch...
  • Page 86: Connection Of Analytical Balances

    2.4.5 Connection of analytical balances Analytical balances are to be connected to the RS232-2 using an appropriate cable 2.5 Setting the Language of the Country The ex-factory default language setting is English. When the piston burette is switched on, the main menu will appear once the boot sequence is completed: Fig.
  • Page 87: Interchangeable Unit Wa

    2.6 Interchangeable unit WA Fig. 11 1) TZ 3871 - suction hose 2) TZ 3872 - connection hose 3) TZ 3873 - dosing hose without dosing tip and holding bracket; TZ 3874 - dosing hose with dosing tip and holding bracket 4) TZ 3801 - valve cover lid 5) TZ 3000 - 3/2-way valve 6) TZ 2003 - drying tube...
  • Page 88: Positioning And Replacing An Interchangeable Unit

    2.7 Positioning and Replacing an Interchangeable Unit The base unit comes with an RFID reader, and all the interchangeable units are equipped with an RFID transponder. This transponder can be used to store the following information: • Unit size (cannot be changed) •...
  • Page 89: Removing An Interchangeable Unit

    Fig. 12.c 2.7.2 Removing an interchangeable unit Removing the interchangeable unit is done in reverse order: • Depress the black button on the left, and then pull the interchangeable unit forward as is shown in fig. 12 c – 12 a. ! Please note: Removing the interchangeable unit is only possible as long as the piston is in the lower position (zero position).
  • Page 90 When used for the first time, it is recommended to enter here at least the name of the reagent being used. To do so, confirm the “Reagent“selection with <ENTER>, then type the name and possibly the concentration (fig. 12). Fig. 15 Press <OK>/<ENTER>...
  • Page 91: Initial Filling Or Rinsing Of The Entire Interchangeable Unit

    Fig. 18 2.8 Initial Filling or Rinsing of the Entire Interchangeable Unit Initial filling of the interchangeable unit is done using the <rinsing > rinsing programme. Fig. 19 On the main menu (fig. 19), press <MODE> key to navigate to the methods/system (fig. 20). Fig.
  • Page 92 Fig. 21 Confirm the selection by pressing <ENTER>: Fig. 22 At this point you can select the number of rinsing cycles (Fig. 19). Initial filling requires a minimum of two rinsing cycles. You can stop the rinsing operation (Fig. 20) at any time by pressing <STOP> and then resume rinsing with <START>.
  • Page 93: Filling The Titration Vessel With Solvent

    2.9 Filling the titration vessel with solvent The solvent is pumped from the solvent bottle into the titration vessel by pushing down the front part of the rocker switch on the titration stand TM 235 KF. Pump solvent into the titration vessel until the titration tip and the electrode are completely immersed.
  • Page 94: Working With The Titrator Titroline

    Piston rod Fig. 25 a Fig. 25 b Basically, it should be noted that within one and the same interchangeable unit only the specified cylinder size may be installed, since otherwise the coding which is memorised within the interchangeable unit will no longer match the cylinder size.
  • Page 95: Display

    Apart from alphanumeric input (a-z, A-Z, 0-9) and a few other functions, almost all functions can be performed using the front keyboard. Methods selection, rinsing, system settings <Mode>: Changing the current method, new method, copy and delete method <EDIT>: <ESC> will take you back to the previous menu level. <ESC>: Start and Stop of a current method <START>:...
  • Page 96: Manual Controller "Mouse

    3.3 Manual controller “mouse“ The “mouse“ (Fig. 23) can be used dosing applications and sample preparation methods. The mouse is not included in the scope of delivery of the TL 7500 basic unit. Fig. 26 Mode Black key Grey Key Dosage through Dosage method Start dosage Filling...
  • Page 97: Menu Structure

    3.5 Menu Structure There are 4 selection menus: • Start or main menu • Method parameters • Method selection • System settings After power-up, the main menu is always the first menu to appear. The method displayed will always be the last method that was used (Fig.
  • Page 98 <MODE>/F6 leads you to the “select method“ menu (Fig. 29). Fig. 29 Existing methods can be selected by pressing the <↓> und <↑> keys and confirming the selection with <OK>/<ENTER>. Once the selection made, you will return to the main menu with the newly selected method. If no method is selected, <ESC>...
  • Page 99: Main Menu

    3.6 Main Menu After power-up, the main menu is always the first menu to appear. The method displayed will always be the last method that was used (Fig. 32). Fig. 32 3.6.1 Standard methods of KF Titration If no titration has been performed yet, it is recommended to load one of the standard methods. These methods have default parameters and can generally be used immediately without changes.
  • Page 100: Automatic Kf Titration

    Standard methods KF Application Titer 1-Component (liquid standard) Determination of the concentration of the titration agent. Suitable for 1-component reagents. Standard is a liquid standard in ampoules with a concentration of 10 mg/g. Titer 1-Component (solid standard) Determination of the concentration of the titration agent.
  • Page 101 Fig. 35 When the final criteria are met, then there is an audible signal and Conditioning ready is shown on the display: Fig. 36 The conditioning remains active until the actual titration is started by pressing <F1/START>. You are prompted immediately to add the sample: Fig.
  • Page 102 Fig. 38 Fig. 39 The balance data can be entered using the front keyboard or an external keyboard. The input is to be confirmed with <OK>/<ENTER>. In the case of an automatic acceptance of the balance data, the weighed-in quantities will be read in from a memory.
  • Page 103 Fig. 41 Fig. 42 Fig. 43 Scaling of the chart will be done automatically. The result will be displayed at the end of the titration (Fig. 44 and 45). Fig. 44...
  • Page 104: Dosage

    <MODE>/<F6> can be used to view the titration curve or further results: Fig. 45 If a printer is connected, the results will either be printed according to the settings made for the method, or else they will be memorised in the form of a PDF- and CSV-file file on a connected USB stick. If no printer or USB stick is connected, the bottom left corner of the display will show the message “no printer“...
  • Page 105 Fig. 48 Fig. 49 The next dosage operation can be started immediately. Filling of the unit will occur automatically. This option can be switched off. Then the cylinder will be filled when the maximum cylinder volume is reached. The unit can be filled at any time using <FILL>.
  • Page 106 Fig. 51 Pressing the <ENTER>/<OK> key will cause the next dosing operation to be performed immediately: Fig. 52 In this case further dosages can be performed using <ENTER>/<OK>. Filling of the unit following dosage will not occur automatically here, unless the maximum cylinder volume has been reached. The unit can be filled at any time using <FILL>.
  • Page 107: Preparing Solutions

    3.6.4 Preparing Solutions The so-called “Preparing solutions“ method is a special dosing method. In this process, a solvent is dosed to a sample weight of a substance until the desired target concentration is reached: Fig. 53 Fig. 54 Fig. 55 If the calculated volume is greater than the maximum volume, an error message will be displayed and dosage will be suppressed for safety reasons: Fig.
  • Page 108: Method Parameters

    Method Parameters From the main menu (Fig. 53), <EDIT>/<F3> will take you to the method parameters: Fig. 57 4.1 Method editing and new method If you select <edit method> or <new method> you will be taken to the modification or new creation of a method. Selecting <new method>...
  • Page 109: Copy Methods

    Fig. 60 The standard name may be adopted or modified. Subsequently, you will be taken to the <Change method parameters> item. Please continue at this point with Chapter 4.6 4.3 Copy Methods Methods can be copied or stored with a new name. If you select this function, the current method will be copied and you can include a new name Fig.
  • Page 110: Print Method

    4.5 Print method The currently selected method can be printed on a connected printer or stored on an USB drive as PDF file Fig. 63 4.6 Change Method Parameters The input or modification of the method name was already described in Chapters 4.1 and 4.3. Fig.
  • Page 111: Result

    For an automatic titration, you can select from the following modes: • KF titration • Dead Stop titration 4.6.1.1 KF and Dead stop titration KF titration is a specific form of dead-stop titration. In normal dead-stop titration, titration is to the specified value in µA, which must be maintained for a defined time.
  • Page 112 Fig. 72 Please confirm your input with <OK</<ENTER>. 4.6.2.1 Calculation Formula The appropriate calculation formula is selected on the Formula selection submenu: Fig. 73 a The following calculation formulae are available for automatic titration mode: Formula Additional information Formula for calculating only the ml consumption (EP-B)*T*M*F1/(W*F2) Formula for calculating the...
  • Page 113 After selecting a formula, please confirm your selection with <OK>/<ENTER>: Fig. 69 The values for the blank value and the factors can be entered manually or read from a global memory. The values from a global memory were defined in advance by a titration or were manually entered. Fig.
  • Page 114 Storing results in global memories is described in Chapter 4.6.3.7 The values of the individual parameters of the selected calculation formula can now be input one by one. Fig. 73 4.6.2.2 Sample weight and volume (sample quantity) Fig. 74 Fig. 75 The Sample Quantity (W) item is used to select whether one is wishing to use a sample weight or a sample volume for titration or solution preparation.
  • Page 115 4.6.2.3 Formula unit The formula unit can be selected in the Unit submenu. Fig. 76 Once the selection made (e.g. %), the unit will also be displayed as piece of information on the display. Fig. 77...
  • Page 116 4.6.2.4 Formulae for the Preparation of Solutions A selection of special calculation formulae is available for the Prepare Solutions mode. The appropriate calculation formula is selected on the Formula Selection submenu: Fig. 78 A selection of 3 different calculation formulae is available: W*(100-Fa-Fb)*Fc/Fd - W*(100-Fb) / (100*Fe) +Ff W*(100-Fa-Fb)*(Fd/Fg ) - W*(100-Fb) / (100*Fg) +Ff W*(100-Fa-Fb)*Fc / (100*Fd)
  • Page 117 4.6.2.5 Decimal digits To conclude, it is possible to determine the number of decimal digits from 2-6. The standard setting is 2. Fig. 79 4.6.2.6 Statistics The mean value and relative standard deviation can be automatically calculated and documented by using statistics.
  • Page 118: Global Memories

    4.6.2.7 Global Memories Results of titrations can be written into one of the 50 global memories (M01 - M50) for additional calculations. Fig. 82 The mean value is written into the global memory when the statistic is switched on. You enter the submenu with <Enter/OK>.
  • Page 119: Titration Parameters

    Fig. 85 4.6.3 Titration parameters The <Titration parameter> submenu is used to determine the actual parameters of the method. The parameters were already introduced in chapter 4.6.2.1: Fig. 86 Fig. 87 Generally applicable titration parameters Depending on the titration mode (KF or dead stop titration) it is possible to enter a variety of parameters. The following parameters are valid for the KF and dead stop titration modes: •...
  • Page 120 Start delay time/Extraction time (KF): With dead-stop titration, the start wait time passes at the beginning of titration. In KF titration, the start wait time = the extraction time. The extraction time ends after the sample is supplied. The start wait/extraction time can be specified between 0 and 999 seconds.
  • Page 121 Fig. 91 In this type of titration, linear step width is used after the continuous titration stage. Titration direction (only dead stop titration mode) The titration direction can be set to “increase“ or “decrease“. For instance, if you wish to perform a sulfurous titration with iodine solution you have to select “increase“.
  • Page 122: Titration End

    Fig. 94 The values can be set between 40 and 220 m. The pre-setting is 100 mV. Low polarisation voltage: insensitive High polarisation voltage: sensitive 4.6.4 Titration end The end of a titration is reached, and the result will be calculated as soon as, or if, respectively: •...
  • Page 123 Minimum titration time The minimum titration time can be set between 0 – 9999 seconds. The default setting is 10 seconds. The minimum titration time prevents premature termination of the titration if there is a delay in the extraction of water from the sample.
  • Page 124: Dosing Parameter

    4.6.5 Dosing parameter Fig. 98 The dosing parameters (dosing speed, filling speed and max. dosing/titration volume) are determined for each method. This applies to all types of methods such as automatic titration, dosing and Solution Preparation. Fig. 99 The dosing speed can be set in % from 1 to 100 %. 100 % is the maximum dosing speed. Interchangeable unit Max.
  • Page 125: Sample Identification

    Fig. 100 If”off“is selected for filling, filling it will not occur automatically after each dosing step. If “intelligent before“ is selected for filling, a verification will be performed each time prior to the next dosing step in order to determine whether the dosing step can still be made without a filling operation. Should this prove to be impossible, the first thing to occur is filling, followed by the dosing step.
  • Page 126: Documentation

    4.6.7 Documentation Fig. 103 Three different format settings are available for documentation on a printer or USB device: “short”, “standard (with curve)” and “GLP”: Fig. 104 Method type Short documentation Standard GLP-Documentation documentation Automatic titration Method name, date, time, duration Same as ‘Short Same as ‘Standard of titration, sample description,...
  • Page 127: System Settings

    System settings Fig. 105 From the main menu (Fig. 107), <SYS>/<F7> will get you to the system settings: Fig. 106 Setting the national language was already described in Chapter 2.5. 5.1 Interchangeable Unit - Reagents Each interchangeable unit is equipped with an RFID transponder. This transponder can be used to store the following information: •...
  • Page 128 Fig. 107 Fig. 108 Fig. 109 If you leave the <Reagents WA> menu using <ESC>, you will always be prompted to know whether you wish to adopt the values: Fig. 110 If <Yes> is selected, the updated values will be written into the RFID transponder of the interchangeable unit.
  • Page 129: Rs232 Settings

    5.2 RS232 Settings ® The <RS232 settings> item can be used to determine the device address of the TitroLine 7500 KF and set the parameters of the two RS232 interfaces independent from each other: Fig. 111 The device address can be set from 0 – 15. Address 1 is the default setting: Fig.
  • Page 130 Fig. 114 The parity can be selected amongst <No>, <Even> and <Odd>. <No> is the default setting. Fig. 115 You may select between 7 and 8 data bits. 8 bits is the default setting. Fig. 116 The RS232 parameters can be set to the factory settings.
  • Page 131: Date And Time

    5.3 Date and Time The factory time setting is Central European Time. This setting may be changed, where necessary: Fig. 117 5.4 Password The activation of the password has not yet been implemented for the current version 12_18. Please contact SI Analytics for sending you an update version.
  • Page 132: Printer

    5.6 Printer For connecting printers please refer to chapter 7.3. Fig. 119 5.7 Device Information <Device Information> contains information about • the current software version • the serial number of the device • printer driver and update version • device address •...
  • Page 133: Software Update

    Fig. 121 No sounds will occur when the external keyboard is used. 5.9 Software Update Fig. 122 An update of the device software requires a USB stick containing a new version. For this operation, the two files that are needed have to be located in the root directory of the USB device: Plug the USB device into a free USB-A port, wait for some seconds, and then select the Software Update function.
  • Page 134 Fig. 123 After starting the update using <OK/ENTER>, next thing to appear is the following graphic: Fig. 124 which will change after a few seconds to the following display: Fig. 125 Upon completion of the update (approx. 2-3 minutes), the device will shut down the software completely and proceed to a new start.
  • Page 135: Data Communication Via Rs232- And Usb-B Interface

    Data Communication via RS232- and USB-B interface 6.1 General Information ® The burette TitroLine 7500 KF has two serial RS232-C interfaces to communicate data with other devices. By means of these two interfaces it is possible to operate several devices on one computer (PC) interface. ®...
  • Page 136 Command Description Reply aaAA automatic allocation of device address aaMC1...XX choosing a method aaBF “filling burette“. Aufsatz wird gefüllt. aaBV output of dosed volume in ml aa0.200 aaDA dose volume without filling, with adding the volume aaDB dose volume without filling, reset of the volume aaDO dose volume with filling, without adding the volume aaGDM...
  • Page 137: Connection Of Analytical Balances And Printers

    Connection of Analytical Balances and Printers Connection of Analytical Balances As it often happens that the sample is weighed in on an analytical balance, it makes sense to connect this ® ® balance to the TitroLine 7500 KF. To connect the balance to the TitroLine 7500 KF, the balance must have a RS232-C-interface and the connection cable must be configured accordingly.
  • Page 138: Balance Data Editor

    7.2 Balance data editor Pressing the die <F5/balance symbol > function key will invoke the so-called balance data editor. A list with the existing balance data will appear: Fig. 127 The balance data can be edited one by one. Following a change, a cross will appear opposite the weighed-in quantity: Fig.
  • Page 139: Connection Of Printers

    Fig. 130 7.3 Connection of Printers The results, calibration data and methods can be printed on the following media: • HP PCL compatible printer (A4) chromatic and monochrome (e.g. laser printer) • Seiko DPU S445 (Thermo paper 112 mm width) •...
  • Page 140: Maintenance And Care Of The Titroline

    ® Maintenance and Care of the TitroLine 7500 KF The preservation of the proper functioning of the piston burette requires testing and maintenance work to be performed on a regular basis. Regular inspections are essential prerequisites for the correctness of the volume and the proper functioning of the piston burette.
  • Page 141: Storage And Transportation

    Please note: Depending on the respective application, there may be different specifications for the entirety of the inspection and maintenance work to be performed. The individual intervals may be extended if no complaints occur, but they will have to be shortened again as soon as any problem has arisen.
  • Page 142: Index

    Index analytical balance 86 manual controller TZ 3880 („Mouse“) 85 Balance data editor 138 max dosing/titration volume 124 Calculation Formula 112 Method name 108 change method parameters 110 method parameters 108 Connection of Analytical Balances 137 new method 108 Connection of Printers 139 Password 131 Connection ports 85 Polarization voltage 121...
  • Page 143 TABLE DE MATIÈRES PAGE ® Caractéristiques techniques du titrateur TitroLine 7500 KF ......145 Résumé ..........................145 ® Caractéristiques techniques du titrateur TitroLine 7500 KF ..........146 Notes d'avertissement et de sécurité et de sécurité ............149 Mise en place et mise en service ................150 Déballage ..........................
  • Page 144 Unité interchangeable réactifs ....................197 Réglages RS232 ........................199 Date et heure ......................... 201 Mot de passe ......................... 201 RESET ..........................201 Imprimante ..........................202 Informations sur l’appareil ..................... 202 Tonalités du système ......................202 Mise à jour du logiciel ......................203 Communication de données via l’interface RS 232 et USB-B ......
  • Page 145: Caractéristiques Techniques Du Titrateur Titroline

    ® Caractéristiques techniques du titrateur TitroLine 7500 KF 1.1 Résumé ® Le TitroLine 7500 KF est un titrateur appropriée pour les applications suivantes: La gamme des titrages possibles comprend les titrages KF volumétriques et à point final avec un maximum de 50 méthodes mémorisables.
  • Page 146: Caractéristiques Techniques Du Titrateur Titroline ® 7500 Kf

    ® 1.2 Caractéristiques techniques du titrateur TitroLine 7500 KF Status July. 01th 2012 Signe CE : Compatibilité électromagnétique selon la directive 2004/108/CE du Conseil ; norme harmonisée appliquée : EN 61326/1:2006. Directive sur les basses tensions selon la directive 2006/95/CE du Conseil, norme harmonisée appliquée : EN 61 010, Partie 1.
  • Page 147 USB type B (« Slave ») pour raccordement ordinateur USB type A (« Master ») pour raccordement - clavier USB - imprimante USB - dispositif de pointage USB (« souris »), - supports d’enregistrement USB tels que, par exemple, clé USB - Hub USB Raccordement agitateur/ TM 235 KF :...
  • Page 148 Status Nov 21. 2013 Specifications Titration Stand TM 235 KF In connection with the titrator TitroLine 7500 KF EMV – compatibility according to Council Directive 89/336/EWG; CE - Mark Transient emissions according to norm EN 50 081, part 1 Interference resistance according to norm EN 50 082, part 2 Low voltage directive according to Council Directive 73/23/EWG Last amended by directive 93/68/EWG;...
  • Page 149: Notes D'avertissement Et De Sécurité Et De Sécurité

    1.3 Notes d'avertissement et de sécurité et de sécurité ® L’appareil TitroLine 7500 KF répond à la classe de protection III. Il a été construit et contrôlé conformément à la norme EN 61 010 - 1, partie 1, mesures de protection pour des appareils de mesure électroniques, et a quitté...
  • Page 150: Mise En Place Et Mise En Service

    Mise en place et mise en service 2.1 Déballage Le titrateur à proprement dit et tous ses accessoires ainsi que les pièces périphériques ont été minutieusement contrôlés à l'usine pour s'assurer de leur bon fonctionnement et taille. Les modules du TitroLine ®...
  • Page 151: Installation Et Raccordement Du Support De Titrage Tm 235 Kf Et Du Récipient De Titrage

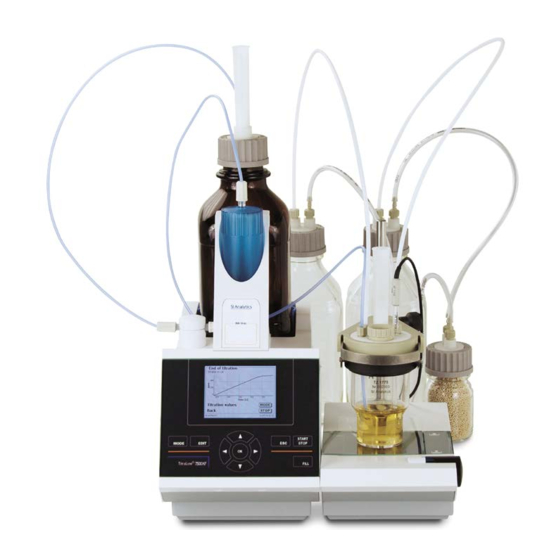
    Fig. 2a L'alimentation reste facile d’accès de sorte qu’il soit toujours aisé de pouvoir déconnecter le titrateur de sa prise. En règle générale, l’agitateur magnétique TM 235 est disposé à droite de la burette à piston. L’agitateur magnétique se raccorde à la douille 12 V « out » au dos de la burette à piston au moyen du câble de raccordement TZ 1577 (fourniture appareil de base) (voir également fig.
  • Page 152 Fig. 3a Placer les trois adaptateurs internes en plastique blanc sur les bouteilles de décharge, de solvant et le flacon sécheur. Remplir le flacon sécheur avec le tamis moléculaire. Raccorder les tuyaux plastiques en PVC et PTFE comme indiqué dans les illustrations suivantes. Les tuyaux en PVC sont raccordés aux connecteurs situés sur la face arrière du TM 235 KF.
  • Page 153 Le flacon sécheur est raccordé au connecteur droit (vue du dessus) du TM 235 KF. La bouteille de décharge (transparente) est raccordée au connecteur gauche. Fig. 4 Le tuyau en PTFE de la bouteille de décharge transparente est ajusté au fond (tuyau 1) du récipient de titrage. Le tuyau en PTFE de la bouteille de solvant (tuyau 2) est ajusté...
  • Page 154 Fig. 6 La pointe de la burette est placée dans l'ouverture NS 14 gauche et raccordée à la vanne de l'unité interchangeable. Introduire d'abord de la fibre de verre et ensuite le tamis moléculaire dans le tuyau sécheur en plastique. Le placer dans l'autre ouverture NS comme indiqué...
  • Page 155: Connexions Du Titrateur. Combination Avec Accessoires Et Autres Appareils

    2.4 Connexions du titrateur. Combination avec accessoires et autres appareils ® 2.4.1 Dos du titrateur TitroLine 7500 KF Fig. 8 ® 2.4.2 Connexions du titrateur TitroLine 7500 KF The TitroLine® 7500 KF is equipped with the following connections: 1) Entrée de mesure µA pour le raccordement d’électrodes doubles de platine (KF 1100, Pt 1200, Pt 1400) 2) Interface USB-B pour le raccordement à...
  • Page 156: Raccordement De Balances D'analyse

    2.4.6 Raccordement de balances d’analyse Les balances d’analyse se raccordent à l’interface RS232 2 avec un câble correspondant. 2.5 Setting the Language of the Country 2.6 Réglage de la langue du pays Au départ de l’usine, la langue est réglée sur l’anglais. Après la mise en circuit de le titrateur et achèvement du cycle de démarrage, le menu principal s’affiche : Fig.
  • Page 157: Unité Interchangeable Wa

    2.7 Unité interchangeable WA Fig. 11 1) TZ 3871 – Tuyau d’aspiration 2) TZ 3872 – Tuyau de raccordement 3) TZ 3873 – Tuyau de dosage sans pointe de dosage ni support ; TZ 3874. – Tuyau de dosage avec pointe de dosage et support 4) TZ 3801 –...
  • Page 158: Montage Et Échange D'une Unité Interchangeable

    2.8 Montage et échange d’une unité interchangeable L’unité de titrage intègre un lecteur RFID et les unités interchangeables intègrent toutes un transpondeur RFID. Les informations suivantes sont enregistrées dans ce transpondeur : • Dimensions de l’unité interchangeable (non modifiable) • ID de l’unité...
  • Page 159: Dépose De L'unité Interchangeable

    Fig. 12.c 2.8.2 Dépose de l’unité interchangeable La dépose de l’unité interchangeable s’effectue en inversant les opérations : • Appuyer sur le bouton noir à gauche et tirer l’unité interchangeable vers l’avant comme représenté à la Fig. 12.c – 12.a. ! Important : Il est possible d’enlever l’unité...
  • Page 160 Lors de la première utilisation, il est recommandé d’inscrire ici au moins le nom du réactif utilisé. A cet effet, confirmer la sélection « Réactif » avec <ENTER>, puis taper le nom et éventuellement la concentration (Fig. 15). Fig. 15 Confirmer avec <OK>/<ENTER>...
  • Page 161: Initial Filling Or Rinsing Of The Entire Interchangeable Unit

    Fig. 18 2.9 Initial Filling or Rinsing of the Entire Interchangeable Unit 2.10 Premier remplissage ou rinçage de l’unité interchangeable complète Effectuer le premier remplissage de l’unité interchangeable avec le programme de rinçage <Rinçage>. A partir du menu principal (fig 19), Fig.
  • Page 162 Fig. 21 Confirmer la sélection en appuyant sur <ENTER> : Fig. 22 Il est alors possible de sélectionner le nombre de cycles de rinçage (Fig. 23). Pour un premier remplissage, rincer au moins deux fois. Il est possible d’interrompre à tout moment le processus de rinçage (Fig. 23) en appuyant sur <STOP>...
  • Page 163: Remplissage Du Récipient De Titrage Avec Le Solvant

    2.11 Remplissage du récipient de titrage avec le solvant Le solvant est aspiré de la bouteille de solvant vers le récipient de titrage en enfonçant la partie frontale de l'interrupteur du support de titrage TM 235 KF. Aspirer le solvant dans le récipient de titrage jusqu'à ce que la pointe de titrage et l'électrode soient complètement immergées.
  • Page 164 Cylindre en verre Tige de piston Fig. 25 Piston rod Fig. 25 a Fig. 25 b Veiller par principe à monter dans l’unité interchangeable uniquement le cylindre de dimensions appropriées car, sinon, le codage mémorisé dans l’unité interchangeable ne coïnciderait plus avec la taille du cylindre. Cela entraînerait des erreurs de dosage.
  • Page 165: Travailler Avec Le Titrateur Titroline

    ® Travailler avec le titrateur TitroLine 7500 KF 3.1 Clavier frontal A l’exception des entrées alphanumériques (a-z, A-Z, 0-9) et de quelques rares fonctions, l’exécution de toutes les fonctions peut être commandée via le clavier frontal. Sélection des méthodes, rinçage, configuration du système <Mode>: Modification de la méthode actuelle, nouvelle méthode, copie et suppression d’une méthode <EDIT>:...
  • Page 166: Dispositif De Pointage

    3.3 Dispositif de pointage Le dispositif de pointage (« souris », Fig. 26) est nécessaire pour le dosage. La souris n'est pas comprise dans les fournitures livrées avec l'appareil de base TL 7500. Fig. 26 Mode Touche noire Touche grise Dosage via méthode de dosage Lancement du dosage Remplissage...
  • Page 167: Menu Structure

    3.5 Menu Structure Le système comporte 4 menus de sélection : • Menu de départ ou menu principal • Paramètres de méthode • Sélection des méthodes • Configuration du système Après la mise en circuit, l’écran affiche toujours le menu principal. La méthode utilisée en dernier lieu est toujours affichée (Fig.
  • Page 168 < Avec <MODE>/F6, on accède au menu de sélection des méthodes (Fig. 29). Fig. 29 Sélectionner les méthodes existantes avec <↓> undo <↑> et confirmer sa sélection avec <OK>/<ENTER>. Après la sélection, le système revient aussitôt au menu principal avec la méthode nouvellement sélectionnée. Si aucune méthode n’a été...
  • Page 169: Menu Principal

    3.6 Menu principal Après la mise en circuit, le menu principal s’affiche toujours. La méthode utilisée en dernier lieu est toujours affichée (Fig. 32). Fig. 32 3.6.1 Méthodes standard de titrage KF Si aucun titrage n'a encore été réalisé, il est recommandé de charger l'une des méthodes standard. Ces méthodes ont des paramètres par défaut et peuvent généralement être utilisées directement sans apporter de modifications.
  • Page 170: Titrage Kf Automatique

    Méthodes standard KF Application Titer 1-Component (liquid standard) Détermination de la concentration de l'agent de titrage. Convient aux réactifs à 1 composant. Le standard est un liquide de référence en ampoules ayant une concentration de 10 mg/g. Titer 1-Component (solid standard) Détermination de la concentration de l'agent de titrage.
  • Page 171 Fig. 35 Lorsque les critères définitifs sont remplies, il ya un signal sonore et <conditionnement fini> est affiché à l'écran: Fig. 36 Le conditionnement reste actif jusqu'à ce que le titrage à proprement dit ait débuté en appuyant sur <F1/START>. Il vous sera immédiatement demandé d'ajouter l'échantillon : Fig.
  • Page 172 Fig. 38 Fig. 39 Il est possible d’entrer les données de balance au moyen du clavier frontal ou du clavier externe. Pour valider les entrées appuyer sur <OK>/<ENTER>. En cas de reprise automatique des données de la balance, les quantités pesées sont lues dans une mémoire. Si la mémoire ne contient pas de données de balance, un message s’affiche indiquant qu’il n’existe pas de données de balance : Fig.
  • Page 173 Fig. 41 Fig. 42 Fig. 43 La mise à l'échelle du graphe sera effectuée automatiquement. Le résultat sera affiché à la fin du titrage (Fig. 44 et 45).
  • Page 174: Dosage

    Fig. 44 <MODE>/<F6> peut être utilisé pour afficher la courbe de titrage ou d'autres résultats : Fig. 45 Si une imprimante est connectée, les résultats sont sortis sur imprimante selon la configuration de la méthode et/ou mémorisés sous forme de fichier PDF sur une clé USB raccordée. Si aucune imprimante ou aucune clé USB n’est raccordée, le message «...
  • Page 175 Fig. 47 Le volume dosé s’affiche brièvement avant que le menu principal s’affiche à nouveau. Fig. 48 Fig. 49 Il est possible de lancer aussitôt le dosage suivant. L’unité interchangeable n’est pas automatiquement remplie après le dosage, à moins que le volume de cylindre maximal ne soit atteint ou que l’option de remplissage automatique ne soit activée.
  • Page 176: Préparation De Solutions

    Fig. 50 Le volume est entré et dosé après la confirmation avec <ENTER>/<OK> : Fig. 51 Pour exécuter d’autres dosages, appuyer sur <ENTER>/<OK>. L’unité Fig. 52 L’unité interchangeable n’est pas automatiquement remplie après le dosage, à moins que le volume de cylindre maximal ne soit atteint.
  • Page 177 Fig. 53 Fig. 54 Fig. 55 Si le volume calculé est supérieur au volume maximal réglé, un message d’erreur s’affiche et, pour des raisons de sécurité, le dosage n’est pas effectué : Fig. 56...
  • Page 178: Paramètres De Méthode

    Paramètres de méthode A partir du menu principal (Fig. 53), on accède aux paramètres de méthode avec <EDIT>/<F3> : Fig. 57 4.1 Edition d’une méthode et nouvelle méthode En sélectionnant <Editer une méthode> ou <Nouvelle méthode>, on accède au menu permettant de modifier une méthode ou de créer une nouvelle méthode.
  • Page 179: Copie De Méthodes

    Une fois la méthode sélectionnée, le système demande aussitôt l’entrée du nom de méthode : Fig. 60 Il est possible de reprendre le nom standard tel quel ou de le modifier. Ensuite, le système commute sur <Modification des paramètres de méthode>. Continuer au chapitre 4.6. 4.3 Copie de méthodes Il est possible de copier des méthodes et de les enregistrer sous un nouveau nom.
  • Page 180: Impression De La Méthode

    4.5 Impression de la méthode Il est possible d’imprimer la méthode actuellement sélectionnée sur une imprimante raccordée ou de la mémoriser sous forme de fichier PDF sur une clé USB. Fig. 63 4.6 Modification des paramètres de méthode L’entrée et la modification du nom de méthode ont déjà été décrites aux chapitres 4.1 et 4.3. Fig.
  • Page 181: Titrages Kf Et À Point Final

    Pour un titrage automatique, vous pouvez sélectionner les modes suivants : • Titrage KF • Titrage à point final 4.6.1.1 Titrages KF et à point final Le titrage KF est une forme particulière de titrage à point final. Dans le titrage à point final classique, le titrage est effectué...
  • Page 182 Le texte du résultat peut contenir jusqu’à 21 signes alphanumériques, signes spéciaux compris : Fig. 67 Confirmer l’entrée avec <OK</<ENTER>. 4.6.2.1 Formules Dans l’option de menu Sélection de la formule, sélectionner la formule de calcul appropriée : Fig. 68 Les formules de calcul suivantes sont disponibles: Information complémentaire Formule Formule pour calculer seulement la...
  • Page 183 Après sélection d’une formule, confirmer avec <OK>/<ENTER> : Fig. 69 Il est possible d’entrer les valeurs pour la valeur à blanc, les facteurs ou de les lire dans la mémoire globale. Les valeurs contenues dans la mémoire globale ont été préalablement déterminées par titrage puis mémorisées ou entrées manuellement.
  • Page 184 La mémorisation de résultats dans des mémoires globales est décrite au chapitre 4.6.3.7. Il est alors possible d’entrer séparément les différents paramètres des formules de calcul sélectionnées : Fig. 73 4.6.2.2 Quantité pesée et volume d’échantillon (quantité d’échantillon Fig. 74 Fig.
  • Page 185: Unité De Formule

    • Volume d’échantillon fixe : L’utilisateur entre un volume d’échantillon fixe en ml. Celui-ci est ensuite automatiquement utilisé lors de chaque essai de la méthode sans interrogation du volume d’échantillon. 4.6.2.3 Unité de formule L’unité de formule peut être sélectionnée dans l’option de menu Unité. Fig.
  • Page 186: Ajout De Formules Pour Solutions

    4.6.2.4 Ajout de formules pour solutions Le mode ajout de solutions propose à la sélection des formules de calcul particulières. Sélectionner la formule de calcul adéquate dans l’option de menu Sélection de formule : Fig. 78 Il est possible de sélectionner 3 formules de calcul différentes : W*(100-Fa-Fb)*Fc/Fd - W*(100-Fb)/(100*Fe) +Ff W*(100-Fa-Fb)*(Fd/Fg ) - W*(100-Fb)/(100*Fg) +Ff W*(100-Fa-Fb)*Fc/(100*Fd)
  • Page 187: Décimales

    4.6.2.5 Décimales Enfin, il est également possible de fixer le nombre des décimales de 0 à 6. Le réglage standard est 2 ou 3 Fig. 79 4.6.2.6 Statistique L’utilisation de la statistique permet de calculer et de documenter automatiquement la moyenne et l’écart type relatif.
  • Page 188: Mémoires Globales

    4.6.2.7 Mémoires globales Il est possible de mémoriser les résultats de titrages dans 50 mémoires globales (M01 – M50) en vue de calculs ultérieurs. Fig. 82 Lorsque la statistique est activée, la moyenne est mémorisée dans la mémoire globale. Avec <Enter/OK>, on accède au sous-menu.
  • Page 189: Paramètres De Titrage

    Fig. 85 4.6.3 Paramètres de titrage L’option de menu <Paramètres de titrage> permet de déterminer les paramètres de la méthode à proprement dit : Les paramètres ont déjà été présentés dans le chapitre 4.6.2.1 : Fig. 86 Fig. 87 Paramètres de titrage généralement valables Il est possible d’entrer différents paramètres selon le mode de titrage (KF or dead stop titration) Les paramètres suivants sont valables pour tous les modes de titrage KF ou dead stop: •...
  • Page 190 Temps d’attente de départ /Temps d´extraction (KF): Avec le titrage à point final, le temps d'attente de départ s'écoule au début du titrage. Dans le titrage KF, le temps d'attente de départ = le temps d´extraction. Le temps d´extraction s'achève après avoir fourni l'échantillon. Les temps d’attente de départ / temps d´extraction peuvent être réglés entre 0 et 999 secondes.
  • Page 191 Fig. 91 Dans ce type de titrage, le pas de dosage linéaire est utilisé après la phase de titrage en continu. Sens de titrage (seulement dans le mode de titrage à point final) Le sens de titrage peut être réglé sur « croissant » ou « décroissant ». Par exemple, si vous souhaitez réaliser un titrage du soufre par une solution d'iode, vous devez sélectionner «...
  • Page 192: Fin Du Titrage

    Fig. 94 Il est possible de régler les valeurs de 40 à 220 mV. la valeur est réglée par défaut sur 100 mV. Tension de polarisation basse : insensible Tension de polarisation élevée : sensible 4.6.4 Fin du titrage La fin d’un titrage est atteinte et le résultat est calculé lorsque : •...
  • Page 193 Maximum titration temps Le maximum titration temps peut être réglé entre 0 et 9999 secondes. Le réglage par défaut est de 600 secondes. Le maximum titration temps est généralement utilisé pour le titrage KF, qui peut générer une dérive en continu élevée résultant d'une réaction secondaire et ne peut donc pas atteindre un point final stable.
  • Page 194: Paramètres De Dosage

    • l'on utilise un très petit pas de dosage (par exemple, 0,001 ml) • l'on utilise un titre de 1 mg/ml • l'on génère une réaction secondaire avec une valeur élevée de dérive 4.6.5 Paramètres de dosage Fig. 98 Les paramètres de dosage (vitesse de dosage, vitesse de remplissage et volume maximum de dosage/titrage) sont fixés pour chacune des différentes méthodes.
  • Page 195: Désignation De L'échantillon

    Fig. 100 L’option remplissage « Arrêt » signifie que le remplissage ne s’effectue pas automatiquement après chaque pas de dosage. Dans le cas de l’option remplissage « intelligent avant », le système contrôle toujours avant le pas de dosage suivant si le pas de dosage peut encore être exécuté sans procédure de remplissage. Si ce n’est pas possible, le remplissage est effectué...
  • Page 196: Documentation

    4.6.7 Documentation Fig. 103 Sur l’imprimante ou la clé USB, 3 réglages différents sont disponibles pour le format de la documentation : « Abrégé » « Standard avec courbe » et « GLP » (GLP = BPL) : Fig. 104 Type de méthode Documentation abrégée Documentation standard...
  • Page 197: Configuration Du Système

    Configuration du système Fig. 105 Pour accéder à la configuration du système à partir du menu principal (Fig. 105), actionner <SYS>/<F7> ou activer <MODE> par les touches du clavier frontal, puis <Configuration du système> : Fig. 106 Le réglage de la langue du pays a déjà été décrit au chapitre 2.5. 5.1 Unité...
  • Page 198 Fig. 107 Fig. 108 Fig. 109 Lorsque l’on quitte le menu <Unité interchangeable réactifs > avec <ESC>, le système demande toujours si l’on désire reprendre les valeurs. Fig. 110 Si la réponse est <Oui>, les valeurs actualisées sont inscrites dans le transpondeur RFID de l’unité interchangeable.
  • Page 199 5.2 Réglages RS232 ® Dans le menu <Réglages RS232>, il est possible de déterminer l’adresse de l’appareil de la TITRONIC 500 et de régler séparément les paramètres des deux interfaces RS232 : Fig. 111 L’adresse de l’appareil peut être réglée sur 0 à 15. L’adresse 1 est préréglée : Fig.
  • Page 200 Fig. 114 La parité peut être réglée sur <No> (sans), <Even> (paire) et <Odd> (impaire). Elle est préréglée sur <No> : Fig. 115 Les bits de données peuvent être réglés entre 7 et 8 bits. Ils sont préréglés sur 8 bits: Fig.
  • Page 201: Date Et Heure

    5.3 Date et heure Au départ de l’usine, l’heure est réglée sur l’heure de l’Europe centrale. Si besoin, le réglage peut être modifié: Fig. 117 5.4 Mot de passe La fonction ‘Mot de passe’ n’est actuellement pas encore validée. Veuillez demander un update à votre revendeur.
  • Page 202: Imprimante

    5.6 Imprimante Pour le raccordement d’imprimantes, veuillez vous reporter au chapitre 7.3. Fig. 119 5.7 Informations sur l’appareil Les <Informations sur l’appareil> contiennent les informations suivantes : • Version logiciel actuelle • Numéro de série de l’appareil • Pilote d’imprimante et version mise à jour •...
  • Page 203: Mise À Jour Du Logiciel

    Fig. 121 Remarque : L’actionnement du clavier externe ne produit aucun son. 5.9 Mise à jour du logiciel Fig. 122 Mise à jour du logiciel de l’appareil requiert une clé USB sur laquelle est enregistrée la nouvelle version. Les deux fichiers nécessaires doivent se trouver dans le répertoire root de la clé USB : Connecter la clé...
  • Page 204 Fig. 123 L’affichage suivant apparaît seulement après le lancement de mise à jour avec <OK/ENTER> : Fig. 124 Puis il commute quelques secondes après sur l’affichage suivant : Fig. 125 Après mise à jour (env. 2-3 minutes), l’appareil arrête complètement le logiciel et démarre à nouveau. Important : Lors de mise à...
  • Page 205: Communication De Données Via L'interface Rs 232 Et Usb-B

    Communication de données via l’interface RS 232 et USB-B 6.1 Généralités ® Le TitroLine 7500 KF est dotée de deux interfaces sérielles RS 232 C pour la communication de données avec d’autres appareils. Ces deux interfaces permettent de faire fonctionner plusieurs appareils sur une interface de ®...
  • Page 206 12.5 volume à doser en ml <CR> <LF> suffixe de fin de l’ordre Command Description Reply aaAA Affectation automatique de l’adresse de l’appareil aaMC1...XX Sélection d’une méthode aaBF « Remplir la burette ». L’unité interchangeable est remplie. aaBV Sortir le volume dosé en ml aa0.200 aaDA Doser le volume sans remplissage, avec addition du volume aaY...
  • Page 207: Raccordement De Balances D'analyse Et D'imprimantes

    Raccordement de balances d’analyse et d’imprimantes 7.1 Raccordement de balances d’analyse Les échantillons étant très fréquemment pesés sur une balance d’analyse, il est rationnel de raccorder cette balance à le TitroLine® 7500 KF. Pour pouvoir raccorder la balance à l’interface RS232 (2) de le TitroLine® 7500 KF la balance doit posséder une interface RS 232 C et il faut disposer d’un câble de raccordement de configuration correspondante.
  • Page 208: Editeur De Balance

    7.2 Editeur de balance Une pression sur la touche de fonction <F5/Symbole de balance> permet d’appeler l’éditeur dit de données de balance. Une liste contenant les données de balance existantes s’affiche : Fig. 127 Il est possible d’éditer séparément les données de balance. Après une modification, une croix s’affiche devant la quantité...
  • Page 209: Imprimante

    Fig. 129 7.3 Imprimante Il est possible d’imprimer les résultats, les données de calibration et les méthodes sur les supports suivants : • Imprimante compatible HP PCL (A4) monochrome et chromatique • Seiko DPU S445 (papier thermique 112 mm de largeur) •...
  • Page 210: Maintenance Et Entretien De Le Titrateur Titroline

    ® Maintenance et entretien de le titrateur TitroLine 7500 KF Pour conserver sa capacité de fonctionnement au titratuer il faut qu’elle soit l’objet de contrôles et de travaux de maintenance réguliers. La justesse du volume et la capacité de fonctionnement de sysème de titration sont soumises à la condition de contrôles réguliers.
  • Page 211: Stockage Et Transport

    Kapitel 8 Lagerung und Transport est proposé par la société SI Analytics GmbH comme prestation de service (sur commande avec certificat de contrôle du fabricant). A cet effet, l’appareil de titrage doit être envoyé à la société SI Analytics GmbH. Description détaillée des travaux de contrôle et d’entretien : Essuyer avec un chiffon doux (et si besoin avec un peu d’eau et de nettoyant ménager ordinaire).
  • Page 212: Index

    Index Affichage 165 notes d'avertissement 149 Ajout de formules pour solutions 186 Nouvelle méthode 178 balances d’analyse 155 Paramètres de dosage 194 Caractéristiques techniques 146 Paramètres de méthode 178 Clavier frontal 165 Paramètres de titrage 189 Clavier PC externe 166 Pauses dans l’utilisation 210 clé...
  • Page 214 SI Analytics GmbH Hattenbergstr. 10 Tel. +49.(0)6131.66.5111 Fax. +49.(0)6131.66.5001 55122 Mainz Deutschland, Germany, Allemagne, Alemania E-Mail: si-analytics@xyleminc.com www.si-analytics.com SI Analytics is a trademark of Xylem Inc. or one of its subsidiaries. © 2013 Xylem, Inc. Version 121126 D EDV 8272310...

Table des Matières