
Manuels Connexes pour Ugolini MiniGEL PLUS


Sommaire des Matières pour Ugolini MiniGEL PLUS
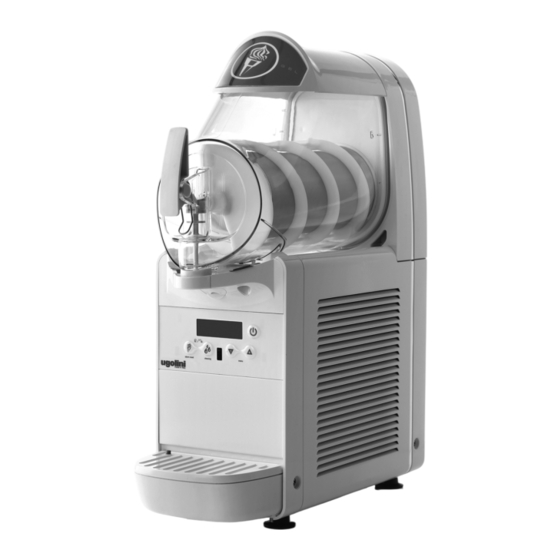
- Page 1 MANUALE D’ISTRUZIONE O P E R A T O R ’ S M A N U A L CARNET D’INSTRUCTIONS GEBRAUCHSANWEISUNG MANUAL DE INSTRUCCIONES...
-
Page 2: Dichiarazione Di Conformità Ce
EC DECLARATION OF CONFORMITY We Ugolini spa, via dei Pioppi, 33 20090 Opera Milano ITALY declare, under our responsibility, that the apparatus COLD DRINK DISPENSER - Trademark: UGOLINI S.p.A. - Manufacturer: UGOLINI S.p.A. - Model: MiniGEL 1/2/3 PLUS - 230V 50Hz are in conformity with the following... - Page 3 Ugolini s.p.a., un esborso superiore 2. Per garanzia si intende la sostituzione o riparazione gratuita delle parti compo- al prezzo versato dall'acquirente per l'acquisto del prodotto.
-
Page 4: Caratteristiche Tecniche
1 CARATTERISTICHE TECNICHE sporto. In caso contrario, provvedere immediatamente ad effet- tuare il reclamo presso il vettore. 3 Appoggiare il distributore su un banco in grado di soste- nerne il peso, anche a carico completo, tenendo presente quanto detto all’avvertimento IMPORTANTE del prece- dente punto 1. -
Page 5: Descrizione Dei Comandi
4 Non mettere in funzione il distributore se i pannelli non 1 Lavare e sanitizzare il distributore prima di utilizzarlo seguendo quanto previsto nelle presenti istruzioni al capitolo sono al loro posto e bloccati con viti. 5.3 LAVAGGIO. 5 Non ostacolare il flusso d’aria di raffreddamento; lasciare 2 Riempire i contenitori con il prodotto desiderato, tenendo uno spazio libero di almeno 15 cm attorno a tutto il distributore. -
Page 6: Funzioni Aggiuntive
quando questo simbolo è acceso e il display indica “COU”, il coperchio non è installato e la macchina non può funzio- Posizione 0 : il distributore è spento. nare. Posizione I : il distributore è abilitato al funzionamento O quando questo simbolo è acceso, si è verificato un allarme ma si trova in Modalità... -
Page 7: Blocco Tastiera
cessario tenere premuto per tre secondi il tasto H. REGOLAZIONE ORA CORRENTE Per regolare il timer di sbrinamento è necessario innanzitutto avviare la macchina in Modalità Service. Per fare questo è IMPORTANTE necessario accendere l’interruttore generale tenendo pre- muto il tasto A. Il simbolo M acceso sul display indicherà che La temperatura di conservazione del prodotto è... - Page 8 6 Non spegnere mai il distributore quando è presente pro- dotto nei contenitori. Se non viene raffreddato il prodotto può deteriorarsi. Inoltre, se non viene mescolato, esso può aggre- garsi e formare dei blocchi di ghiaccio. Facendo ripartire il mescolatore in queste condizioni (senza attendere che il ghiac- cio sia sciolto), il distributore potrebbe danneggiarsi.
- Page 9 figura 4 3 Rimuovere il mescolatore sfilandolo dal cilindro evapora- tore. Quindi rimuovere il giunto esagonale (vedere figura 5). figura 6 5 Smontare il rubinetto seguendo la sequenza indicata (vedere figura 7). figura 7 6 Rimuovere il cassetto raccogligocce e svuotarlo. 7 Rimuovere dal contenitore il restrittore di flusso (vedere figura 5 4 Togliere la guarnizione dalla apposita sede (vedere figura...
- Page 10 figura 8). morbide. 4 Risciacquare tutte le parti lavate, con acqua corrente. 5. 4. 3 SANITIZZAZIONE DEL DISTRIBUTORE SMONTATO La sanitizzazione deve essere eseguita immediatamente prima di mettere in funzione il distributore; evitare che que- sto rimanga inattivo per lungo tempo dopo la sanitizzazio- 1 Prima di iniziare le procedure descritte nel seguito lavarsi le mani con un sapone antibatterico.
- Page 11 7 Risciacquare con bevanda fresca in modo da eliminare ogni (vedere figura 11). possibile residuo di soluzione sanitizzante dal fondo dei conte- nitori. Asciugare l'interno dei contenitori con un tovagliolo di carta del tipo “usa e getta”. 5. 5 SANITIZZAZIONE DEL DISTRIBUTORE MONTATO La sanitizzazione dell'apparecchio montato, precedente la sua messa in funzione, può...
- Page 12 figura 14). (vedere figura 15). figura 14 figura 15 ATTENZIONE Fare attenzione alle alette del condensatore in quanto taglienti. 4 In caso di rumore anomalo, scollegare il refrigeratore e rivolgersi all’assistenza. 5 In caso di guasto, scollegare la macchina in quanto potrebbe riavviarsi improvvisamente.
-
Page 13: Technical Characteristics
1 TECHNICAL CHARACTERISTICS with a series of high feet (approximately 100 mm), these must replace the original ones. 6 Before plugging in the dispenser, check that the mains voltage is the same as that indicated on the data plate. Connect the dispenser to a single phase network, using an outlet complete with earthing as defined by current standards. -
Page 14: Operating Procedures
17 Is forbidden to insert cream spray bottles inside bowl. Use 6 Using the controls (see Chapter 5.1 DESCRIPTION OF CONTROLS). only for cooling mentioned liquids. 7 The dispenser must operate without interruption: the 18 Do not storage of hazardous and toxic substance or liquid cooling system for each container will automatically stop when in the appliance. -
Page 15: Additional Functions
product from a minimum value of 1 to a maximum value of 10 Key H If pressed, this activates the ICE CREAM OR using the C and D keys. Within the 1 to 5 range, you can GRANITA PRODUCTION function. This operating regulate the density in steps of 0.5, while in the 5 to 10 range, you can regulate the density in steps of 1. - Page 16 5. 3 OPERATION HELPFUL HINTS OPERATION ENABLING 1 The time required to obtain the cooling of the product varies depending on several factors such as the ambient temperature, the initial temperature of the product, its sugar content (degrees Brix) and fat content and the density adjustment. 2 Topping up the containers with product that is already pre- IMPORTANT cooled further increases the efficiency of the dispenser.
- Page 17 3 Remove the mixer by sliding it out of the evaporator clockwise direction to release the open button (see figure 2). cylinder. Then remove the hexagonal joint (see figure 5). figure 2 2 To remove the container, push the lever upwards (see figure 3) and then remove the container itself (see figure 4).
- Page 18 not clean enough. Do not use abrasive detergents. IMPORTANT In order to prevent damage to the dispenser, use only detergents that are compatible with the plastic parts. 2 Use a suitable brush and wash all the parts in contact with the beverage thoroughly with the detergent solution.
- Page 19 rear wall (see figure 10). 12). figure 10 5 Reassemble the hexagonal joint and then the mixer (see figure 11). figure 12 7 Rinse using a cool beverage in order to eliminate any remaining sanitising solution from the bottom of the containers. Dry the inside of the containers with a disposable paper towel.
-
Page 20: Routine Maintenance
6 It needs to fix everything back in the initial position after any remaining sanitising solution from the bottom of the containers. Do not perform further rinsing. repairmen, like screws and covers. 6. 1 MAINTENANCE (TO BE CARRIED OUT BY 6 ROUTINE MAINTENANCE QUALIFIED SERVICE PERSONNEL ONLY) 1 Every day: inspect the dispenser and check for leaks of... -
Page 21: Caracteristiques Techniques
1 CARACTERISTIQUES TECHNIQUES 3 Poser le distributeur sur un support en mesure de soutenir son poids, y compris avec une charge complète, en tenant compte de l’avertissement IMPORTANT mentionné au point 1 qui précède. 4 Prévoir un espace de 15 cm au moins tout autour du d i s t r i b u t e u r p o u r n e p a s o b s t r u e r l e f l u x d ’... -
Page 22: Description Des Commandes
7 Ne pas démonter le réservoir, ni enlever les mélangeurs ou du volume égale à 10 % environ. les panneaux pour le nettoyage ou l'entretien sans s'être Pour la préparation des glaces, considérer une augmentation assuré que le distributeur est débranché de l'électricité. du volume égale à... -
Page 23: Fonctions Complémentaires
CLAVIER DES COMMANDES quand ce symbole est allumé et que « COU » est affiché sur l’écran, le couvercle n’est pas installé sur la machine et celle-ci ne peut pas fonctionner. O quand ce symbole est allumé, une alarme de température s’est produite en phase de fonctionnement. -
Page 24: Minuterie De Dégivrage
Pour réinitialiser l’alarme et revenir à l’affichage fixe, maintenir la touche H enclenchée pendant trois secondes. Pour effectuer cette opération, suivre les instructions ci- dessous: - Démarrer la machine en Mode Service à l’aide de l’interrupteur général en pressant la touche A. IMPORTANT - Presser simultanément les touches C et D pour habiliter le Mode... -
Page 25: Nettoyage
5. 3 SUGGESTIONS 5. 4. 1 DEMONTAGE 1 Le temps nécessaire pour obtenir la réfrigération du produit varie en fonction de différents facteurs, tels que la température ambiante, la température initiale du produit, sa teneur en sucre ATTENTION (degré Brix) et en graisses et le réglage de la densité. Avant de procéder au démontage des composants, cou- 2 Le fait de remplir les bacs avec un produit déjà... - Page 26 (voir figure 3) vers le haut, puis extraire le bac (voir figure 4). Enlever ensuite le joint hexagonal (voir figure 5). figure 3 figure 5 4 Ôter la garniture de son logement (voir figure 6). figure 4 3 Ôter le mélangeur en l'extrayant du cylindre d'évaporation. figure 6 5 Démonter le robinet en suivant la séquence indiquée (voir figure 7).
-
Page 27: Desinfection Du Distributeur Demonte
7 Enlever le réducteur de débit du bac (voir figure 8). 3 Laver les cylindres d’évaporation à l’aide d’une brosse en soie souple. 4 Rincer toutes les pièces lavées à l'eau du robinet. 5. 4. 3 DESINFECTION DU DISTRIBUTEUR DEMONTE La désinfection doit être effectuée tout de suite avant de mettre le distributeur en marche ;... -
Page 28: Desinfection Du Distributeur Monte
11). récolte-gouttes (voir figure 12). figure 11 6 Remonter le bac en le poussant vers la cloison arrière et en vérifiant qu’il s’emboîte bien dans la garniture. Le levier de blocage doit s'abaisser jusqu'à ce qu’il repose sur le plateau figure 12 7 Rincer avec une boisson fraîche de façon à... -
Page 29: Entretien
6 Remettre tous les composants, comme les vis et les façon à agiter la solution pendant 2 minutes environ. 5 Vider la solution désinfectante des bacs en ouvrant les couvercles, dans leur position initiale après réparation. robinets et l’éliminer. 6 Rincer avec une boisson fraîche de façon à éliminer d'éventuels résidus de solution désinfectante qui auraient pu se déposer sur le fond des bacs. -
Page 30: Technische Daten
1 TECHNISCHE DATEN davongetragen hat. Falls dies der Fall sein sollte, unverzüglich beim Spediteur reklamieren. 3 Den Dispenser auf eine feste Unterlage stellen, die dem Gewicht auch bei voller Ladung standhält und auf alles achten, was in Absatz 1 unter WICHTIG aufgelistet ist. 4 Mindestens 15 cm Platz rund um den Dispenser lassen, um den Luftfluss der Kühlung nicht zu beeinträchtigen. - Page 31 einen Freiraum von mindestens 15 cm lassen. berücksichtigen, dass das Volumen bei der Verarbeitung 6 Weder die Finger noch Gegenstände in die Schlitze der zunimmt. Aus diesem Grund darf der Behälter nicht bis zum maximalen Inhalt gefüllt werden. Wände oder in die Öffnung des Hahns stecken. Bei der Herstellung von Granita ist eine Volumenzunahme von 7 Zur Durchführung...
- Page 32 BEDIENFELD Wenn dieses Symbol aufleuchtet und das Display “COU” anzeigt, ist die Abdeckung nicht installiert und die Maschi- ne kann nicht in Betrieb gehen. O Wenn dieses Symbol aufleuchtet, ist während des Be- triebs ein Temperaturalarm aufgetreten. Produkttemperatur. Q Anzeige der eingegebenen Konsistenz. Skala der eingegebenen Temperatur (°C oder °F).
- Page 33 sigkeit gefriert automatisch auf die im Modus ZUBEREITUNG eingegebene Durch Drücken einer beliebigen Taste des Dispensers wird der Konsistenz gebracht wird. WASCHBETRIEB gestoppt und die PRODUKTKONSER- VIERUNG erneut aktiviert. AKTIVIERUNG ZUM BETRIEB TEMPERATURALARM Die Temperatur auf dem Display wird normalerweise dauerhaft angezeigt.
- Page 34 unter der hinteren Verkleidung sauber ist. EINSTELLUNG DES ENTFROSTUNGSINTERVALLS Nach dem Einstellen der Uhrzeit können die gewünscht- en Entfrostungsintervalle eingestellt werden. Hierzu müssen gleichzeitig kurz die Tasten H und E betätigt werden. Es wird die Uhrzeit 00:00 eingeblendet und die ACHTUNG Anzeigen F oder G geben den eingegebenen Modus für die angezeigte Uhrzeit an.
- Page 35 freizugeben, die zum Öffnen benutzt wird (Bild 2). Sechskantanschluss entfernen (Bild 5). Bild 2 2 Zum Ausbau des Behälters den entsprechenden Hebel n a c h o b e n d r ü c k e n ( B i l d 3 ) u n d d a n n d e n B e h ä l t e r herausziehen (Bild 4).
-
Page 36: Desinfektion Des Demontierten Dispensers
Reihenfolge beachten (Bild 7). in Kontakt kommen, mit der Seifenlauge reinigen. ACHTUNG Beim Waschen des Dispensers darauf achten, dass die Elektrobestandteile nicht mit dem Wasser in Kontakt kommen, da sonst Stromschläge verursacht werden können oder der Dispenser geschädigt werden könnte. 3 Die zylinderförmigen Verdampfer mit einer weichen Bürste abwaschen. -
Page 37: Desinfektion Des Montierten Dispensers
dabei an der hinteren Wand befinden (Bild 10). er am Tropfenfänger aufliegt (Bild 12). Bild 10 5 Den Sechskantanschluss und dann den Rührarm wieder einbauen (Bild 11). Bild 11 6 Den Behälter wieder einbauen und gegen die Rückwand drücken, dabei sicherstellen, dass er vollständig mit der Dichtung abschließt. - Page 38 6. 1 WARTUNG (MUSS VOM AUTORISIERTEN anschließend entfernen. 6 Mit einem frischen Getränk nachspülen, so dass alle KUNDENDIENSTDURCHGEFÜHRT möglichen Reste des Desinfektionsmittels vom Boden des WERDEN) Behälters entfernt werden. 7 Ein weiteres Nachspülen ist nicht erforderlich. 6 INSTANDHALTUNG WICHTIG 1 Täglich: Den Dispenser kontrollieren und sicherstellen, Um Schäden am Dispenser zu vermeiden, dürfen die Pla- dass keine Lecks an den Dichtungen bestehen.
-
Page 39: Caracteristicas Tecnicas
1 CARACTERISTICAS TECNICAS el transporte. En caso positivo, será necesario efectuar inmediatamente la reclamación a la compañía de transportes. 3 Apoyar el distribuidor sobre un mostrador capaz de sostener su peso, incluso con el máximo de la carga, teniendo presente lo que se ha dicho en el aviso IMPORTANTE del punto 1 precedente. - Page 40 7 No desmontar el contenedor, no quitar los mezcladores o instrucciones del fabricante. 4 Si se utilizan productos naturales para la preparación de paneles para limpieza o manutención sin cerciorarse que el distribuidor esté desenchufado del suministro de corriente. granizados (por ejemplo zumo de limón, naranja o café), diluir 8 Para el correcto funcionamiento, coma la temperatura 150-200 gramos de azúcar por cada litro de producto.
-
Page 41: Funciones Adicionales
Las funciones de las teclas presentes en el teclado son las Cuando este símbolo está encendido, el temporizador siguientes: está en funcionamiento. Tecla A Si se pulsa durante 2 segundos permite pasar de la modalidad stand-by a la modalidad de funciona- PARA EL FUNCIONAMIENTO DEL DISTRIBUIDOR miento y viceversa. - Page 42 acceso a los comandos del distribuidor. Para ello es necesario RE GUL A CIÓN DE L A H O RA C O RR IE NTE Y D EL man te ner pul sa das du ra nte dos seg undo s d e forma TEMPORIZADOR contemporánea las teclas E y H.
- Page 43 CONSERVACIÓN del producto elimina además la posible reloj y desbloquear la tecla de apertura (ver figura 2). formación de hielo (por condensación de la humedad atmosférica) en la parte exterior de los recipientes. 6 No apagar nunca el distribuidor cuando se encuentra presente producto en los recipientes.
- Page 44 3 Quitar el mezclador A sacándolo del cilindro evaporador. indicada (ver figura 7). Luego retirar el empalme hexagonal B (ver figura 5). figura 7 6 Sacar el cajón recogedor de gotas y vaciarlo. 7 Sacar del recipiente el restrictor de flujo (ver figura 8). figura 5 4 Sacar la guarnición del correspondiente alojamiento (ver figura 6).
- Page 45 secuencia inversa respecto a la de la figura 9. No utilizar detergentes abrasivos. 4 Montar de nuevo la guarnición del recipiente en el alojamiento correspondiente. NOTA: el ala de mayor diámetro tiene que apoyarse a la pared posterior (ver figura 10). IMPORTANTE Para prevenir desperfectos al distribuidor utilizar sólo detergentes compatibles con las partes de plástico.
- Page 46 sobre la plataforma de goteo (ver figura 12). permitir que la solución se mueva, durante 2 minutos. 5 Vaciar los recipientes de la solución desinfectante a través de los grifos de erogación y luego eliminarla. 6 Enjuagar con agua limpia para eliminar cualquier posible resto de solución desinfectante del fondo de los recipientes.
- Page 47 figura 14). indica (ver figura 15). figura 15 figura 14 ATTENCION Prestar atención a las aletas del condensador puesto que son cortantes. 4 En caso de ruidos anómalos, desconecte el enfriador y consulte al servicio técnico. 5 En caso de falla, desconecte la máquina para evitar su reencendido imprevisto.
-
Page 48: Ersatzteilliste
ELENCO RICAMBI SPARE PARTS LIST LISTE DES PIECES DE RECHANGE ERSATZTEILLISTE DESCRIPCION PIEZAS DE REPUESTO... - Page 49 2425_99 V 2.9 15M16 1 2Q000-00801 Cappello con magnete Top cover with magnet Couvercle avec aimant Abdeckplatte mit Magnet Cubierta con imán 2 2Q000-04100 Fotografia per cappello Picture for top cover Photo pour couvercle Foto für Abdeckplatte Fotografía para cubierta 3 2Q000-04000 Schermo Picture screen Porte-photo...
- Page 50 46 2Q000-01900 I n n e s t o e s a g o n a l e p e r Hexagonal coupling for shaft Raccord hexagonal pour arbre S e c h s k a n t a n s c h l u s s d e r Embrague hexagonal para albero Welle...
- Page 51 NOTE - NOTES- NOTES - ANMERKUNGEN - NOTAS:...
- Page 52 02425-00099 R5.3 15M16...