Chapitres
Table des Matières
Dépannage

Manuels Connexes pour SciCan Dri-Tec STATIM 2000S


Sommaire des Matières pour SciCan Dri-Tec STATIM 2000S
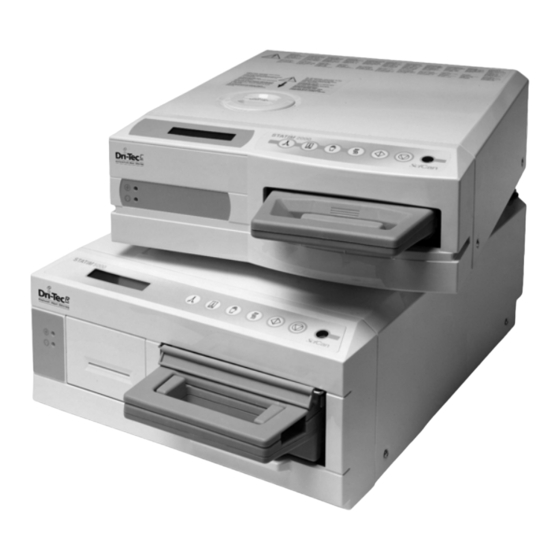
- Page 1 STATIM 2000S/5000S C A S S E T T E A U T O C L A V E ™ • Operator’s Manual • Benutzerhandbuch • Manuel de l’utilisateu • Manuale per l’operatore • Manual del Operador...
-
Page 2: Table Des Matières
....41 11. Specifications ....43 EU Representative For all service and repair inquiries: SciCan Inc. SciCan SciCan Medtech... -
Page 3: Introduction
1. Introduction Statim 5000S Statim 2000S... -
Page 4: Important Information
2. Important Information 2.1 Disclaimers Drying Performance... - Page 5 2. Important Information Con’t. 2.2 Statim 2000S — Unit overview Figure 1 START STOP Cassette Tray and Lid Power Cord Operator’s Manual Unwrapped Instrument Rack Waste Bottle Exhaust Tube Bottle Lid Fitting Stat-Dri P.C.D. + 20 SciCan Tube Mounting Hardware Sterilization Emulators...
- Page 6 2.3 Statim 5000S — Unit overview Figure 2 START STOP Drying Enhancement Plates Cassette Tray and Lid Power Cord Unwrapped Operator’s Manual Instrument Rack Exhaust Tube Waste Bottle Bottle Lid Fitting Stat-Dri P.C.D. + 20 SciCan Tube Mounting Hardware Sterilization Emulators...
-
Page 7: Installation
3. Installation 3.1 Environmental Considerations • Temperature and Humidity • Spacing • Venting • Work Surface • Electromagnetic Environment • Electrical Requirements 3.2 Unit Placement Figure 3... -
Page 8: Connecting The Waste Bottle
3. Installation Con’t. 3.3 Connecting the Waste Bottle 5000S 2000S Figure 4 3.4 Filling the Statim Reservoir... -
Page 9: Setting The Time And Date
3. Installation Con’t. 3.5 Priming the Statim Pump Figure 5 Figure 6 3.6 Setting the Time and Date Display when setting the Date / Time... -
Page 10: Language Selection
3. Installation Con’t. STOP 3.7 Language Selection Display when scrolling through languages STOP 3.8 Assigning Unit Identifier Number Display when assigning unit number STOP 3.9 Shipping the Unit... -
Page 11: Instructions For Use
4. Instructions For Use 4.1 Statim 2000S — Using the Cassette • To open the cassette • To close the cassette Figure 7 • Inserting the cassette into the Statim 2000S • Removing the cassette • Disengaging the cassette • STAT-DRI... - Page 12 4. Instructions For Use Con’t. 4.2 Statim 5000S — Using the Cassette • To open the cassette • To close the cassette • Inserting the cassette into the Statim 5000S Figure 8...
-
Page 13: Preparing And Loading Instruments
4. Instructions For Use Con’t. • Removing the cassette • Disengaging the cassette 4.3 Statim 5000S — STAT-DRI Plates 4.4 Preparing and Loading Instruments • Clean Instruments... - Page 14 4. Instructions For Use Con’t. • Unwrapped Instruments • Wrapped Instruments (single wraps) • Rubber and Plastic Instruments cannot...
-
Page 15: Instrument Weight Guide
4. Instructions For Use Con’t. • All Instruments Best Practice: • Routine Monitoring 4.5 Instrument Weight Guide Instrument Typical Instrument Weight NOTE... -
Page 16: Selecting A Cycle
4. Instructions For Use Con’t. 4.6 Selecting a Cycle 1. Unwrapped Cycles STOP min / 18 min 100˚C / 101 kPa Sterilizing 134˚C / 304 kPa - 3 purges (Conditioning) 138˚C / 341 kPa peak at 133˚C / 295 kPa Venting vent to 115˚C / 169 kPa Pressurizing... - Page 17 4. Instructions For Use Con’t. 2. Hollow Wrapped Cycles min / 18 min 100˚C / 101 kPa Sterilizing 134˚C / 304 kPa - 6 purges (Conditioning) 138˚C / 341 kPa peak at 133˚C / 295 kPa Venting vent to 115˚C / 169 kPa Pressurizing Air Drying START...
- Page 18 4. Instructions For Use Con’t. START 4. Air Dry Only Cycle STOP STOP START...
-
Page 19: Running A Cycle
4. Instructions For Use Con’t. 4.7 Running a Cycle START... -
Page 20: Stopping A Cycle
4. Instructions For Use Con’t. STOP STOP 4.8 Stopping a Cycle STOP STOP STOP... -
Page 21: Maintenance
5. Maintenance 5.1 Cleaning the Cassette 5.2 Cleaning the Water Reservoir Filter 5.3 Cleaning the Reservoir 5.4 Cleaning the Exterior Surfaces 5.5 Changing the Statim 2000S Air Filter 2000S Figure 10... -
Page 22: Replacing The Cassette Seal
5. Maintenance 5.6 Changing the Bacteria Retentive Air Filters 2000S Figure 11 5000S Figure 12 5.7 Replacing the Cassette Seal... -
Page 23: Maintaining Fluid Levels
5. Maintenance con’t. NOTE NOTE Figure 13 5.8 Maintaining Fluid Levels 5.9 Reading Water Quality... -
Page 24: Preventative Maintenance Schedule
5. Maintenance con’t. 5.10 Preventative Maintenance Schedule NOTE Operator Technician... -
Page 25: The Communication Port
Printer Model End Of Line Serial Port Printer user ° CR/LF Bitrate character SciCan Data Logger End Of Line Serial Port Printer user ° CR/LF Bitrate character * Due to a variety of software programs/viewers that can be used to view the data files stored on a mass storage device such as a USB memory stick, we recommend the above set- tings. - Page 26 6. The Communication Port con’t. 6.2 Installing the SciCan Data Logger User Mode User Setup Menu STOP STEP 1 Selecting the USB Flash/MSD Option STOP...
- Page 27 6. The Communication Port con’t. Setting the Serial Port Bitrate to 9600 Setting the Printer user Character; (example: 134°C) Save and Exit...
- Page 28 6. The Communication Port con’t. Step 2 Selecting the Time and Date Note: STOP STOP Step 3 Setting Unit ID Note: STOP STOP Step 4 Connecting the SciCan Data Logger...
- Page 29 6. The Communication Port con’t. 6.3 Installing Paper on the Internal Printer...
- Page 30 6. The Communication Port con’t. Figure 15.1 Figure 15.2...
- Page 31 6. The Communication Port con’t. 6.4 Removing Internal Printer Paper Jams Figure 16...
- Page 32 6. The Communication Port con’t.
-
Page 33: Cycle Printout Overview
6. The Communication Port con’t. 6.5 Cycle Printout Overview... - Page 34 6. The Communication Port con’t.
-
Page 35: Troubleshooting
7. Troubleshooting Problem Solution... - Page 36 7. Troubleshooting con’t.
- Page 37 7. Troubleshooting con’t.
- Page 38 7. Troubleshooting con’t. Installing the SciCan Data Logger on your Statim.
-
Page 39: Spare Parts List
8. Spare Parts List ACCESSORIES... -
Page 40: Warranty
9. Warranty Limited Warranty SciCan Statim 2000S / 5000S SciCan SciCan’s SciCan SciCan SciCan SciCan’s SciCan SciCan SciCan SciCan www.scican.com... -
Page 41: Test Protocol
10. Test Protocol 10.1 Type test... - Page 42 10. Test Protocol con’t. STATIM 2000S STATIM 5000S Cycle...
-
Page 43: Specifications
11. Specifications 11.1 Statim 2000S — Specifications Machine Dimensions: Cassette Size Cassette Size Sterilization Chamber Volume: Reservoir Volume: Weight Clearance required: Clearance required for movement of the door(s): Minimum charge in the water reservoir: PRV value (pressure relief valve): Electrical Rating: Current: Protection Class: Protection:... - Page 44 11. Specifications con’t. 11.2 Statim 5000S — Specifications Machine Dimensions: Cassette Size Cassette Size Sterilization Chamber Volume: Reservoir Volume: Weight (Without water): Clearance required: Clearance required for movement of the door(s): Minimum charge in the water reservoir: PRV value (pressure relief valve): Electrical Rating: Current: Protection Class:...
- Page 45 10. Testprotokoll ....41 11. Technische Daten ....43 Vertreter in der EU: Alle Service- und Reparaturanfragen richten Sie bitte an: SciCan Inc. SciCan SciCan Medtech...
-
Page 46: Einführung
1. Einführung Statim 5000S Statim 2000S... -
Page 47: Wichtige Informationen
2. Wichtige Informationen 2.1 Haftungsausschluss Trocknungsleistung... - Page 48 2. Wichtige Informationen (Fortsetzung) 2.2 Statim 2000S — Geräteübersicht Abbildung 1 START STOP Kassettentray und Deckel Stromkabel Instrumentenständer für Bedienungsanleitung unverpackte Instrumente Abwasserflasche Ablassschlauch Flaschendeckelhalterung Stat-Dri P.C.D. + 20 SciCan Schlauchmontage-Hilfsteile Sterilisationsemulatoren...
- Page 49 2. Wichtige Informationen (Fortsetzung) 2.3 Statim 5000S — Geräteübersicht Abbildung 2 START STOP Trocknungshilfsplatten Kassettentray und Deckel Stromkabel Instrumentenständer für Bedienungsanleitung unverpackte Instrumente Abwasserflasche Ablassschlauch Flaschendeckelhalterung Stat-Dri P.C.D. + 20 SciCan Schlauchmontage-Hilfsteile Sterilisationsemulatoren...
-
Page 50: Einrichtung
3. Einrichtung 3.1 Umgebungsbedingungen • Temperatur und Luftfeuchtigkeit • Abstände • Belüftung • Arbeitsfläche • Elektromagnetisches Umfeld • Elektrische Anforderungen 3.2 Aufstellen des Gerätes Abbildung 3... - Page 51 3. Einrichtung (Fortsetzung) 3.3 Anbringen der Abwasserflasche 5000S 2000S Abbildung 4 3.4 Befüllen des Statim-Behälters...
-
Page 52: Einstellen Von Uhrzeit Und Datum
3. Einrichtung (Fortsetzung) 3.5 Vorbereiten der Statim-Pumpe Abbildung 5 Abbildung 6 3.6 Einstellen von Uhrzeit und Datum Anzeige bei der Einstellung von Datum/Uhrzeit... - Page 53 3. Einrichtung (Fortsetzung) STOP 3.7 Sprachauswahl Anzeige beim Scrollen durch die Sprachen STOP 3.8 Gerätekennung vergeben Anzeige bei Zuweisung der Gerätenummer STOP 3.9 Versand des Gerätes...
-
Page 54: Bedienungsanleitung
4. Bedienungsanleitung 4.1 Statim 2000S — Verwendung der Kassette • Öffnen der Kassette Abbildung 7 • Schließen der Kassette • Einsetzen der Kassette in den Statim 2000S • Herausnehmen der Kassette • Ausklinken der Kassette • STAT-DRI... - Page 55 4. Bedienungsanleitung (Fortsetzung) 4.2 Statim 5000S — Verwendung der Kassette • Öffnen der Kassette • Schließen der Kassette • Einsetzen der Kassette in den Statim 5000S Abbildung 8...
- Page 56 4. Bedienungsanleitung (Fortsetzung) • Herausnehmen der Kassette • Ausklinken der Kassette 4.3 Statim 5000S — STAT-DRI-Platten 4.4 Vorbereiten und Einstellen der Instrumente • Reinigen der Instrumente...
- Page 57 4. Bedienungsanleitung (Fortsetzung) • Unverpackte Instrumente • Verpackte Instrumente (einzeln verpackt) • Gummi- und Kunststoffinstrumente nicht...
- Page 58 4. Bedienungsanleitung (Fortsetzung) • Alle Instrumente NICHT Empfohlene Vorgehensweisen • Routineüberwachung 4.5 Leitfaden für das Instrumentengewicht Instrument Typisches Instrumentengewicht HINWEIS...
- Page 59 4. Bedienungsanleitung (Fortsetzung) 4.6 Auswahl eines Sterilisationsprogrammes 1. Sterilisationsprogramme Unverpackt STOP min / 18 min 00˚C / 101 kPa Sterilisation 134˚C / 304 kPa - 3 Reinigungsgänge (Aufbereitung) 138˚C / 341 kPa Höchstwert bei 133˚C / 295 kPa Entlüften auf 11 5˚C / 169 kPa Druckabbau Druckaufbau...
- Page 60 4. Bedienungsanleitung (Fortsetzung) 2. Sterilisationsprogramme HOHLKÖRPER VERPACKT min / 18 min Sterilisation 00˚C / 101 kPa 134˚C / 304 kPa - 6 Reinigungsgänge (Aufbereitung) 138˚C / 341 kPa Höchstwert bei 133˚C / 295 kPa Entlüften auf 11 5˚C / 169 kPa Druckabbau Druckaufbau Lufttrocknung...
- Page 61 4. Bedienungsanleitung (Fortsetzung) START 4. Programm Nur Lufttrocknen STOP STOP NICHT START...
- Page 62 4. Bedienungsanleitung (Fortsetzung) 4.7 Durchlauf eines Programms DRUECKEN...
- Page 63 4. Bedienungsanleitung (Fortsetzung) STOP STOP 4.8 Anhalten eines Programms STOP STOP STOP...
-
Page 64: Wartung
5. Wartung 5.1 Reinigen der Kassette 5.2 Reinigen des Wasserbehälter-Filters 5.3 Reinigen des Behälters 5.4 Reinigen der Außenflächen 5.5 Auswechseln des Statim 2000S-Luftfilters 2000S Abbildung 10... - Page 65 5. Wartung 5.6 Auswechseln des Bakterienrückhaltefilters 2000S Abbildung 11 5000S Abbildung 12 5.7 Austausch der Kassettendichtung...
- Page 66 5. Wartung (Fortsetzung) HINWEIS HINWEIS Abbildung 13 5.8 Aufrechterhalten der Flüssigkeitsniveaus 5.9 Ablesen der Wasserqualität...
- Page 67 5. Wartung (Fortsetzung) 5.10 Zeitplan präventive Wartungsmaßnahmen HINWEIS Bediener Techniker...
-
Page 68: Kommunikationsanschluss
6. Kommunikationsanschluss 6.1 RS232-Kommunikationsanschluss ODER Druckermodell Zeilenende Serieller Druckeranwender ° CR/LF Anschluss Bitrate Zeichen SciCan Data Logger Zeilenende Serieller Druckeranwender ° CR/LF Anschluss Bitrate Zeichen... - Page 69 6. Kommunikationsanschluss (Forts.) 6.2 Einrichten des SciCan Data Logger (Datenrekorder) Anwendermodus Anwender-Setup-Menü STOP SCHRITT 1 Auswahl der Option USB Flash/MSD STOP...
- Page 70 6. Kommunikationsanschluss (Forts.) Einstellen der Bitrate Serieller Anschluss auf 9600 Einrichten des Druckeranwenderzeichens °; (Beispiel: 134 °C) Speichern und beenden...
- Page 71 6. Kommunikationsanschluss (Forts.) Schritt 2 Einstellen von Uhrzeit und Datum Hinweis: STOP STOP Schritt 3 Geräte-ID einstellen Hinweis: STOP STOP Schritt 4 Anschluss des SciCan Data Logger...
- Page 72 6. Kommunikationsanschluss (Forts.) 6.3 Einlegen von Papier in den internen Drucker...
- Page 73 6. Kommunikationsanschluss (Forts.) Abbildung 15.1 Abbildung 15.2...
- Page 74 6. Kommunikationsanschluss (Forts.) 6.4 Beseitigen von Papierstaus im internen Drucker Abbildung 16...
- Page 75 6. Kommunikationsanschluss (Forts.)
- Page 76 6. Kommunikationsanschluss (Forts.) 6.5 Übersicht Ausdruck Sterilisationsgang...
- Page 77 6. Kommunikationsanschluss (Forts.)
-
Page 78: Problembehandlung
7. Problembehandlung Problem Lösung... - Page 79 7. Problembehandlung (Fortsetzung)
- Page 80 7. Problembehandlung (Fortsetzung)
- Page 81 7. Problembehandlung (Fortsetzung) Einrichten des SciCan Data Logger an Ihrem Statim...
-
Page 82: Ersatzteilliste
8. Ersatzteilliste ZUBEHÖR... -
Page 83: Garantie
9. Garantie Eingeschränkte Garantie SciCan Statim 2000S / 5000S SciCan SciCan SciCan SciCan SciCan SciCan SciCan SciCan SciCan SciCan www.scican.com... -
Page 84: Testprotokoll
10. Testprotokoll 10.1 Typenprüfung... - Page 85 10. Testprotokoll (Fortsetzung) STATIM 2000S STATIM 5000S Sterilisationsgang...
-
Page 86: Technische Daten
11. Technische Daten 11.1 Statim 2000S — Technische Daten Geräteabmessungen: Kassettengröße Kassettengröße Volumen Sterilisationskammer: Behältervolumen: Gewicht Erforderliche Abstände: Erforderlicher Abstand zum Bewegen der Tür(en): Mindestfüllmenge des Wasserbehälters: PRV-Wert (Überdruckventil): Elektrischer Nennwert: Stromart: Schutzklasse: Schutz: Umgebungstemperatur: Schallpegel: Relative Luftfeuchtigkeit: Maximale Betriebshöhe über NN:... - Page 87 11. Technische Daten (Fortsetzung) 11.2 Statim 5000S — Technische Daten Geräteabmessungen: Kassettengröße Kassettengröße Volumen Sterilisationskammer: Behältervolumen: Gewicht (ohne Wasser): Erforderliche Abstände: Erforderlicher Abstand zum Bewegen der Tür(en): Mindestfüllmenge des Wasserbehälters: PRV-Wert (Überdruckventil): Elektrischer Nennwert: Stromart: Schutzklasse: Schutz: Umgebungstemperatur: Schallpegel: Relative Luftfeuchtigkeit: Maximale Betriebshöhe über NN: Technische Daten optionaler interner Drucker: Typ:...
- Page 88 11. Spécifications ....43 Représentant UE Pour toute demande de renseignements relatifs à l’entretien et aux réparations, contacter : SciCan Inc. SciCan SciCan Medtech...
-
Page 89: Introduction
1. Introduction Statim 5000S Statim 2000S... -
Page 90: Informations Importantes
2. Informations importantes 2.1 Avertissements Performances de séchage... -
Page 91: Statim 2000S - Vue D'ensemble De L'appareil
Tiroir de cassette et cou- Cordon d’alimentation vercle Grille à instruments non- Manuel de l’opérateur enveloppés Bouteille à eau résiduaire Tube d’évacuation Raccord de couvercle Stat-Dri de bouteille Émulateurs de stérilisa- Quincaillerie de montage tion des tubes SciCan P.C.D. + 20... -
Page 92: Statim 5000S - Vue D'ensemble De L'appareil
Tiroir de cassette et cou- Cordon d’alimentation vercle Grille à instruments non- Manuel de l’opérateur enveloppés Bouteille à eau résiduaire Tube d’évacuation Raccord de couvercle de Stat-Dri bouteille Émulateurs de Quincaillerie de montage stérilisation des tubes SciCan P.C.D. + 20... -
Page 93: Installation
3. Installation 3.1 Considérations environnementales • Température et humidité • Espacement • Expulsion de vapeur • Surface de travail • Environnement électromagnétique • Exigences électriques 3.2 Mise en place de l’appareil Figure 3... -
Page 94: Branchement De La Bouteille À Eau Résiduaire
3. Installation - Suite. 3.3 Branchement de la bouteille à eau résiduaire 5000S 2000S Figure 4 3.4 Remplissage du réservoir... -
Page 95: Réglage De La Date Et De L'heure
3. Installation - Suite. 3.5 Amorçage de la pompe Statim Figure 5 3.6 Réglage de la date et de l’heure Figure 6 hors tension sous tension S’affiche lors du réglage de la date et de l’heure... -
Page 96: Sélection De La Langue
3. Installation - Suite. STOP 3.7 Sélection de la langue Affichage pendant le défilement des langues STOP 3.8 Attribution du numéro d’identification de l’appareil hors tension S’affiche lorsqu’un numéro est affecté à l’appareil STOP 3.9 Expédition de l’appareil... -
Page 97: Instructions D'utilisation
4. Instructions d’utilisation 4.1 Statim 2000S — Utilisation de la cassette • Pour ouvrir la cassette • Pour fermer la cassette Figure 7 • Insertion de la cassette dans le Statim 2000S • Retrait de la cassette • Dégagement de la cassette : •... -
Page 98: Statim 5000S - Utilisation De La Cassette
4. Instructions d’utilisation - Suite. 4.2 Statim 5000S — Utilisation de la cassette • Pour ouvrir la cassette • Pour fermer la cassette • Insertion de la cassette dans le Statim 5000S Figure 8... -
Page 99: Statim 5000S - Plaques Stat-Dri
4. Instructions d’utilisation - Suite. • Retrait de la cassette • Dégagement de la cassette : 4.3 Statim 5000S — Plaques STAT-DRI 4.4 Préparation et chargement des instruments • Nettoyer les instruments... - Page 100 4. Instructions d’utilisation - Suite. • Instruments non enveloppés • Instruments enveloppés (enveloppes uniques) • Instruments en caoutchouc et en plastique...
- Page 101 4. Instructions d’utilisation - Suite. • Tous les instruments Conseil • Surveillance de routine 4.5 Guide des poids des instruments Instrument Poids type des instruments NOTA...
-
Page 102: Sélection D'un Cycle
4. Instructions d’utilisation - Suite. 4.6 Sélection d’un cycle 1. Cycles pour instruments NON EMBALLÉ STOP min / 18 min 100˚C / 101 kPa Stérilisation 134˚C / 304 kPa - 3 purges (Conditionnement) 138˚C / 341 kPa max. à 133˚C / 295 kPa Ventilation ventilation à... - Page 103 4. Instructions d’utilisation - Suite. 2. Cycles pour instruments CREUX ENVELOPPÉS min / 18 min 100˚C / 101 kPa Stérilisation 134˚C / 304 kPa - 6 purges (Conditionnement) 138˚C / 341 kPa max. à 133˚C / 295 kPa Ventilation ventilation à 115˚C / 169 kPa Pressurisation Séchage à...
- Page 104 4. Instructions d’utilisation - Suite. START 4. Cycle de séchage à l’air seul STOP STOP démarrage...
-
Page 105: Exécution D'un Cycle
4. Instructions d’utilisation - Suite. 4.7 Exécution d’un cycle START Start... -
Page 106: Interruption D'un Cycle
4. Instructions d’utilisation - Suite. STOP STOP 4.8 Interruption d’un cycle STOP STOP STOP... -
Page 107: Entretien
5. Entretien 5.1 Nettoyage de la cassette 5.2 Nettoyage du filtre du réservoir d’eau 5.3 Nettoyage du réservoir 5.4 Nettoyage des surfaces extérieures 5.5 Changement des filtres à air Statim 2000S 2000S Figure 10... -
Page 108: Changement Des Filtres À Air Retenant Les Bactéries
5. Entretien 5.6 Changement des filtres à air retenant les bactéries hors tension 2000S Figure 11 5000S Figure 12 5.7 Remplacement du joint de cassette... -
Page 109: Maintien Des Niveaux Des Liquides
5. Entretien - Suite. NOTA NOTA 5.8 Maintien des niveaux des liquides Figure 13 5.9 Mesure de la qualité de l’eau... -
Page 110: Calendrier D'entretien Préventif
5. Entretien - Suite. 5.10 Calendrier d’entretien préventif NOTA Opérateur Technicien... -
Page 111: Le Port De Communication
Enregistreur de Fin de ligne Port série Utilisateur de données SciCan CR/LF Caractère l’imprimante° bitrate * En raison de la diversité de programmes/visionneurs de logiciels pouvant être utilisés pour visu- aliser les fichiers de données stockés sur un périphérique de stockage de masse, comme une... -
Page 112: Installation De L'enregistreur De Données Scican
6. Le port de communication - Suite. 6.2 Installation de l’enregistreur de données SciCan Mode utilisateur Menu Configuration utilisa- teur STOP Étape 1 Sélection de l’option USB Flash/MSD STOP... - Page 113 6. Le port de communication - Suite. Réglage du port série bitrate sur 9600 Configuration du caractère utilisateur de l’imprimante (exemple : 134 °C) Enregistrer et Quitter...
- Page 114 6. Le port de communication - Suite. Étape 2 Sélection de la date et de l’heure Nota : STOP STOP Étape 3 Configuration de l’ID de l’appareil Nota : STOP STOP Étape 4 Branchement de l’enregistreur de données SciCan...
-
Page 115: Installation Du Papier Dans L'imprimante Interne
6. Le port de communication - Suite. 6.3 Installation du papier dans l’imprimante interne hors tension hors tension sous tension... - Page 116 6. Le port de communication - Suite. Figure 15.1 Figure 15.2...
-
Page 117: Élimination Des Bourrages Du Papier Dans L'imprimante Interne
6. Le port de communication - Suite. 6.4 Élimination des bourrages du papier dans l’imprimante interne hors tension Figure 16... - Page 118 6. Le port de communication - Suite.
-
Page 119: Vue D'ensemble Du Cycle D'impression
6. Le port de communication - Suite. 6.5 Vue d’ensemble du cycle d’impression... - Page 120 6. Le port de communication - Suite.
-
Page 121: Dépannage
7. Dépannage Problème Solution sous tension hors tension sous tension couper... - Page 122 7. Dépannage - Suite.
- Page 123 7. Dépannage - Suite. hors tension hors tension sous tension sous tension hors tension sous tension...
- Page 124 7. Dépannage - Suite. d’Installation de l’enregistreur de données SciCan sur le Statim.
-
Page 125: Liste Des Pièces De Rechange
8 Liste des pièces de rechange ACCESSOIRES... -
Page 126: Garantie
9. Garantie Garantie limitée SciCan Statim 2000S / 5000S SciCan SciCan SciCan SciCan SciCan SciCan SciCan SciCan SciCan SciCan www.scican.com... -
Page 127: Protocole D'essai
10. Protocole d’essai 10.1 Test de type... - Page 128 10. Protocole d’essai Suite. STATIM 2000S STATIM 5000S Cycle...
-
Page 129: Spécifications
11. Spécifications 11. Statim 2000S — Spécifications Dimensions de l’appareil : Dimensions Dimensions Volume de la chambre de stérilisation : Volume du réservoir : Poids Dégagement nécessaire : Dégagement nécessaire pour l’ouverture des portes : Charge minimale dans le réservoir d’eau : Valeur de la soupape de sécurité... - Page 130 11. Spécifications - Suite. 11.2 Statim 5000S — Spécifications Dimensions de l’appareil : Dimensions Dimensions Volume de la chambre de stérilisation : Volume du réservoir : Poids (sans eau) : Dégagement nécessaire : Dégagement nécessaire pour l’ouverture des portes : Charge minimale dans le réservoir d’eau : Valeur de la soupape de sécurité...
- Page 131 10. Protocollo di collaudo ... . 41 11. Specifiche tecniche ....43 RAPPRESENTANTE UE: Per tutte le richieste di servizi e riparazioni: SciCan Inc. SciCan SciCan Medtech...
-
Page 132: Introduzione
1. Introduzione Statim 5000S Statim 2000S... -
Page 133: Informazioni Importanti
2. Informazioni importanti 2.1 Esonero da responsabilità Asciugatura... - Page 134 ARRESTO Cassetto e coperchio cari- Cavo di alimentazione catore Cestello per strumenti Manuale per l’operatore senza rivestimento Bottiglia di scarico Tubo di scarico Accessorio coperchio bot- Stat-Dri tiglia Struttura di montaggio del P.C.D. + 20 simulatori di tubo sterilizzazione SciCan...
- Page 135 Piastre per una migliore asciugatura Cassetto e coperchio Cavo di alimentazione caricatore Cestello per strumenti Manuale per l’operatore senza rivestimento Bottiglia di scarico Tubo di scarico Accessorio coperchio Stat-Dri bottiglia P.C.D. + 20 simulatori di Struttura di montaggio del sterilizzazione SciCan tubo...
-
Page 136: Installazione
3. Installazione 3.1 Considerazioni ambientali • Temperatura e umidità • Distanze • Ventilazione • Superficie operativa • Ambiente elettromagnetico • Requisiti elettrici 3.2 Collocazione del dispositivo Figura 3... -
Page 137: Riempimento Del Serbatoio
3. Installazione, segue 3.3 Collegamento della bottiglia di scarico 5000S 2000S Figura 4 3.4 Riempimento del serbatoio... -
Page 138: Impostazione Di Data E Ora
3. Installazione, segue 3.5 Priming della pompa Statim Figura 5 Figura 6 3.6 Impostazione di data e ora Display quando si impostano la data e l’ora... -
Page 139: Selezione Della Lingua
3. Installazione, segue ARRESTO 3.7 Selezione della lingua SPENTO Display quando si scorrono le lingue ARRESTO 3.8 Assegnazione di identificativo del dispositivo Display quando si assegna un numero al dispositivo ARRESTO 3.9 Trasporto del dispositivo... -
Page 140: Istruzioni Per L'uso
4. Istruzioni per l’uso 4.1 Statim 2000S — Uso del caricatore • Come aprire il caricatore • Come chiudere il caricatore Figura 7 • Inserire il caricatore nello Statim 2000S • Rimozione del caricatore • Disimpegnare il caricatore • STAT-DRI... - Page 141 4. Istruzioni per l’uso, segue 4.2 Statim 5000S — Uso del caricatore • Come aprire il caricatore • Come chiudere il caricatore • Inserire il caricatore nello Statim Figura 8 5000S...
- Page 142 4. Istruzioni per l’uso, segue • Rimozione del caricatore • Disimpegnare il caricatore 4.3 Statim 5000S — Piastre STAT-DRI 4.4 Preparazione e caricamento degli strumenti • Pulire gli strumenti...
- Page 143 4. Istruzioni per l’uso, segue • Strumenti senza rivestimento • Strumenti con rivestimento (singoli rivestimenti) • Strumenti di gomma e plastica non possono...
- Page 144 4. Istruzioni per l’uso, segue • Tutti gli strumenti Pratica consigliata • Controllo di routine 4.5 Schema dei pesi degli strumenti Strumento Peso tipico degli strumenti NOTA...
- Page 145 4. Istruzioni per l’uso, segue 4.6 Selezione di un ciclo 1. Cicli senza rivestimento ARRESTO min / 18 min 00˚C / 101 kPa Sterilizzazione 134˚C / 304 kPa - 3 canc. (condizionam.) 138˚C / 341 kPa picco a 133˚C / 295 kPa Ven tilazione ventil.
- Page 146 4. Istruzioni per l’uso, segue 2. Cicli vuoto con rivestimento min / 18 min Sterilizzazione ˚C / 101 kP 134˚C / 304 kPa - anc. (c on d izi onam.) 138˚C / 341 kPa c c o a 133 ˚C / 295 kP Ven tilazione ent il.
- Page 147 4. Istruzioni per l’uso, segue AVVIO 4. Ciclo di sola asciugatura ad aria ARRESTO STOP AVVIO...
- Page 148 4. Istruzioni per l’uso, segue 4.7 Esecuzione di un ciclo INIZIO...
- Page 149 4. Istruzioni per l’uso, segue ARRESTO ARRESTO 4.8 Arresto di un ciclo ARRESTO ARRESTO ARRESTO...
-
Page 150: Manutenzione
5. Manutenzione 5.1 Pulizia del caricatore 5.2 Pulizia del filtro del serbatoio dell’acqua 5.3 Pulizia del serbatoio 5.4 Pulizia delle superfici esterne 5.5 Modifica del filtro dell’aria Statim 2000S 2000S SPENTO Figura 10... -
Page 151: Cambio Dei Filtri Dell'aria Antibatterici
5. Manutenzione 5.6 Cambio dei filtri dell’aria antibatterici 2000S Figura 11 5000S Figura 12 5.7 Sostituzione della tenuta del caricatore... -
Page 152: Lettura Della Qualità Dell'acqua
5. Manutenzione, segue NOTA NOTA Figura 13 5.8 Manutenzione dei livelli di fluidi 5.9 Lettura della qualità dell’acqua... - Page 153 5. Manutenzione, segue 5.10 Piano di manutenzione preventiva NOTA Operatore Tecnico...
-
Page 154: La Porta Di Comunicazioni
6.1 La porta di comunicazioni RS232 OPPURE Modello della stampante Fine della riga Velocità in bit Carattere dell’utente° CR/LF della porta seriale della stampante Registratore dati SciCan Fine della riga Velocità in bit Carattere dell’utente° CR/LF della porta seriale della stampante... - Page 155 6. La porta di comunicazioni, segue 6.2 Installazione del registratore dati SciCan User Mode Dell’utente del menu ARRESTO Fase 1 Selezione dell’opzione USB/Flash MSD ARRESTO...
- Page 156 6. La porta di comunicazioni, segue Impostazione della velocità in bit della porta seriale a 9600 Impostazione del carattere dell’utente della stampante (esempio: 134 °C) Risparmi e rimuova...
- Page 157 6. La porta di comunicazioni, segue Fase 2 Selezione di data e ora Nota: ARRESTO ARRESTO Fase 3 Impostazione dell’ID del dispositivo Nota: ARRESTO ARRESTO Fase 4 Connessione del registratore dati SciCan...
- Page 158 6. La porta di comunicazioni, segue 6.3 Installazione della carta nella stampante interna...
- Page 159 6. La porta di comunicazioni, segue Figura 15.1 Figura 15.2...
- Page 160 6. La porta di comunicazioni, segue 6.4 Eliminazione degli inceppamenti della carta nella stampante interna Figura 16...
- Page 161 6. La porta di comunicazioni, segue...
- Page 162 6. La porta di comunicazioni, segue 6.5 Panoramica della stampa del ciclo...
- Page 163 6. La porta di comunicazioni, segue...
-
Page 164: Risoluzione Dei Problemi
7. Risoluzione dei problemi Problema Soluzione... - Page 165 7. Risoluzione dei problemi, segue...
- Page 166 7. Risoluzione dei problemi, segue...
- Page 167 7. Risoluzione dei problemi, segue Installazione del registratore dati SciCan sullo Statim.
-
Page 168: Elenco Delle Parti Di Ricambio
8. Elenco delle parti di ricambio ACCESSORI... -
Page 169: Garanzia
9. Garanzia Garanzia limitata SciCan Statim 2000S / 5000S SciCan SciCan SciCan SciCan SciCan SciCan SciCan SciCan SciCan SciCan www.scican.com... -
Page 170: Protocollo Di Collaudo
10. Protocollo di collaudo 10.1 Tipo di test... - Page 171 10. Protocollo di collaudo, segue STATIM 2000S STATIM 5000S Ciclo...
-
Page 172: Specifiche Tecniche
11. Specifiche tecniche 11.1 Statim 2000S — Specifiche tecniche Dimensioni macchina: Dimensioni caricatore Dimensioni caricatore Volume camera sterilizzazione: Volume serbatoio: Peso Spazio libero necessario: Spazio libero necessario per la movimentazione degli sportelli: Carico minimo del serbatoio d’acqua: Valore valvola limitatrice di pressione (VLP): Classe elettrica: Corrente: Classe protezione:... - Page 173 11. Specifiche tecniche, segue 11.2 Statim 5000S — Specifiche tecniche Dimensioni macchina: Dimensioni caricatore Dimensioni caricatore Volume camera sterilizzazione: Volume serbatoio: Peso (senz’acqua): Spazio libero necessario: Spazio libero necessario per la movimentazione degli sportelli: Carico minimo del serbatoio d’acqua: Valore valvola limitatrice di pressione (VLP): Classe elettrica: Corrente: Classe protezione:...
- Page 174 10. Protocolo de Pruebas ... . 41 11. Especificaciones ....43 Representante en la UE Para toda averiguación sobre servicio y reparaciones, llame: SciCan Inc. SciCan SciCan Medtech...
-
Page 175: Introducción
1.Introducción Statim 5000S Statim 2000S... -
Page 176: Información Importante
2. Información importante 2.1 Descargos de responsabilidad Secado... - Page 177 Bandeja y tapa del cassette Cordón eléctrico Manual del operador Rejilla de instrumentos desembolsados Botella de desechos Tubo de escape Accesorio de la tapa de la Stat-Dri Botella Emuladores de esteril- Herrajes de montaje ización P.C.D. del tubo + 20 SciCan...
- Page 178 Bandeja y tapa del cassette Cordón eléctrico Rejilla de instrumentos Manual del operador desembolsados Botella de desechos Tubo de escape Accesorio de la tapa Stat-Dri de la Botella Emuladores de esteril- Herrajes de montaje ización P.C.D. del tubo + 20 SciCan...
-
Page 179: Instalación
3. Instalación 3.1 Consideraciones ambientales • Temperatura y Humedad • Espaciamiento • Ventilación • Superficie de trabajo • Entorno electromagnético • Requerimientos eléctricos 3.2 Ubicación de la unidad Figura 3... -
Page 180: Conexión De La Botella De Desechos
3. Instalación, Cont. 3.3 Conexión de la botella de desechos 5000S 2000S Figura 4 3.4 Relleno del depósito... -
Page 181: Configuración De La Hora Y La Fecha
3. Instalación, Cont. 3.5 Primación de la bomba Statim Figura 5 Figura 6 3.6 Configuración de la hora y la fecha Apague Mostrar al configurar Fecha / Hora encienda... -
Page 182: Selección Del Idioma
3. Instalación, Cont. PARADA apague 3.7 Selección del Idioma Apague encienda Visualizar cuando se desplaza a través de los idiomas. PARADA 3.8 Preparación de la unidad para el uso Apague Visualizar al asignar un número de unidad encienda PARADA 3.9 Despacho de la unidad... -
Page 183: Instrucciones De Uso
4. Instrucciones de uso 4.1 Statim 2000S — El uso del cassette • Para abrir el cassette Figura 7 • Para cerrar el cassette • Introducción del cassette en el Statim 2000S • Extracción del cassette • Desenganche del cassette •... - Page 184 4. Instrucciones de uso, Cont. 4.2 Statim 5000S — El uso del cassette • Para abrir el cassette • Para cerrar el cassette • Introducción del cassette en el Statim 5000S Figura 8...
- Page 185 4. Instrucciones de uso, Cont. • Extracción del cassette • Desenganche del cassette 4.3 Statim 5000S — Bandejas STAT-DRI 4.4 Preparación y carga de los instrumentos • Limpieza de los instrumentos...
- Page 186 4. Instrucciones de uso, Cont. • Instrumentos desembolsados • Instrumentos embolsados (envoltorios únicos) • Instrumentos de goma y de plástico no se pueden...
- Page 187 4. Instrucciones de uso, Cont. • Todos los instrumentos Mejor Uso • Monitorización de Rutina 4.5 Tabla de pesos de los instrumentos Instrumento Peso típico del instrumento NOTA...
- Page 188 4. Instrucciones de uso, Cont. 4.6 Selección de un Ciclo 1. Ciclos Desembolsados PARADA min / 18 min 00˚C / 101 kPa Esterilización 134˚C / 304 kPa - 3 depuraciones (Acondicionamiento) 138˚C / 341 kPa máximo a 133˚C / 295 kPa Ven tilación ventilar a 11 5˚C / 169 kPa...
- Page 189 4. Instrucciones de uso, Cont. 2. Ciclos Huecos Embolsados Esterilización 00˚C / 101 kPa 134˚C / 304 kPa - 1 depuración (Acondicionamiento) 138˚C / 341 kPa máximo a 133˚C / 295 kPa Ven tilación ventilar a 11 5˚C / 169 kPa Presurización Secado por aire INICIO...
- Page 190 4. Instrucciones de uso, Cont. INICIO 4. Ciclo de Secado por Aire Solamente PARADA STOP INICIO...
- Page 191 4. Instrucciones de uso, Cont. 4.7 Ejecución de un ciclo INICIO...
- Page 192 4. Instrucciones de uso, Cont. PARADA PARADA 4.8 Detención del ciclo PARADA PARADA PARADA...
-
Page 193: Mantenimiento
5. Mantenimiento 5.1 La limpieza del cassette 5.2 Limpieza del filtro del depósito de agua 5.3 Limpieza del depósito 5.4 La limpieza de las superficies exteriores 5.5 Cambio de los filtros de aire Statim 2000S 2000S Apague Figura 10... - Page 194 5. Mantenimiento 5.6 Cambio de los filtros de aire para retención de bacterias Apague 2000S Figura 11 5000S Figura 12 5.7 Reemplazo de la junta del cassette...
- Page 195 5. Mantenimiento, Cont. NOTA NOTA Figura 13 5.8 Cómo mantener los niveles del líquido 5.9 Lecturas de la calidad del agua...
-
Page 196: Programa De Mantenimiento Preventivo
5. Mantenimiento, Cont. 5.10 Programa de mantenimiento preventivo NOTA Operador Técnico... -
Page 197: El Puerto De Comunicaciones
6.1. El puerto de comunicaciones RS232 Modelo de impresora Fin de la línea Puerto Serie Usuario de CR/LF Velocidad en bits impresora ° carácter Cargador de datos SciCan Fin de la línea Puerto Serie Usuario de CR/LF Velocidad en bits impresora ° carácter... - Page 198 6. El puerto de comunicaciones, Cont. 6.2 Instalación del cargador de datos SciCan Modo de Usuario Menú Configuración del usuario PARADA Paso 1 Selección de la opción USB Flash/MSD PARADA...
- Page 199 6. El puerto de comunicaciones, Cont. Configuración de la velocidad en bits del puerto serie a 9600 Configuración de los caracteres del usuario de impresora (ejemplo: 134°C) Guardar y salir...
- Page 200 6. El puerto de comunicaciones, Cont. Paso 2 Configuración de la hora y la fecha Nota: Paso 3 Configuración del ID de unidad Nota: Paso 4 Conexión del cargador de datos SciCan...
- Page 201 6. El puerto de comunicaciones, Cont. 6.3 Instalación del papel en la impresora interna apáguela Encienda...
- Page 202 6. El puerto de comunicaciones, Cont. Figura 15,1 Figura 15,2...
- Page 203 6. El puerto de comunicaciones, Cont. 6.4 Eliminación de atascos de papel en la impresora interna Apague Figura 16...
- Page 204 6. El puerto de comunicaciones, Cont. encendido encenderla...
- Page 205 6. El puerto de comunicaciones, Cont. 6.5 Vista general de la impresión del ciclo...
- Page 206 6. El puerto de comunicaciones, Cont.
-
Page 207: Localización De Fallos
7. Localización de fallos Problema Solución enciende Apague encenderla apague... - Page 208 7. Localización de fallos, Cont...
- Page 209 7. Localización de fallos, Cont apague Apague encenderla encendida Apague encenderla...
- Page 210 7. Localización de fallos, Cont Instalación del car- gador de datos SciCan en la unidad Statim.
-
Page 211: Lista De Repuestos
8 Lista de Repuestos ACCESORIOS... -
Page 212: Garantía
9. Garantía Garantía Limitada SciCan Statim 2000 / 5000 SciCan SciCan SciCan SciCan SciCan SciCan’s SciCan SciCan SciCan SciCan www.scican.com... -
Page 213: Protocolo De Pruebas
10. Protocolo de Pruebas 10.1 Prueba de tipos... - Page 214 10. Protocolo de Pruebas, Cont. STATIM 2000S STATIM 5000S Ciclo...
-
Page 215: Especificaciones
11. Especificaciones 11.1 Statim 2000S — Especificaciones Dimensiones de la máquina: Tamaño del Cassette Tamaño del Cassette Volumen de la cámara de esterilización: Volumen del depósito: Peso Distancia necesaria: Distancia necesaria para el movimiento de la/s puerta/s: Carga mínima en el depósito de agua: Valor de PRV (Válvula de seguridad): Clasificación eléctrica: Corriente:... - Page 216 11. Especificaciones, Cont. 11.2 Statim 5000S — Especificaciones Dimensiones de la máquina: Tamaño del Cassette Tamaño del Cassette Volumen de la cámara de esterilización: Volumen del depósito: Peso (sin agua): Distancia necesaria: Distancia necesaria para el movimiento de la/s puerta/s: Carga mínima en el depósito de agua: Valor de PRV (Válvula de seguridad): Clasificación eléctrica:...