Faro Laser Line Probe HD Instructions D'assemblage
Liens rapides
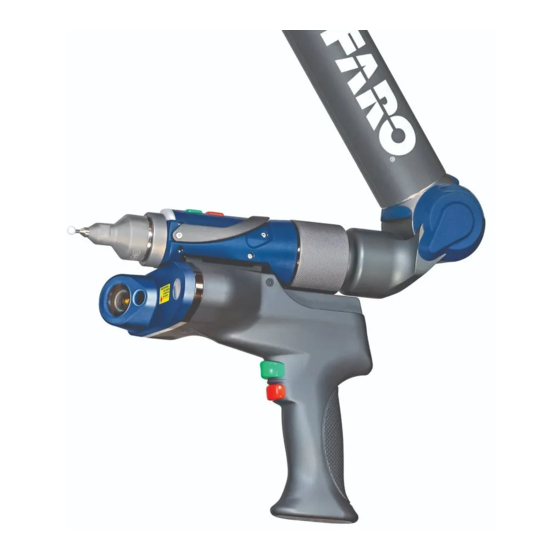
FARO Laser Line Probe HD Assembly Instructions
Instructions d'assemblage du FARO Laser Line Probe HD
Aufbauanleitung für den FARO Laser Line Probe HD
Istruzioni per il montaggio del dispositivo FARO Laser Line Probe HD
Instrukcja montażu ramienia FARO Laser Line Probe HD
Инструкции по сборке манипулятора FARO Laser Line Probe HD
FARO Laser Line Probe HD Montaj Talimatları
Instruções para montagem do FARO Laser Line Probe HD
Instrucciones para el ensamble del FARO Laser Line Probe HD
FARO Laser Line Probe HD 安装说明
FARO Laser Line Probe HD 組み立て手順

Sommaire des Matières pour Faro Laser Line Probe HD
- Page 1 Instructions d’assemblage du FARO Laser Line Probe HD Aufbauanleitung für den FARO Laser Line Probe HD Istruzioni per il montaggio del dispositivo FARO Laser Line Probe HD Instrukcja montażu ramienia FARO Laser Line Probe HD Инструкции по сборке манипулятора FARO Laser Line Probe HD FARO Laser Line Probe HD Montaj Talimatları...
- Page 2 File: F:\Control\Records\05Manufa\Partspec\15933.pdf FARO P/N: 15933 (Rev. 3) Rev Date: 08/28/17...
- Page 3 Set up your Quantum and install the 6 mm or 3 mm ball probe. Mettez en place votre Quantum et installez le palpeur sphérique de 6 mm ou de 3 mm. Richten Sie den Quantum ein, und installieren Sie die 6-mm- oder 3-mm-Kugelmesssonde.
- Page 4 " Loosen the handle locking ring by turning it counterclockwise. Desserrez la bague de verrouillage de la poignée en la faisant tourner dans le sens inverse des aiguilles d’une montre. Lösen Sie den Spannring am Griff, indem Sie ihn gegen den Uhrzeigersinn drehen.
- Page 5 Remove the protective cover. Retirez le couvercle de protection. Entfernen Sie die Schutzhülle. Rimuovere la copertura protettiva. Usuń pokrywę ochronną. Снимите защитный чехол. Koruma kapağını çıkarın. Remova a capa protetora. Retire la cubierta de protección. 取下保护盖。 保護カバーを取り外します。...
- Page 6 Insert the front edge of the probe into the slot. Insérez le bord avant du palpeur dans le logement. Schieben Sie das vordere Ende der Messsonde in den Schlitz. Inserire il bordo anteriore della sonda nell’asola. Włóż krawędź czołową sondy do slotu. Вставьте...
- Page 7 Push the probe handle in so that the connectors connect. Poussez la poignée du palpeur jusqu’à ce que les connecteurs se connectent. Schieben Sie den Griff der Messsonde ein, sodass die Steckverbindung hergestellt ist. Spingere e inserire l’impugnatura in modo che i connettori si colleghino.
- Page 8 & Tighten the locking ring by turning it clockwise. Do not over tighten the ring. Serrez la bague de verrouillage en la faisant tourner dans le sens des aiguilles d’une montre. Ne serrez pas excessivement la bague. Spannen Sie den Spannring an, indem Sie ihn im Uhrzeigersinn drehen.
- Page 9 Buttons Use the buttons on the EDGE handle or the buttons on the FARO Laser Line Probe handle to control measuring. • Use the FRONT (green) button to start data collection. Points are only sent to the computer when the laser is in range. Once you start collecting data, press the FRONT button again to pause.
- Page 10 • Herhangi bir ölçüm komutunu sonlandırmak için ARKA (kırmızı) düğmeyi kullanın. Botões Use os botões no cabo do EDGE ou os botões no cabo do FARO Laser Line Probe para controlar a medida. • Use o botão AVANÇAR (verde) para iniciar a coleta de dados.
- Page 11 Botones Utilice los botones del asa del EDGE o los botones del asa del palpador de línea láser FARO para controlar la medición. • Utilice el botón ADELANTE (verde) para comenzar a recolectar datos. Los puntos se envían a la computadora cuando el láser está...
- Page 12 LEDs The two Handle LEDs, indicate the distance to the target object from the FARO Laser Line Probe. Remember, data is only sent to the computer when the FARO Laser Line Probe is in range. • Out of Range (two Red LEDs) . The Laser Line Probe is too close or too far from the part.
- Page 13 LEDs Die beiden LEDs am Griff zeigen den Abstand zwischen dem Zielobjekt und der FARO Laser Line Probe an. Denken Sie daran, dass nur dann Daten an den Computer gesendet werden, wenn sich die FARO Laser Line Probe im richtigen Bereich befindet.
- Page 14 Line Probe находится в диапазоне ближе к детали. • Дальний диапазон (два желтых индикатора). Щуп Laser Line Probe находится в диапазоне дальше от детали. Кроме того, для отображения расстояния и расположения щупа FARO Laser Line Probe по отношению к детали в данном ПО служит диалоговое окно «Дальномер».
- Page 15 (dois LEDs amarelo) O Laser Line Probe está dentro da faixa, mais longe da peça. Além disso, o software usa uma caixa de diálogo Localizador de faixa para mostrar a distância e a posição do FARO Laser Line Probe em relação à peça.
- Page 16 Los dos LED de funciones indican la distancia al objetivo desde el palpador de línea láser FARO. Recuerde, los datos sólo se envían a la computadora cuando el palpador de línea láser FARO está en rango. • Fuera de rango (dos LED rojos).
- Page 17 ハンドルの 2 つの LED は、 FARO Laser Line Probe からターゲッ トオブジ ェク トまでの距離を示します。 データがコンピュータに送られるのは FARO Laser Line Probe が測定範囲内にある場合だけであることに注意してくださ い。 • 測定範囲外 ( 2 つの赤色の LED ) 。 Laser Line Probe がパーツに 近すぎる、 または遠すぎます。 • 中心範囲 ( 2 つの緑色の LED ) 。 レーザーは測定範囲の中心にあ...
- Page 18 Прежде чем приступить к измерениям с помощью щупа Laser Line Probe, необходимо откалибровать шаровой щуп и лазерный щупа Laser Line Probe. Dengeleme Laser Line Probe ile ölçüm yapmadan küresel probu ve Laser Line Probe cihazını dengelemelisiniz. Compensação Antes de medir com o Laser Line Probe, você deve calibrar o sensor esférico e o Laser Line Probe.
- Page 19 Attach the FARO Compensation Plate to your work surface. Attachez la plaque ou la sphère de compensation FARO sur votre surface de travail. Befestigen Sie die FARO Kalibrierungsplatte auf der Arbeitsfläche. Installare la piastra di compensazione alla superficie di lavoro.
- Page 20 Lancez la commande PALPEURS et sélectionnez un palpeur sphérique de 6 mm ou de 3 mm. Compensez le palpeur sphérique. Reportez-vous au manuel de l’utilisateur du FARO Quantum pour des instructions détaillées. Starten Sie den Befehl MESSSONDEN, und wählen Sie eine Standard-kugelmesssonde (6 mm oder 3 mm) aus.
- Page 21 FARO Laser Line Probe HD. PROBLAR komutuyla başlatın ve FARO Laser Line Probe HD öğesini seçin. Inicie o comando PROBES e selecione o FARO Laser Line Probe HD. Inicie el comando PALPADORES y seleccione el FARO Laser Line Probe HD.
- Page 22 启动“探针”命令并选择 FARO Laser Line Probe HD。 プローブコマンドを開始して FARO Laser Line Probe HD を選択します。 Click the Plane Compensation button. Cliquez sur le bouton Compensation plan. Klicken Sie auf die Schaltfläche EBENENKALIBRIERUNG. Fare clic su Compensazione del piano. Kliknij przycisk Kompensacja płaszczyzny.
- Page 23 You can choose to use the previously measured plane, or measure the plane. Click OK to compensate the Laser Line Probe, or measure the plane. Vous pouvez choisir d’utiliser le plan de mesure préalable ou remesurer le plan. Cliquez sur OK pour compenser le Laser Line Probe, ou mesurez le plan.
- Page 24 LASER LIGHT DO NOT STARE INTO BEAM OR VIEW DIRECTLY WITH OPTICAL INSTRUMENTS LUMIÈRE LASER NE FIXEZ PAS LE FAISCEAU ET NE LE REGARDEZ PAS DIRECTEMENT AVEC DES INSTRUMENTS OPTIQUES LASERLICHT SCHAUEN SIE NICHT IN DEN LICHTSTRAHL, UND VERWENDEN SIE ZUR DIREKTEN ANSICHT KEINE OPTISCHEN GERÄTE RAGGIO LASER NON FISSARE LO SGUARDO NEL RAGGIO LASER, NEPPURE PER MEZZO...
- Page 25 FARO Quantum Kılavuz içinde FARO Lazer Hattı Prob bölümüne bakın. Calibre o Laser Line Probe. Para obter instruções detalhadas, consulte a seção FARO Laser Line do Manual do FARO Quantum. Compense el Laser Line Probe. Para obtener instrucciones detalladas, consulte la sección Palpador de línea láser FARO del Manual del FARO Quantum.
- Page 26 Both probes are now ready for measuring. Use the PROBES command to switch between the FARO Laser Line Probe HD and the ball probe. Les deux palpeurs sont désormais prêts à mesurer. Utilisez la commande PALPEURS pour passer du palpeur sphérique au FARO Laser Line Probe HD et vice-versa.
- Page 28 188 Pingfu Road, Xuhui District Shanghai 200231, China TEL: +800 6511 1360, +86 021 61917600 FAX: +86 21 64948670 E-Mail: supportchina@faro.com FARO, FaroArm, and FARO Laser ScanArm are registered trademarks and trademarks of FARO Technologies, Inc. © 2002-2017 FARO Technologies, Inc. All Rights Reserved.